Delightful Crab Dome Recipe

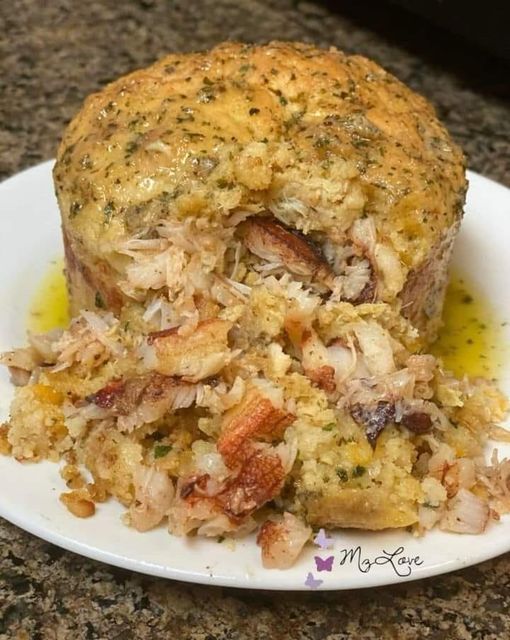
Delightful Crab Dome Recipe A delicious seafood meal with a pleasing blend of textures and tastes is the crab dome. For seafood lovers who want to wow visitors or just have a fancy dinner at home, this dish is ideal. This dish makes a gorgeous and delectable centerpiece for any dining event with its combination of crunchy crust, fragrant herbs, and luscious crab flesh.

Ingredients for Delightful Crab Dome Recipe

  1. 2 cups cooked crab meat, flaked
  2. 1 cup breadcrumbs
  3. 1/2 cup mayonnaise
  4. 1/4 cup finely chopped onion
  5. 1/4 cup finely chopped bell pepper
  6. 2 cloves garlic, minced
  7. 2 tablespoons chopped parsley
  8. 1 tablespoon lemon juice
  9. 1 teaspoon Worcestershire sauce
  10. 1/2 teaspoon paprika
  11. Salt and pepper to taste
  12. Olive oil for brushing

Instructions for Delightful Crab Dome Recipe

  • Turn the oven on to 375°F, or 190°C.
  • Mix the filling together: Crab meat, breadcrumbs, mayonnaise, onion, bell pepper, garlic, parsley, lemon juice, Worcestershire sauce, paprika, salt, and pepper should all be combined in a big mixing bowl. Blend until well blended.
  • Get the mold ready: Apply a little layer of olive oil to a small bowl or a round dome shape. Firmly pack the crab mixture into the mold.
  • To bake the dome, place it on a baking sheet and bake it for 25 to 30 minutes at a preheated temperature, or until the top becomes crispy and brown.
  • Take out the mold and serve: After a few minutes of cooling, gently remove the crab dome from the mold and place it on a serving platter. For added luster, lightly apply some olive oil on the top.

In conclusion, this crab dome is a visual feast as well as a culinary delight. It is a flexible meal that may be included in a bigger seafood platter or served as the main item. It is a must-try for every seafood lover because of the flavorful blend of crispy topping, delicate crab flesh, and fragrant herbs.

A homemade dessert in 5 minutes

A homemade dessert in 5 minutes There are moments when the need for something decadent and delicious hits, and there’s no turning back! For this reason, we’ve put together the best 5-minute no-cook sweets that will sate your appetites without having to be cooked. These fast and simple desserts, which range from fruity pleasures to creamy sweets, are ideal for hectic nights, hot summer days, or whenever you need a sweet pick-me-up.

Ingredients for a homemade dessert in 5 minutes

  • 400 ml of milk
  • Zest of 1 lemon
  • 1 teaspoon of vanilla sugar
  • 2 egg yolks
  • 40g of sugar
  • 15g of cornstarch
  • Juice of 1 lemon
  • 100g of sweetened condensed mil
  • Optional for decoration: cinnamon, cocoa powder, or chocolate shavings
  1. In a bowl, begin by blending milk, vanilla sugar, and lemon zest. This combination should be heated to the verge of boiling.
  2. Beat the egg yolks, sugar, and cornstarch together until smooth in a separate basin.
  3. To keep the eggs from scrambling, gradually blend the heated milk mixture into the egg yolk mixture while stirring continuously.
  4. After combining well, let this mixture to cool entirely.
  5. Once the mixture has cooled, whisk in the sweetened condensed milk and the juice from one lemon.
  6. Combine all the ingredients and beat until the mixture reaches the required consistency.
  7. Let your imagination go wild now! Depending on your desire, garnish your dish with chocolate shavings, cocoa powder, or a mixture of cinnamon and sugar.
  8. To ensure that the flavors blend harmoniously, refrigerate the dessert for half an hour.
  9. That’s it, dear! This delicious no-bake dessert is ready to be served after it has cooled and set. It’s a simple dish that tastes like it took hours to prepare, making it ideal for indulging in sweet tooths or wowing visitors with your culinary skills. Savor the simplicity and the blast of cool tastes in each bite!

Shh, this my secret weapon for keeping my husband in a good mood

Shh, this my secret weapon for keeping my husband in a good mood – he loves it


Ingredients:

The following ingredients are needed:

  1. three cups of cold mashed potatoes
  2. one big egg
  3. one cup of shredded cheddar cheese
  4. quarter cup of chopped chives
  5. quarter cup of all-purpose flour
  6. half a teaspoon of garlic powder
  7. 1/4 cup of grated Parmesan cheese, reserved for rolling
  8. Ghee or cooking spray for use in pans

METHOD:

  1. 1. Adjust the oven temperature to 400 degrees Fahrenheit (200 degrees Celsius) and lightly oil or spray a small muffin tray.
  2.  Combine the chopped cheddar, chives, cool mashed potatoes, egg, flour, garlic powder, salt, and pepper in a large mixing basin.
  3.  Roll the dough into 1-inch balls and coat each one with grated Parmesan cheese.
  4. Gently press the oiled potato balls into the cavities of the muffin pan so that they form a puff.
  5. Bake the puffs for about 15 to 20 minutes, or until the tops become somewhat crispy and golden brown.
  6.  Remove them from the pan once they have cooled for a few minutes. Serve while still warm, and enjoy watching them go!

Modifications & Tips:

  1. Add extras for a unique flavor profile; try crumbled cooked bacon, chopped jalapeños for spiciness, or replace cheddar with your favorite blend of cheeses.
  2. You might use instant mashed potatoes as a last-minute, time-saving option. It is crucial to avoid handling the mixture until it has reached room temperature.
  3. These little puffs freeze very well. When completely cool, freeze them on a baking sheet for a few minutes before placing them in a freezer bag. Serve them warm from the oven, crisp and toasty.
  4. Use low-fat cheese and mashed cauliflower in place of half the potatoes to cut down on the amount of fat. Tastes great even with a few less calories.
  5. Try new things with your food without fear; that’s what makes it so enjoyable, isn’t it? Start your culinary adventure with these Cheesy Mashed Potato Puffs if you’re ready to try something new.

Roast potatoes crisp-wise

Roast potatoes crisp-wise

Ingredients:


  1. 4 to 5 pounds beef roast—like sirloin or ribeye
  2. Taste-based salt and pepper
  3. Two teaspoons of olive oil
  4. Four minced garlic cloves
  5. Two fresh rosemary tsp, chopped
  6. With regard to the fondant potatoes:
  7. Six big peeled and chopped potatoes in cylinders.
  8. one half cup unsalted butter
  9. One cup either beef or chicken brothfresh thyme sprigs1. Roasting the beef

PREPARATION:

  1. For the Roast Beef, preheat the oven to 375°F (190°C).
  2. Add a generous amount of salt and pepper to the meat roast.
  3. Heat the olive oil in a pan over medium-high heat. Roast over a searing, browning all sides.
  4. Swirl the chopped rosemary and minced garlic over the roast.
  5. Place the roast on a roasting pan and bake in a preheated oven until the desired level of doneness is reached.

2. Preparing the Potato Fondant:

  1. Melt butter in a large ovenproof skillet over medium-high heat.
  2. Add the potato cylinders and sear until golden brown on both sides.
  3. Add a dash of pepper and salt to the stock after adding the thyme sprigs.
  4. After the potatoes have absorbed the flavorful liquid and become tender, transfer the pan to the oven.

3. Slumbering and working:

  1. Let the roast meat rest for fifteen minutes before slicing.
  2. Serve the opulent fondant potatoes beside the expertly sliced roast beef.

    Have fun!

Chinese Black Pepper Chicken Stir Fry

Chinese Black Pepper Chicken Stir Fry This Chinese Black Pepper Chicken Stir-Fry suits your need for something delicious with a kick of heat. This recipe has the ideal ratio of heat, umami, and texture since it is full of tender chicken, crisp veggies, and the robust taste of freshly ground black pepper. It’s a tasty way to add restaurant-caliber Chinese tastes to your own kitchen, and it’s quick and simple to prepare. Let’s take a look at how to make this flavorful, spicy stir-fried chicken that’s great for weekday meals or even special occasions!

Ingredients Chinese Black Pepper Chicken Stir Fry

  1. 2 pounds (1 kilogram) skinless, boneless chicken breasts, cut into thin strips
  2. 3 tablespoons low-sodium soy sauce
  3. 1 ½ tablespoons fresh ginger, minced
  4. 2-3 tablespoons cornstarch
  5. 2 tablespoons toasted sesame oil
  6. 2 tablespoons rice vinegar
  7. 5 tablespoons vegetable oil (divided)
  8. 3 celery stalks, thinly sliced
  9. 1 large onion, cut into cubes
  10. 1 ½ tablespoons of freshly cracked black pepper
  11. Salt to taste

Instructions Chinese Black Pepper Chicken Stir Fry

  • Marinate the Chicken: Place the thinly sliced chicken strips, soy sauce, cornstarch, and chopped ginger in a big basin. Allow the chicken to marinade for about 15 to 20 minutes, tossing to coat evenly. The ginger provides a fragrant aroma, and the cornstarch will assist form a light crust when the chicken is stir-fried.
  • Get the Stir-Fry Sauce ready: Mix the rice vinegar, toasted sesame oil, and a little teaspoon of salt in a small bowl. This will serve as the foundation for the stir-fry sauce, giving it acidity and a nutty scent.
  • To stir-fry the chicken, place a large wok or pan over medium-high heat with three tablespoons of vegetable oil. Don’t overcrowd the pan while the oil is hot; instead, add the marinated chicken in stages. The chicken should be stir-fried for four to five minutes, or until it is cooked through and golden brown.
  • Prepare the Veggies: Transfer the remaining 2 tablespoons of vegetable oil to the same wok or pan. Stir-fry the diced onions and sliced celery for three to four minutes, or until they are softened but still have some crunch. To bring out the taste of the veggies, sprinkle them with a little salt.
  • Putting Everything Together: Add the stir-fry sauce back to the pan with the cooked chicken. Add a substantial amount of freshly ground black pepper to the chicken and veggies. For two to three minutes, stir everything together, making sure the chicken and vegetables are well covered in sauce and pepper. After tasting the food, taste again and adjust the seasoning by adding additional salt or pepper to taste.
  • Serve and Enjoy: Take the stir-fry off the heat as soon as the chicken is covered in the flavorful black pepper sauce and the veggies are crisp-tender. Serve hot over noodles or steaming rice, and if you’d like, top with sliced scallions or more freshly ground black pepper.

In conclusion, this stir-fried chicken with Chinese black pepper is a tasty, easy-to-make recipe that will soon become a family favourite. A lovely symphony of flavors and textures is created by the mix of delicate chicken, crisp veggies, and the pungent kick of freshly ground black pepper. This stir-fry is ideal for a simple weekday meal since it can be served with rice, noodles, or your other sides. You can make a delicious and filling Chinese dinner at home with only a few ingredients and little preparation.

Southern Crab Beignets with White Remoulade Sauce

Southern Crab Beignets with White Remoulade Sauce

These mouthwatering Southern Crab Beignets will add a touch of the South to your dinner. These delightfully crispy, light, and full of sweet crab meat beignets are a lovely take on a classic New Orleans dish. These flavorful nibbles, enhanced with a dash of cayenne pepper, fresh scallions, and tangy Creole mustard, are ideal as an appetizer or snack. Serve them with a rich, creamy White Remoulade Sauce to create a meal with mouthwatering textures and powerful tastes. These crab beignets will surely wow and fill you up whether you’re serving them at a party or having them for a quiet dinner.

Ingredients

For the Crab Beignets

    • 1 lb blue crab meat or any good-quality crab meat

No-Bake Peach Cheesecake

No-Bake Peach Cheesecake
🍑 If you’re craving a delicious and refreshing dessert without turning on the oven, this No-Bake Peach Cheesecake is perfect! With sweet peaches, a crunchy pecan crust, and a creamy cheesecake filling, it’s a summertime treat that comes together quickly and easily.
Ingredients:
For the Crust:
1 cup graham cracker crumbs 🍪
⅓ cup pecan halves or candied pecans, finely chopped 🌰
½ teaspoon ground cinnamon 🌿
4 tablespoons unsalted butter, melted 🧈
For the Cheesecake Filling:
16 ounces cream cheese, room temperature 🧀
14 ounces sweetened condensed milk 🥛
2 teaspoons pure vanilla extract or vanilla bean paste 🌟
8 ounces frozen whipped topping, thawed 🥄
For the Peach Compote:
1 pound fresh or frozen sliced peaches 🍑
½ cup packed light brown sugar 🍬
3 tablespoons water 💧
¼ teaspoon pure vanilla extract 🌟
1 teaspoon ground cinnamon 🌿
For the Garnish:
Whipped topping 🥄
Candied pecans 🌰
Instructions:
1️⃣ Prepare the Crust:
In a medium bowl, combine graham cracker crumbs, chopped pecans, ground cinnamon, and melted butter. Stir until the mixture resembles wet sand. Evenly distribute the mixture among 8 individual serving dishes. Press the crumbs into the bottom of each dish and refrigerate to set.
2️⃣ Make the Cheesecake Filling:
In the bowl of a stand mixer or using a large bowl with an electric mixer, beat the cream cheese until smooth and creamy, about 3 minutes. Gradually add the sweetened condensed milk while mixing on low speed. Stir in vanilla extract. Scrape down the sides of the bowl and mix for another 1-2 minutes. Gently fold in the thawed whipped topping.
3️⃣ Assemble the Cheesecakes:
Spoon or pipe the cheesecake filling over the chilled crusts in the serving dishes. Return to the refrigerator and let chill while preparing the peach compote.
4️⃣ Prepare the Peach Compote:
In a medium saucepan over low-medium heat, combine sliced peaches, brown sugar, water, vanilla extract, and ground cinnamon. Cook, stirring occasionally, until the mixture thickens and the liquid reduces, about 15-20 minutes. Allow the compote to cool completely, then transfer to a lidded container and refrigerate.
5️⃣ Serve the Cheesecakes:
Before serving, top each cheesecake with a spoonful of peach compote, a dollop of whipped topping, and candied pecans. Serve chilled and enjoy!
6️⃣ Storage:
Refrigerate any leftover cheesecake for up to 3 days.
Enjoy your refreshing and creamy No-Bake Peach Cheesecake!

Rice and Veggie Patties

Rice and Veggie Patties

Ingredients:

  1. 200 grams of rice that has been cooked.
  2. 1 egg
  3. Oil made from olives, for cooking in hot oil.
  4. Half of an onion, diced.
  5. 1 carrot, cut into small pieces.
  6. tablespoon of regular flour
  7. 2 tablespoons of Parmesan cheese
  8. Add salt and black pepper according to your preference.
  9. A bit of crushed red pepper
  10. Bread crumbs, for covering

Method:

Prepare the combination of rice.

  1. Transfer 200g cooked rice to a bowl.
  2. Mix well after adding one egg to the rice.
  3. Simmer the veggies in a skillet with a little amount of oil.
  4. Apply a little amount of medium-heat olive oil to a pan.
  5. Add the chopped onion to the pan and simmer, stirring periodically, for two minutes.
  6. Add the chopped carrot and stir-fry for an additional three to five minutes.
  7. Transfer the cooked veggies to the rice bowl.

Combine the ingredients.

  1. Put one tablespoon of all-purpose flour and two teaspoons of Parmesan cheese into the basin.
  2. Add salt, black pepper, and a small amount of crushed red pepper.
  3. Stir everything together until it is thoroughly blended.
  4. Shape and cover the burger patties.
  5. Put bread crumbs on a dish.
  6. Using a spoon or your hands, form the rice mixture into balls, then flatten each ball into a flat patty.
  7. Roll each burger to ensure uniform coating with bread crumbs. Continue until all of the mixture has been utilized.
  8. In a pan, cook the burgers.
  9. In a pan, preheat the olive oil over medium heat.
  10. The breaded patties should be crispy and golden brown after three to five minutes of cooking on each side in the pan.
  11. Serve customers at a restaurant or other business.
  12. When the patties are done, remove them from the pan and place them on a platter covered with paper towels to absorb any remaining oil.

Warm it up and enjoy!

  1. Concepts for providing service.
  2. Savor these crispy patties with your favorite sauce, such as ranch, marinara, or aioli.
  3. They also taste well served as an accompaniment to a main entrée or as a side salad.

Advice on Cooking:

  1. To ensure that the patties hold together when fried, make sure the rice mixture is well combined.
  2. For added flavor and health benefits, feel free to add additional vegetables or herbs to the mixture.

Food’s Health Benefits

  1. With leftover rice and veggies, these patties make a delectable snack.
  2. They provide a decent balance of lipids, proteins, and carbohydrates.

Concluding remarks

These crispy rice and veggie patties are meant to be prepared and enjoyed, I hope. They are a simple but delicious dish that works well for any occasion. Enjoy your meal and have fun in the kitchen!

Cheesy Garlic Chicken Wraps

Indulge in the ultimate comfort food with Cheesy Garlic Chicken Wraps, a flavorful and satisfying meal that’s perfect for lunch, dinner, or anytime in between. This mouthwatering recipe combines tender chicken, creamy cheese, and aromatic garlic, all wrapped in a warm tortilla.

Why You’ll Love This Recipe

Easy to Make: Quick prep time and simple ingredients make this recipe a breeze to prepare.

Customizable: Add your favorite fillings, such as veggies, salsa, or avocado, to make it your own.

Flavorful: Garlic and cheese meld together for an irresistible taste.

Portable: Perfect for on-the-go meals, picnics, or packed lunches.

– Crowd-Pleaser: Great for family dinners, parties, or game-day

Ingredients

  1. 2 cups cooked chicken breast, shredded
  2. 1 cup shredded mozzarella cheese
  3. 1/2 cup cream cheese, softened
  4. 2 cloves garlic, minced
  5. 1/2 tsp Italian seasoning
  6. 4 large flour tortillas
  7. 1 tbsp butter, melted
  8. Salt and pepper to taste
  9. Fresh spinach or lettuce (optional)

METHOD:

  1. Combine the shredded chicken, cream cheese, mozzarella, minced garlic, Italian seasoning, salt, and pepper in a bowl.
  2. After arranging the tortillas, evenly distribute the chicken mixture over them
  3. If desired, add spinach or lettuce, then firmly coil each tortilla.
  4. Spread some melted butter on the wraps.
  5. The wraps should be cooked for two to three minutes on each side over medium heat, or until they are golden brown and the cheese has melted
  6. Warm up and serve with a side of ranch or marinara sauce for dipping.
  7. Add more vegetables or change the cheeses for a different taste to personalize.


Tasty Spinach Stuffed Pastry

Tasty Spinach Stuffed Pastry In many kitchens and hearts, the spinach-stuffed pastry has a particular place when it comes to savory pastries. This delicious delicacy is enveloped in buttery, flaky puff pastry and marries the earthiness of fresh spinach with the creamy smoothness of ricotta and Parmesan cheese. These pastries will look impressive whether you’re making a family meal, serving breakfast, or simply in the mood for a delicious snack.
Not only are spinach-filled pastries delicious, but they also have several health advantages. Iron, calcium, and vitamins A and C are just a few of the many vitamins and minerals found in spinach. These pastries combine the savory taste of Parmesan with the protein-rich ricotta cheese to create a tasty and nourishing combination. Their popularity is a result of their adaptability and cozy taste combination, which both non-vegetarians and vegetarians find appealing.

Try serving your spinach-stuffed pastries with a bowl of tomato soup or a crisp garden salad to enhance the flavor experience. The rich, creamy content of the pastries is well counterbalanced by the crispness of the salad or the sharpness of the soup. Serve these pastries with a crisp iced tea or a glass of chilled white wine for a more decadent supper. Spinach packed pastries are sure to become a favorite in your recipe collection, regardless of how you choose to eat them.

Ingredients Tasty Spinach Stuffed Pastry:

  1. 2 puff pastry sheets, thawed; 2 cups chopped fresh spinach
  2. Half a cup of ricotta
  3. Grated Parmesan cheese, half a cup
  4. One beaten egg (for the egg wash)
  5. One teaspoon of garlic powder
  6. To taste, add salt and pepper.
  7. One tablespoon of olive oil

Instructions Tasty Spinach Stuffed Pastry:

  • Preheat Oven: Line a baking sheet with parchment paper and preheat your oven to 400°F (200°C).
  • Get the Filling Ready:
  1. Heat the olive oil in a big skillet over medium heat.
  2. Cook the chopped spinach for two to three minutes, or until it wilts.
  3. Take it off the fire and let it to cool a little.
  4. The cooked spinach, ricotta cheese, Parmesan cheese, garlic powder, salt, and pepper should all be combined in a medium-sized bowl. Blend well.
  • Put the Pastries Together:
  1. Roll out the puff pastry sheets on a board dusted with a little flour.
  2. Each sheet should yield four squares, for a total of eight squares.
  3. Put a dollop of the cheese and spinach mixture in the middle of every square.
  4. Using a fork, seal the edges of the triangle or rectangle formed by folding the pastry over.
  5. Place the pastries on the baking sheet that has been prepared.
  • Put on Egg Wash:
  • For a golden finish, brush the tops of the pastries with the beaten egg.
  • Cook: Bake for 15 to 20 minutes in a preheated oven, or until the pastries are puffy and have a golden brown color.