Watermelon Honey

Watermelon Honey

Watermelon Honey! Sugar-Free! 1 Ingredient! Easy Recipe

Look no farther than watermelon honey for a tasty, natural, sugar-free sweetener that’s also easy to create. This delicious syrup can be created with only one ingredient, watermelon, and is ideal for giving your favourite foods a hint of sweetness without any extra sugar. Let’s investigate how to prepare this simple and healthful dessert at home.

Watermelon honey is a great substitute for more conventional sweeteners. Fresh watermelon, which is inherently sweet and hydrating, is used to make it totally. This syrup is a wonderful complement to drinks, sweets, and even savoury foods since it concentrates the natural sugars in watermelon without sacrificing any of its delicious flavour. In addition, it is devoid of artificial additives and preservatives, which makes it a better option for your family.

Health Benefits of Watermelon

  1. Hydration: Watermelon is a great option for staying hydrated because it contains more than 90% water.
  2. Packed with Nutrients: Antioxidants including lycopene and vitamins A, C, and B6 are found in abundance in watermelon, supporting general health.
  3. Low in Calories: You may add sweetness to your diet without feeling guilty because this fruit is low in calories.
  4. Supports Digestion: The fibre in watermelon encourages regular bowel motions and helps with digestion.

The Recipe for Watermelon Honey

There’s just one item needed to make watermelon honey at home: fresh watermelon. Here’s how to go about it:
  • One huge watermelon

Detailed Instructions:

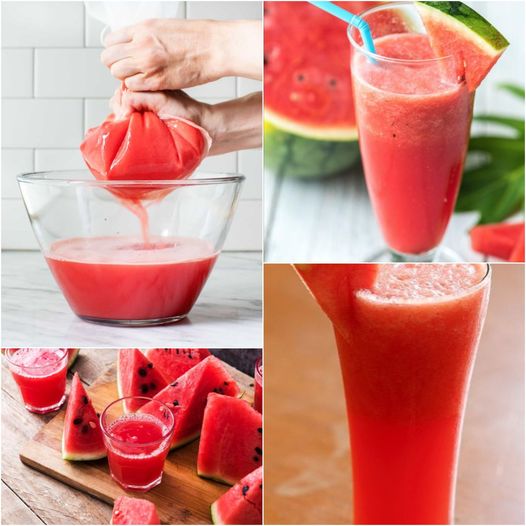
  1. Cut the watermelon into pieces and remove the peel to begin preparing it. For this dish, you simply need the red meat.
  2. Blend the Watermelon: Put the pieces of watermelon in a blender and process until they’re smooth. Depending on the size of your blender, you might need to do this in batches.
  3. Extract the Juice: To get rid of the pulp, drain the blended watermelon into a big saucepan using cheesecloth or a fine-mesh strainer. In order to extract as much juice as possible, press down on the pulp.
  4. Cook the Juice: Over medium heat, bring the watermelon juice to a boil, then lower the heat and simmer it. Juice should be allowed to thicken and decrease, stirring from time to time. Be patient and keep an eye on it since this procedure may take two to three hours.
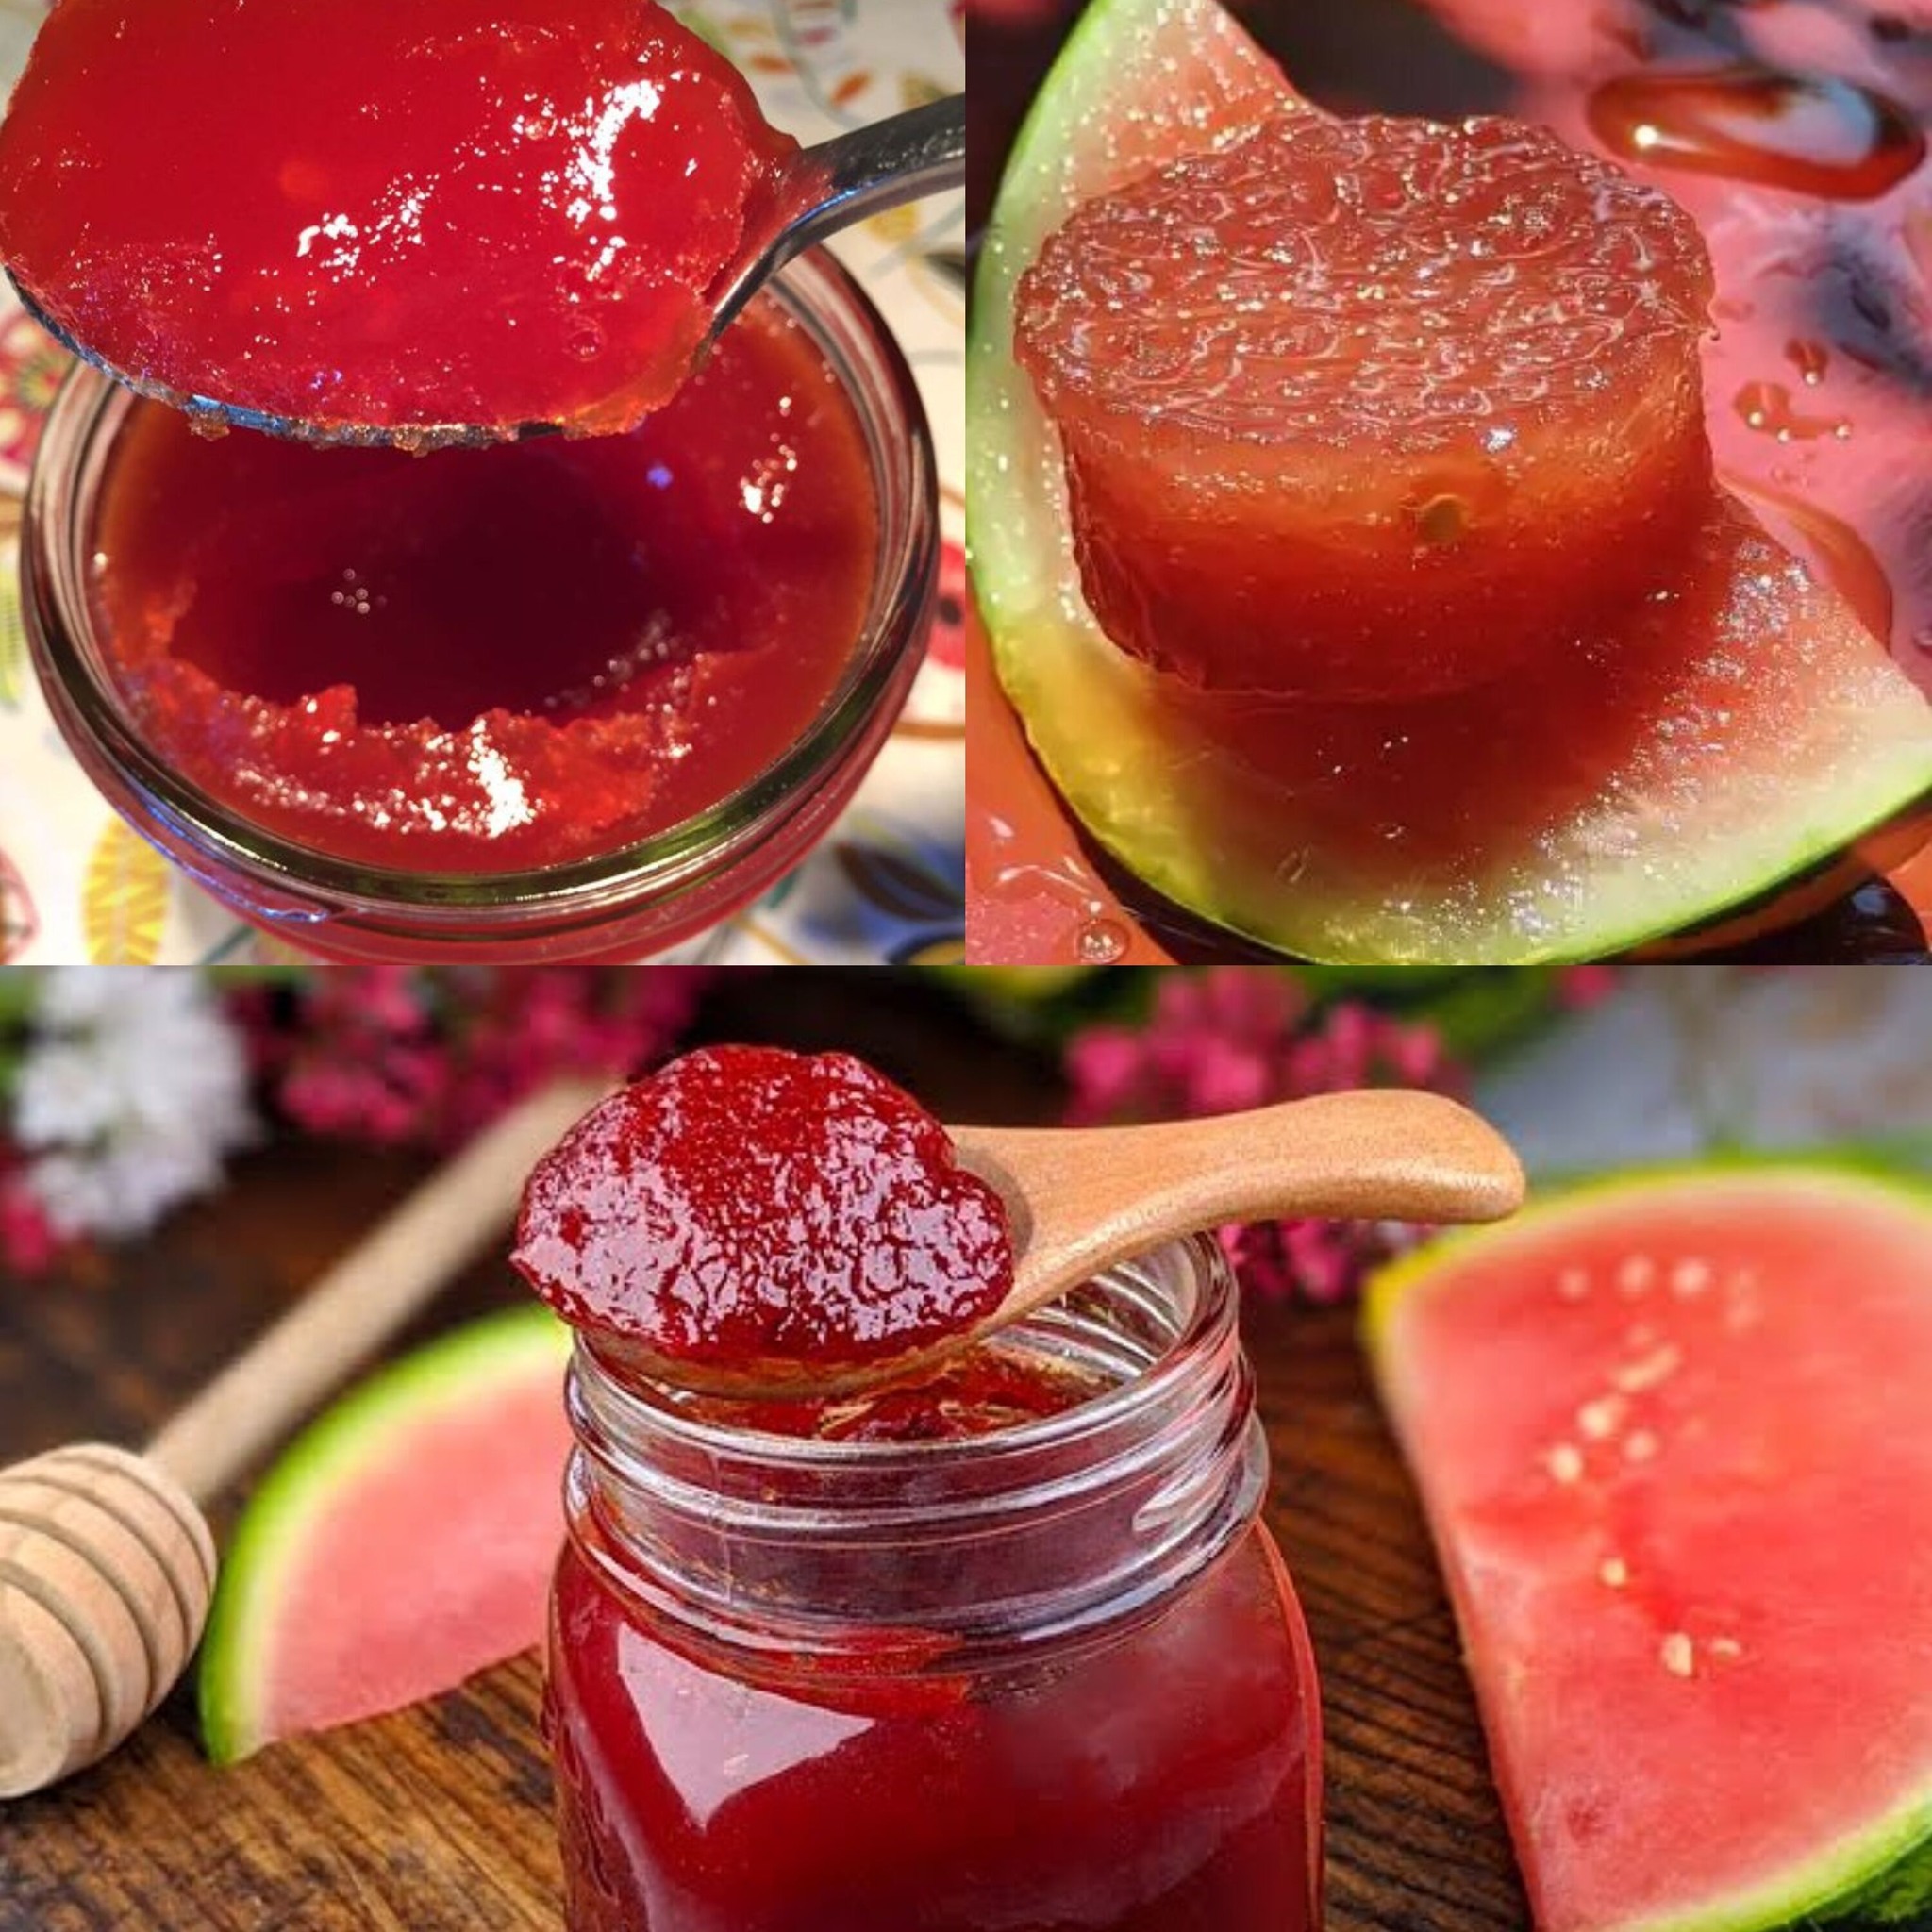
  5. Verify the Consistency: Take the juice off the fire as soon as it has reduced to a thick, syrupy consistency. The texture should be similar to honey.
  6. Chill and Store: After the watermelon honey has cooled fully, pour it into a sterile bottle or jar. It may be stored for up to two weeks in the refrigerator.

A Delicious and Healthy Sweetener

There are many uses for watermelon honey, making it a nutritious and adaptable sweetener. Use it as a natural sweetener in baking, or drizzle it over pancakes or swirl it into your morning tea. There are countless options, and everyone in your home will love the mouthwatering, fruity taste.

Mix Lemons with Mint

Mix Lemons with Mint

Mix Lemons with Mint: My Family is Surprised with the Result!

The most remarkable results are occasionally achieved with the most basic elements. Blending mint with lemons is one of those wonderful concoctions that has several health advantages in addition to tasting great. My family was shocked by this easy mixture’s amazing outcomes. Let’s discuss how to prepare this cool beverage and why it should be a regular part of your day.

Lemons are widely recognised for having a high vitamin C content, which supports healthy digestion, strengthens immunity, and keeps skin clean. They also have cleansing qualities and are high in antioxidants. In contrast, mint is a wonderful plant that may help decrease inflammation, alleviate digestive difficulties, and add a burst of fresh flavour. When these two components are combined, a delightful beverage and a potent health benefit result.

Health Benefits of Lemons and Mint

  1. Boosts Immunity: Lemons’ strong vitamin C content keeps you healthy by fortifying your immune system.
  2. Helps with Digestion: Mint and lemon are both excellent for digestion. Mint calms the stomach and eases discomfort, while lemon stimulates the digestive processes.
  3. Hydrates and Refreshes: This combination is great for staying hydrated, especially on hot days, because it is so refreshing.
  4. Body Detoxification: Mint promotes liver detoxification by increasing bile flow from the liver, while lemons aid in liver detoxification.
  5. Encourages Healthy Skin: The antioxidants in mint and lemons help shield your skin from harm and encourage a radiant, healthy complexion.

How to Make Lemon Mint Water

A few basic items are needed to make a refreshing glass of lemon-mint water at home. Here’s how to go about it:

  1. One lemon
  2. Several fresh mint leaves
  3. One water litre
  4. Cubes of ice (optional)

Detailed Instructions:

  1. Get the ingredients ready: Thoroughly wash the mint and lemon leaves. Cut the lemon into slender pieces.
  2. Combine in a Pitcher: Place the fresh mint leaves and lemon slices in a big pitcher.
  3. Add Water: Fill the pitcher with one litre of water, making sure the lemon and mint are submerged.
  4. Chill and Infuse: To allow the flavours to fully develop, place the mixture in the refrigerator for a minimum of two hours. You may leave it overnight for a stronger flavour.
  5. Present and Savour: If preferred, pour the lemon-mint water over ice cubes. Savour this revitalising and reviving beverage all day long.

A Straightforward Way to Improve Your Health

A tasty and efficient strategy to improve your health is to include lemon mint water in your daily routine. This simple beverage is great for boosting digestion, staying hydrated, and giving you a flavorful burst.

The amazing results of this easy mixture astounded my family, and I have no doubt that others will as well. So why not attempt some lemon-mint water? Let’s toast to a tasty, healthful beverage that is both delicious and refreshing!


spoon Zucchini fritters

spoon Zucchini fritters

Spoon zucchini fritters

easy and quick to make!

Zucchini fritters are a tasty way to sneak more vegetables into your dinner. They’re not only quick and simple to prepare, but they’re also a fantastic way to use up any leftover veggies that may be in the fridge. You’ll need eggs, zucchini, flour, baking powder, cheese and chopped ham to make these crispy fritters. To make a thick batter, just grate the vegetables and combine them with the remaining ingredients. The batter is cooked in heated oil until golden, using spoons! Every mouthful has a crispy outside and a soft, sensitive inside. Delectable! The pickiest of diners will love these.

Ingredients:

  1. Eggs: Use big, pasture-raised eggs.
  2. Use big, fresh zucchini; there’s no need to skin them first.
  3. Use gluten-free or all-purpose flour for your flour.
  4. Almond or soy milk can be used in place of milk.
  5. Baking powder gives the fritters their rising force.
  6. Use Monterey Jack, Swiss, or cheddar cheese for your cheese.
  7. Chopped boiling gammon can be used instead of crispy bacon.
  8. All you need for seasoning is salt and pepper (add a dash of cayenne if you want your food spicy).
  9. Oil: Use canola, peanut, sunflower or maize oil, or any other neutral oil that can withstand higher cooking temperatures.

Directions:

  1. Shred the zucchini using the coarse side of the grater into a small basin.
  2. To the eggs, add the cheese, salt, and pepper. Stir until well blended.
    Pour in the milk after adding the flour and baking powder.
  3. Using a spoon, mix the ingredients to create a thick batter.
  4. Add the boiling ham and zucchini.
  5. To preheat, dip two spoons into the oil.
  6. Scoop the fritter batter into the heated oil using the spoons.
  7. Fry till golden and cooked thoroughly.
  8. Have fun!

Rosemary and Cloves

Rosemary and Cloves

Rosemary and Cloves:

Grow Back Your Front Hair with This HAIR SPRAY

You’re not the only one who has to cope with receding hairlines or thinning hair. Fortunately, a DIY hair spray comprised of cloves and rosemary is a helpful natural remedy. This easy cure can restore your gorgeous locks and promote hair development. Let’s examine the operation of this hair spray and how to create it at home.

Why Rosemary and Cloves?

Two potent natural compounds that are well-known for their ability to improve hair are rosemary and cloves. Antioxidant-rich and anti-inflammatory, rosemary promotes better blood circulation to the scalp, which in turn promotes hair growth. Additionally, it is believed to fortify hair follicles, which may aid in halting additional hair loss. Contrarily, cloves include substances that strengthen the scalp and encourage hair development. Their antifungal qualities maintain the scalp healthy and clean, which fosters the ideal environment for hair growth.

Benefits of Rosemary and Clove Hair Spray

  • Stimulates Hair Growth: Cloves and rosemary work together to increase blood flow to the scalp, which promotes the growth and strength of new hair.
  • Strengthens Hair Follicles: By strengthening hair follicles, both substances lessen hair loss and breakage.
  • Enhances Scalp Health: The antifungal and anti-inflammatory qualities protect the scalp from infections and dandruff.
  • Natural Shine: Using this hair spray on a regular basis will give your hair a naturally lustrous, silky look.

How to Make Rosemary and Clove Hair Spray

It’s simple to make this hair spray at home with only a few basic ingredients:
  • one cup of water
  • A couple of fresh rosemary sprigs or two teaspoons of dried rosemary
  • One tablespoon of whole cloves

Detailed Instructions

  • Bring the ingredients to a boil: Bring one cup of water to a boil in a small saucepan. Pour the boiling water over the cloves and rosemary.
  • Simmer: For ten to fifteen minutes, lower the heat and let the mixture to simmer. This lets the water absorb the health benefits of the cloves and rosemary.
  • Let the pot cool fully after removing it from the heat and straining it. After the mixture cools down, sift it to get rid of the cloves and rosemary.
  • Fill a clean spray bottle with the infused water after it has been bottled.

How to Apply Hairspray

Use the rosemary and clove hair spray as part of your regular hair care regimen for the greatest results:

  1. Apply to Scalp: Directly spray the mixture into the parts of your scalp that you wish to encourage hair growth.
  2. Massage: To assist increase blood circulation, gently massage the spray into your scalp in circular strokes.
  3. Leave it On: There’s no need to rinse out the spray. You can leave it on your scalp to work its magic throughout the day.

A Natural Path to Fuller Hair

Adding this hair spray with clove and rosemary to your regimen is an easy and efficient approach to promote healthy scalp and hair development. This DIY cure is ideal for anyone who wants to grow back hair on their front face because it is prepared with natural materials and is simple to prepare. Why not give it a go and witness the incredible outcomes for yourself? Your hair will be appreciative!


Avocado Seed Powder

Avocado Seed Powder

Avocado Seed Powder

Discover the Amazing Benefits of Avocado Seed Powder

Probably the first thing that comes to mind when you think about avocados is their creamy green flesh. However, did you know that avocado seeds provide a wealth of health advantages as well? An amazing method to utilise these advantages in a straightforward, user-friendly fashion is through avocado seed powder. Let’s examine the health benefits of avocado seed powder as well as how to prepare and utilise it at home.

Avocado seeds are high in fibre, good fats, and antioxidants. Over 70% of the antioxidants included in the entire fruit are contained in them. These antioxidants aid in the fight against free radicals, which can harm cells and have a role in ageing and illness. with addition to its anti-inflammatory qualities, avocado seed powder has the potential to improve heart health, facilitate digestion, and possibly aid with weight control.

Health Benefits of Avocado Seed Powder

  1. Rich in Antioxidants: Your body can be shielded from oxidative stress and inflammation by the abundance of antioxidants found in avocado seeds.
  2. Promotes Heart Health: Avocado seeds’ heart-healthy lipids and fibre can help reduce cholesterol and strengthen the heart.
  3. Helps with Digestion: The fibre in avocado seed powder promotes regular bowel motions and a healthy digestive tract.
  4. Boosts Immune System: Your immune system is fortified by the antioxidants and anti-inflammatory qualities.
  5. Assists with Weight Management: The fibre content might make you feel fuller for longer periods of time, which helps curb your appetite.

How to Make Avocado Seed Powder

It’s easy to make avocado seed powder at home. Here’s how to go about it:
As many avocado seeds as you like

Detailed Instructions:

  • Prepare the Seeds: Set aside the seeds from your avocados after you’ve enjoyed the flesh. Wash them well to get rid of any last bits of fruit.
  • To dry the seeds, spread them out on a baking sheet and let the natural drying process to take a few days. As an alternative, bake them for approximately two hours at a low temperature (around 250°F or 120°C) in the oven.
  • Peel the Skin: It will be simpler to peel the outer layer of the seeds once they have dried. Peel off the thin, brown skin to reveal the inner seed.
  • ground the Seeds: Using a coffee grinder or blender, chop the seeds into small pieces and then ground them into a fine powder. Based on your appliance’s strength, you might have to perform this in batches.

How to Use Powdered Avocado Seeds
Because of its adaptability, avocado seed powder is a simple addition to any diet. Here are some suggestions:

  • Smoothies: To increase the amount of nutrients in your preferred smoothie, add a teaspoon of powdered avocado seeds.
  • Baking: Stir the powder into the batter for pancakes, muffins, or bread
  • Soups & Stews: To improve the nutritional content of soups and stews, stir in a tiny quantity
  • Tea: Steep a teaspoon of the powder in a cup of hot water for a few minutes, then drink the comforting infusion.

A Straightforward Way to Improve Your Health

Including powdered avocado seeds in your diet is a simple and efficient approach to improve your general health. It is nutrient-rich and can increase your immune system, promote heart health, and aid with digestion.

Why Not Give It a Try?

Remember to save the seed from your avocado the next time you eat one! Rather, process it into a healthy powder made of avocado seeds and begin enjoying the health advantages right away. Raise a glass to your health and wellness with this wonderful, simple-to-make powder!

Elixir of Youth

Elixir of Youth

Elixir of Youth: A Natural Remedy for a Long and Healthy Life

Are you looking for a natural approach to keep your young vigour and support the health of your heart? This proverbial fountain of youth, created with garlic and apple cider vinegar, can boost general health, clear blood vessels, and help avoid blood clots. It is an easy-to-use, yet effective, cure that encourages a long, healthy life.

Ingredients Required:

  1. One cup of vinegar made from apple cider
  2. ten garlic cloves

These two components combine to generate a powerful, simple-to-prepare concoction that has several health advantages.

Why These Ingredients?

  1. Apple Cider Vinegar: It’s well known that apple cider vinegar may cleanse blood vessels. It supports healthy circulation, lowers blood pressure, and raises cholesterol levels. Apple cider vinegar’s acetic acid aids in dissolving artery-clogging plaque accumulation.
  2. Garlic: An excellent natural source of heart health is garlic. It purifies blood vessels and lowers cholesterol. In addition to its anti-inflammatory qualities, garlic can lower the incidence of blood clots and thrombosis. It’s a fantastic natural treatment for averting strokes and heart attacks.

How to Prepare Your Elixir of Youth:

  1. Get the garlic ready: Peel and lightly smash ten garlic cloves to unleash their health-promoting components.
  2. Mix with Apple Cider Vinegar: Put one cup of apple cider vinegar and one cup of crushed garlic in a jar. Ensure that the vinegar has completely dipped the garlic.
  3. Infuse the Mixture: Place the jar snugly shut and leave the mixture for approximately a week at room temperature. To make sure the ingredients are thoroughly mixed and the garlic permeates the vinegar, shake the container every day.
  4. Strain and Store: To get rid of the garlic bits, strain the mixture one week later. The elixir should be kept chilled in a container that is well sealed.

How to Use Your Elixir of Youth:

  • Dosage: Take one tablespoon of this elixir every day, ideally first thing in the morning when you’re not hungry. This optimises its health advantages.
  • Mix with Water: To make the elixir more pleasant, you can dilute its powerful flavour in a glass of water or combine it with a small amount of honey.

Final Tips:

  • Lastly, remember that consistency is key. Include this elixir in your daily regimen for optimal benefits. Frequent usage promotes general wellbeing and keeps the heart healthy.
  • Healthy Lifestyle: To maximise the advantages of this elixir, combine it with a nutritious diet, frequent exercise, and enough of water.
  • Speak with your physician: It’s a good idea to speak with your healthcare practitioner before using any natural cure, particularly if you have any pre-existing problems or are on any drugs.

Made with apple cider vinegar and garlic, this proverbial “elixir of youth” is a straightforward yet powerful approach to enhance heart health and live a long, healthy life. This herbal medication can make you feel young and energetic all day long by lowering the risk of heart attacks and strokes, clearing blood vessels, and avoiding blood clots. Savour the advantages of this potent concoction and welcome a more robust future!

Tea Bag Usage

Tea Bag Usage

Have you ever enjoyed a cup of tea so much that you felt a little guilty throwing the spent tea bag in the trash? Hold on to your hats, for those tiny bags are far more useful than you may imagine! You’ll be thinking twice about your garbage habits after seeing these fantastic ideas for reusing your used tea bags.

1. Soothe Tired Eyes

Your eyes may feel drained and swollen after a demanding day. Secondhand tea bags are a wonderful treatment! Just let them cool in the fridge for a few minutes, then cover your closed eyes with them for ten to fifteen minutes. You appear and feel more alert thanks to the caffeine and tannins in the tea, which also assist to refresh and minimise puffiness around your eyes.
2. Freshen Up Your Fridge

Your refrigerator seems to be smelling a little off. Tea bags that have been used might be helpful! After a few old tea bags have dried, store them in a small dish or other container in the rear of the refrigerator. Their ability to absorb smells will leave your fridge smelling clean and fresh.

4. Natural Cleaner

Glass and mirrors may be effectively cleaned using used tea bags. Simply re-steep the bags in a little amount of warm water, and then clean glass surfaces with the tea. It removes filth and leaves a sheen without streaks. Ideal for cleaning your windows to a lustrous shine without using harsh chemicals!

5. Relieve Insect Bites

Tea’s inherent anti-inflammatory qualities help relieve skin irritation. Use a cold, moist tea bag on the affected region to provide relief if you have a mild rash or insect bite. By lowering swelling and stinging, it provides a natural remedy for those bothersome bites.

The Magic of Bay Leaves: A Quick Fix for Gray Hair

You Will Never Throw Away Used Tea Bags After Watching This

The Magic of Bay Leaves: A Quick Fix for Gray Hair

Finding the first gray hair strands can be unexpected. While some people accept this natural transition, others try to find ways to prolong their original hair color. One interesting home remedy is the ubiquitous culinary herb, bay leaf, which lends flavor to many foods. Here’s how boiling bay leaves could be the easy, fast way to temporarily darken gray hair you’ve been looking for.

How Operates:

Bay leaves are a great, natural substitute for store-bought hair colors since they naturally contain components that can temporarily darken hair. This approach lowers the possibility of chemical dye harm to your hair while being simple, affordable, and kind to it.

Detailed Instructions for Applying Bay Leaves on Gray Hair:

Components and Equipment:

  1. Several dried bay leaves
  2. two glasses of water
  3. A boiling pot
  4. A sieve
  5. A collecting container

Getting ready:

  • After adding the water to the pot, add the bay leaves.
  • After bringing the mixture to a boil, reduce the heat, and simmer it for roughly 20 minutes. To remove as much colorant from the leaves as feasible is the aim.
  • Once the mixture has simmered, remove from the fire and let it cool.
  • Remove all of the leaf fragments by straining the liquid into a container.
  • Application: Give your hair a regular wash and pat dry with a towel to keep it wet.
    Make sure to completely cover any gray areas in your hair after using the cooled bay leaf solution.
    Let the solution settle for a while.

for roughly two minutes in your hair.
Use warm water to rinse your hair.

Advantages and Advice:

  • Safe and all-natural: This technique is all-natural and does not use the harsh chemicals that are present in many hair dyes.
  • Efficient and Practical: Applying it is comfortable and takes only a few minutes at home.
  • Temporary Coverage: Since the color will gradually fade over time, this is ideal for special occasions or brief wardrobe changes.

In summary:

Maintaining your hair color naturally, effectively, and creatively can be achieved by using bay leaves to cover gray hair. This technique allows you to experience a little bit of nature’s charm while avoiding the chemical alternatives and providing a speedy fix. Whether you’re preparing for a noteworthy occasion or simply If you’d want to try changing up your appearance, bay leaves are a fantastic and practical option.

Using Potatoes and Egg Whites

Using Potatoes and Egg Whites

Look 18 Even If You’re 70! Using Potatoes and Egg Whites: Anti-Aging Secrets

Who wouldn’t want to go back in time and have glowing, young skin? No matter your age, you may seem younger with the power of potatoes and egg whites. These straightforward, all-natural components are nutrient-rich skin-loving compounds that tighten, lift, and brighten your complexion. This is how you apply them.

Ingredients Required:

  1. One potato
  2. One white egg

You may appear younger and feel more confident with this potent anti-aging mask made of these two everyday components.

Why Are These Ingredients Used?

  • Potatoes: High in potassium, antioxidants, and vitamins C and B6, potatoes are a nutritious food. They encourage a brighter, more even skin tone and assist to lighten dark spots and puffiness. Potatoes’ natural enzymes contribute to the skin’s mild exfoliation.
  • Egg Whites: Egg whites are well-known for their ability to tighten skin. They aid in minimising pores, firming the skin, and minimising the look of fine lines and wrinkles. Egg whites are a great source of nutrients and proteins that leave the skin feeling smooth and renewed.

How to Prepare Your Potato and Egg White Mask:

  1. To prepare the potato, begin by giving it a thorough wash and peel. Using a fine grater, shred the potato, and then use a clean cloth or sieve to extract the juice. Gather the potato liquid into a basin.
  2. Crack an egg and extract the white and yolk using a spoon. Put the egg white into the bowl with the liquid from the potato.
  3. Combine the Ingredients: Beat the egg white and potato juice until thoroughly mixed and beginning to foam.
  4. Apply the Mask: Distribute the mixture evenly over your face and neck, being careful not to get any in your eyes, using a brush or clean fingertips. Make sure you apply it to every part of your body where you wish to tighten and lessen wrinkles.
  5. Allow It to Rest: Put the mask on for ten to fifteen minutes. As the mask dries, you should feel it tighten, which indicates that it is effective.
  6. Rinse Off: Gently rinse off the mask with lukewarm water. Pat your skin dry with a clean towel and apply a moisturizer to keep your skin hydrated.

The secret to great outcomes is consistency: apply this mask two to three times a week. Applying it often can help keep your skin looking young.

Remain Hydrated: Eating a balanced diet and drinking lots of water can boost the benefits of your skincare regimen.

Sun Protection: To shield your skin from damaging UV rays and stop premature ageing, use sunscreen to your entire body during the day.

Your complexion will seem firmer, smoother, and younger if you use this potato and egg white mask as part of your skincare regimen. Accept these anti-aging tips and get the rewards of appearing youthful at any age!

Canning Watermelon Juice to Warm Your Soul

Canning Watermelon Juice to Warm Your Soul

Canning Watermelon Juice to Warm Your Soul

Grandma’s Secret

Grandmother has a secret that she has been telling her loved ones for years—a secret that comes out at the height of summer, when watermelon is at its ripest and juiciest. Canned watermelon juice is a tradition that transforms summer’s abundance into a delectable delicacy that cheers the spirit throughout the chilly winter months!

Grandma’s Easy and Enjoyable Method
Making canned watermelon juice is a simple and enjoyable procedure that Grandma does. She begins by picking out the best and most ripe watermelons by hand from the nearby market. She carefully and precisely chops them up, taking care to remove the seeds and make sure that only the tastiest, juiciest flesh is preserved in her jars.

Then the magic happens: juicing! Grandma uses her dependable antique juicer to extract every last drop of liquid gold from the chunks of watermelon. The outcome is a vivid, cool juice that perfectly encapsulates summertime with each sip.

Maintaining Summer’s Abundance
Grandma proceeds with the canning procedure when the juice is ready. She makes sure everything is spotless and prepared for preservation by carefully sterilising her jars and lids. She carefully pours the freshly squeezed watermelon juice into each jar, allowing exactly the correct amount of headspace, using expert hands.

Grandma carefully prepares the sealed jars in a water bath to ensure optimal preservation for extended storage. And just like that, the abundance of summer is preserved in a jar and ready to be savoured on frigid winter days.

Winter Sweets: A Splash of Summer Taste
As the weather drops and the first snowflakes fall, Grandma’s bottled watermelon juice turns into a priceless find. A simple twist of the lid releases a burst of summer flavour that warms the body and the soul.

In the midst of the darkest winter days, Grandma’s watermelon juice tastes great on its own or blended into mocktails and drinks. It serves as a reminder that summer’s warmth is always there, even during the coldest months.

Keep Summer’s Bounty, Make Winter Days Brighter
So, follow Grandma’s lead and can your own watermelon juice if you’re searching for a tasty solution to preserve summer’s abundance and brighten dreary winter days. You may have the flavour of summer all year long with a little work and a lot of love!