Rise and Shine with the Ultimate Breakfast Bread

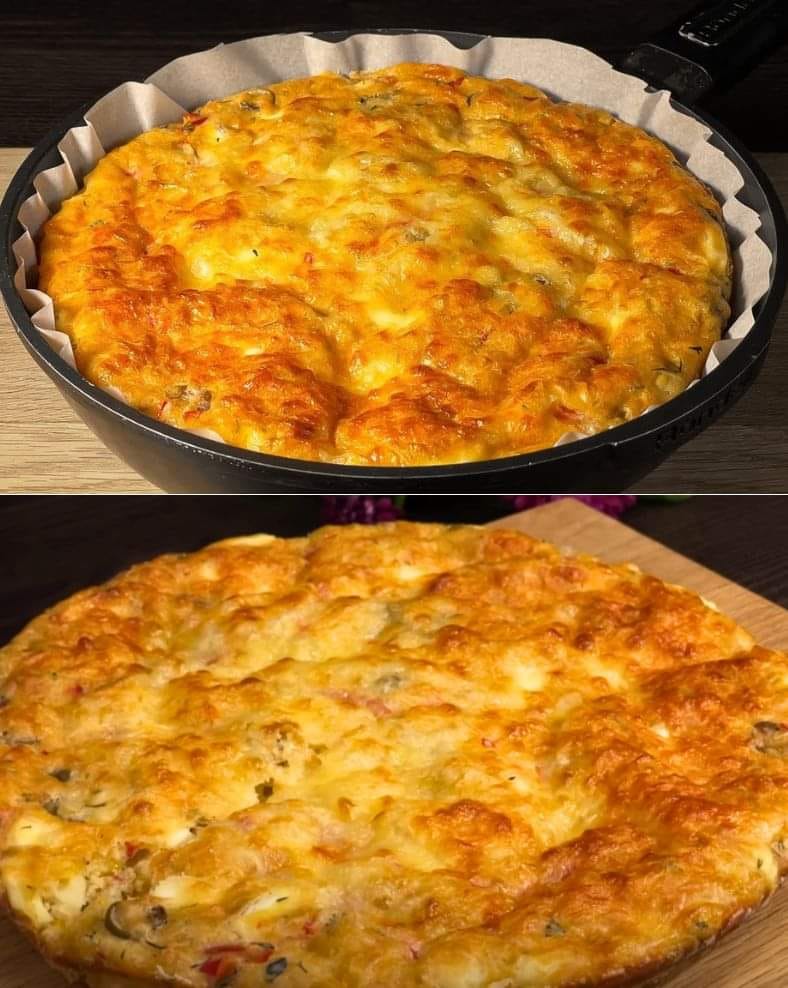
Rise and Shine with the Ultimate Breakfast Bread: A Quick and Tasty Recipe

Imagine waking up to the aroma of warm, freshly baked bread that was just taken out of the oven. That’s precisely what this recipe for breakfast bread promises to be: a delicious treat that’s easy to create and really fulfilling to consume. A revolutionary morning routine that will leave you wanting more is here to replace your dull meals.

2. Components

To get started, gather these essential ingredients:

  1. 200 ml or 1 cup of warm water
  2. 200 ml (one cup) warm milk
  3. Ten grams (0.4 oz.) of dry yeast
  4. eight grams (0.3 oz.) of salt
  5. 400 g (4 cups) of ordinary flour
  6. 125 grams, or 4.5 ounces butter
  7. 100 milliliters, or 0.5 cups refined sunflower seed oil
  8. Seven ounces (200 grams) of cottage cheese or feta
  9. One egg yolk, to be used to brush the cake before baking

getting ready

3. Creating the Dough

It’s not as hard as you might imagine to make the dough:

  • Step 1: Combine warm milk, warm water, and dry yeast in a deep bowl. Mix the yeast until it dissolves.
  • Step 2: Stir in the salt and sifted flour gradually until a soft, smooth dough forms.
  • Step 3: Roll the dough into a ball, put it in a bowl, and let it rise for forty-five minutes in a warm location.

4. Filling Preparation

Improve the flavour with an easy-to-make but mouthwatering filling:

  • Step 4: Combine refined sunflower oil with melted butter.
  • Step 5: Use a fork to mash the feta cheese.

5. Cake Shaping

Use your imagination when creating the presentation:

  • Step 6: Form the three equal portions of the risen dough into balls.
  • Step 7: Roll each ball into a round sheet and arrange them in layers, covering each with a coating of the butter-oil mixture and cheese.
  • Steps 8 through 11: Fold the sheets into layers to produce a lovely, airy texture.
  • Step 12: Before baking, move the cake to a baking sheet and allow it to rest.

6. Preparing and Presenting

In the oven, bring your masterpiece to life:

  • Step 13: Bake the cake at 190°C until it turns brown after brushing it with beaten egg yolk.
  • Step 14: Allow bread to cool before cutting into slices and serving.

7. Why This Particular Recipe?

Find out why this morning bread has become so popular:

  • Simple Ingredients: A few basic cupboard goods combine to produce an amazing dish.
  • Quick Preparation: You can quickly enjoy freshly made bread by following a few simple procedures and waiting only a short while.
  • Irresistible Flavour: Every bite is unforgettable because to the marriage of savory cheese and buttery layers

.
8. Success Guidance

Make sure each time you bake morning bread it comes out flawlessly:

  • Use Fresh Ingredients: The finished product is improved by using high-quality ingredients.
  • Don’t Put in Too Much Work: To prevent tough bread, handle the dough carefully.
  • Try Different Fillings: You can alter the recipe by adding your preferred herbs or cheeses.

9. Modifications and Replacements

Use these imaginative ideas to personalize this recipe:

  • Sweet Twist: For a sumptuous treat, replace the savoury filling with jam or Nutella.
  • Vegetarian Option: For a lighter version, omit the cheese and add roasted veggies.
  • Gluten-Free Substitute: For people following a gluten-free diet, use a blend of flour.

Apricot Cake with Cheese – A Delightful Summer Treat

Apricot Cake with Cheese – A Delightful Summer Treat

Ingredients

Gather the following items to make this delicious cake:

  1. Seven tablespoons, or ½ cup, of room-temperature cow butter
  2. 1/3 cup sugar and 2 eggs
  3. one cup of yoghurt
  4. one and a quarter cups flour
  5. two tsp powdered baking

Regarding the Cream:

  • 12.3 ounces (1 1/2 cups) room-temperature cottage cheese
  • two tsp sugar
  • Two tsp sour cream, plus a drizzle
  • One-half teaspoon of vanilla extract
  • One compote of apricots

Further:

  • half a cup of flour
  • one-fourth cup sugar
  • Four tablespoons, or 1/4 cup, of room-temperature cow butter

Getting Ready

Let’s get started with the setup:

  • Sprinkles: Set up the sprinkles first. Cream sugar and softened butter together, then stir in flour to form a loose consistency. While you work on the cream and dough, chill this mixture in the refrigerator.
  • Cream: In a bowl, combine all of the cream’s components; whisk vigorously until the mixture is smooth.
  • Dough: Beat sugar and eggs together until frothy. Add the oil and the flour-baking powder mixture. Stir in baking soda, Fanta, ground almonds, and starch to form a smooth dough.
  • Stacking Layer the dough in a pan that has been both greased and floured.
  • Apricot Topping: After placing the apricot halves on top of the dough, grind some almonds and sprinkle them on top.
  • Cream Layer: Evenly spread the cream over the apricots, then top with the ready-made sprinkles.

Baking Procedure

  • Preheat and Bake: Turn the oven’s temperature up to 170 degrees. Preheat the oven to 350 degrees Fahrenheit for 35 minutes. After that, adjust the temperature to 150 degrees Celsius (fan function) and bake for ten more minutes.

Flavour and Texture

  • There are many different textures and flavors in this apricot cheesecake. Richness and smoothness are contributed by the cream cheese and the luscious apricots, which give a crisp, delicious flavour. Every bite has the ideal balance because to the gorgeous golden color and crunchy texture of the sprinkles on top.

Ideal for Any Occasion

  • This cake is perfect for any occasion, whether you’re having a picnic, celebrating with loved ones, or just treating yourself to a decadent dessert. Due to its adaptability, it can be used for every event and gives your parties a refined and delicate touch.

Changes in Recipe

  • Use your imagination when preparing this dish. For a new twist, try experimenting with other fruits like berries or peaches. For added crunch, experiment with different kinds of cheese or add some nuts.

Advice and Techniques

  • Ingredients at Room Temperature: For best blending, make sure your cheese and butter are room temperature.
  • Sprinkles Mixture: Allowing the mixture to cool will help it maintain its texture and shape when baked.
  • Even Layering: To ensure that the cake has a consistent flavour and texture throughout, divide the dough and cream equally.

In summary
To sum up, this cheese and apricot cake is a delicious summer dessert that is sure to wow. It is a must-try for any dessert enthusiast due to its simple preparation and mouthwatering flavour. Why then wait? Make this delicious cake and savour every bite of heavenly apricot flavour. Salutations!

Indulge in Homemade Delight Easy-to-Make Carrot Cake

Indulge in Homemade Delight: Easy-to-Make Carrot Cake

This delectable carrot cake recipe is the only thing you need if you’re seeking a moist, tasty treat that’s as easy to make as it is to enjoy! All you’ll need is some basic pantry goods and some fresh ingredients, and you’ll have a delicious slice of handmade bliss in no time.

Ingredients

Gather the materials to make this delicious carrot cake:

Regarding the cake:

  1. three eggs
  2. one and a half cups sugar
  3. one-third cup of vegetable oil
  4. one and a half cups flour
  5. One orange’s zest
  6. 1.5 cups of carrots, grated
  7. 3/4 cup walnuts, plus additional if required for decorating
  8. A small amount of salt
  9. two tsp powdered baking
  10. As desired, add the cinnamon,
  11. cloves, and nutmeg (you added a tablespoon of spicy mixture).

Regarding the cream:

  • 8 to 9 ounces of cream cheese
  • 1/4 to 1/3 cup of sugar powder

Getting ready: Cake

Now let’s get started on creating this delicious cake:

  • Grate the Carrots: To begin, finely grate the carrots. This assures a cake that is tasty and moist.
  • Zest the Orange: Grate or zest one orange to extract its aromatic zest. This gives the cake a zesty, invigorating note.
  • Get the walnuts ready: Grind the walnuts in a grinder or chop them with a knife. Choose a gritty texture so that every bite has a satisfying crunch.
  • Beat Eggs and Sugar: Beat the eggs and sugar in a mixing dish until a smooth, creamy mixture forms.
  • Oil Incorporation: Stir thoroughly to make sure the vegetable oil is completely incorporated before gradually adding it to the egg and sugar mixture.
  • Mix the dry ingredients together: Sift the flour, baking powder, salt, and any additional spices in a different bowl. This produces a tasty mixture that will improve the flavour of your cake.
  • Combine Wet and Dry Ingredients: Stir the egg mixture with the chopped walnuts, orange zest, and grated carrots. Mix until all the ingredients are dispersed equally.
  • Fold in Dry Ingredients: Stir gently until a homogeneous batter develops, then gradually fold the dry ingredients into the wet mixture.
  • Bake until done: Pour the batter into a parchment paper-lined baking tray. For 45 to 55 minutes, or until a wooden skewer inserted into the center comes out clean, bake at 180°C in a preheated oven.

Grandma’s Roast Recipe Stunned Everyone

Grandma’s Roast Recipe Stunned Everyone Easy Hearty Dinner

Who doesn’t adore a delicious, warm Grandma’s cooking meal? Prepare for that with Grandma’s roast recipe! This flavorful dish will please even the pickiest eaters. Let’s get into this delicious, all-occasion meal.

Ingredients

Grandma’s delicious roast requires these ingredients:

  1. 200 grams (1/2 lb) white bread (stale)
  2. 1 cup milk
  3. 2 pounds ground beef
  4. Chives
  5. 1/2 pound cheese
  6. 3 eggs
  7. Salt and Pepper
  8. 1 tsp nutmeg
  9. Optional: 1-2 tbsp. breadcrumbs
  10. 1. Pear Vegetable oil
  11. Coriander

Making the Mixture

  • First, cut the white bread into little cubes and soak them in milk for 15 minutes to swell.
  • Mix Ingredients: Chives and other greens should be finely chopped. After soaking, crush the bread until smooth and blend with ground meat, chopped onions, and seasonings.
  • Add Eggs and Cheese: Add grated cheese to the mixture. Mix the eggs into the mixture until smooth.
    Season with salt, pepper, nutmeg, and coriander. Mix thoroughly to spread flavors evenly.

Making Cutlets

  • Prepare Mold: Rub your hands with vegetable oil and cube the onion. Make big cutlets from two halves of the mixture.
  • Layering: Sprinkle onions over the mold, add cutlets, and add coriander and nutmeg for flavour.

Baking Roast

  • Bake: Preheat the oven to 180 degrees Celsius and bake the roast for 1 hour until cooked through and golden brown.
  • Sides: Fry potatoes and make a salad while the roast bakes.

Sides Matter

  • No substantial dinner is complete without tasty sides. Serve Grandma’s roast with roasted veggies, mashed potatoes, or a crisp garden salad. These sides enhance the roast and complete the meal.

Serving and Enjoying

  • After the roast is cooked and the sides are ready, join Grandma for her masterpiece at the table. Serve the roast hot with your favorite sides and watch it go in minutes. Enjoy every bite and cherish family memories.

Grandma’s Recipe—Why?

  • Grandma’s roast recipe is simple and delicious. This recipe uses simple ingredients to provide a memorable supper, unlike complex gourmet dishes. It shows the power of home cooking and family traditions.

Nutritional Benefits

  • Besides being soothing, Grandma’s roast is nutritious. Protein, vitamins, and minerals are found in lean ground beef, fresh herbs, and healthy seasonings. Vegetables and salad on the side add fiber and nutrients.

Tricks and Tips

  • Stale bread soaks better, making the roast moist and tender.
    Try Different Herbs: To customize your roast’s flavour, try different herbs and spices.
  • Making the roast mixture ahead of time and refrigerating it until baking makes it convenient for hectic days or entertaining.

Frozen Chocolate Bars with Peanuts

Frozen Chocolate Bars with Peanuts

Savor these delicious Frozen Chocolate Bars paired with Peanuts. This delicious treat blends the richness of dark chocolate, the crunch of peanuts, and the creaminess of cottage cheese or cream cheese. These frozen bars are simple to make and will satisfy any sweet taste, making them ideal for a summer dessert or a special treat.

Ingredients:

  1. 10.5 ounces or 300 grams of cottage cheese or cream cheese
  2. 40 g (3 tablespoons) of traditional butter, cocoa, or coconut
  3. Two teaspoons (40 g) of honey
  4. One teaspoon vanilla extract
  5. Two tablespoons (20 g) cocoa powder
  6. 40 grams, or 1/4 cup roasted peanuts
  7. 160 grams, or 5.6 ounces dark chocolate
  8. 3 tablespoons, or 40 g vegetable-based oil

Information on Nutrition

  • Servings: Eight bars
  • 200 calories a bar.

Guidelines

Getting the Cream Base Ready

  • Mix the ingredients together: Transfer the cream or cottage cheese to a mixing bowl. Pour in the melted chocolate or coconut butter (or traditional butter, if you’d like). Incorporate the vanilla essence, cocoa powder, and honey into the bowl.
  • Blend until smooth: Blend or process everything into a uniform mass using a food processor or blender. If lumps are still present, use a stick blender to puree the mixture until it is flawlessly smooth and creamy.

Chilling the Cream Substrate

  • Fill the Molds: Get an ice stick silicone mould ready. The prepared cream mixture should be poured into each mold cavity. Use a spatula to smooth the tops.
  • Freeze: Once the moulds are completely set, freeze them for at least three hours.

Get the Chocolate Coating Ready

  • Chop the Peanuts: Dice the peanuts into medium-fine bits while the cream sticks are freezing. Put aside.
  • Break up the dark chocolate into small pieces and transfer them to a heat-resistant basin to melt. Use a microwave or double boiler to melt the chocolate. If using a microwave, heat for 30 seconds at a time, stirring in between, until completely melted.
  • Add Oil to Chocolate: After the chocolate has melted, thoroughly combine it with the vegetable oil. This will result in a glossy, smooth covering.
  • Add Peanuts: Gently stir in the chopped peanuts until they are well mixed into the chocolate mixture.

Adding Glaze to the Frozen Bars

  • To remove the frozen cheese sticks from the silicone molds, just peel them off. Put them on a dish or baking sheet that has been lined.
  • Dip in Chocolate: Using a small knife or skewer, pierce each bar on the shorter side. Make sure every bar is well covered after dipping it into the ready chocolate coating. When the chocolate comes into touch with the frozen bars, it should solidify virtually instantly.
  • Final Freeze: To ensure that the chocolate coating is completely set, return the coated bars to the freezer for a further fifteen minutes.

Getting in touch
Serve and Enjoy: Your Frozen Chocolate Bars with Peanuts are ready to eat once the chocolate covering has solidified. Serve right away or freeze for up to a week in an airtight container.
These Peanut Frozen Chocolate Bars are the ideal balance of crunchy, creamy, and chocolaty flavour. Savour them as a cool dessert or a unique treat on a steamy day.

Savory Mediterranean Vegetable and Cheese Cake

Savory Mediterranean Vegetable and Cheese Cake

Savory Mediterranean Vegetable and Cheese Cake: Savor the exquisite fusion of Mediterranean flavors. Made from a soft, velvety dough, this savory cake is stuffed with creamy mozzarella, tangy feta cheese, and colorful veggies. This meal is not only tasty but also nutrient-dense, making it ideal for breakfast, brunch, or a satisfying snack. Now let’s get into how to make this delicious dessert.

Components of the Batter

  1. two eggs
  2. 3 1/2 tablespoons (50 ml) vegetable oil
  3. Milk, 100 ml (1/2 cup)
  4. Add salt to taste.
  5. One tsp (5 g) baking powder
  6. 130 g flour (1 cup plus 1 tablespoon)

Regarding the Filling

  • One sliced delicious yellow pepper
  • One chopped sweet red pepper, one chopped tomato, and fifty grams,
  • or 1/4 cup, of sliced green olives
  • 100 g (3 1/2 oz.) crumbled feta cheese
  • Dill, fresh to flavour
  • 100 g (3 1/2 oz.) of shredded firm mozzarella cheese
    Other
  • 20 g (1 1/2 tbsp.) butter to be used for mold cleaning
  • Using flour to dust the mold
  • mozzarella grate to taste

Guidelines

  • Setting Up the Wet Batter Mix Components: Crack the eggs into a bowl for mixing. Pour in the milk and vegetable oil. Beat the items together thoroughly using a whisk or mixer. Use salt to season to your preference.
  • Add Dry Ingredients: Mix in the baking powder and then slowly pour in the flour. Beat the batter until it is lump-free and smooth.

Getting the Filling Ready

  • Cut up the veggies: Chop the tomato, red and yellow peppers, and green olives finely. Grate the firm mozzarella cheese and crumble the feta cheese. Finely chop a tiny bunch of new dill.
  • Combine Filling Ingredients: Place the chopped tomatoes, peppers, olives, crumbled feta cheese, chopped dill, and half of the shredded mozzarella in a separate, sizable bowl. To make sure all the ingredients are dispersed evenly, thoroughly mix.

Putting the Cake Together

  • Get the mold ready: Set the oven temperature to 180°C (350°F). Apply butter grease to a baking mold, being sure to coat the entire mold. To stop the cake from sticking, dust the mold with flour.
  • Beat in the Filling and Batter. Fold the cheese and vegetable combination gently into the batter that has been prepared. Stir until the filling is mixed into the batter all the way through.
  • Fill the mold: Fill the prepared mold with the resultant mixture. With a spatula, evenly spread it out.
  • Place mozzarella on top: Evenly distribute the remaining grated mozzarella cheese over the batter’s top.

Making Baking

  • Prepare the Cake: After the oven has heated up, place the mold inside and bake for around 35 minutes. When a toothpick inserted into the center comes out clean and the top of the cake is crispy and golden brown, it is done.
  • After baking, take the cake out of the oven and let it cool a little inside the mold before serving. Place it on a wire rack to cool completely after ten minutes. Cut into slices and serve warm or cold.

Serving Suggestions:

  • This flavorful cake tastes great with a bowl of soup or a crisp green salad. It also makes a filling snack when eaten by itself. With its mouthwatering flavours and lovely texture, this Mediterranean Vegetable and Cheese Cake is perfect for any occasion.

Information on Nutrition

  • 8 servings; 220 calories a serving
  • Twelve grams of total fat
  • Five grams of saturated fat
  • 60 mg of cholesterol
  • 400 mg of sodium
  • 20g of total carbohydrates
  • dietary fiber: two grams
  • 3g of sugars
  • 10g of protein

in summary
Savor the wholesome deliciousness of our mouthwatering Savory Mediterranean Vegetable and Cheese Cake, which is equally tasty and nutritious. This recipe is a guaranteed way to please your taste buds and nourish your body, and it’s perfect for family get-togethers, potlucks, or a cosy dinner at home. Have fun!

Simple and Delicious 3-Ingredient Breakfast Omelet

Simple and Delicious 3-Ingredient Breakfast Omelet

You can get your day started off right with this morning omelets that is easy to make, delicious, and full. It is created with only three essential ingredients: eggs, milk, and cheese. This is a dish that is not only simple to make but also provides a great deal of satisfaction. This recipe yields a soft and fluffy omelets that is sure to impress everyone at the table, making it ideal for using on mornings when time is of the essence.

Components are eight eggs.

  1. 400 milliliters, or one and a half cups, of milk
  2. 150 grams (one and a half cups) finely grated cheese
    For your taste, salt
  3. 4–7 grams (one-half tablespoon) of butter

Information Regarding Nutrition

  • There are four servings.
  • Each serving has 220 calories.
  • The process of preparation a moment
  • Time needed for preparation: ten minutes
  • The cooking time is thirty-five minutes.
  • A total of forty-five minutes

Details to follow

Putting together the mixture of eggs

  • Whisk the Eggs and Milk Together: A deep mixing dish should be used to crack the eight eggs. The 400 milliliters of milk should be added. Add salt to taste and season with it. Mix the ingredients together with a whisk until they are thoroughly mixed and foamy.
  • Include the Cheese in the Mix: Using a grater, grate a total of 150 grams of cheese. Add the grated cheese to the mixture that consists of the milk and eggs. In order to evenly mix the cheese, give it a slight stir.

Putting the Omelets in the oven

  • Put together the baking dish by: To preheat your oven, set it to 200 degrees Celsius (392 degrees Fahrenheit). In order to avoid the food from adhering to the baking mold or dish, grease it with 5-7 grams of butter and make sure that the entire surface is covered.
  • The mixture should be poured: The egg, milk, and cheese combination should be poured into the baking mould that has been prepared.
  • Bake the Omelets: After the oven has been warmed, place the baking mold inside the oven and bake for thirty-five minutes. It is expected that the omelets would get puffy and become a light golden color.

After the omelets has been prepared, take it out of the oven and allow it to cool out before serving. Before slicing it, you should wait until it has cooled down significantly. I hope you enjoy this soft, light, and really flavorful omelets while it is still warm.
This breakfast omelets, which only requires three ingredients, is ideal for individuals who enjoy a breakfast meal that is both speedy and satisfying in the morning. Due to the fact that it requires very little time for preparation and cooking, this recipe is an excellent option for hectic weekdays as well as lazy weekends. Have fun!

Savory Cabbage Pancakes with Yogurt Sauce

Savory Cabbage Pancakes with Yogurt Sauce

Components:

For the cabbage pancakes, you will need:

  1. – 500 grams of cabbage that has been finely shredded –
  2. Vegetable oil –
  3. two onions that have been finely diced –
  4. three cloves of garlic have been minced
  5. – Three eggs
  6. four tablespoons of flour (sixty grams)
  7. – One teaspoon of salt (eight grams)
  8. – One teaspoon of ground black pepper (four grams) is
  9. equal to one teaspoon of ground red pepper.

As for the Fry:

  • – Oil derived from vegetables

To prepare the yoghurt sauce,

  • – Two sprigs of dill,
  • diced as well as three tablespoons of yoghurt (75 grams)
  • This recipe calls for one grated cucumber
  • and red powdered pepper, to taste.

As for the cabbage pancakes, here are the instructions:

In a large mixing bowl, combine the following ingredients:

  • cabbage that has been finely shredded, onions that have been finely chopped, garlic that has been minced, eggs, flour, salt, ground red pepper, and black pepper.
  • After thoroughly combining, mix.
  • 2. Bring a skillet filled with vegetable oil to a temperature of medium-high.
  • 3. Form individual pancakes by spooning parts of the cabbage mixture into the skillet before placing them in the pan. Utilising a spatula, give them a slight flattening.
  • 4. Fry the pancakes until they are golden brown and crispy on both sides, according to your preference. It is possible that you will need to complete this task in batches.
  • 5. Take out the pancakes that have been fried and set them on paper towels so that any extra oil can drain out.

To prepare the yoghurt sauce,

  • 1. Pour yoghurt, grated cucumber, chopped dill, and red powdered pepper into a separate bowl and whisk until the ingredients are well combined. Modify the level of heat to suit your preferences.
  • Served on the side, the savory cabbage pancakes should be accompanied by the yoghurt sauce. Cheers to your scrumptious lunch!

Amazing Dessert Without Oven And Eggs, Wrapped With Toasted Peanuts

Amazing Dessert Without Oven And Eggs, Wrapped With Toasted Peanuts You Won’t Regret It

Do you have a yearning for a delicious, quick dessert that doesn’t require eggs or an oven? There’s nowhere else to look! I’m going to share a delicious eggless and oven-free dessert recipe with you in this article. Prepare to savour the delectable goodness of milk and chocolate candies encased in toasted peanuts. Your taste buds will be delighted after tasting this pleasure.

Ingredients

Let’s look at the ingredients you’ll need before we get started cooking:

  1. Cinnamon, 35 grams of corn starch,
  2. 80 grams of sugar,
  3. 25 grams of butter
  4. and 70 grams of chopped peanuts
  5. 125 grams of milk chocolate
  6. Grain of Coconut Vanilla Powder
  7. With all the ingredients ready,

let’s proceed to the detailed instructions for making this delicious dessert.

Step 1 of Making the Sweet Delight: Setting Up the Base

  • Mix together 500 ml milk, 80 g sugar, 25 g flour, 1 tsp vanilla powder, and 35 g corn flour in a pot. To make sure there are no lumps, thoroughly mix. Transfer the mixture to the saucepan and simmer over medium heat until it thickens. This serves as our dessert’s delectable foundation.

Step 2: Chilling and Adding Butter

  • After the mixture has thickened, toss in 25 grams of butter, melting it completely and incorporating it thoroughly. It’s time to transfer this deliciously creamy mixture into glass glasses. After letting it cool, chill it in the refrigerator for at least two hours. The dessert must chill in order for it to set correctly.

    Step 3: The Perfect Toasty Peanut

  • Remove the dessert cups once the dessert has set. The magic starts now! Around the edges of the pastries, liberally sprinkle 70 g of chopped peanuts. This gives every bite a delicious crunch and nutty flavour.

Step 4: Drizzle with chocolate

  • In order to elevate this dish to an even more luxurious level, melt 125 grams of milk chocolate in a bain-marie. After it’s glossy and smooth, liberally pour melted chocolate over the top of each candy. The mix of the warm chocolate and the chilly dessert is too good to resist.

Step 5: Add a coconut garnish

  • Add a piece of coconut grain on the top of each dessert as the last touch. This gives your milk and chocolate candies a touch of unique flavour and a tropical flare.

In summary
Best wishes! You just made a delicious dessert without using eggs or an oven. A real delight for the senses, these milk and chocolate candies are encased in toasted peanuts. It’s a complete delight with its creamy smoothness, nutty crunch, and decadent chocolate drizzle. This dish will not let you down, whether you’re making it for a special occasion or just to indulge your sweet appetite.

Best Foods to Eat for Longevity

When it comes to living a longer and better life, eating the correct meals may make a major contribution. Garlic, lime, ginger, turmeric, and cocoa are just few of the components that are well-known for the positive effects they have on many aspects of health. If you include them in your diet, you may improve your overall health and increase your chances of getting older. Let’s investigate the reasons why these foods are so helpful, as well as the ways in which you may effortlessly include them into your everyday diet.

Garlic 1. Improves Immune System: Garlic is loaded with antioxidants and has potent anti-inflammatory qualities, all of which may assist in improving your immune system with regular consumption.
2. Health of the Heart: It plays a role in lowering blood pressure and cholesterol levels, which in turn reduces the likelihood of developing heart disease.
3. Antibacterial qualities: Garlic’s inherent antibacterial qualities assist in the prevention and treatment of illnesses.
Instructions on How to Use:

  1. Include garlic that has been minced in stews, soups, and sauces.
  2. It may be used as a seasoning for meats and vegetables that have been roasted.
  3. Incorporate it into marinades and salad dressings whenever possible.

Lime:

  1. Lime is a good source of vitamin C, which has a role in enhancing the immune system and promoting healthy skin. Lime is rich in vitamin C.
  2. 2. Lime juice’s acidity may assist activate digestive fluids, which in turn helps with digestion. Lime juice is a good source of vitamin C.
  3. Lime juice has the potential to assist in the detoxification process of the liver.

Instructions on How to Use:

  1. Fresh lime juice should be squeezed over salads, tacos, and seafood that has been cooked.
  2. To make a drink that is very refreshing, add lime slices to water or tea.
  3. The flavour of baked products and sweets may be improved by adding lime zest to them beforehand.

Ginger:

1. Anti-Inflammatory Ginger is well-known for its anti-inflammatory characteristics, which may assist in the reduction of both pain and inflammation.
2. Health of the Digestive System: It helps with digestion and may be helpful in reducing nausea.

3.Increases Immunity Ginger has antioxidant qualities that increase the body’s ability to fight off infections.
Instructions on How to Use:

  1. When making smoothies or juices, use fresh ginger.
  2. Ginger that has been grated may be used in stir-fries, soups, and margarine.
  3. Prepare a calming beverage by making ginger tea.

Turmeric

  1. Turmeric . Anti-Inflammatory: Turmeric is a potent anti-inflammatory agent since it includes curcumin.
  2. Antioxidant: It has powerful antioxidant qualities that shield cells from harm and help prevent them from disease.
  3. Promotes Brain Health Curcumin has the ability to increase levels of brain-derived neurotrophic factor (BDNF), which in turn provides improvements in brain function.

Instructions on How to Use:

  1. To curries, soups, and stews, turmeric is a great addition.
  2. You may use turmeric powder into drinks or smoothies.
  3. You may use it into spice mixtures for roasted meats and veggies.
  4. Cocoa is loaded in antioxidants, which may help decrease inflammation and protect against heart disease. Cocoa is among the foods that are rich in antioxidants.
  5. . Mood Enhancer: Due to the presence of flavonoids in cocoa, flavonoids have the ability to boost both mood and cognitive performance.
  6. In terms of cardiovascular health, it has the potential to reduce blood pressure and enhance blood flow.

Instructions on How to Use:

  1. Add cocoa powder that has not been sweetened to your smoothies and muesli.
  2. Dark chocolate with a cocoa content of 70% or above is a delicious and nutritious treat.
  3. When baking, cocoa may be used to produce treats that are healthier.

Final Thoughts
It is possible to greatly improve both your health and your lifespan by include these potent foods in your diet. Not only are garlic, lime, ginger, turmeric, and cocoa delightful, but they are also loaded with an abundance of nutrients that are beneficial to your health in a variety of different ways. If you want to experience the advantages of a healthier and longer life, you should look into including these components into your diet. We raise our glasses to long life and excellent health!