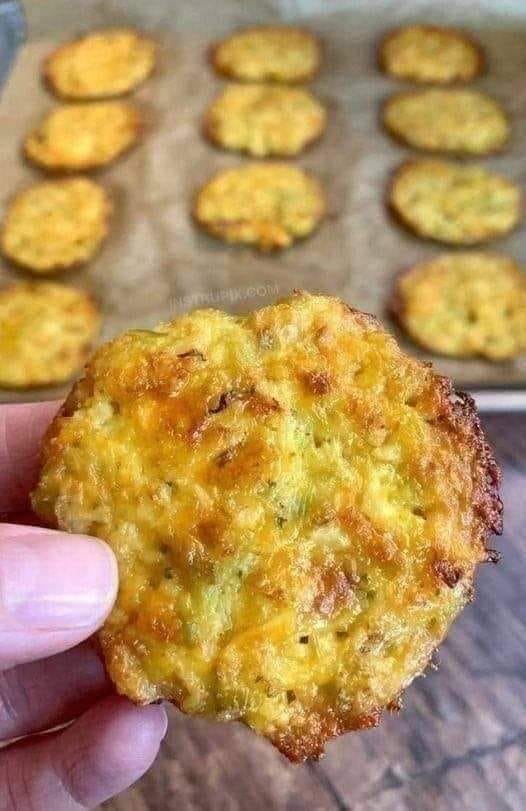
Chocolate banana in puff pastry

Chocolate banana in puff pastry you’ve never tried such an easy and delicious snack

THE INGREDIENTS

  1. Two large rolls of puff pastry and six bananas
  2. Honey with hazelnuts
  3. Egg for the purpose of egg wash
  4. Glucose

A METHOD

  • The puff pastry should be unrolled on a cutting board, and then it should be cut into strips.
  • After peeling the bananas, cut them in half using a sharp knife. Hazelnut cream should be used to fill the middle.
  • Puff pastry strips should be used to wrap them, and then they should be placed on a baking sheet that has been covered with parchment paper.
  • Using an egg wash, brush the banana rolls with sugar, and then sprinkle them with that. Place in the oven and bake for 25 minutes at 190 degrees Celsius (374 degrees Fahrenheit).
  • Place the banana rolls in a single layer on a serving plate and serve them.

Hawaiian Pineapple Coconut Fluff

Hawaiian Pineapple Coconut Fluff

Greetings from the tropical dessert paradise! Look no farther than this Hawaiian Pineapple Coconut Fluff if you’re yearning something airy, fluffy, and brimming with flavours of a sunny Hawaiian trip. With each bite of this delicious dessert, you’ll be whisked away to a tropical paradise thanks to the harmonic fusion of creamy coconut, sweet pineapple, and fluffy texture.

Components:

  1. One can (20 ounces) of drained crushed pineapple (save 1/4 cup of juice)
  2. One cup of shredded coconut with sweetness
  3. One box (3.4 oz) of quick vanilla custard mix
  4. one cup of milk
  5. One cup sour cream gives it a tart, creamy texture.
  6. 1 cup Cool Whip-style whipped topping
  7. Optional: Add 1/2 cup chopped maraschino cherries for a vibrant and festive touch.
  8. If desired, add 1/2 cup chopped pecans or walnuts for crunch.

Guidelines:

1. Get the custard mixture ready.

  • Mix the milk and instant vanilla custard mix in a big bowl until well blended and slightly thickened. About two minutes should pass for this.
  • To the custard mixture, add the sour cream and stir until smooth. The addition of sour cream will give the combination a somewhat tangy taste and creaminess.

2. Mix the Elements Together:

  • Make sure the shredded coconut is equally distributed before adding it to the custard mixture.
  • Add the reserved 1/4 cup of pineapple juice, along with the crushed pineapple that has been drained, and mix gently to incorporate it. Take care not to overmix in order to preserve the fluff.

3. Add the Whipped Topping in:

  • The whipped topping should be folded in until the mixture is frothy and light. This is what will give the fluff its sweetness and airy texture.

4. Include any extra ingredients:

  • Add the chopped maraschino cherries and nuts, if using, and fold gently. These give the fluff a crunch and a pop of colour.

5. Refrigerate and Present:

  • Refrigerate the Hawaiian Pineapple Coconut Fluff for at least one to two hours after covering the bowl with plastic wrap. This enables the texture to solidify and the flavours to combine.
  • Stir the fluff gently before serving. Move it to individual dessert cups or a serving bowl.

Advice for the Optimal Fluff:

  • Be sure the pineapple has drained completely: excessively much moisture may cause the fluff to become excessively wet.
  • To make the fluff sweeter, taste it before serving and add a small amount of sugar or honey if you’d like.
  • Extra coconut as a garnish: As a finishing touch, scatter some more shredded coconut on top.

Changes and Replacements:

  • Tropical Twist: To add even more tropical flavour, add sliced mango or kiwi.
  • Nut-Free: If you’re allergic to nuts or just want a smoother texture, just leave out the nuts.
  • Dairy-Free: For a fully dairy-free version, replace the sour cream with coconut yoghurt and top with whipped cream made without dairy.

In summary:

  • Hawaiian Pineapple Coconut Fluff has the ideal ratio of creamy textures to tropical flavours. It only takes a few basic materials and little preparation time to make. This fluff will be a hit whether it’s served as a light dessert after a filling meal or as a cool side dish at a summer BBQ.
  • With every bite of this delicious delicacy, relish its tropical flavour and fluffy texture as it transports you to a paradise on a sunny island. Cheers to a happy indulgence!

Fresh Fruit and Milk Delight

Fresh Fruit and Milk Delight: A Gelatin-Free Dessert

Ingredients:

  1. peeled and divided-section tangerines
    Cut and peeled kiwis
  2. Sliced and peeled persimmons
  3. Grapefruit, cut into pieces and peeled
  4. Core and cut an apple
  5. Sliced and peeled banana
  6. Eight grams of agar-agar
  7. 50 milliliters of water
  8. 350 milliliters of milk
  9. Two hundred grams of condensed milk
  10. 200 grams of yoghurt or sour cream

Guidelines:

Get the Fruit Ready:

  • Using individual serving dishes or a big serving bowl, arrange the sliced banana, kiwi, persimmons, grapefruit, and apple.

Get the Agar-Agar Mixture Ready:

  • Combine the agar-agar and 50 milliliters of water in a small saucepan. Give it three to five minutes to soak.
  • Stirring continuously, cook the liquid over medium heat until the agar-agar dissolves completely. Take off the heat.

Blend the Milk Concoction:

  • Heat the milk and condensed milk in a different saucepan just long enough to blend them together. Avoid boiling.
  • Stir in the dissolved agar-agar mixture after the milk has warmed up. To make sure everything is well incorporated, stir thoroughly.

Mix with Yoghurt or Sour Cream:

  • Take the milk mixture off of the hob. To avoid curdling, make sure the yoghurt is at room temperature before using it. Blend the yoghurt or sour cream into the milk mixture until it’s smooth.

Put the Dessert Together:

  • Over the placed fruits, pour the milk and yoghurt combination.
  • After letting the dessert sit until it starts to solidify, chill it for at least an hour to ensure it sets completely.

Serve:

  • Once the dessert is set, serve it cold. For added sweetness, you can drizzle some honey over it or add some more fresh fruit as a garnish.

Serving Ideas:

  • A light and refreshing way to finish any meal is with this Fresh Fruit and Milk Delight. On warm days, it’s also ideal as a snack in the afternoon. This dish is a delight for both children and adults due to its creamy texture and bright fruit flavors.

Azoic

  • Savor the fresh fruit sweetness of this easy, fast, and delectable dessert that is sure to become a new family favorite!


No-Bake Biscuit Cake with Coffee Drink

No-Bake Biscuit Cake with Coffee Drink

ingredients

  1. To make the cake layers, use 200 ml (6.8 FL oz.) milk.
  2. 400 g (14 oz.) cookies
  3. Vanilla Pudding Layer:
  4. A liter of milk
  5. 100 g (3.5 Oz) vanilla custard powder
  6. 3.5 ounces sugar
  7. Vanilla essence, 10 ml
  8. Whipped Cream Layer:
  9. 3.4 ounces whipped cream
  10. 20g (0.7oz) sugar powder
  11. For Chocolate Ganache:
  12. Milk, 200 ml
  13. 400 g (14 oz.) cookies
  14. 150 g dark chocolate
  15. 5.1 ounces whipped cream
  16. 50 g white chocolate
  17. 0.3 ounce vegetable oil
  18. To Drink Coffee:
  19. 0.5 ounce instant coffee
  20. 0.5 ounce cocoa powder
  21. 0.5 oz. sugar
  22. 7 g cinnamon
  23. Vanilla essence, 5 ml
  24. 6.8 FL oz. hot water
  25. 5.1 FL oz. milk
  26. 50g (1.8oz) whipped cream
  27. For garnish, 2 g (0.1 ounce) cinnamon

Directions:

Prepare Cake Layers:

Soften the biscuits by briefly dipping them in milk. Place dipped biscuits in a cake pan in a single layer.

Make Vanilla Pudding:

  • Cook the Pudding: Mix 1 liter milk, 100 g vanilla pudding powder, 100 g sugar, and 10 ml vanilla essence in a saucepan. Stir continually over medium heat until thickened.
  • Layer Pudding: Pour thickened pudding over the cake pan biscuits. Spread evenly and chill until set.

Make the Whipped Cream Layer:

  • Whisk the Cream: Mix 100 ml whipping cream and 20 g powdered sugar in a dish until stiff peaks form.
  • Whipped Cream: Cover the custard with whipped cream. Refrigerate until ganache time.


Make Chocolate Ganache:

  • Melt 150 g dark chocolate with 150 ml whipped cream and 10 ml vegetable oil in a microwave-safe bowl or double boiler. Combine until smooth.
  • Layer Ganache: Pour melted chocolate ganache over whipped cream. Spread evenly and chill until set.
  • For decoration, melt 50 g white chocolate and drizzle over the hardened ganache layer.

Making Coffee:

  • Mix the Coffee: Mix 15 g instant coffee, 15 g cocoa powder, 15 g sugar, 7 g cinnamon, and 5 ml vanilla essence in a mug.
  • Pour 200 ml hot water over the ingredients and whisk until dissolved.
  • Add 150 ml milk and stir.
  • Sprinkle cinnamon and 50 g whipped cream on the coffee drink.

Serve:

  • Serve chilled biscuit cake slices with coffee.

Serving Ideas:

  • For a treat, serve the cake with fresh berries or vanilla ice cream.
  • For a festive flair, add chocolate shavings or fruit pieces to the cake.

Cooking Tips:

  • For a sturdy, tidy cake, set each layer before adding the next.
  • High-quality chocolate has the best flavour and texture.

Nutritional Benefits:

  • Dairy brings calcium and protein.
  • Cocoa: Antioxidants boost mood.


Nutritional Data:

  • Vegetarian: Yes
  • Use gluten-free biscuits if needed.
  • Nut-Free: Yes

Storage Advice:

  • Refrigerate: Keep leftover cake in an airtight jar for 3 days.
  • Freeze: The cake can be frozen for a month. Refrigerate thaw before serving.

Reasons to Love This Recipe:

  • Easy: No-bake steps.
  • Chocolate ganache, whipped cream and custard layers are delicious.
  • Versatile: Perfect for casual gatherings and important occasions.

Conclusion:

This No-Bake Biscuit Cake with Coffee Drink is a delicious delicacy with great flavors and textures. It’s simple to make, so beginners and experts can enjoy it. Enjoy this tasty treat with family!

The Irresistible Appeal of Pineapple Upside-Down Cake

The Irresistible Appeal of Pineapple Upside-Down Cake

This is a traditional recipe that will help you make a delicious and moist pineapple upside-down cake at home:

Components of the Topping:

  1. 1/4 cup melted unsalted butter
  2. Half a cup of dense brown sugar
  3. Ten maraschino cherries and one can (20 ounces) of pineapple slices in liquid that have been drained

Regarding the Cake:

  1. 1/2 cup of flour for all purposes
  2. One tsp baking powder
  3. One-half tsp baking soda
  4. 1/4 tsp salt
  5. Half a cup of softened unsalted butter
  6. 1 cup of sugar, granulated
  7. Two big eggs
  8. One tsp vanilla essence
  9. one and a half cups whole milk

Guidelines

  • Warm up the oven: Set the oven temperature to 350°F (175°C). Butter a 9-inch circular cake pan.
  • Get the topping ready: Tilt the cake pan to coat the bottom as you pour the melted butter into it. equitably. Over the butter, scatter the brown sugar. Place the pieces of pineapple on top of the brown sugar. and fill each pineapple ring’s center with a maraschino cherry.
  • Mix the Dry Ingredients: Combine the flour, baking soda, and baking powder in a medium-sized basin. and salt. Put aside.
  • Mix Wet Ingredients: Lightly mix softened butter and granulated sugar in a large bowl. and soft. One egg at a time, adding and beating thoroughly after each addition. Add the vanilla extract and stir.
  • Put together the batter by alternating between adding the dry ingredients and the wet mixture gradually.
  • starting with the dry ingredients and finishing there. Stir just until everything is incorporated.
  • Pour the Batter: Spread the batter evenly across the pineapple and cherries in the pan with care. equitably using a spatula.
  • Bake the Cake: Bake for 45 to 50 minutes, or until a toothpick inserted into the center comes out clean. center emerges spotless. Give the cake ten minutes to cool in the pan.
  • Flip the Cake: To remove the cake from the pan, run a knife around its edges. Arrange a portion place a plate on top of the pan and gently flip the cake over. After a few minutes, let it sit before removing the pan.
  • Present and Savor: After slicing, serve the cake warm or at room temperature. Savor the buttery, creamy cake. with the pineapple topping that has caramelized.
  • The Everlasting Allure of Upside-Down Pineapple Cake
    The persistent appeal of pineapple upside-down cake can be ascribed to its distinct flavour and texture combination as well as its eye-catching design. The pineapple and cherries that have caramelized to perfection produce a gorgeous, glossy top that is both tasty and inviting. Serve pineapple upside-down cake at a family get-together, for a special occasion, or just for yourself, and it will always look impressive.

In summary

  • Beyond just a dessert, pineapple upside-down cake is a monument to the power of time-honored recipes and a nostalgic taste of simpler days.
  • Many people love it because of its delicious flavours, straightforward ingredients, and rich history.
  • You can make your own delicious pineapple upside-down cake at home and enjoy the nostalgia of this classic dessert by following the recipe and advice given.
  • So go ahead and enjoy a slice of pineapple upside-down cake and relish the flavour combination that has made it so popular over the years.

Burnt Basque Cheesecake Recipe

Burnt Basque Cheesecake Recipe

Components

  1. Cream Two pounds (900 grams) of cheese, at room temperature
  2. 300 grams, or 1 1/2 cups, of granulated sugar
  3. Six big eggs
  4. hefty Two cups (480 ml) of cream
  5. Every Use 1/4 cup (30 grammes) of flour
  6. Vanilla One teaspoon of extract
  7. Half a teaspoon of salt

Guidelines:

Warm up the oven:

  • Set oven temperature to 400°F, or 200°C. Using parchment paper, line a 10-inch (25 cm) springform pan, making sure the paper extends at least 2 inches (5 cm) above the pan’s rim. This will keep the cheesecake from overflowing and give it its distinctive rustic appearance.

Get the batter ready:

  • Using an electric mixer, beat the cream cheese in a large mixing basin until it becomes smooth and creamy. In order to make sure the batter is lump-free, this step is essential.
    Add the granulated sugar gradually while beating the mixture until it is entirely integrated and frothy.

Put the Eggs in:

  • One egg at a time, adding and beating thoroughly after each addition. This contributes to a seamless and uniform combination.

Add the Cream:

  • Add the salt, vanilla essence, and heavy cream. Beat at a moderate pace until the mixture is thoroughly blended and smooth.

Put the Flour in:

  • Over the cream cheese mixture, sift the flour. Reduce the speed and beat just until the flour is mixed. Be the Take care not to overmix since it may result in a denser texture.
  • Pour and Bake: Using a spatula to smooth the top, pour the batter into the springform pan that has been prepared.
    Bake for 50–60 minutes in a preheated oven, or until the center is still somewhat jiggly and the top is a deep golden brown. During baking, the cheesecake will rise and then fall as it cools.

Calm & Relaxed:

  • Let the cheesecake come to room temperature in the pan. After it has cooled fully, refrigerate for give the flavors time to mingle and the texture time to solidify—at least four hours or overnight.

Serve:

  • Peel the parchment paper off of the cheesecake after removing it from the springform pan. Cut into pieces and present chilled or room temperature. You can eat the cheesecake simply or with fresh berries or a dollop of whipped cream.

Advice for Making the Optimal Burnt Basque Cheesecake:

  • Ingredients at Room Temperature: Make sure all of the ingredients—especially the eggs and cream cheese—are at for a smooth batter, let it come to room temperature.
  • High Heat Baking: To get the recognizable charred top, the baking temperature must be high. and a creamy inside.
  • Parchment Paper: Thoroughly line the pan with parchment paper, allowing it to hang over the edge to avert leaks and facilitate the cheesecake’s removal.
  • Chill Time: For optimal texture and flavour, give yourself enough time to chill. Serving the cheesecake at its best following an overnight refrigeration.

Advantages for Nutrition:

Cream cheese: Contains calcium, which is important for strong bones. has healthy fats and protein that help with energy and satiety.

Eggs:

  • Packed with quality protein and vital elements such as selenium, choline, and the vitamins B12 and D.

Moderation in action:

  • Even though it’s rich, consuming this cheesecake in moderation can contribute to a balanced diet by providing a a wonderful treat that isn’t overdone.

In summary
The appeal of imperfection and the beauty of simplicity are both demonstrated by the Burnt Basque Cheesecake.
Its rustic look, along with its creamy interior and deeply caramelized top, offers a distinctive take on the traditional cheesecake. This dessert is ideal for enjoying as a special treat at home or wowing visitors. Make a cheesecake with this recipe that is flavorful, rich, and completely unique. Take pleasure in the cooking process and relish every rich bite of this amazing dessert!

The Ultimate Creamy Dessert Delight

Mille-Feuille: The Ultimate Creamy Dessert Delight

Ingredients for Puff Pastry Layers:

Two puff pastry sheets (store-bought or handmade)

  1. Granulated sugar: sprinkles
  2. Powdered Sugar: Dusting

For pastry cream:

  • Whole Milk: 2 cups
  • (1 vanilla bean or 1 teaspoon extract)
  • Half-cup Granulated Sugar
  • Four big egg yolks
  • Corn flour: 1/4 cup
  • Two teaspoons unsalted butter
  • To add creaminess, whip 1/2 cup heavy cream.

For Assembly:

  • Dust with confectioners’ sugar
  • Crumpled Puff Pastry Scraps: optional garnish

Instructions:

Prepare Puff Pastry Layers:

  • Heat the oven to 400°F (200°C). Parchment a baking sheet.
    To remove wrinkles, roll out puff pastry sheets on a lightly floured surface. Cut each page into three equal-sized rectangles.
  • Lay pastry rectangles on the baking sheet. Fork-prick the entire surface of each slice to prevent over-puffing during baking.
  • Lightly dust with granulated sugar. To keep the pastry flat, add another parchment paper sheet on top and another baking sheet.
  • Pre-heat the oven and bake for 15-20 minutes until golden brown and crispy. Allow the pastry to cool completely on a wire rack.

Make Pastry Cream:

  • Cook milk and vanilla bean (split and seeds scraped) in a medium saucepan until simmering. Remove from heat and infuse for 10 minutes. Put vanilla essence in the milk after it has heated.
  • In another bowl, mix sugar, egg yolks, and cornflour until light and smooth.
  • To avoid overcooking, slowly add heated milk to the egg mixture while whisking frequently.
  • Return the mixture to the saucepan and stir continually over medium heat until the cream thickens and boils. Cook another 1-2 minutes, then remove from heat.
  • Stir in melted butter until smooth. Place pastry cream in a bowl and cover with plastic wrap, pressing it onto the surface to prevent skin formation. Allow it to chill completely in the fridge.
  • If desired, add whipped heavy cream into chilled pastry cream for lightness.

Build the Mille-Feuille:

  • Serve one puff pastry rectangle on a plate. Cover with pastry cream evenly.
  • Repeat with two additional puff pastry-cream layers.
  • Add powdered sugar and crumpled puff pastry scraps to the top layer for texture and adornment.
  • To serve, slice the Mille-feuille carefully with a sharp knife.
  • Serve chilled or room temperature. Enjoy a delicious mix of crispy pastry and creamy filling.

Perfect Mille-Feuille Tips:

  • Handling Pastry: To keep puff pastry flaky, keep it refrigerated until usage.
  • Ensure uniform layers by using a piping bag to distribute pastry cream for cleaner, more accurate layers.
  • Allow enough time for the completed Mille-feuille to chill for easy slicing and blending of flavours.

Nutritional Benefits:

  • Milk and Cream Provides calcium and vitamin D for bone health.
  • Protein and good fats boost nutrition.
  • Egg yolks are high in vitamins A, D, E, and K, as well as choline, which is beneficial for brain function.
  • Consuming mille-feuille in moderation can be part of a healthy diet, despite its indulgence.

In conclusion

  • mille-feuille is a decadent delicacy that exemplifies French patisserie. Featuring flaky puff pastry and creamy filling, this dessert is ideal for formal events or refined home treats. Create a gorgeous Mille-feuille with this recipe to impress and delight family and friends. Soak up the process of making this beautiful dessert and relish each bite!

LOTUS BISCUIT CHEESECAKE

LOTUS BISCUIT CHEESECAKE

Base Ingredients:

  1. 250 grammes of Lotus biscuits
  2. 90g of butter
  3. 14 grammes of powdered gelatin, stuffed
  4. 70g cool whipped cream and 240g water
  5. 85 grammes of powdered sugar
  6. Standard Philadelphia cream cheese, 540 grammes
  7. One tsp of pasted vanilla
  8. 200 grammes of Lotus cookie cream

Reportage:

  1. 200 grammes of Lotus cookie cream
  2. three to four crumbled Lotus cookies

Base of preparation:

1. Using a Thermomix, crush the Lotus cookies.

2. Add melted butter to the crumbled biscuits. Mix until well combined.

3. Employ a 20 cm detachable mould. Line the bottom with parchment paper or, if possible, a cardboard disc (it will be simpler to take the cheesecake out of the mould after it’s finished). While we prepare the filling, push the mixture firmly into the mold’s bottom using your fingers and store it in the refrigerator.

Stuffed:

  • In a glass, combine water and powdered gelatin. Give it ten minutes to rest.
  • Beat the cream until it forms soft peaks. Beat for a further twenty seconds after adding the sugar.
  • Until light and smooth, beat together cheese, vanilla, and biscuit cream. Use the flat blades and beat slowly if using a kitchen robot to ensure that no air gets inside. Gradually add the cream and stir at a moderate speed until the mixture is smooth.
  • Microwave the glass containing the gelatin for 15 seconds. Allow the mixture to cool for a few minutes before adding two teaspoons to the gelatin. Gently stir until well blended. Stir once more after adding the gelatin to the remaining mixture.
  • Fill the mould, use a kitchen spatula to level the top, and freeze for half an hour.

Coverage:

  • In the microwave, melt the biscuit cream and drizzle it over the cake.
  • Refrigerate the cake for a minimum of six hours. Using your fingers, dust the edges of the surface with crushed cookie crumbs to decorate.

Heavenly Walnut Chocolate Dessert

Heavenly Walnut Chocolate Dessert

Ingredients for the Base:

  1. 120 g (4.2 oz) finely chopped walnuts
  2. 400 g, or 14 oz, of smashed cookies
  3. 120 g (0.6 cup) of sugar
  4. Two grammes (0.5 teaspoon) of vanilla sugar
  5. Cocoa powder 60 grammes (0.5 cup)
  6. One quarter cup, or 250 millilitres, of milk
  7. 150 g (5.3 oz) of butter
    Regarding the Upper Layer:
  8. 20 g (0.7 oz) walnuts, chopped; 100 g (3.5 oz) milk
  9. chocolate (or dark chocolate, if preferred); and 100 ml (0.5
  10. cup) of chopped, 33%–35% fat cream

Guidelines

Get the Base Ready:

  • Break up the cookies into tiny fragments and transfer them into a big mixing basin.
  • To the crumbled cookies, add the 120 g of chopped walnuts.
  • Mix the milk, sugar, and vanilla sugar together in a saucepan. Over medium heat, stir until the sugar is completely dissolved.
  • When the milk mixture thickens, add the chocolate powder and whisk constantly.
  • Add the butter and stir until melted and well blended once it has thickened.
  • Over the cookie and walnut mixture, pour the chocolate mixture. Blend until well blended.
  • Pressing down to form a uniform layer, transfer the mixture into a baking pan. Refine the surface using a spatula.
  • Get the Upper Layer Ready:
  • Dice the leftover 20 grammes of walnuts and distribute them equally across the bottom layer.
  • The cream should be heated in a different saucepan over medium heat until it barely starts to simmer.
  • After turning off the heat, stir in the chopped chocolate into the cream. Stir the chocolate until it melts completely and becomes creamy.
  • Evenly spread the chocolate mixture over the bottom layer as you pour it on.
  • Cool and Present:
  • To set, put the dessert in the refrigerator for at least half an hour.
  • Cut into pieces and serve after it has set.
    Serving Ideas
    Serve the dessert straight out of the refrigerator, cold.
    It pairs perfectly with a glass of cold milk or a cup of coffee.

Cooking Advice

  • To prevent any dry areas, make sure the cookie batter and chocolate mixture are thoroughly mixed.
  • You can increase the amount of chopped nuts or chocolate chips in the foundation mixture for a more luscious version.

Benefits to Nutrition

  • Nuts are an excellent source of fibre, protein, and good fats.
  • Rich in antioxidants, cocoa powder enhances the flavour of chocolate.
    Nutritional Details
    There are nuts and dairy in this dish.

Storage Advice

  • Any leftovers can be kept fresh for up to a week in the refrigerator in an airtight container.
    For extended storage, the dessert can also be frozen. In the refrigerator, thaw before serving.

Reasons to Love This Recipe

  • There is no baking involved in this quick and simple dessert to prepare.
  • It’s impossible to resist the marriage of sweet cookies, rich chocolate, and crunchy walnuts.
  • It’s a flexible dessert that may be tailored with various chocolate or nut varieties.

In summary
This rich chocolate dish with walnuts is the ideal way to indulge your sweet craving. It’s tasty, simple to make, and certain to wow your family and friends. Savour this delicious dessert with those you care about!

Chocolate Peanut Cookie Balls

Chocolate Peanut Cookie Balls

Ingredients:

  1. 500g cookies, 120g peanuts smashed, and chopped
  2. 120 grammes of sugar
  3. 60 grammes of cocoa powder
  4. 250 millilitres of milk
  5. 150g of butter
  6. A small amount of vanillin
  7. Eighty grammes of dark chocolate
  8. Eighty grammes of milk chocolate
  9. 20 millilitres of vegetable oil
  10. 50g of chopped peanuts (to garnish)

Guidelines:

  • Get the Cookie Mixture Ready: Finely crumble the cookies and combine them in a big basin with 120g of finely chopped peanuts.
  • Prepare the Cocoa Blend:
    Mix the milk, sugar, and cocoa powder in a saucepan.
    To dissolve the sugar and cocoa, bring the mixture to a boil while stirring constantly.
  • After it reaches a boil, lower the heat and simmer for two minutes.
  • Take off the heat and toss in the butter along with a little pinch of vanillin until the butter has melted completely and the mixture is smooth.
  • The cocoa mixture should be allowed to come to room temperature.
  • Create the Balls:
    Over the cookie and peanut mixture, drizzle the cooled cocoa mixture.
  • Until all ingredients are well blended, thoroughly mix.
  • To keep your hands from sticking, lubricate them with vegetable oil.
  • Create little balls out of the mixture that are roughly the size of walnuts.
  • Transfer the balls to a parchment paper-lined baking sheet.
  • To firm up, refrigerate for one hour.
  • Coat with Chocolate: Melt the dark and milk chocolates with the vegetable oil in a double boiler in the microwave, stirring until smooth.
  • Make sure every cookie ball is completely covered by dipping it into the melting chocolate.
  • Back on the baking sheet covered with parchment, place the balls coated in chocolate.
  • Add a garnish and relax:
  • As a garnish, sprinkle the leftover chopped peanuts over the tops of the coated balls.
  • To set the chocolate, put the tray in the fridge for twenty minutes.
  • Serve: The cookie balls are ready to be served once the chocolate has hardened.
  • Savour these mouthwatering sweets either cold or room temperature.
  • Serving Ideas: At get-togethers or parties, serve these cookie balls as a delicious snack.
    Combine with a cup of tea or coffee for a tasty treat.

Cooking Advice:

  • To avoid melting the butter too soon, wait until the cocoa mixture has completely cooled before combining it with the cookies.
  • For an adult twist, try adding a little amount of your preferred liquor to the cocoa mixture as a variation.

Nutritional Advantages: Peanuts include protein and good fats.
Antioxidants found in dark chocolate may have positive health effects.

Nutritional Details:

  • Gluten-Free: Cookies without gluten can be used to make this.
  • Nut-Free: Use seeds or other nut-free substitutes in place of peanuts.

Keep in mind:

  • For up to a week, keep the cookie balls refrigerated in an airtight container.
  • Additionally, these can be refrigerated for a maximum of three months; prior to eating, defrost in the refrigerator.

Why You’ll Enjoy This Recipe:

  • This dish is suitable for any occasion and is quite simple to prepare. Crunchy peanuts, rich cocoa, and creamy chocolate combine to produce a flavour and texture that is difficult to resist. This is a fun and easy dessert that doesn’t require baking and can be made in advance.

In conclusion, indulge yourself to some chocolate peanut cookie balls for a decadent dessert that will wow your guests. They will quickly become a favourite in your dessert repertoire because to their easy preparation and delectable flavour. Salutations!