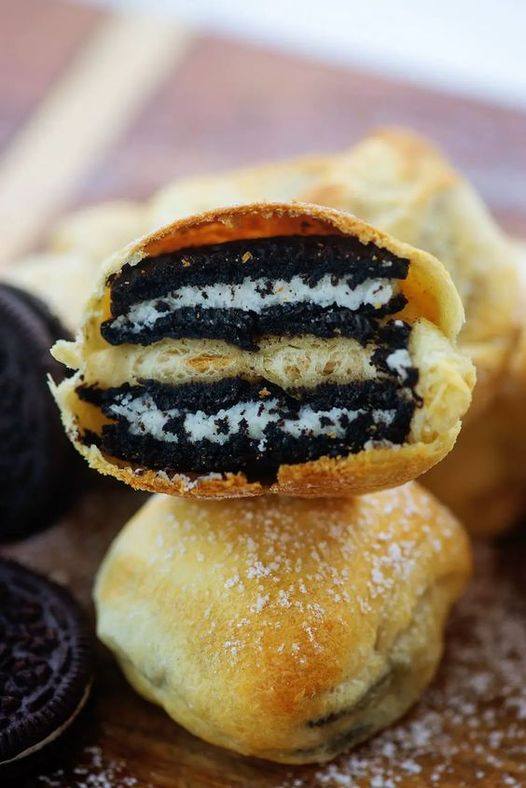
Air Fryer Oreos

Air Fryer Oreos

Oreos from an air fryer are just too good! While they’re significantly less expensive and slightly healthier in the air fryer, they taste just as fantastic as the fried Oreos you would get from the fair. Moreover, you can quickly prepare them at home.

Deep-fried Oreo cookies are, without a doubt, my favourite deep-fried treat! The cookie becomes softer and practically melts in the middle of its crispy exterior. It’s shockingly excellent, I promise.

I decided to try baking Oreos in the air fryer the other day because I was really craving some deep-fried ones. I got to consume a lot of air-fried Oreos during testing, which brightened my day!

Components

  1. Ten Chocolate Sandwich Cookies with Oreo Double Stuf
  2. One crescent roll dough sheet with powdered sugar as a garnish

Guidelines

  • Set the air fryer’s temperature to 380°F.
  • After unrolling the crescent dough sheet onto a slightly floured surface, gently flatten the dough with a rolling pin.
  • Divide the dough into ten equal portions, then wrap one piece of dough around each Oreo, squeezing the seams shut.
  • After lightly misting the wrapped cookie on both sides with oil spray, carefully lay it in an air fryer basket, taking care not to pack it too full. Work in groups if required.
    For four minutes, air fry.
  • Take out of the air fryer and generously dust with powdered sugar.
  • Warm up and serve.

Greek Chicken souvlaki

Greek Chicken souvlaki

Works great with chicken thighs or breasts! You must give these a try.

Components:

  1. Four cubed, skinless, boneless chicken breasts or thighs
  2. Two tsp olive oil
  3. two minced garlic cloves
  4. One tablespoon of lemon juice
  5. One tsp of dehydrated oregano
  6. A single tsp of dried thyme
  7. One tsp of paprika
  8. Half a teaspoon of salt
  9. 1/4 tsp black pepper
  10. To serve, tzatziki sauce
  11. Rice or pita bread, for serving
  12. Toppers that are optional include feta cheese, diced tomatoes, sliced cucumbers, and chopped red onions.

Guidelines:

  • Olive oil, minced garlic, lemon juice, dried thyme, dried oregano, paprika, salt, and black pepper should all be combined in a mixing dish. Mix thoroughly until fully incorporated.
  • To the bowl containing the marinade, add the diced chicken. Until the chicken is coated all over, toss. The chicken should marinate in the fridge for at least 30 minutes, but preferably up to 2 hours. Cover the bowl and let it there.
  • For around five minutes, preheat your air fryer to 200°C (390°F).
  • After the chicken has marinated for the full duration, thread the chunks onto skewers.
  • Leaving room between each skewer to allow for air circulation, place the skewers in the air fryer basket that has been preheated in a single layer.
  • The chicken souvlaki should be air-fried for 10 to 12 minutes at 200°C (390°F), turning the skewers halfway through, or until the meat is cooked through and has a golden brown exterior.
  • Once done, take the chicken souvlaki out of the air fryer with caution.
  • Serve the hot chicken souvlaki with your preferred toppings, rice or pita bread, and tzatziki sauce.
  • Savour your freshly made Greek chicken souvlaki just out of the air fryer!

AIR FRYER PINEAPPLE

AIR FRYER PINEAPPLE

Tart, caramelized pineapple from an air fryer! A delightfully healthy dessert or side dish that is sure to please. Easy to prepare, requiring only 4 ingredients and taking less than 20 minutes to complete.

You can use this tasty delicacy as a healthy dessert alternative or serve it alongside your main course. Either way, it’s really fulfilling! It tastes like grilled pineapple, except you don’t have to light the grill!

Components

  1. Two generous cups of thinly sliced pineapple from around a ½-sized pineapple
  2. One tablespoon of melted vegan butter or margarine, if desired
  3. Two tsp pure maple syrup
  4. One tsp of cinnamon
  5. Not required Lime and Chipotle Dip
  6. Three tablespoons of vegan mayo or cashew cream
  7. Half a lime, or one tablespoon, of lime juice
  8. One-half teaspoon of chili powder

Guidelines

  • Put about two heaping cups of peeled, cored, and sliced pineapple in a mixing dish.
  • In a separate bowl, mix the melted butter, maple syrup, and cinnamon; pour mixture over pineapple pieces. To evenly coat the slices, gently mix.
  • Then, arrange them in the frying basket in a single layer (a little overlap is okay) and air fry at 380 degrees F for 12 to 15 minutes, or until caramelized. At the halfway point, turn the pineapple over once.
  • Serve warm or cold as a dessert or side dish.
    Dip Not Required
  • While the pineapple is cooking, mix the three ingredients for the chili lime dip in a small bowl.
    Remarks
  • The pineapple slices shouldn’t be thrown into the fryer basket. To avoid shattering them and to stop extra liquid from burning and trickling down below your basket, spoon them in one at a time.
  • Refrigerate leftovers for two to three days in a sealed container.

The Heart-Friendly Benefits of Garlic

The Heart-Friendly Benefits of Garlic

Not only is garlic a mainstay in cooking due to its strong flavour, but it also has many heart-healthy advantages! Let’s explore the reasons why using a small amount of garlic in your meals may be a fantastic way to maintain the health of your heart.

The health benefits of garlic have been praised since ancient times. Garlic is rich in anti-inflammatory and antioxidant components that contribute to overall health, but its effects on heart health are especially significant.

Garlic is well-known for its capacity to assist in controlling cholesterol levels. Research indicates that garlic may help lower levels of LDL (low-density lipoprotein), or “bad” cholesterol, as well as total cholesterol. Garlic lowers blood pressure by controlling these levels, which lowers the risk of heart diseases like atherosclerosis by preventing the accumulation of plaque in the arteries.

The effect that garlic has on blood pressure is yet another wonderful advantage. As a natural blood thinner, garlic aids in the management of hypertension, a major risk factor for heart disease. Garlic is a food that can help maintain your blood vessels open and relaxed, which facilitates easy blood flow.

Allicin is another substance found in garlic that is released when the garlic is cut or crushed. Strong anti-inflammatory and antioxidant qualities of allicin may help shield the heart from oxidative stress, which is a factor in heart disease.

So what are some ways to increase your intake of garlic? It’s easy! Almost any dish can benefit from the addition of garlic. Garlic not only adds flavour and health benefits to recipes calling for it, but it also gives a burst of zest to marinades and simmering soups and stews. You can begin by infusing olive oil with garlic or you can add fresh garlic to your dips and sauces. A basic supper can be improved by simply roasting a few cloves with some veggies.

Keep in mind that garlic is only one component of a heart-healthy diet, even though it’s a fantastic complement. Maintaining heart health also requires frequent check-ups, physical activity, and a balanced diet.

The next time you’re in the kitchen, grab a head of garlic and keep in mind that each clove improves your food while simultaneously providing delicious support for your heart health!

Ginger Magic: A Recipe for Revitalizing Your Intestines and Liver

Ginger Magic: A Recipe for Revitalizing Your Intestines and Liver

Are you seeking a natural way to improve the health of your liver and digestive system? Ginger might be the solution! Ginger is widely known for its potent health properties and has been used for generations to promote general well-being. Let’s look at a straightforward ginger dish that is not only simple to prepare but may also give you a boost of vitality.

Why, Ginger?

The root herb ginger is prized for both its many health advantages and its powerful, fiery flavour. It is especially well-known for how well it supports liver function and how well it affects digestion. Improved bile production, increased digestive enzyme secretion, and liver detoxification are all aided by ginger, which may improve general health.

A Basic Recipe for Ginger

The key to this recipe is its simplicity and potency. It has been formulated to provide the reviving effects of ginger with a mild effect on the stomach.

Components:

  1. 1 tsp finely shredded fresh ginger
  2. One cup of water that is boiling
  3. Honey (to taste, optional)
  4. Lemon juice (extra vitamin C optional)

Guidelines:

  • Get the ginger ready: Peel and finely chop a fresh ginger root first. One tablespoon or so of grated ginger will be required.
  • Steep the Ginger: Put one cup of boiling water over the grated ginger in a cup. Give it ten minutes or so to steep. This procedure aids in the ginger’s active component extraction.
  • After steeping, remove the ginger pieces from the water by straining them out and throwing them away. You have a strong ginger tea now.
  • Enhance the Flavour: You can increase the amount of vitamin C in the drink by adding a squeeze of lemon juice and honey to sweeten it. Both enhance flavour and offer extra health advantages.

What to Anticipate

Including this ginger tea in your daily regimen will assist liver function and aid with intestinal cleansing. You may have lighter bloating, better digestion, and increased energy. Additionally, ginger’s anti-inflammatory qualities can aid in soothing the digestive tract.

Safety and Things to Think About

Even while most individuals may safely use ginger, especially if you’re new to taking it, it’s always a good idea to start with tiny doses and observe how your body responds. Before beginning any new health regimen, it is advisable to speak with a healthcare provider if you have any medical concerns or are currently taking medication.

In summary

This recipe for ginger is a great way to use the natural properties of ginger to help clear your liver and intestines. It could have a big impact on your daily mood and is easy to use and effective. Why not give it a shot and see if you can get your step a little more peppier?

Revitalize Your Intestines and Liver in Just 3 Days with Carrots!

Revitalize Your Intestines and Liver in Just 3 Days with Carrots!

Are you feeling a little stuck or sluggish? Perhaps it’s time for a natural boost for your intestines and liver. In addition to being delicious, carrots are a great source of nutrients that can aid in body cleansing. This is how, in just three days, you can utilize carrots to cleanse your system!

Why Do Carrots?

Carrots are a great source of fiber, vitamins, and antioxidants that aid in healing and detoxifying. They have beta-carotene, which helps the liver operate and eliminate toxins by being converted by the body into vitamin A. Carrot fiber also aids in better digestion and maintains the clarity of your intestines.

A Basic Carrot Programme

This is a three-day carrot regimen that is meant to be light on your system and easy to follow.

Day 1: Juice made from carrots

Pour yourself a glass of fresh carrot juice to start your morning. This is a great approach to stimulate your intestines and liver. Juice four or five carrots, then savour! Carrots can also be blended with a small amount of water if juicing is not an option.

Day 2: Snack on Raw Carrots

Eat raw carrot sticks as a snack throughout the day. They are hydrating, crispy, and high in fiber. This will assist clean your intestines as the fiber passes through, in addition to keeping you full.

Day 3: Supper with cooked carrots

Finish off your three-day routine with a cooked carrot supper. As a side dish, you may steam some carrots or prepare a carrot soup. Carrots cooked in various ways release different nutrients, and it’s a calming way to end your cleanse.

What to Anticipate

At the end of the three days, you may have increased energy and a lighter feeling. Carrots contain fibre that aids in intestinal cleansing and minerals that promote healthy liver function. Better digestion, less bloating, and an overall sense of wellbeing can result from this easy detox.

Safety and Things to Think About

For the majority of people, this carrot regimen is safe and natural. Nonetheless, it’s wise to speak with a healthcare professional before beginning any new fitness regimen, particularly if you have any dietary or medical restrictions.

In summary

There is no need for liver and intestinal refreshing to be difficult or harsh. Carrots can naturally cleanse your system in just three days. Why not attempt it then? With just a few easy dietary changes, you could be astonished at how much better you feel!

How to Prepare Aloe Leaves for Edible Use and Freezing

How to Prepare Aloe Leaves for Edible Use and Freezing

Aloe vera is well known for its health advantages, particularly in relation to digestive and skin health. However, did you know that aloe vera may be eaten? Yes, it is correct! Before you can take use of aloe vera’s health benefits, you must carefully prepare the leaves in order to eliminate the latex, which includes substances that may irritate your digestive system. Here’s a quick guide explaining how to store aloe vera safely for later use.

First Step: Choosing and Preparing the Aloe Leaves

  • The outermost leaves of the aloe vera plant are the most developed and contain the most gel, so start by selecting fresh, plump leaves from there. In order to get rid of any dirt or debris, rinse the leaves under cool running water.

Step 2: Eliminating the Hazardous Elements

  • Actually, the “poison” in aloe leaves is a yellowish latex called aloin that is located just beneath the leaf’s surface. In order to ensure that the aloe is safe to eat, this must be removed.
  • Slice off the Base: To start, cut off a leaf’s base, which is where it connects to the rest of the plant, around an inch in length. The largest concentration of aloin is found in this section.
  • Peel the Skin: Gently remove the aloe leaf’s green outer skin with a sharp knife or vegetable peeler. To prevent removing too much of the clear aloe gel, try to keep your distance from the skin.
  • Eliminate the Yellow Sap: The yellowish latex will become visible when you peel the skin. You can either let it drain by placing the leaf on an incline for a few minutes, or you can wash it off under running water. To make sure all the aloin is gone, some people like to soak the aloe slices in water for a few hours.

Step 3: Aloe Vera Storage

  • Your clear aloe gel is now ready to consume, or it can be stored for later use.
  • For Instant Use: Chop the gel into cubes and use it straight away, or blend it into salads and smoothies.
  • To Freeze: Transfer the aloe gel cubes onto a parchment paper-lined tray and freeze for solidification. After the cubes are frozen, move them to a freezer-safe bag or container. This method of storing them allows them to be utilized as needed for several months.

In summary

Aloe vera requires some work to prepare for eating, but the health advantages make it worthwhile. Aloe vera can be used topically, as a digestive aid, or to improve smoothies. As long as the alone is properly removed, it can be a safe and adaptable part of any wellness regimen. Take advantage of aloe vera’s inherent benefits by following this simple preparation process!

Refreshing and Healthy: The Wonders of Watermelon Juice

Refreshing and Healthy: The Wonders of Watermelon Juice

There’s no better taste of summer than the crisp, cool taste of watermelon. However, did you know that making a juice out of this beloved fruit can provide a number of health advantages in addition to a delicious drink? Here’s why watermelon juice ought to be your go-to beverage, particularly in the summertime.

What Makes Watermelon Juice?

In addition to being delicious, watermelon is a great source of nutrition and hydration. It’s a great source of hydration because it contains around 92% water. It also has substantial levels of antioxidants, amino acids, vitamins A, B6, and C, and a little quantity of potassium. These all add to its health-promoting qualities.

Benefits of Watermelon Juice for Health

  • Hydration: Watermelon juice is a delicious method to meet your fluid demands. Remaining hydrated is essential for preserving healthy bodily processes.
  • Heart Health: Citrulline, an amino acid found in watermelon, may aid to lower blood pressure and increase blood flow.
  • Anti-inflammatory Properties: Lycopene, an antioxidant found in watermelon, has the ability to both lessen inflammation and offer some UV protection.
  • Relieving Muscle Soreness: Watermelon juice is a fantastic post-exercise beverage since it contains citrulline, which may help lessen muscle soreness.

Preparing Juice from Watermelon

Watermelon juice preparation is quick and easy, taking only a few minutes. Here’s how to do it:

Components:

  1. Watermelon fresh (seeds or not)
  2. A fresh lime juice squeeze (optional for extra zest)
  3. Mint leaves (especially refreshing if you add them in)

Guidelines:

  • Cut the watermelon into chunks to prepare it. Iron and zinc can be found in the seeds, which you can remove if you’d like.
  • Blend: Fill a blender with the watermelon pieces. For a refreshing taste, add some mint leaves and a squeeze of lime for a tangy twist.
  • Strain (Optional): Strain the mixture to get rid of the pulp for a smoother juice. But if you leave the pulp in your drink, it will have more fiber.
  • Serve Cold: Transfer the juice into glasses and savor it immediately. Serve over ice for an even more pleasant beverage.

In summary

Juice from watermelon is a great addition to your drink selections because it has several health advantages in addition to great flavour. It’s incredibly refreshing, simple to prepare, and ideal for increasing your fluid intake on hot days—or actually any day. What better way to enjoy a refreshing beverage than making some fresh watermelon juice? Your taste senses and your body will both appreciate it!

Sugar-Free Pineapple Watermelon Juice

Sugar-Free Pineapple Watermelon Juice: A Refreshing and Nutritious Drink

Nothing like a cool glass of juice to relieve your thirst and improve your health when the weather becomes hot. Pineapple watermelon juice is a fantastic sugar-free option if you’re seeking for something sweet. This refreshing beverage is bursting with health benefits as it blends the zest of the tropics with the gentle sweetness and hydration of watermelon.

Why Watermelon and Pineapple?
Both pineapple and watermelon are great options for a nutritious juice because they are low in calories and high in nutrients. Bromelain, vitamin C, and antioxidants—all of which are linked to immune system support and anti-inflammatory effects—pack a punch in pineapple. Contrarily, watermelon is an incredibly hydrating fruit that also contains magnesium, vitamins A and C, and the amino acid citrulline, which is beneficial for both heart health and muscle repair.

Benefits of Pineapple Watermelon Juice for Health

  • Boosts Hydration: The high water content of pineapple and watermelon keeps you feeling hydrated and rejuvenated.
  • Promotes Digestive Health: Bromelain, an enzyme found in pineapples, helps break down proteins and may help lessen bloating and other digestive problems.
  • Promotes Heart Health: The potassium in watermelon and the bromelain in pineapple have the potential to reduce blood pressure and enhance cardiovascular health in general.
  • Anti-Inflammatory Effects: Due to their anti-inflammatory qualities, both fruits may aid people with arthritis and other inflammatory illnesses by lowering inflammation in the body.

How to Make Pineapple Watermelon Juice Without Sugar

Components:

  1. Two cups of freshly cut and seeded watermelon
  2. One cup of freshly diced pineapple
  3. Cubes of ice (optional)
  4. sprigs of fresh mint (for garnish)

Guidelines:

  • Peel and cube the pineapple and watermelon as you prepare the fruit. Ripe fruits provide the greatest flavour.
  • Blend: In a blender, combine the watermelon and pineapple cubes. Process till smooth.
  • To serve, pour the juice into a glass over ice and add some fresh mint leaves for a finishing touch of greenery.

Savoring Your Juice

You may sip this sugar-free pineapple watermelon juice anytime of the day. It’s ideal as a light, fruity drink for evening relaxation or as a morning pick-me-up or afternoon refreshment. In addition to tasting great, every drink adds an abundance of nutrients to your diet.

In summary

A great method to take advantage of the natural sweetness and health benefits of fruits without any additional sugar is to drink sugar-free pineapple watermelon juice. This drink is incredibly refreshing, simple to prepare, and full of health-promoting components. Try it; you never know, it might end up being your new go-to healthy beverage!

Air Fryer Chili Chicken

Air Fryer Chili Chicken

You can achieve really crispy chicken without deep frying by using this recipe for air fryer chilli chicken thighs! After giving your chicken thighs a dry rub, air fried them for around 16 minutes, rotating them midway. It really is that easy.

You and we both adore air-frying chicken thighs! One of our most well-liked recipes for air fryers is this one, and a tone of you have cooked it time and time again, giving it 5-star ratings.

The air fryer is going to transform your life if you are used to cooking baked or grilled chicken thighs till they are delicious and crispy. I really do mean it when I say these are extremely crispy!

The best part is that you don’t need to use as much oil when cooking chicken thighs in an air fryer as you would when deep-frying them. Rather, you apply a small amount of drizzle and let the air fryer do the rest!

Components

  1. Bone-in chicken thighs, 2 pounds (we used 4)
  2. half a spoonful of powdered garlic
  3. Two tsp of paprika
  4. One tsp of dried thyme
  5. Half a teaspoon of salt
  6. Two tsp of brown sugar
  7. Two tsp olive oil
  8. One teaspoon of chili or red pepper flakes

Guidelines

  • Set the air fryer’s temperature to 400 degrees Fahrenheit and apply non-stick cooking spray within the basket.
    Use a paper towel to pat the chickens dry before preparing them.
  • A person is using a dishtowel to remove the skin from chicken breasts.
  • In a bowl, add the brown sugar, chili flakes, dried thyme, paprika, garlic powder, and salt. Mix until well blended.
  • After that, cover the chicken thighs with the dry rub. Make sure the whole chicken thigh is coated with the dry rub.
  • A white dish with seasoned chicken breasts on it.
  • After putting the chicken thighs in the air fryer, skin side down, coat them with olive oil. If your air fryer is small, you might need to do this in two batches.
  • Depending on the size of your thighs, cook the chicken for a further 6 to 10 minutes after flipping them after 8 minutes in the air fryer.
  • Take the chicken thighs out of the air fryer if the internal temperature reaches 160°F to 165°F and the skin is crispy.
  • Cook the chicken thighs for a further two minutes if you want them to be crispier. Sit the chicken for three to five minutes, then serve.