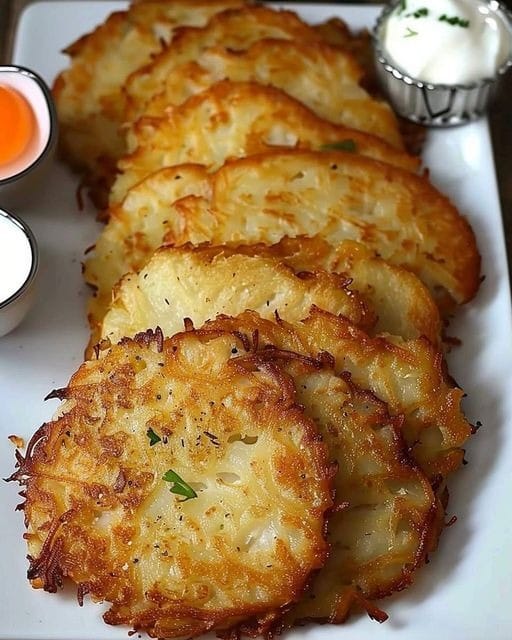
Easy Blueberry Yogurt Cake

Easy Blueberry Yogurt Cake

Easy Blueberry Yogurt Cake (Gluten-Free)

Introducing a delightful treat that combines the freshness of blueberries with the creamy goodness of yogurt, all in a gluten-free package! This Easy Blueberry Yogurt Cake is a simple yet elegant dessert that will surely impress your friends and family. With its moist and tender crumb, bursting with juicy blueberries in every bite, this cake is perfect for any occasion, from brunches to afternoon teas. Plus, it’s gluten-free, making it suitable for those with dietary restrictions. So grab your apron and let’s get baking!

Ingredients:

  1. 2 cups (400g) sweetened yogurt
  2. 4 eggs
  3. 4 Tbsp (40g) cornstarch
  4. 1/2 cup (70g) blueberries
  5. Optional: 20 blueberries for topping

Directions:

  1. Turn the oven on to 340°F, or 170°C.
  2. Mix the eggs, cornflour, and sweetened yoghurt in a bowl. Blend until well combined.
  3. Stir in 1/2 cup blueberries gently into batter.
  4. Fill a 6-inch (15-cm) cake pan with the batter after greasing it.
  5. You may optionally add some decoration by scattering 20 blueberries on top.
  6. In order for a toothpick to come out clean, bake for 50 to 55 minutes.
  7. Enjoy your guilt-free Blueberry Yoghurt Cake after letting it cool and slicing!
  8. A tasty gluten-free dessert made without wheat, sugar, or oil!

Air fryer method:

  1. Preheat Your Air Fryer: Preheat your air fryer to 320°F (160°C) for 5 minutes. Grease a cake pan that fits into your air fryer basket with cooking spray or line it with parchment paper.
  2. Bake in Air Fryer: Place the cake pan into the preheated air fryer basket. Air fry at 320°F (160°C) for 25-30 minutes or until a toothpick inserted into the center comes out clean.

Tips:

  1. Use a Gluten-Free Flour Blend: Not all gluten-free flour blends are created equal. Look for a high-quality blend specifically formulated for baking cakes. These blends usually contain a mix of rice flour, tapioca starch, and potato starch for the best texture.
  2. Measure Ingredients Accurately: Gluten-free baking is more sensitive to ingredient proportions. Use measuring cups and spoons designed for dry and wet ingredients to ensure accuracy.
  3. Don’t Overmix: Overmixing the batter can result in a dense and tough cake. Mix until the ingredients are just combined to avoid developing too much gluten in the batter.
  4. Adjust Baking Time: Gluten-free cakes may require slightly longer or shorter baking times compared to traditional cakes. Keep an eye on the cake towards the end of the baking time and perform a toothpick test to check for doneness.
  5. Add Xanthan Gum if Necessary: Some gluten-free flour blends already contain xanthan gum, which helps provide structure and elasticity to baked goods. If your blend doesn’t contain it, consider adding 1/2 teaspoon to 1 teaspoon of xanthan gum to the dry ingredients for better texture.
  6. Use Room Temperature Ingredients: Bring your yogurt, egg, and any other refrigerated ingredients to room temperature before mixing. Room temperature ingredients blend more easily and evenly into the batter.
  7. Coat Blueberries in Flour: Tossing the blueberries in a tablespoon of gluten-free flour before folding them into the batter can help prevent them from sinking to the bottom of the cake during baking.
  8. Preheat Your Air Fryer or oven: Preheating the air fryer ensures that your cake starts cooking immediately once it’s placed inside, leading to more consistent results.
  9. Check for Doneness: Every air fryer model is different, so keep an eye on your cake towards the end of the baking time. Adjust the cooking time as needed to ensure the cake is baked through without burning the edges.
  10. Let it Cool Completely: Allow the cake to cool completely before slicing and serving. Gluten-free cakes can be more delicate when warm, so letting them cool ensures they hold together well.

Easy Air Fryer Omelette

Easy Air Fryer Omelette

Easy Air Fryer Omelette

Easy Air Fryer Omelette: Made in the air fryer in only 8 minutes, this omelette is stuffed with cheese and crisp veggies!
For your omelette, you may chop your ingredients the night before or cook them first thing in the morning. Usually, the night before, I slice them up.

I occasionally cut additional veggies so I have enough for two morning omelettes.

For a two-egg omelette, for example, I would coarsely chop up ¼ cup of fresh mushrooms and two teaspoons of each of the remaining ingredients.

Ingredients:

  1. Two eggs
  2. a half cup of milk
  3. A dash of salt
  4. Diced fresh meat and vegetables (I used, mushrooms, green onions, and red bell pepper)
  5. One teaspoon McCormick Good Morning Herb-Garden Breakfast Seasoning
  6. ¼ cup of shredded cheese (I used mozzarella and cheddar)


Directions:

  1. Blend the eggs and milk thoroughly in a small bowl.
  2. To the egg mixture, add a small teaspoon of salt.
    Include the vegetables in the egg mixture.
  3. Fill a 6″ by 3″ pan that has been properly oiled with the egg mixture.
  4. Put the pan inside the air fryer’s basket.
  5. Cook for 8 to 10 minutes at 350 degrees Fahrenheit.
  6. When the eggs are halfway done, season them with the morning spice and top with cheese.
  7. Lift the omelette from the pan’s sides with a thin spatula and place it onto a dish.
  • Optionally garnish with more green onions

TIPS:

As with any other cooking technique, preheating your air fryer will guarantee that your omelette cooks through and evenly.

  • Prepare the Ingredients: Before beginning, chop the required fillings, such as cheese, meats, and veggies. This guarantees that they cook fast and evenly.
  • oil the Pan: To keep the air fryer basket or tray from sticking, lightly oil it. You can use butter, oil, or cooking spray.

Easy Fluffy brioche

Easy Fluffy brioche

Easy Fluffy brioche

Here’s a quick and fluffy brioche recipe! This recipe is guaranteed to become a kitchen staple, regardless of your level of baking experience. Homemade brioche is the ideal choice for breakfast, lunch, or any other time you’re craving something sweet due to its tender texture and rich butter flavour. Now get your ingredients ready, put on your sleeves, and let’s bake!

Ingredients:

380g (3 cups) all-purpose flour;

  1. 20g (3 tbsp) cornstarch;
  2. 40g (3 tbsp) butter;
  3. 50g (⅝ cup) sugar;
  4. 1 egg;
  5. 7g (1 tsp) salt;
  6. 7g (1 ½ tsp) dry yeast;
  7. 150ml (⅔ cup) warm milk;
  8. 40ml (3 tbsp) vegetable oil;
  9. Melted butter, sesame seeds

Directions:

  1. Activate the Yeast: In a small dish, combine the warm milk and 1 tablespoon of sugar. After scattering the yeast on top, let it sit until it foams, about 5 minutes.
  2. To make the dough, put the flour, salt, and remaining sugar in a large mixing bowl or stand mixer that has a dough hook attached to it. Add the eggs and yeast mixture. Work the dough on low speed just until it begins to come together.
  3. Add the Butter: Using a knife, cut the softened butter into tiny pieces. Add the butter to the dough little by little, mixing it in well. Continue to knead the dough for about 8-10 minutes until it becomes smooth and elastic.
  4. First Rise: After the dough has doubled in size, place it in a bowl that has been oiled, cover it with a fresh kitchen towel, and let it rise in a warm location for one to two hours.
  5. Form the Brioche: Pinch the dough lightly to release the air once it has risen. Make equal parts of the dough and roll them into balls. Make sure there is room between each ball when you place them in the air fryer basket.
  6. Second Rise: Put a fresh kitchen towel over the brioche dough balls and let them rise in the air fryer for a further 30 to 45 minutes, or until they start to puff up.
  7. Air Fry: Set your air fryer to 180°C, or 350°F. Applying egg wash to the brioche dough balls is optional. After inserting the basket into the air fryer, heat for ten to fifteen minutes, or until the brioche is well cooked and golden brown. Depending on how big your air fryer is, you might have to work in batches.
  8. Serve: Take the fried brioche out of the air fryer and allow it to cool a little before serving. Savour your light brioche from the air fryer!

Please feel free to modify the temperature and cooking time according to the model of your air fryer, since they may differ.

TIPS:

  1. Use a Good Recipe: Start with a reliable brioche recipe. Look for one specifically designed for an air fryer or one that can be easily adapted.
  2. Room Temperature Ingredients: Make sure your ingredients, especially eggs and butter, are at room temperature. This helps create a smooth dough and encourages yeast activity.
  3. Handle the Dough Gently: Brioche dough is delicate. Handle it gently to avoid overworking it, which can result in a tougher texture.
  4. Proofing Time: Allow the dough to proof properly. This might take longer in cooler environments. Follow the recipe’s instructions for proofing, but keep in mind that air fryers generally have a faster cooking time, so the proofing might be shorter than traditional methods.
  5. Preheat the Air Fryer: Preheat your air fryer before placing the brioche dough inside. This ensures that the cooking starts immediately and helps achieve an even bake.
  6. Use Parchment Paper: Line the air fryer basket with parchment paper to prevent the brioche from sticking. This also makes cleanup easier.
  7. Don’t Crowd the Basket: Leave enough space between the brioche pieces in the air fryer basket to allow for proper airflow. Crowding can result in uneven cooking.
  8. Check for Doneness: Since air fryers cook faster than traditional ovens, keep a close eye on the brioche as it bakes. Use a toothpick or cake tester to check for doneness. The internal temperature should reach about 190°F (88°C) for fully baked brioche.
  9. Cooling: Allow the brioche to cool slightly in the air fryer basket before transferring it to a wire rack to cool completely. This helps prevent it from becoming too soggy on the bottom.
  10. Experiment: Air fryers can vary in temperature and performance, so don’t be afraid to experiment with cooking times and temperatures to find the perfect settings for your fluffy brioche.

With these tips in mind, you should be able to achieve delicious, fluffy brioche in your air fryer!

Air Fryer Cheesy Beef Stuffed Potato Cakes

Air Fryer Cheesy Beef Stuffed Potato Cakes

Air Fryer Cheesy Beef Stuffed Potato Cakes

Indulge in a savory delight with these Air Fryer Cheesy Beef Stuffed Potato Cakes! A fusion of comfort food and culinary innovation, these golden brown beauties are sure to tantalize your taste buds and leave you craving more. Picture this: fluffy mashed potatoes embracing a rich, seasoned beef filling, all encased in a crispy, cheese-infused crust. And the best part? They’re cooked to perfection in the air fryer, meaning you can enjoy that irresistible crunch with a fraction of the oil. Whether served as a crowd-pleasing appetizer, a satisfying snack, or a hearty meal paired with your favorite sides, these potato cakes are bound to become a new family favorite. Get ready to elevate your culinary repertoire with this deliciously inventive twist on a classic dish!”

Ingredients:

  • 2 large potatoes, peeled and diced
  • 1/2 pound ground beef
  • 1/2 onion, finely chopped
  • 1/2 bell pepper, finely chopped
  • 1 clove garlic, minced
  • 1/2 cup shredded cheddar cheese
  • Salt and pepper to taste
  • 2 tablespoons olive oil
  • 1/4 cup breadcrumbs
  • 1 egg, beaten
  • Cooking spray

Instructions:

  1. Prepare the Potatoes:
    • Place the diced potatoes in a pot of salted water and bring to a boil. Cook until tender, about 10-12 minutes. Drain and mash the potatoes in a large bowl.
  2. Cook the Beef Mixture:
    • In a skillet, heat 1 tablespoon of olive oil over medium heat. Add the ground beef and cook until browned, breaking it apart with a spoon as it cooks.
    • Add the chopped onion, bell pepper, and garlic to the skillet with the beef. Cook until the vegetables are soft, about 5 minutes. Season with salt and pepper to taste.
  3. Combine Potato and Beef Mixture:
    • Mix the cooked beef and vegetable mixture with the mashed potatoes in the large bowl. Stir in the shredded cheddar cheese until well combined.
  4. Form Potato Cakes:
    • Take a scoop of the potato mixture and shape it into a small patty. Repeat with the remaining mixture.
  5. Coat with Breadcrumbs:
    • Place the breadcrumbs in a shallow dish. Dip each potato cake into the beaten egg, then coat it with breadcrumbs, pressing gently to adhere.
  6. Air Fry:
    • Preheat your air fryer to 375°F (190°C).
    • Lightly coat the air fryer basket with cooking spray. Arrange the potato cakes in a single layer in the basket, leaving some space between each cake.
    • Spray the tops of the potato cakes with cooking spray.
    • Air fry for 10-12 minutes, flipping halfway through, until the potato cakes are golden brown and crispy.
  7. Serve:
    • Once cooked, remove the potato cakes from the air fryer and let them cool for a few minutes before serving.
    • Enjoy your delicious Air Fryer Cheesy Beef Stuffed Potato Cakes!

Feel free to adjust the seasoning or add any other ingredients you prefer to personalize this recipe to your taste!

Air Fryer Mashed Potato Balls

Air Fryer Mashed Potato Balls

Servings: Four portions
fifteen minutes for preparation15 minutes for cooking
300 kcal of calories
30 minutes in total

Components

  1. 3 cups leftover mashed potatoes
  2. Half a cup of shredded cheddar cheese
  3. 1/4 cup of optionally crumbled bacon
  4. Two teaspoons of finely chopped green onions or fresh chives
  5. To taste, add salt and pepper.
  6. One beaten egg
  7. 1 cup breadcrumbs from Panko
  8. half a teaspoon of powdered garlic
  9. Half a teaspoon of powdered onion

Guidelines

  • Mashed potatoes, shredded cheese, crumbled bacon, chives, onion and garlic powders, salt, and pepper should all be combined in a big bowl. Until all ingredients are well combined, thoroughly mix.
  • Shape the mixture into little balls that resemble golf balls. Refrigerate for ten to fifteen minutes to firm up the mixture if it’s too sticky.
  • Each ball should be dipped in beaten egg first, then panko. Breadcrumbs until they are covered uniformly.
  • To solidify the coating, place the coated balls on a plate and refrigerate for an additional ten minutes.
  • Set the air fryer’s temperature to 400°F. Make sure the potato balls do not touch when you place them in the air fryer basket. Apply a thin layer of cooking spray.
  • Cook for five minutes, then turn the balls over and continue cooking for five more minutes, or until they are crispy and golden brown.
  • Quickly serve with your preferred dipping sauce.

Notes:

  • To assist the balls maintain their shape, if your mashed potatoes are extremely mushy, mix in a small amount of flour.
  •  use a vegetarian equivalent for a vegetarian version.
    Mashed potato balls from the air fryer can be warmed for two to three minutes. Crisp them up one more.

Air Fryer Chicken Thighs (With Bone In Thighs)

Air Fryer Chicken Thighs (With Bone In Thighs)

SUMMARY
The greatest thing right now is cooking chicken thighs in the air fryer—it’s my (healthy) passion! The bone-in chicken thighs that are air-fried have a crispy outside and a juicy interior. Thighs cooked in an air fryer are flavorful, simple to prepare, and ready in 30 minutes or less. The fact that you can pair air fryer chicken thighs with almost any major side dish is the finest part. As a choice of protein, they go really nicely with fried rice, cabbage, roasted vegetables, salads, and pretty much any cuisine.

INGREDIENT.

  1. Large skin-on and bone-in chicken thighs
  2. A tsp or less of salt
  3. -half teaspoon of black pepper
  4. One tsp powdered onions
  5. One-half teaspoon of powdered garlic
  6. Half a teaspoon arid thyme
  7. Two tsp of paprika
  8. ½ to 1 tsp “Slap ya mama” Walker and Sons’ Cajun Seasoning
  9. Crushed one Maggi (or one teaspoon of Knorr seasoning)
  10. One tablespoon extra virgin olive oil, or EVOO
  11. One lemon

DIRECTIONS

  • Use the juice from half of a lemon to thoroughly wash the chicken thighs. Using paper towels, pat dry to extract as much moisture as possible.
  • Put on gloves, add seasonings and olive oil to the thighs, then use your hands to distribute the dry rub all over the chicken thigh. If you’re in a rush, cook the thighs right away, or cover and let them marinade for two hours.
  • Set the Air Fryer to 400 degrees Fahrenheit, add the chicken, skin side up, and cook for an additional 10 minutes. Five minutes.
  • After that, lower the heat to 350 and continue cooking for ten to fifteen minutes. These large thighs took a total of 27 minutes to cook.
  • Please be aware that cooking times may differ depending on the type of air fryer you have or the size of your chicken thighs.
  • My large chicken thighs cooked through just well. On the other hand, my Instant Pot Air Fryer is a great device!
  • Using a meat thermometer is the best option for cooking meat in the Air Fryer.

roasted red pepper, spinach, and mozzarella stuffed chicken

roasted red pepper, spinach, and mozzarella stuffed chicken

roasted red pepper, spinach, and mozzarella stuffed chicken

The use of fresh, colourful produce, health advantages, and bright flavours are what make Mediterranean food so popular across the world. The Roasted Red Pepper, Spinach, and Mozzarella Stuffed Chicken is a standout dish from its extensive menu that showcases the region’s exceptional culinary skills. This recipe epitomises the Mediterranean style of robust and nutritious meals, in addition to being a palate-pleasing dish.

Ingredients:

Prepare the Chicken:

  1. Four skinless and boneless chicken breasts
  2. One cup of sliced roasted red peppers
  3. one cup of raw spinach
  4. One cup of finely shredded mozzarella cheese
  5. Two tsp olive oil
  6. one tsp powdered garlic
  7. One tsp of Italian spice
  8. To taste, add salt and pepper.

Directions:

Prepare the Chicken:

  1. Preheat your air fryer to 375°F (190°C).
  2. Slice each chicken breast horizontally to create a pocket, being careful not to cut all the way through.
  3. Equally distribute the roasted red peppers, spinach, and mozzarella cheese among the chicken breasts, stuffing them.
  4. Use toothpicks to secure the openings if necessary.
  5. In a small bowl, stir together olive oil, garlic powder, Italian seasoning, salt, and pepper. Coat both sides of the chicken breasts with this mixture by brushing it on.
  6. Lightly spray the air fryer basket with olive oil spray.
  7. Place the stuffed chicken breasts in the air fryer basket, making sure they are not overcrowded.
  8. Lightly spray the tops of the chicken breasts with olive oil spray.
  9. Air fry for 18-20 minutes, flipping halfway through, until the chicken is cooked through and the cheese is melted and bubbly.
  10. Once cooked, remove the chicken from the air fryer and let it rest for a few minutes before serving.
  11. Serve hot and enjoy your delicious roasted red pepper, spinach, and mozzarella stuffed chicken!

Oven Method:

  • Preheat your oven to 375°F (190°C).
  • Place the stuffed chicken breasts in a baking dish and bake for 25-30 minutes, or until the chicken is thoroughly cooked and no longer pink inside.


Carrot Cake Roll Recipe

Carrot Cake Roll Recipe

Carrot Cake Roll Recipe

Welcome to a culinary adventure where traditional flavors meet innovative cooking techniques! Today, we’re diving into the world of desserts with a twist, presenting to you a mouthwatering creation.you can make this cake in oven and air fryer.

For the Carrot Cake:

  1. 3/4 cup all-purpose flour
  2. 1/2 tsp baking powder
  3. 1/2 tsp baking soda
  4. 1/2 tsp salt
  5. 1/2 tsp ground cinnamon
  6. 1/2 tsp ground ginger
  7. 1/4 tsp ground nutmeg
  8. 1/8 tsp ground cloves
  9. 3 large eggs
  10. 3/4 cup granulated sugar
  11. 2 Tbsp oil (canola or vegetable)
  12. 1 tsp vanilla extract
  13. 2 cups shredded carrots

For the Best Cream Cheese Frosting:

  1. 8 oz cream cheese, cold
  2. 8 Tbsp (1/2 cup or 1 stick) butter, room temperature
  3. 1 cup powdered sugar
  4. 1 tsp vanilla extract

Directions:

  1. Turn the oven on to 375°F, or 190°C. Press parchment paper into a jelly roll pan (10 x 15 inches), leaving it hanging over the sides for simple removal.
  2. Mix the flour, baking soda, baking powder, salt, nutmeg, cloves, cinnamon, and ginger in a medium-sized bowl.
  3. Whisk the eggs, oil, vanilla extract, and granulated sugar together well in a big basin that is separate from the other one.
  4. Mixing only until combined, gradually add the dry ingredients to the wet ones. Add the shredded carrots and fold.
  5. Evenly distribute the batter after pouring it into the pan. Cook for ten to thirteen minutes, or until the cake bounces back when you touch it.

Roll and Cool:

  1. Using the edges of the parchment paper, carefully remove the cake from the pan as soon as it is taken out of the oven. Set it down on a level surface.
  2. While the cake is still warm, wrap it up in the parchment paper, starting from the short end. Give it ten minutes or so to cool fully.

Prepare the Frosting:

  1. Beat the room temperature butter and chilled cream cheese together in a medium-sized bowl until smooth.
  2. Add the vanilla essence and powdered sugar gradually while beating until thoroughly mixed and creamy.

Put the Cake Roll Together:

  1. The cake should be carefully unrolled without breaking.
    Over the cake, evenly distribute the cream cheese icing.
  2. Without using the parchment paper, reroll the cake.
  3. To set, wrap it securely in plastic wrap and place it in the fridge for at least an hour or the freezer for around half an hour.

Serve:

  1. When the cake is ready to be served, cut it neatly using a hot knife that has been rinsed under hot water and dried.
  2. Before serving, let the slices defrost a little.

Air fryer Method:

  1. Preheat your air fryer to 325°F (160°C).
  2. Air fry the cake: Place the pan in the preheated air fryer and cook for about 12-15 minutes, or until the cake is set and springs back when lightly touched.

Tips and Variations

  • Add-ins: For extra crunch, stir in 1/2 cup finely chopped pecans or walnuts into the batter.
  • Spices: To create a distinctive flavour twist, add a touch of cardamom or adjust the spice amounts to your taste.
  • icing: Incorporate a teaspoon of lemon zest into the cream cheese mixture for a tangier icing.
  • Presentation: For a traditional appearance, dust the cake roll with powdered sugar before serving.

How to Store Refrigeration:

You may keep the constructed cake roll in the refrigerator for up to five days by placing it in an airtight container.
Freezing: Tightly wrap the cake roll with plastic wrap and then aluminium foil for extended storage. For up to three months, freeze. Before serving, let it thaw overnight in the refrigerator.

Air Fryer Blooming Onion

Air Fryer Blooming Onion

Air Fryer Blooming Onion appetiser for a delicious and entertaining game day snack that your friends and family will enjoy!

10 minutes for prep and 25 minutes for cooking.
35 minutes total time
6 Servings

Ingredients For Air Fryer Blooming Onion:

  1. One big sweet onion
  2. 2 and a half cups all-purpose flour
  3. One tablespoon of paprika
  4. One-tsp cayenne pepper
  5. ½ teaspoon of cumin powder
  6. a smidgeon of dried thyme
  7. Half a teaspoon of dried oregano
  8. Two big eggs
  9. one cup of milk
  10. one cup of water
  11. To taste, add salt and pepper.
  12. Spray bottle filled with oil

Instructions For Air Fryer Blooming Onion:

  • To make the onion blossom, slice it. The onion’s outer shell should be peeled off after cutting about 1/2 of an inch from the top. One big sweet onion
  • Onion cut-side down should be placed. Cut downward all the way to the cutting board, starting approximately 1/2 inch from the root.
  • Make four slices around the onion, evenly spaced, by repeating. Once you have 16 cuts that are uniformly spaced, make 3 more cuts in between each part.
  • After flipping the onion over, let it for five minutes so the petals may unwind.
  • Use your fingers to carefully separate the outer parts before breading.
  • In a large bowl, whisk together flour, paprika, cayenne, cumin, thyme, oregano, salt, and pepper. Whisk together the eggs, milk, and water in a medium-deep bowl.
  1. Two and a half cups all-purpose flour
  2. one tablespoon each of paprika and cayenne pepper
  3. one teaspoon each of ground cumin
  4. one teaspoon each of dried thyme and dried oregano,
  5. two big eggs
  6. one cup each of milk and water
  7. To taste, add salt and pepper.
  • Transfer the onion, cut-side up, to a clean bowl and cover with the flour mixture. Apply the flour mixture to the onion using a big spoon, making sure to get in between the onion petals. After flipping the onion over, remove any remaining flour. Keep the flour bowl aside.
  • Coat the onion evenly after adding it to the egg mixture. Take out and allow any extra to fall off.
  • After that, return the onion to the flour mixture that was set aside and continue flouring. Make sure any excess flour is gently tapped off. When you’re done, there will be flour remaining in the bowl.
  • The onion should be refrigerated.
  • Set the air fryer’s temperature to 350ºF for ten minutes.
  • Take the onion out of the fridge and liberally mist it with vegetable oil using a spray bottle. Spray bottle filled with oil.
  • Once an aluminium foil sling has been made, place the onion, cut side up, within the fryer basket.
  • Cook after setting the timer for 25 minutes. As the onion cooks, spray it two or three times with cooking oil. If there are any areas where flour is still visible, mist them with oil.
  • Using the aluminium foil sling, extract the onion after 25 minutes, and then season with salt & pepper.
  • Enjoy; Accompany with the onion dip.

Recipe By; Anne

Crispy Skinned Juicy Air Fryer Chicken Thighs

Crispy Skinned Juicy Air Fryer Chicken Thighs

Crispy Skinned Juicy Air Fryer Chicken Thighs Air fryer chicken thighs with crispy skin, incredible juicy texture, and a garlic paprika seasoning are a fuss-free meal that boosts confidence in the kitchen and receives rave reviews. Your favourite method for cooking chicken thighs will become using an air fryer, which cooks food faster and with better results than a traditional oven.

Prep time: Five minutes      Cook time: Twenty minutes
30 minutes in total
There are four servings.

Ingredients For Crispy Skinned Juicy Air Fryer Chicken Thighs:

  1. One tablespoon of paprika
  2. Half a spoonful of paprika, smoked
  3. Two tsp kosher salt
  4. one tsp powdered garlic
  5. half a teaspoon of pepper, black
  6. 4 bone-in, skin-on chicken thighs (approximately 2 to 2 1/2 pounds); if boneless chicken thighs are preferred, refer to the notes.
  7. Two teaspoons pure olive oil
  8. slices of lemon for serving
  9. chopped cilantro or parsley fresh for serving

Instructions For Crispy Skinned Juicy Air Fryer Chicken Thighs:

  1. Combine the paprika, smoked paprika, black pepper, garlic powder, and salt in a big bowl.
  2. After thoroughly drying both sides, add the chicken thighs to the basin. After drizzling with oil, toss to coat in the spice blend.
  3. Set the air fryer’s temperature to 400°F. Place the chicken thighs skin-side down in a single layer; check to see whether they are not touching; if so, cook the chicken in batches.
  4. When an instant read thermometer placed at the thickest part of a thigh (but not touching bone) registers 155°F, air fried the chicken thighs for 16 to 22 minutes, turning them halfway through. Remove from heat, cover and let to rest for five minutes (the FDA considers chicken done when it reaches 165°F, but as it sits, its temperature will climb; different air fryer models have different cooking times, so check ahead of time for peace of mind). Serve hot, garnished with fresh herbs and lemon wedges (squeezed over the top of the dish).

Recipe By: Well plated

Notes and advice For Crispy Skinned Juicy Air Fryer Chicken Thighs:

  1. Remarks on Boneless Thing: Apply the spice mixture on as instructed. Place the chicken, smooth side down, into the air fryer and preheat to 380°F. Cook the chicken for 6 to 8 minutes, turning it halfway through, or until an instant-read thermometer registers 155°F. After letting it rest for five to ten minutes (during which time the temperature will rise), serve warm.
  2. TO STORE: Chill chicken for up to four days in the refrigerator in an airtight storage container.
  3. TO REHEAT: Use a microwave or a 350°F oven to gently reheat leftovers in a baking dish.
  4. TO FREEZE: For up to three months, freeze the thighs in an airtight, freezer-safe storage container. Thaw in the fridge for a full night before reheating.