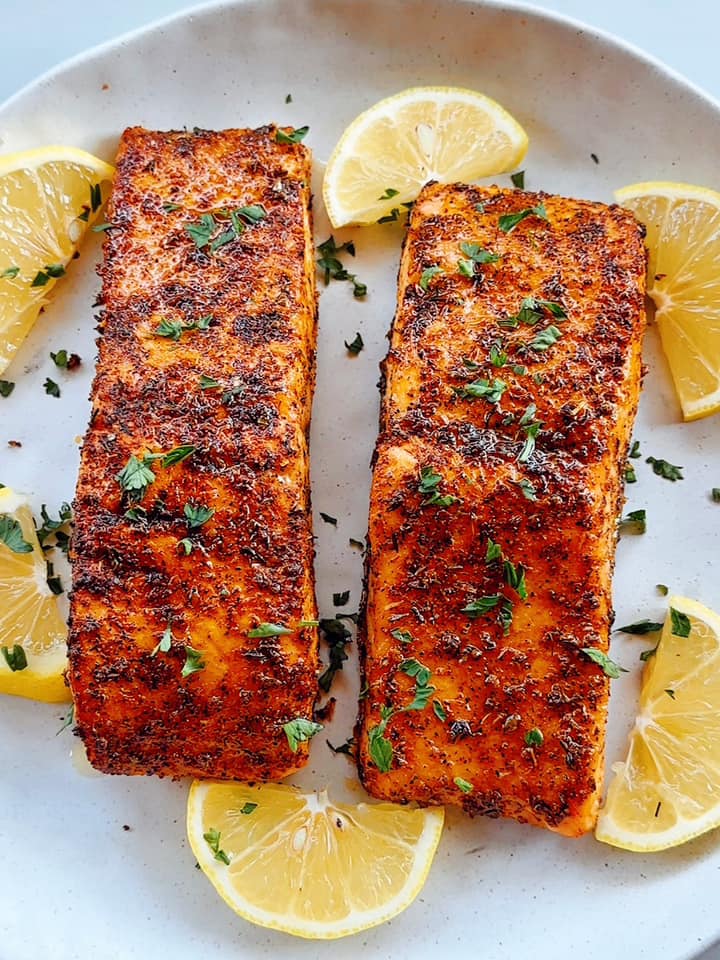
Air fryer blackened salmon
There is something wonderful about Air Fryer Blackened Salmon. It has the strong tastes of Cajun spices and the soft, flaky texture of properly cooked salmon. If you want to make something quick and healthy instead of cooking, this recipe is perfect for a weeknight dinner or a special event. This recipe has all the steps you need to make a food that is full of taste and will impress your guests.
ingredients
- Salmon pieces, 4 of them, about 6 ounces each, skin on or off
- 2. 5 cups of olive oil
- 1 tablespoon of paprika that has been smoked
- Use one tablespoon of garlic powder
- 1 teaspoon of onion powder
- 1 teaspoon of dried thyme
- 1 teaspoon of dried oregano
- 1 teaspoon of black pepper, ground
- One teaspoon of salt
- Add or take away 1 teaspoon of chili pepper to taste.
- One lemon, cut into slices
- Chopped fresh parsley
Tips and Advice
- First Step: Get the Blackened Seasoning ready.
- Put the smoked paprika, garlic powder, onion powder, dried thyme, dried oregano, ground black pepper, salt, and cayenne pepper in a small bowl. Mix the spices together. Make sure the spices are spread out evenly by mixing them well.
- Step 2: Add seasonings to the salmon. Oil the salmon:
Wet the salmon pieces with paper towels and pat them dry. A small layer of olive oil should be spread over each fillet to help the spices stick.
Use the seasoning:
Cover all of the salmon fillets with the brown seasoning and press it onto the fish to make sure it sticks well. Make sure that all sides are covered the same way. - Step 3: Get the air fryer hot.
- Warm up:
For about 5 minutes, heat your air fryer up to 400°F (200°C). - Step 4: Cook the Salmon Arrange in the Air Fryer: Spray cooking spray on the air fryer basket. Spread the salmon pieces out in a single line in the basket. If the skin is still on, put the skin-side down. Depending on how big your air fryer is, you might have to cook them one at a time.
- Preheat the oven to 400°F (200°C). Cook the salmon for 8 to 10 minutes, or until it flakes easily with a fork and the outside is slightly browned and crispy. The temperature inside should hit 63°F (145°C).
- Step 5: Serve Rest: After cooking, let the salmon rest for a few minutes so the juices can spread out again.
- Finish: Put some fresh parsley on top of the grilled salmon pieces and serve them with lemon slices. Ideas for Making
- It Better: Serve this dish with steamed veggies, a fresh salad, or rice.
- Spice Level: Change how much cayenne pepper you use to get the level of heat you like. For extra kick, you can also add more black pepper.
- Herbs: To change the taste, mix in a little dried basil or rosemary with the brown spice.
- Cooking Time: The cooking time may need to be slightly changed depending on how thick the salmon pieces are. It might take a minute or two longer for thicker fillets.
- Add a splash of garlic sauce or fresh lemon juice to your food to make it taste even better.
In conclusion
Making Blackened Salmon in an air fryer is a quick and easy way to make a tasty and healthy meal. The strong Cajun spices make the crust taste great, and the air fryer keeps the salmon soft and juicy on the inside. This dish tastes like it came from a restaurant and is great for a busy weeknight or a special dinner. Enjoy this tasty recipe with your favorite sides and enjoy the taste of salmon that is cooked just right. Have fun cooking!