Cake in 15 minutes The famous cake that drives the whole world crazy Better than apple pie

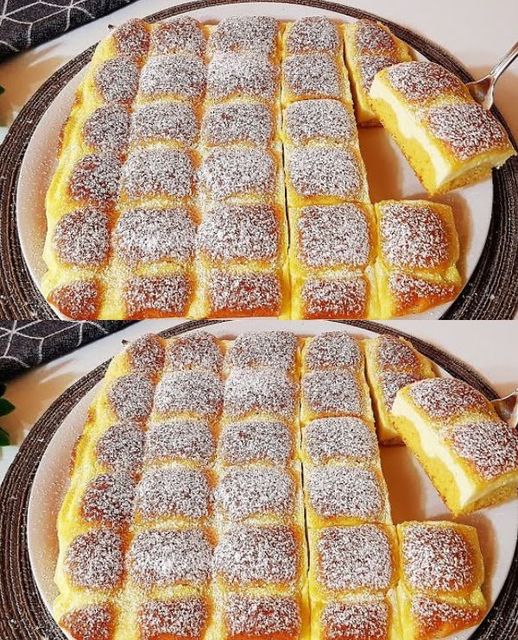
Cake in 15 minutes! The famous cake that drives the whole world crazy! Better than apple pie

Imagine this: You have a sweet tooth, but you don’t want to slave away in the kitchen for hours on end. Do not be alarmed! The day is saved by this 15-minute cake recipe. Simple ingredients and quick instructions will have you enjoying a tasty, moist cake in no time.

Components of the cake:

  1. One and a half cups (200 g) of flour
  2. Seven tsp (or almost 100 ml) of seed oil
  3. 1 tablespoon (75 g) of powdered sweetener subtracted
  4. from 3/4 cup (or 3/4 cup (150 g) of regular sugar)
  5. 1 1/2 tablespoons plus 1/4 cup (or roughly 70 ml) milk
  6. One and a half tsp baking powder
  7. One and a half tsp vanilla sugar
  8. three eggs
  9. One dash of salt
  10. Sufficient powdered sugar for dusting

Regarding the cream:

  1. 8.8 ounces (about 250 grams) of mild cheese, such light cream cheese
  2. One tsp vanilla sugar
  3. Two tablespoons of ordinary sugar
  4. or two teaspoons of powdered sweetness
  5. One tablespoon of cornflour
  6. One egg

Getting ready:

Creating the Dough

  • Blending the Cake
  • Crack those eggs into a bowl to start things off. Whisk in your preferred sweetener and a little amount of salt until foamy. Add the oil and milk next, then the flour, baking powder, and vanilla sugar in that order. In order to prevent lumps, fully mix.

Getting the Mold Ready

  • Pour the batter into a 22 x 22 centimeter square mold lined with parchment paper, leveling it out. Put it away for the time being.
  • Making the Creamy Goodness in Advance
    Mix the light cheese, egg, sweetener, and corn starch in a bowl.
  • and sugar with vanilla. Blend till creamy and smooth. To make application easier, transfer the mixture into a piping bag.
  • Putting the Cake Together and Decorating with Cream
    The exciting part is about to begin! Garnish the cake batter in a checkerboard design using the piping bag. Use your imagination while creating your design!
  • Cake Baking: The Baking Time
    Set the oven to 180°C and bake the cake for thirty to thirty-five minutes. When finished, take it out of the mold and give it a dusting of icing sugar for decoration.

In summary
You can whip up a cake that rivals even the most labor-intensive sweets in only fifteen minutes. This cake, with its creamy topping and airy texture, is destined to become a family favorite. Bid farewell to extended baking sessions and hello to short, tasty confections!

The Perfect Recipe: Easy and Cheap Cake that Melts in Your Mouth

The Perfect Recipe: Easy and Cheap Cake that Melts in Your Mouth

Who doesn’t enjoy a tasty cake that’s inexpensive and simple to make? Imagine biting into a cake that is tasty and moist, and with each bite, it almost dissolves on your tongue. We’ll go over the method for making this delicious delicacy in this article, which uses basic components that you probably already have in your home. Prepare yourself for a delightful baking journey that will make your taste senses dance!

Overview
Let’s get started right away in the baking industry with this easy yet decadent cake recipe that will wow your guests and entice your palate. Bid farewell to convoluted baking recipes and hello to a simple procedure that yields amazing results.

Getting the Ingredients Ready

  1. 150 g (1 ½ cup) of flour
  2. 100 ml (½ cup) of water
  3. 100 ml (½ cup) of milk
  4. 80 grammes (1/3 cup) butter
  5. Four eggs
  6. Making Baking One teaspoon of powder
  7. One-half teaspoon of salt

Regarding the smooth filling:

  1. 500 milliliters of milk
  2. 150 g (1 ½ cup) of sugar
  3. 100 g (1 cup) of flour
  4. Two eggs
  5. 180 g (3/4 cup) of butter

Getting the Cake Batter Ready

To commence, let us melt the butter in a pot over a low flame. After melting, combine the milk, water, and salt; gradually bring the mixture to a simmer. Mix the flour and baking powder together in an other bowl. Stirring continuously, gradually add the flour mixture to the saucepan until a smooth dough forms.

Making the Cake

  • As the dough cools, preheat the oven to 200 degrees Celsius. After cooling, place one egg there. one at a time, fully blending. Pour half of the batter into a 25 centimeter round cake tin that has been lined with parchment paper. Roast for about 20 minutes, or until well browned. For the second crust, follow the same procedure.

Preparing the Creamy Filling

  • Beat the eggs and sugar together to make the creamy filling. Slowly add the flour, making sure there are no lumps. In a saucepan, heat the milk and gradually add the egg mixture. Stir constantly until the liquid thickens. Let cool completely before mixing in the beaten butter.

Putting Your Cake Together

  • After the creamy filling and both crusts have cooled, top one crust with the other and spread the creamy filling over it to build your cake. Store in the refrigerator for about two hours to Permit the flavors to combine.

Cooling and Presenting

  • Your cake is ready to be served after chilling! To add some decoration, dust the top with powdered sugar and savor the delicious, melt-in-your-mouth sweetness.

The Reasons This Cake Is So Adorable

  • The combination of simplicity and luxury in this cake makes it appealing. You may make a dessert that is comparable to those seen at premium bakeries with little work and inexpensive components.

Advice for Optimizing the Temperature in Your Cake Room Ingredients:

  • For best mixing, make sure your butter and eggs are room temperature.
  • Appropriate Mixing: Be careful not to overmix the mixture because this could make the cake too dense.
  • Even Baking: To guarantee even browning, turn your cake tin halfway through the baking process.

A Simple Path to Heart Health: A Natural Remedy with Just 3 Ingredients

A Simple Path to Heart Health: A Natural Remedy with Just 3 Ingredients

Some of the most effective cures in the fight to keep our blood vessels and heart healthy come from nature. Imagine a natural remedy that uses just three substances to not only promise to reduce cholesterol but also to clean your blood vessels. This method, which emphasizes preventative and natural treatment, is not only simple to use but also fits with a more comprehensive approach to healthcare.

  1. Three Times Power
  2. Three simple ingredients—
  3. garlic, ginger, and apple cider vinegar
  4. —that you may already have in your home are all that are needed for the natural remedy we’re talking about today. For millennia, people have appreciated not just the taste of these foods but also their health advantages.
  • Garlic: Known for its potent properties, garlic can significantly reduce lower cholesterol and strengthen cardiac health. Its lipid-lowering, anti-blood clotting, and antioxidant properties are assumed to be attributed to its active ingredient, allicin.
  • Ginger: For cardiovascular health, this root is another superpower. Ginger is an important ally in keeping clean and healthy blood vessels since it can lower cholesterol and avoid blood clots.
  • Apple cider vinegar: Known for its many health advantages, this substance can help reduce blood sugar, encourage weight loss, and strengthen heart health by lowering cholesterol.

Formulating the Cure

  • You’ll need equal parts apple cider vinegar, ginger juice, and garlic juice to make this natural elixir. After thoroughly combining these ingredients, drizzle in more honey to improve and sweeten the taste. In addition to adding taste to the concoction, honey has several health advantages of its own, such as antioxidants.
  • To fully benefit from this combo, take a tablespoon on an empty stomach first thing in the morning. For optimal outcomes, incorporate consistency into your everyday routine.

Adopting a Natural Method

  • This straightforward three-ingredient recipe demonstrates the potency of natural substances in promoting general health and heart health. It’s a low-impact, high-impact method of taking care of your cardiovascular system without heavily depending on drugs.
  • Naturally, it’s best to speak with a healthcare professional before beginning any new health routine, particularly if you already take medication or have pre-existing medical concerns.
  • Do not undervalue the simplicity of what nature has to give. Sometimes the healthiest remedies are the ones that have been there for generations and are just waiting to be rediscovered and accepted.

What Would Happen If You Chewed ONE Clove Daily

What Would Happen If You Chewed ONE Clove Daily Chewing a clove can help fight harmful bacteria in your mouth, reducing plaque buildup, and keeping your gums healthy. Plus, its natural antiseptic properties can soothe toothaches and oral infections.

Enhanced Digestive Health

Cloves are also known for their positive effects on the digestive system. If you’ve ever experienced digestive discomfort, chewing a clove daily might offer some relief. Cloves can stimulate the secretion of digestive enzymes, reducing indigestion and bloating. Their carminative properties help in reducing gas and improving gut health, making your digestive process smoother and more comfortable.

A Natural Way to Regulate Blood Sugar

For those mindful of their blood sugar levels, cloves could be a beneficial addition to your diet. Some studies suggest that cloves can help regulate blood sugar levels by improving insulin function. Including a clove in your daily routine might assist in maintaining balanced blood sugar levels, which is especially beneficial after meals.

Boosting Your Immune System

Cloves are packed with antioxidants, which are crucial for fighting off oxidative stress and aiding in immune health. By chewing a clove daily, you’re providing your body with a natural source of antioxidants, supporting your body’s ability to fight off infections and diseases.

How to Incorporate Cloves into Your Daily Routine

Incorporating a clove into your daily routine is simple. Start with one clove per day, either chewing it directly or incorporating it into a tea or meal where it can be consumed easily. If you find the taste too intense, you can gradually introduce it into your diet until you become accustomed to the flavor.

Embracing the habit of chewing a single clove daily could be a small step toward significant health benefits. From improving oral health to aiding in digestion and boosting your immune system, this simple practice might just be the wellness boost you’ve been looking for. Give it a try and see how this little spice can make a big difference in your daily health.

Homemade Garlic Cough Syrup: A Natural Remedy to Cleanse Your Lungs

Homemade Garlic Cough Syrup: A Natural Remedy to Cleanse Your Lungs

Having to deal with lung congestion and a chronic cough can be painful and draining. Consider creating your own homemade cough syrup with garlic if you’re searching for a natural substitute for over-the-counter cough medications. Garlic is a well-known and potent substance with numerous health advantages, including supporting immune function and clearing respiratory pathways. This simple-to-make syrup for garlic cough helps clear your lungs and soothe your throat at the same time. Here’s how to make this powerful home cure.

Garlic’s Health Benefits

  • Because of the powerful medicinal benefits of garlic, many cultures have employed it for ages. It contains a lot of substances with antiviral, antibacterial, and antifungal properties, such as allicin.
  • Garlic is a great option for treating respiratory infections because of these qualities. cause congestion and coughing.

Ingredients Required:

  1. 1 head of fresh garlic;
  2. 2 cups of water; raw honey (to taste);
  3. optional: ginger or lemon for extra flavor and benefits;

Step-by-Step Preparation:

  • Peel and finely chop or crush an entire head of garlic; this helps release more of the compound’s active ingredients.
  • Simmer: Put the chopped or crushed garlic in a small saucepan with 2 cups of water. Bring to a boil, then lower the heat and simmer for approximately 15 minutes, allowing the garlic to infuse the water with its beneficial compounds.
  • Strain and Sweeten: After simmering, strain the mixture to remove all solid pieces of garlic. While the liquid is still warm (but not too hot),
  • To taste, add raw honey. In addition to being a natural sweetener, honey has antimicrobial and throat-soothing qualities.

Include Extras:

  • Squeeze in some fresh lemon juice or add a couple pieces of ginger while it’s cooking for an added kick. Ginger and lemon both contribute to the syrup’s flavor and offer additional vitamins and anti-inflammatory properties.
  • How to Use Dosage: To reduce cough and congestion, take one spoonful of the garlic cough syrup up to three times per day.
  • Storage: Keep the remaining syrup refrigerated in a sealed container. You can store it for up to a week.

In summary
To relieve a bothersome cough, try this wonderful natural cure created at home: homemade garlic cough syrup. and clear their lungs. It is ideal for individuals looking for a more holistic approach to health because its natural ingredients offer a secure and reassuring substitute for store-bought cough syrups. The next time you need respiratory relief, try this easy, efficient, and natural formula.

Refreshing Parsley and Tomato Drink: A Natural Remedy for Cholesterol and Blood Pressure

Refreshing Parsley and Tomato Drink: A Natural Remedy for Cholesterol and Blood Pressure

Sustaining appropriate blood pressure and cholesterol levels is essential for general health, particularly as we concentrate on heart health. Consider giving a homemade drink with tomatoes and parsley a try if you’re searching for a natural strategy to assist these areas of your health. This delightful beverage is a great way to add some extra flavor to your daily routine. It combines the heart-healthy properties of tomatoes with the purifying power of parsley.

  • Benefits of Parsley and Tomato Parsley: Packed with vitamins and antioxidants, such as vitamin C, which strengthens the immune system, and vitamin K, which supports bone health, this leafy green is more than just a garnish. Another benefit of parsley is that it has natural diuretic qualities that assist the body get rid of extra salt and water, which in turn lowers blood pressure.
  • Tomato: There are tomatoes are an excellent source of the antioxidant lycopene, which has been demonstrated to lower the risk of heart disease. They also contain a lot of potassium, which helps lower blood pressure and balance the body’s sodium levels.

Ingredients Required

  1. One sizable bunch of raw parsley
  2. Two big, juicy tomatoes
  3. one cup of water
  4. A teaspoon of lemon juice or a sprinkling of salt are optional but can add taste.

Steps in Preparation

Clean the Ingredients:

Rinse the tomatoes and parsley well in cold water to get rid of any contaminants or pesticides.

Get the parsley and tomatoes ready:

To make blending the tomatoes easier, chop them into quarters. Since the stems of the parsley are full of flavor, chop them roughly as well.

Mixing:

  • Put the chopped Blend together tomatoes, parsley, and water. Process the ingredients on high until it’s smooth. To get the right consistency, you can add a little more water if the drink is too thick.

Stress (Optional):

  • Use cheesecloth or a fine mesh screen to strain the mixture and remove the pulp for a smoother drink. The season If you would like to improve the flavor, add a teaspoon of lemon juice or a bit of salt.

How to Use:

  • Serve chilled for a delicious taste. Enjoy this drink chilled. To help with digestion and nutrient absorption, you can have a glass of this parsley and tomato beverage once a day, ideally before meals.

Daily Routine:

  • Include this beverage in your daily regimen to help control blood pressure and cholesterol levels. Of course.

In summary
This drink with tomato and parsley is an easy-to-make, all-natural method of supporting heart health and preserving normal cholesterol and blood pressure levels. It is a welcome addition to your regular diet in addition to being healthful. As part of your dedication to living a better lifestyle, give it a try and enjoy its health benefits.

Put this in your shampoo and your hair will grow

Put this in your shampoo and your hair will grow like crazy and it will be lush 💥

This natural approach is not only simple to make but also gentle, making it perfect for anyone looking to enrich their hair care routine with the goodness of nature.

The Power of Natural Ingredients:
This remedy leverages the potency of natural ingredients, each selected for their hair growth and strengthening properties. Here’s what you’ll need to create this magical elixir:

Aloe Vera Gel: A treasure trove of vitamins and minerals, aloe vera gel hydrates the scalp and fosters healthy hair growth.

Coconut Oil: This oil penetrates the hair shaft, providing moisture and reducing protein loss from the hair.

Peppermint Oil: Known for stimulating the scalp, a few drops can invigorate hair follicles and promote growth.

Crafting Your Natural Hair Growth Elixir:
Gather the Ingredients: Combine two tablespoons of pure aloe vera gel, one tablespoon of coconut oil, and 2-3 drops of peppermint oil in a bowl. Ensure all ingredients are organic for the best results.

Blend Thoroughly: Mix the ingredients until you achieve a smooth, consistent paste. This blend harnesses the hydrating properties of aloe vera, the nourishing effects of coconut oil, and the stimulating benefits of peppermint oil.

Apply with Love: Before your regular shampoo routine, apply this mixture to your scalp and hair. Gently massage it in for a few minutes to boost circulation and enhance absorption.

Let it Work its Magic: Allow the mixture to sit for at least 30 minutes, or if possible, leave it on overnight for deep nourishment. Rinse it out, then proceed to wash your hair as usual.

Embrace Consistency for Lush Results:
Incorporate this natural remedy into your hair care routine 1-2 times a week for the best outcomes. Consistent use is key to unlocking the full potential of these natural ingredients, allowing your hair to become stronger, longer, and more vibrant with time.

This gentle, yet effective remedy is a testament to the beauty of embracing natural solutions for hair care. It’s a sustainable, healthful choice that not only benefits your hair but also aligns with a lifestyle that honors the environment. Prepare to be amazed as your hair transforms, becoming a lush, flourishing crown that reflects the care and love you’ve invested.

WONTONS soup

Wonton soup
Never get tired of this amazing soup. You can use store-bought wontons but I like to make mine… it flavor is unbeatable!💯👌🏼

Ingredients:

WONTONS

  1. 8 ounces ground beef
  2. 1 tablespoon rice wine vinegar
  3. 1 tablespoon soy sauce
  4. 1 teaspoon sesame oil
  5. 1 teaspoon fresh ginger, grated
  6. 1 teaspoon brown sugar
  7. 2 green onions, finely chopped
  8. 24 square (3½ inches each) wonton wrappers

SOUP

  1. 6 cups (1,440g) chicken broth
  2. 1½ teaspoons garlic, minced
  3. 2 tablespoons soy sauce
  4. 1 teaspoon sesame oil
  5. 2-3 green onions, finely chopped

PREPARATION:

WONTONS

  1. In a large bowl combine beef, rice wine, soy sauce, sesame oil, ginger, sugar, and onion. Mix well.
  2. Place 1 heaping teaspoon of filling into the center of each wonton wrapper.
  3. Moisten edges with water and fold the corners together, pressing out any excess air. (It should look like a triangle).
  4. Slightly lift the long edge of the wonton. Wrap the edges in the opposite directions and press firmly to seal, using your finger to create a space and wetting the edges as needed.
  5. Continue with the rest of the wontons and let them rest while you prepare the soup.

SOUP

  1. In a medium pot over medium heat add chicken broth, garlic, soy sauce, sesame oil, and green onions.
  2. In a separate large pot, bring about 4 quarts of water to a boil. Once the water is boiling, add wontons and cook for 5 minutes.
  3. Strain the wontons and add them to the warm broth mixture. Serve warm.

Enjoy !

throw a Lemon down the Drain

throw a Lemon down the Drain and you’ll THANK ME FOREVER

Prepare to be astounded as I divulge the method for utilizing lemons to solve a typical home problem!

Lemons are not only a delicious fruit. They are an effective ally in keeping a kitchen tidy and smelling good since they have natural acidity and a light fragrance. There are still mysteries about lemons to uncover!

  • Natural Cleaner: The citric acid in lemons cleans our pipes naturally by dissolving debris and buildup. As a result, the drainage system is more effective and clean.
  • Bid Farewell to Odors: The kitchen sink may occasionally emit disagreeable scents. But do not worry! These smells may be neutralized by the deodorizing qualities of lemons, leaving your kitchen feeling pleasant and fresh.
  • Secure and Sustainable –
  • In our Using lemons in your cleaning regimen is a positive step in the direction of a greener planet. Lemons are harmless, non-toxic, and biodegradable in contrast to chemical cleansers.

It’s quite simple to clean your drain using lemons. Take these easy actions:

  • Cut a lemon into quarters, or into smaller pieces if necessary.
  • Pour the slices of lemon down the drain.
  • Activate the water supply and, in case you own one, the waste disposal.
  • Let the magic of the lemon work. It releases juice and oils as it grinds, leaving behind a clean, fresh aroma.

in summry

Keep this wonderful tip in mind the next time you have a lemon in your palm. Not only does using lemons to clean your drain leave your kitchen smelling wonderful, but it also not to mention makes the house greener and cleaner overall. Accept these tiny adjustments that add up to a lot, and allow joy to permeate your day!

4 Benefits of Greek Yogurt

4 Benefits of Greek Yogurt and how it compares to plain yogurt

Greek yogurt is surpassing its plain counterpart and enhancing your wellness regimen with a tangy punch.

1. Rich in Protein

Greek yogurt is a fantastic source of protein. Greek yogurt is made by straining it several times to extract the lactose and whey, leaving behind a thicker, more nutrient-dense product. Greek yogurt has almost twice as much protein as ordinary plain yogurt as a result. Because of this, it’s a great option for preserving muscle mass and warding off hunger pangs, giving you a feeling of fullness that lasts all day.

2. Less Sugar

Although the ingredients for both Greek and plain yogurts are the same, the straining method used to produce Greek yogurt lowers its lactose content, which

is a sugar that occurs naturally. This indicates that Greek yogurt is often a better choice for people watching their sugar intake because it has less sugar per ounce than plain yogurt.

3. Packed with Probiotics

Greek yogurt, like its plain sibling, is a fantastic source of probiotics, which are good bacteria that promote intestinal health. However, some types of Greek yogurt can provide a stronger probiotic punch because of their thicker concentration. These living things have the potential to improve immunological function and aid in digestion by balancing the gut flora.

4. Flexible Uses in Cooking

Greek yogurt has a tangier flavor and thicker texture, which make it highly flexible in cooking. It can give smoothies more creaminess and act as a healthy substitute for sour cream or mayonnaise in recipes. without adding fat, and even serve as a foundation for creamy dips or sauces. Because it can tolerate heat better than plain yogurt, it can be baked or cooked, adding a protein-rich boost to dishes.

Plain vs. Greek:

The Conclusion

Plain yogurt has a place in a balanced diet, but Greek yogurt stands out for individuals looking to maximize their health because of its unique nutritional profile, which includes higher protein, reduced sugar, and abundant probiotics. Greek yogurt is a pleasantly creamy method to enhance your health journey, whether you’re eating it for breakfast, as a midday snack, or as a flexible component in your cuisine.