Air Fryer Mini Egg Shortbread Recipe

Air Fryer Mini Egg Shortbread Recipe

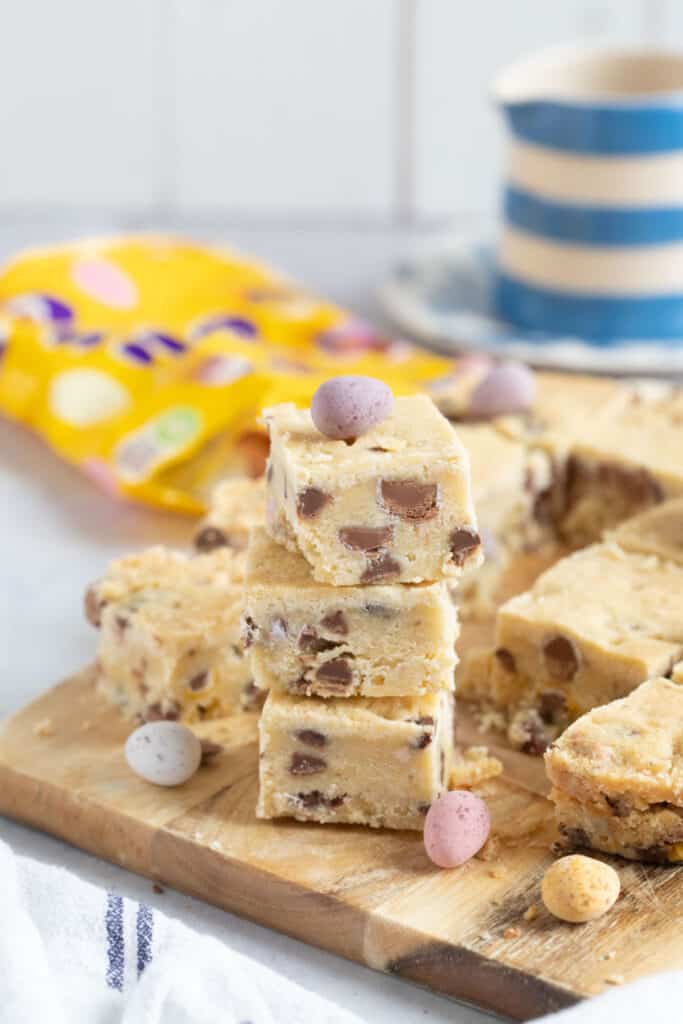
Air Fryer Mini Egg Shortbread Recipe These small egg shortbread squares made using an easy air fryer are a simple Easter dessert that’s perfect for gatherings with friends and family.

Chocolate tiny eggs are added to this recipe to give it a fun and distinctive variation on the traditional buttery, flaky shortbread.

Only five ingredients are needed for this easy air fryer shortbread recipe, all of which you probably already have in your kitchen (since who can live without a bag of little eggs at home.


Why this dish is sure to please:

  • This little egg shortbread takes much less time to prepare and bake when baked in an air fryer.
  • It’s ideal for Easter parties because of its festive appearance and brilliant little eggs decoration.
  • The recipe is quite adaptable and works well with modifications. This recipe lets you customise it to your desire by allowing you to change the sweetness, add ingredients to suit dietary requirements (such gluten-free or vegan choices), or try different kinds of chocolate or Easter candies for decoration.

Recipe By: Beth Sachs

Preparation Time: Seven minutes
Cooking Time: 20 minutes
27 minutes in total
16 Servings; 279 Calories


Ingredients For Air Fryer Mini Egg Shortbread Recipe:


  • 315 g plain flour
  • 115 g granulated sugar
  • 225 g cubed unsalted butter
  • Chocolate Chips, 100 grams
  • 150 g of little eggs, cut in half using a sharp knife


Instructions For Air Fryer Mini Egg Shortbread Recipe:


  • Set the air fryer’s temperature to 170°C (340°F) and line a shallow baking pan that measures 20 cm (or any other size that fits within the air fryer’s basket) with baking paper.
  • In a mixing dish, combine the cubed butter, flour, and sugar; massage in with your hands to produce fine breadcrumbs.
  • 115 g of granulated sugar, 315 g of plain flour, and 225 g of unsalted butter
  • Add the tiny eggs and chocolate chips and stir.
    150 g Mini Eggs and 100 g Chocolate Chips
    Press the shortbread dough firmly into the prepared baking pan.
  • Fry in the air for 20 minutes, or until softly golden. After letting cool, cut into squares or bars.


Notes For Recipe:
  • First, warm your air fryer, just as you would with traditional baking.
  • The power and temperature of air fryers can vary. To avoid over-browning, begin checking your shortbread a few minutes before the recommended cooking time is up. They should be set and slightly golden, but keep in mind that they will solidify more as they cool.
  • Before slicing the shortbread into bars, let it cool.


Facts about Nutrition:
Serving Size of Air Fryer Mini Egg Shortbreads 279 Calories * Daily Value* Fat 26.6% and 17.g of Saturated Fat 10 g, or 63%, of trans fat Polyunsaturated Fat, 0.5 g One gram of monounsaturated fat 4 grams of cholesterol 30 mg/10% of sodium 4% mg 0% potassium 70 mg % of Carbohydrates 32 g 11% Fibre 1 g 4% Sugar 16 g/18% of protein 3.6% of Vitamin A 351 IU/7 % Calcium 13 milligrammes 1% Iron 1 mg 6% * Percentage Daily Values are based on a 2000 calorie diet.

SOFT AND FLUFFY HOMEMADE BREAD

SOFT And FLUFFY HOMEMADE BREAD

SOFT AND FLUFFY HOMEMADE BREAD Enjoyed warm from the oven with soft butter, toasted and slathered with jam or honey, or used days later for French toast or bread pudding, this bread is so soft that it almost seems like a cloud.


This bread recipe is my favourite since it’s fluffy and soft yet still quite manageable to deal with dough. The bread freezes beautifully for several days, and the leftovers create the most delicious garlic bread. I usually bake one loaf at a time and freeze the second one for a later date.

Ingredients:

  1. 5 cups of flour
  2. 1 tablespoon of dry yeast
  3. 2 tablespoons of sugar
  4. 1 teaspoon of salt
  5. 1/4 cup oil
  6. 2 cups of milk
  7. 1 tablespoon of butter
  8. 100 grams of ghee
  9. 1 egg yolk
  10. Sesame

Preparation:

  1. Mix all ingredients for batter and knead.
  2. Divide the dough into 4 parts.
  3. Stretch out the cake.
  4. Brush with melted butter and form a roll.
  5. Let sit for 30 minutes.
  6.  Roll up each roll and brush with butter. Form a roll. Place on a baking tray with parchment paper and make cuts.
  7. Let sit for 1 hour.
  8. Grease each roll with yolk and sprinkle with sesame seeds.
  9.  Bake for 20 minutes at 180°C/350°F.


Easy Air Fryer Baked Potatoes

Easy Air Fryer Baked Potatoes

Easy Air Fryer Baked Potatoes The inside of these simple air fryer baked potatoes is soft and fluffy, with a delectably crispy exterior!

I really do enjoy using my air fryer, especially to make these delicious jacket potatoes.

Perfectly cooked, they have the crispiest crispy skin—even crispier than potatoes fried in the oven! You won’t ever want to make baked potatoes in the oven again after using an air fryer!

TIPS:

  • To guarantee the fluffiest middle, it’s crucial to use baking potatoes for this recipe.
  • Avoid packing the air fryer basket too full. To guarantee crispy skin, leave room around each potato. In my air fryer, I can put three medium-sized potatoes (or two giant ones), but you might only be able to cook two medium-sized baking potatoes if your air fryer is smaller.
  • When potatoes are rotated midway during cooking, the skin crisps up uniformly on all sides. They will be quite hot, so use tongs!
  • It’s recommended to let the potatoes cool in the air fryer basket for five minutes before serving.


Variations:

  • Replace the fry light spray with avocado or olive oil.
  • For extra flavour, before air-frying the skins, sprinkle over some garlic powder, smoked paprika, or even chilli powder.
  • For appetisers or finger buffets, prepare small baked potatoes using an air fryer. Cut the cooking time in half and use tiny potatoes instead of baking potatoes.


Storage:

Storage Store: Baked potatoes from an air fryer can be refrigerated and reheated for up to three days (recipes follow!).

Reheat:

The baked potatoes can be reheated in the air fryer until they are hot again, or they can be microwaved until they are extremely hot in a dish that can fit in the microwave. I like to eat these straight out of the air fryer because you lose some of the skin’s crispiness when you microwave them.

RECIPE CARD

  1. Two potatoes in the oven I like to use a baking potato that is medium in size.
  2. Use one teaspoon of Fry Light, or One tsp olive oil
  3. One tsp sea salt

Guidelines

  1. Set your air fryer’s temperature to 200°C (400°F).
  2. Wash, wipe, and pat the baking potatoes dry.
    Two potatoes in the oven
  3. Mist 2 or 3 sprays of fry light on the outside of each of the potatoes and rub in with your hands to coat each potato evenly. As an alternative, use olive oil.
    1 teaspoon Fry Light
  4. Place the potatoes in your air fryer basket and sprinkle with sea salt.
    1 teaspoon Sea Salt
  5. Bake potatoes for 40–45 minutes for medium-sized potatoes and 45–50 minutes for large potatoes, or until a sharp knife can easily pierce the middle of the potato. If you can, turn the food with tongs halfway through cooking.


This Incredible Plant Kills Cancer Cells in As Little as 48 Hours

This Incredible Plant Kills Cancer Cells in As Little as 48 Hours

This Incredible Plant Kills Cancer Cells in As Little as 48 Hours! It Outperforms Chemotherapy by a Factor of One Hundred


Dandelion Tea Kills Cancer Cells in Just 48 Hours While Preserving Healthy Cells!
The Wonder Plant That Totally Eliminates Cancer Cells in 48 Hours—100 Times More Powerful Than Chemotherapy!

Even with so many beneficial medicinal properties, this plant is often overlooked. All you need to do is pick dandelion blooms from a field devoid of dirt and cars.

The Wonder Plant That Totally Eliminates Cancer Cells in 48 Hours—100 Times More Powerful Than Chemotherapy!

Even with so many beneficial medicinal properties, this plant is often overlooked. All you need to do is pick dandelion blooms from a field devoid of dirt and cars.


Our grandparents were aware of the therapeutic benefits of dandelion syrup, but we now know that dandelion root can help cancer patients. Scientists have found that the roots of this plant can kill cancer cells more successfully than chemotherapy can.


A study by the Department of Chemistry and Biochemistry in Canada has given cancer patients new hope. Research has shown that dandelion roots “kill” cancer cells while protecting healthy cells. According to study, dandelions can eradicate cancer cells in around 48 hours.


The plant’s remarkable properties led to the research team receiving further money to continue their studies, as regular application of the herb can eradicate the largest cancer cell.


John Di Carlo, 72, felt that dandelions had healing properties. After attempting multiple therapy without results for three years, he began consuming dandelion root tea. It took him almost four months to fully recuperate after that.


air fryer chick-fil-a grilled chicken recipe

air fryer chick-fil-a grilled chicken recipe

The best imitation is this Air Fryer Chick-fil-A Grilled Chicken Recipe! With the air fryer, you can rapidly make delicious grilled chicken nuggets.

First of all, I genuinely adore these homemade Chick-fil-A low-carb nuggets. They taste just like the best kind of grilled nuggets from Chick-fil-A.

You can prepare these grilled chicken nuggets whenever you have a craving since they taste just like the genuine thing!

Components

  1. One pound of skinless, boneless chicken breast
  2. Juice from 1/2 cup dill pickles
  3. one-fourth cup heavy cream
  4. one tsp powdered garlic
  5. One tsp of celery salt
  6. One-half tsp sweet paprika
  7. One tsp salt
  8. half a teaspoon of pepper, black

Guidelines

  • I began by chopping chicken tenderloins into 1-inch chunks. put them in a big enough bowl so I could use it to marinade the nuggets.
  • Pour heavy cream and pickle juice over the nuggets until they are completely covered. Allow to sit for half an hour. I then used a paper towel to wipe off the heavy cream and pickle juice.
  • Put the dried chicken and spice combination in a mixing dish.
  • Blend thoroughly.
  • Disperse the coated nuggets onto a plate or within a basket that has been oiled in the air fryer (do not pack them in). Place the air fryer in. Then program it to operate at 350 degrees Fahrenheit for five minutes. Make sure the chicken is cooked through after 5 minutes. If not, give them enough time to finish with an interior temperature of 165 degrees Fahrenheit. Since I own an OMNI, I If your air fryer does not have broil option, you can skip the extra three minutes at 450 degrees Fahrenheit (broiler setting).
  • Arrange, present, and savor!

Tips for Keto Nuggets

  • Chop the chicken into uniformly proportioned bite-sized pieces. They’ll cook more uniformly. Replace the dill pickle juice with sweet pickle juice for hint of sweetness. Delicious!
  • Adapt the seasonings to your own taste.
  • Always keep in mind that changing the seasonings won’t make the grilled chicken recipe from Chick-fil-A taste the same!

Rediscover Youthful Radiance: The Banana Peel and Cornstarch Secret ‎‎

Rediscover Youthful Radiance: The Banana Peel and Cornstarch Secret

‎‎Sometimes the most amazing and successful beauty secrets are found in the age-old wisdom of the past and the simplicity of nature, lost in the never-ending pursuit of youthful, smooth skin. Imagine discovering a century-old anti-wrinkle remedy that only requires simple ingredients like cornstarch and banana peel. This miraculous pair is praised for its surprise efficacy in reducing wrinkle appearance and reviving the skin, in addition to their simplicity.

Cornstarch and Banana Peels: The Secret to Their Magic

Banana peels are rich sources of antioxidants, vitamins, and minerals and are not only a waste product. The nutrients in banana peels when applied topically can help combat the free radicals that cause aging, moisturize and nourish the skin in a gentle way, and even improve the texture of the skin.

as well as tone. Conversely, when mixed with banana peels, cornstarch functions as a mild, natural exfoliator, eliminating dead skin cells and aiding in the smoothing of fine lines and wrinkles.

Making Your Eternal Skin Remedy

  • This anti-wrinkle therapy is easy to make and a pleasurable procedure to create. Here’s how to make this traditional treatment at home:
  • To prepare the banana peel, start by choosing a banana that is ripe. Save the peel for your skincare routine and use the fruit as a wholesome snack. Because riper bananas contain more antioxidants, ripeness is important.

Create the Mixture: Using a scraper, extract one tablespoon of the soft inner layer from the inside of the banana skin. Add a teaspoon to this mixture.cornstarch in a little dish. Blend until a smooth paste is achieved.

Apply with Love: Lightly dab this mixture over your face, paying particular attention to wrinkles and fine lines that stand out. To enable the nutrients to deeply penetrate and do their magic, the paste should be applied to the skin and kept there for fifteen to twenty minutes.

Rinse and Revel: Use lukewarm water to rinse off the paste, pat your skin dry, and then apply your preferred moisturizer.

Accept Nature’s Offering

This treatment with cornstarch and banana peels enables you to appreciate the beauty of sustainable, natural skincare. It’s evidence of the potency of basic components and the proverbial maxim that sometimes the best answers can be discovered in the most unexpected places.

Including this procedure in your A skincare regimen can help your skin feel renewed, energetic, and youthfully glowing in addition to minimizing the look of wrinkles. Re-discover the delight of unspoiled beauty and the ageless mysteries found in nature.


A Calmer, Happier Digestive System

A Calmer, Happier Digestive System

Ever ponder how a minor adjustment to your regular diet might have such a significant effect on your overall health and wellbeing? You need go no farther than ginger, an aromatic and tasty root that is extremely beneficial to your body. Let’s examine more closely at how ginger can enhance your general vitality, from calming your digestive tract to strengthening your immune system.

One well-known benefit of ginger is that it helps with digestive problems. This common root can help your stomach greatly if you suffer from nausea, bloating, or digestive issues. You can have a more pleasant and smoother digestive system by adding ginger to your regular meals or sipping ginger tea.

Antioxidants and anti-inflammatory chemicals abound in ginger, which might

strengthen your defenses against infection. Consuming ginger on a regular basis gives your body the assistance it needs to fend off infections and illnesses, improving your health and resilience to common disorders.

Many illnesses, including arthritis and joint discomfort, can be caused by chronic inflammation. The good news is that ginger contains potent anti-inflammatory qualities that can ease pain and lessen swelling all over your body. Ginger may offer natural relief and increased mobility for those who suffer from aching joints or painful muscles. Include ginger in your diet on a regular basis.


Ginger has been demonstrated to decrease blood pressure and cholesterol, improve circulation, and support cardiovascular health. Ginger is essential for maintaining good blood flow and lowering the risk of heart disease.

preserving general cardiovascular health and a robust, joyful heart.

The energizing scent and restorative qualities of ginger can help you feel more energised and have better mental clarity. Ginger helps your body and mind feel renewed and energized all day long by improving nutrient absorption and boosting circulation.

It’s very simple to incorporate ginger into your regular routine. All you have to do is throw it into your food, make a cup of tea, or drink smoothies that have been infused with ginger. You may unleash a world of health benefits from including ginger in your diet that can improve your general well-being and change the way your body functions.

There is no denying the advantages of including ginger in your regular regimen. Ginger has many health benefits for your body, including reducing gastrointestinal distress, boosting immunity, and supporting heart health. By including ginger regularly in your diet, you give your body the tools it needs to grow and develop, which will make you happier and healthier for years to come. Thus, don’t hesitate any longer; begin enjoying the benefits of ginger right now and discover the amazing superfood’s transformational potential.

air fryer nutella scrolls

air fryer nutella scrolls

Savor the delicious simplicity of Air Fryer Nutella Scrolls, the ideal dessert for anybody who enjoys the marriage of rich chocolate and flaky pastry.

Variations

You may give Air Fryer Nutella Scrolls a unique and intriguing touch by experimenting with different recipe modifications. Here are some imaginative ways to experiment with various tastes and textures:

  • Nutella and Banana Scrolls: Before rolling the dough, add a thinly sliced banana to the Nutella spread. The banana gives the scrolls a unique texture and a hint of natural sweetness.
  • Chocolate Chip Nutella Scrolls: For an extra chocolaty treat, top the Nutella with chocolate chips. Chocolate enthusiasts will find this particularly tempting.
  • Strawberry and Nutella Scrolls: Top the Nutella with thinly sliced fresh strawberries. The tangy, juicy flavor of the strawberries balances the sweetness of the chocolate.
  • Nutella and Coconut Scrolls: Before rolling, sprinkle the Nutella with shredded coconut. The coconut gives the scrolls a hint of chewiness and a tropical flavor.
  • Nutella and Peanut Butter Scrolls: To add a rich, nutty flavor, swirl some peanut butter into the Nutella spread. A timeless favorite is peanut butter and chocolate together.
  • Cinnamon Nutella Scrolls: The warm, spicy flavor of a sprinkled cinnamon in the Nutella complements the chocolate flavor well.
  • Nutella with Marshmallow Scrolls: Top the Nutella with little marshmallow pieces. When air-fried, they will melt and get a gooey feel.
  • Nutella & Nut Scrolls: To increase the nutty flavor and give the dish a crisp texture, add chopped hazelnuts, almonds, or walnuts.

Components

  1.  One sheet of puff pastry
  2. half a cup of Nutella spread
  3. For dusting, use two tablespoons of icing sugar.

Guidelines

  • Get the pastry ready: Puff pastry sheet should be unrolled onto a level surface. If it’s coming out of the freezer, be sure it’s fully thawed.
  • Include Nutella: Spread Nutella liberally over the pastry’s surface, leaving a thin border around the borders.
  • Roll the pastry: To create a log, carefully wrap up the pastry starting at one end.
  • Slice the Scrolls: To create individual scrolls, cut the wood into slices that are between one and two inches thick.
  • Warm up the air fryer. Aim for 180°C (350°F) on your air fryer.
  • Air Fry: Arrange the scrolls inside the air fryer basket so that they are not in contact with each other. Cook for 8 to 10 minutes, or until they start to turn golden and puff up.
  • To serve, let the scrolls cool somewhat and then sprinkle with icing sugar.

Notes Pro Advice:

Consistent Thickness: To guarantee even cooking, cut the scrolls to a consistent thickness.

Prevent Stickiness: To make slicing the scrolls simpler and avoid sticking, lightly flour the knife.

Avoid packing the air fryer basket too full. Cook, if needed, in batches.

Nutella Amount: You can change the amount of Nutella to suit your tastes. More filling results in a center that is gummy.

Serving Warm: The Nutella is deliciously melted and the dough is crispy, so these scrolls are best enjoyed warm.

Storage: To revive the texture of any leftovers, reheat them in the air fryer for a few minutes while they’re still sealed in an airtight container.

Air Fryer Loaded Potato Skins

Air Fryer Loaded Potato Skins

These Air Fryer Loaded Potato Skins make the ideal party snack or appetizer. These scrumptious potato skins are perfect for any occasion since they are packed with of flavorful chicken, creamy sour cream, and gooey cheese.

Recipe by Fork to spoon

Components

  1.  Six big russet potatoes
  2. Two tsp olive oil
  3. To taste, add salt and black pepper.
  4. Six cooked and chopped chicken strips
  5. 1/2 cup shredded cheddar cheese
  6. and 1/2 cup sour cream
  7. Two tablespoons of freshly cut chives
  8. Extra toppings at your discretion: chopped green onions, diced tomatoes, and spicy sauce

Guidelines

  • Warm up the air fryer. Set your air fryer’s temperature to 400°F (200°C) in the meantime as you get the potatoes ready.
  • After giving the russet potatoes a good scrub, use paper towels to pat them dry.
  • Make several holes in each potato with a fork so that steam can escape while it cooks.
  • Make sure the potato skins are well-coated by giving them a light olive oil brush.
  • To taste, add a dash of salt and black pepper to the skins.
  • Put the cooked potatoes into the air fryer basket that has been warmed.
  • The potatoes should be air-fried for 30 to 40 minutes, rotating them halfway through, or until the insides are soft and the skins are crispy.
  • Cook the chicken in a different pan or microwave until crispy while the potatoes are cooking. Once cooked, break it up or cut it into tiny bits.
  • After letting the cooked potatoes cool a little, cut them in half lengthwise.
  • Remove the majority of the potato flesh with care, leaving about ¼ inch still attached to the skins. Put the potato you scooped out aside for later use (like mashed potatoes).
  • Every potato skin should have some grated cheddar cheese inside.
  • Place the crumbled chicken slice on top.
  • Place the loaded potato skins back into the basket of the air fryer.
  • The cheese should be melted and bubbling after a further five to seven minutes of air fry time.
  • Take the hot potato skins out of the air fryer with care.
  • Top each potato skin with a sprinkling of finely chopped fresh chives and a dollop of sour cream.
  • Add optional toppings to your loaded potato skins, such as chopped green onions, diced tomatoes, or a sprinkling of spicy sauce.
  • Have fun: While still hot and oozy, serve your Air Fryer Loaded Potato Skins right away. They are a great snack or appetizer for any occasion.

Quick and easy homemade bread

Bread quick and easy

Quick and easy homemade bread My bread-buying habits have changed.Thanks to a simple and delicious recipe, learning how to make fresh bread has never been easier. This technique, which my grandfather taught me, demonstrates that making bread from scratch doesn’t have to take all day. If you’re up for the task and enjoy baking, try making your own bread the next time you go grocery shopping rather of purchasing it from the bread department. Here’s a comprehensive recipe for making this delicious dish.


Ingredients:

To activate to the yeast.

For the first mixture,


Directions:

  1. To activate the yeast, first mix 1/4 cup of warm water with the dried yeast in a bowl. You must sit still for a few minutes throughout the activation process.
  2. Prepare the Base Mixture: Place the yeast mixture and 1/3 cup all-purpose flour in a separate bowl. Once everything is well combined, cover and place in a warm location to start the fermentation process.
  3. In a large basin, mix the sugar, salt, and 1 1/4 cups warm water to make the dough. Incorporate the yeast/flour blend from Step 2 and blend thoroughly. Sift 3 1/2 cups all-purpose flour as you progressively add it to avoid lumps.
  4. Knead together the ingredients to get a smooth dough. Put aside to get up. After kneading, cover the dough and let it rest in a warm location. Look, the fact that its size has doubled indicates that the ascension was successful.
  5. After the dough has risen, form and prove it on a baking sheet covered with parchment paper. Form it into a loaf and sprinkle some sugar on top. Allow it to proof in a warm location for the last rise, which will add volume and texture.
  6. Preheat the oven to 482°F, or 250°C, and then reduce the temperature to 410°F, or 210°C, while the bread is baking. This will ensure the ideal bake. Bake for 20 minutes, or until the crust is golden brown and the aroma of the perfume permeates the space.
  7. You will get a loaf of bread and a small token of handmade happiness if you follow these directions. Evidence that good bread can be produced with minimal effort, staple ingredients, and heat instead of complex methods and hours of preparation. Once you try this simple and tasty method, you could be convinced, as I was, that buying bread is not necessary.