Discover a Natural Way to Lose Weight and Reduce Bloating

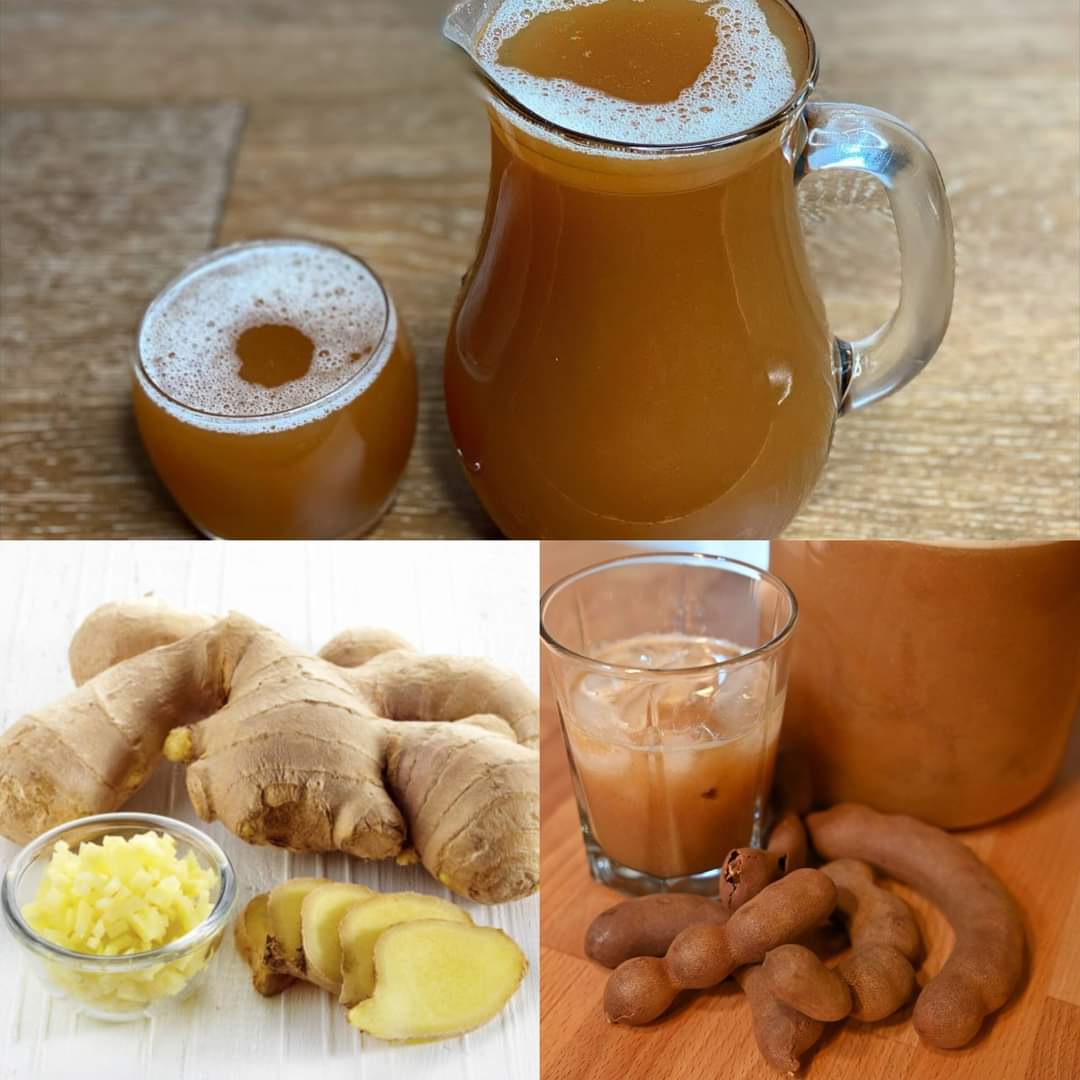
Discover a Natural Way to Lose Weight and Reduce Bloating with Tamarind and Ginger Drink

A homemade drink made with ginger and tamarind might be the answer you’re looking for if you want to lose weight naturally and feel less bloated. This delicious mixture works wonders as a powerful fat burner for the abdomen. Let’s learn how to prepare this beneficial drink and take advantage of all of its health advantages.

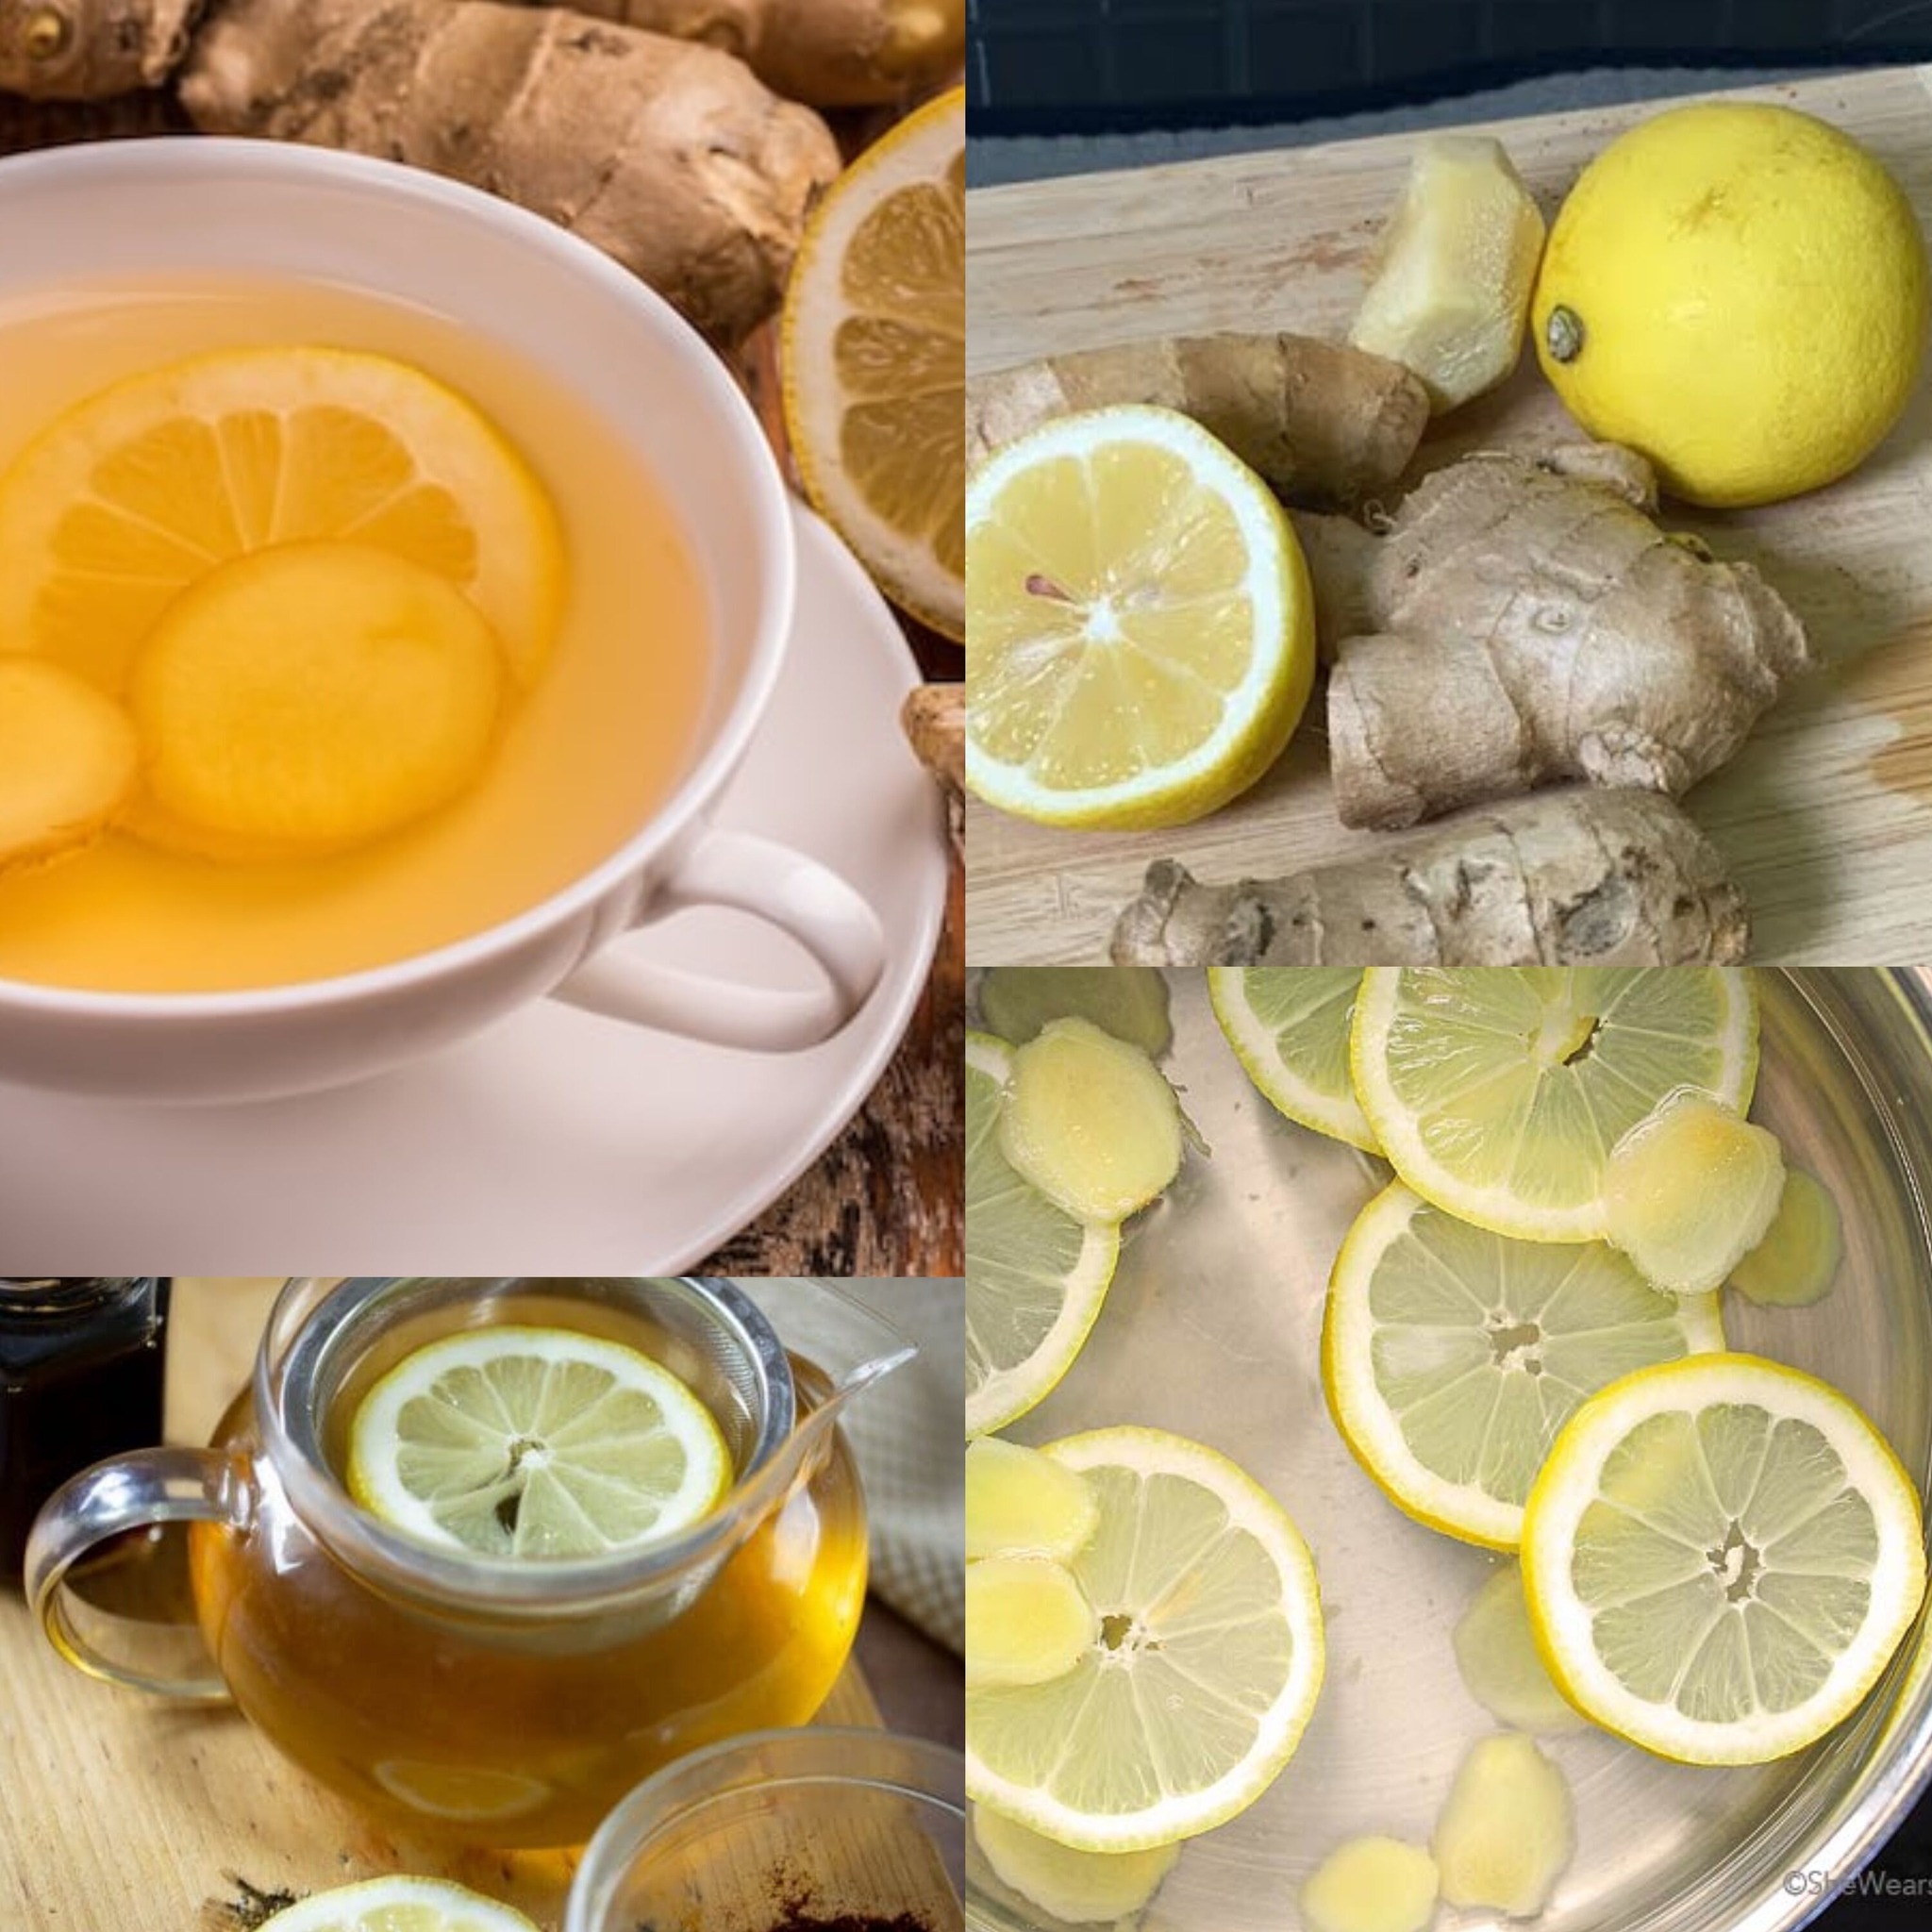
Advantages of Ginger and Tamarind The health benefits of ginger andtamarind include improving metabolism, aiding in digestion, and offering a wealth of antioxidants.

  • One popular natural treatment for bloating and gastrointestinal pain is ginger. It helps hasten the passage of food through your stomach by stimulating the digestive system.
  • Tamarind is high in fibre, helps with digestion, and is frequently used in traditional weight loss therapies.

Ingredients for Ginger and Tamarind Drink

To prepare this easy-to-make yet potent beverage, you’ll need:

  1. A tsp of tamarind paste
  2. One inch of newly grated, freshly fresh ginger root
  3. Four glasses of water
  4. To taste, honey or another natural sweetener
  5. A lemon slice as a garnish (optional)

How to Mix Your Drink Get the ingredients ready:

  • First, dissolve the tamarind paste completely by diluting it with a small amount of warm water.
  • Grate and peel the root of ginger.
  • Simmer: Bring the water to a boil in a medium-sized pot. Add the grated ginger and the tamarind mixture. Simmer the mixture for around fifteen minutes on low heat. This will impart the tastes and health

benefits of the ginger and tamarind into the water

  •  Strain: Take the saucepan off of the hob after it has simmered. Empty the mixture into a sizable pitcher or jug, discarding the solid ginger pieces and any tamarind pieces that haven’t dissolved.
  • Sweeten and Serve: Use honey to taste-test the beverage. This contributes its own natural benefits in addition to improving the flavour. Squeeze in a lemon slice for a cool citrus twist.
  • Savour: You can have this beverage warm or cold. Sipping a cup of this aromatic tea on a daily basis will help you efficiently control your weight and minimise bloating. Savouring Your Health Drink You may improve your overall digestion and get a flatter stomach by making this tamarind and ginger drink a daily ritual. This warming, calming drink boosts metabolism to help you lose weight while also assisting with bloating reduction.
  • Anyone searching for a natural approach to enhance their health and wellbeing should try this drink. Why not give it a shot now and see how it affects the comfort and health of your digestive system? With just one sip, here’s to a happier, healthier you!

Olive Oil and Salt Scrub for Joint Pain

Experience Relief with a Simple Olive Oil and Salt Scrub for Joint Pain

The discomfort that is caused by joint pain can be a barrier, but natural remedies such as a scrub made with olive oil and salt provide a solution that is not only straightforward but also highly effective. The anti-inflammatory properties of olive oil and the calming effects of salt are combined in this simple-to-make scrub, which offers a natural way to alleviate discomfort and aid in the enhancement of mobility. You may begin reaping the advantages of this scrub by following these instructions on how to make it at home.

Olive oil and salt both have a number of advantages:

Because of its high concentration of antioxidants and anti-inflammatory compounds, olive oil is an excellent choice for reducing the inflammation and pain that are associated with joint conditions. The addition of salt, particularly Epsom or sea salt, brings magnesium into the mix, which is known for its ability to relax muscles and reduce swelling.

How to Make and Use the Olive Oil and Salt Scrub:

  1. ½ cup of high-quality olive oil
  2. ¼ cup of fine sea salt or Epsom salt

Details to follow:

Mix Ingredients: In a bowl, add the olive oil and salt. Stir the mixture until it reaches the consistency of a paste. In order to reap additional advantages, you may choose to use a few drops of essential oils such as peppermint or lavender, which are known for their relaxing and anti-inflammatory effects.

You should apply the scrub by massaging it into the parts of your body that are experiencing joint discomfort in a gentle manner.

Increasing circulation and decreasing stiffness are two benefits that may be gained by massage. Be cautious to apply with moderate strokes to prevent irritating the skin or joints.
Leave on for Relief: Allow the scrub to remain on your skin for around 15-20 minutes. Because of this, the magnesium from the salt and the antioxidants from the olive oil have more time to infiltrate and work on the regions that are afflicted.

When the allotted time has passed, it is time to remove the scrub by rinsing it off with warm water. This scrub may be used on a daily basis or a few times each week, depending on the kind of skin you have and how sensitive it is.

Additional Tips:

Warm the Olive Oil: For a more calming experience, slightly warm the olive oil before combining it with the salt. Warm oil may help the combination enter deeper into the skin, improving its medicinal properties.

Maintain a healthy level of hydration: Consuming a large amount of water may assist in the elimination of toxins associated with inflammation.

Concluding remarks:

Creating your own olive oil and salt scrub is not simply an excellent technique to treat joint discomfort; it’s also a wonderful, spa-like routine that you can undertake in the comfort of your home. The use of this simple treatment may assist you in preserving your flexibility and comfort, therefore fostering a lifestyle that is more active and pleasurable. Give it a go, and you’ll notice a change in the way you go about your everyday day!

Ginger and Lemon: A Nightly Ritual for a Refreshing Morning

Ginger and Lemon: A Nightly Ritual for a Refreshing Morning

Are you trying to find a quick fix to make your mornings more productive? A warm beverage made with ginger and lemon right before bed can be exactly what you need! With its many health advantages, this calming drink that mixes the freshness of lemon with the fiery bite of ginger may just brighten your mornings.

Why Lemon and Ginger?

  • Ginger is more than simply a spice for cooking thanks to its zesty and energizing flavour. It has been praised for its capacity to promote easy digestion and calm the digestive tract. A little ginger can help soothe your stomach, whether you’re experiencing mild indigestion or a bloated feeling.
  • In contrast, a lemon tastes like a cup of sunshine. Antioxidants and vitamin C are abundant in it, and they are great for your immune system. In addition to being a natural mood enhancer, the crisp, citrussy scent is ideal for capping off the day well.

How to Make Your Evening Drink

  • This drink is quite simple to make. Just cut up some fresh ginger root and drop it into a boiling kettle of water. Give it a gentle simmer for approximately five minutes so that the fragrance of the ginger can seep into the water. Then add half a lemon’s juice to give your brew a zesty touch. Enjoy your drink exactly as it is if you prefer it a little heated, or allow it to cool to a lulling temperature that you can enjoy sipping before bed.

The Enchanted Overnight

  • The natural ingredients in ginger and lemon cooperate harmoniously while you sleep. The cooling properties of lemon and the warming properties of ginger may help facilitate a mild detoxification process. By morning, the purifying benefits may have left you feeling lighter and more energized, and you might even see a brighter complexion.

A serene and radiant dawn awaits.

  • Imagine waking up to a quiet stomach, a clear head, and a revitalized body. This little bedtime routine might just result in mornings that are more colorful. So why not give it a go this evening? It’s a tiny action that could have a significant impact on how you start each day. Savor the warmth and allow this enchanted mixture to lead the way to a wonderful morning!

A Delightful Breakfast Surprise Egg in a Tomato

A Delightful Breakfast Surprise Egg in a Tomato

Imagine waking up to a delightfully nutritious breakfast consisting of a nicely baked egg nested inside a fresh tomato. This easy-to-make but delicious recipe bakes one egg to perfection and mixes the comforting richness of an egg with the juicy tomatoes. It’s a comforting recipe that infuses your daily routine with a little ingenuity. Let’s look at how to cook this delicious breakfast at home with only a few items and very little preparation!

Why This Particular Combination? Eggs offer premium protein and vital nutrients, and tomatoes are a great source of potassium, folate, and vitamins C and K. This combo is delicious and provides you with a quick energy boost to get through the day.

Components:

  1. Four sizable tomatoes
  2. Four eggs
  3. To taste, add salt and pepper.
  4. Garnish with optional herbs like chives or basil.
  5. A sprinkling of grated cheese is optional.

Guidelines:

  • First, prepare the tomatoes by putting the oven temperature on 375°F (190°C). Slice off the top of each tomato gently, leaving the walls intact, and use a spoon to carefully hollow out the insides while the oven preheats. Your eggs will naturally form a cup as a result.
  • Season: Drizzle a little salt and pepper inside each tomato. For added flavour, feel free to add a pinch of your preferred dried herbs.
  • Crack an egg into each tomato cup to add the eggs. When baked, try not to break the yolk for a beautiful presentation.
  • Bake: To keep the tomatoes stable, put them in a baking dish. This is the perfect opportunity to top with some grated cheese if you enjoy cheese. Bake for 15 to 20 minutes, or until the eggs set to your desired consistency, in a preheated oven.
  • Garnish and Serve: Take out of the oven and sprinkle some fresh herbs, such as chives or basil, on top. These provide your meal a vibrant burst of flavour and color.

Serving suggestions:

  • Although this meal tastes great on its own, it also goes well with a light salad or a slice of whole-grain toast. It’s a vibrant, well-balanced dinner that will wow everyone.
  • This tomato recipe with egg is a culinary delight for the senses as well as the eyes. This is a great way to get extra veggies into your breakfast and to make cooking interesting. Savour this delicious, simple-to-make recipe that will quickly become a morning staple!

Cooking Corn the Right Way: A Chef’s Secret Trick

Cooking Corn the Right Way: A Chef’s Secret Trick

Corn on the cob is a vegetable that is commonly found in kitchens, particularly during the summer months when it is at its most deliciously fresh. The idea that you should simply boil corn in plain water is a frequent kitchen myth that may be preventing you from enjoying the corn that is the sweetest and most flavourful possible. According to this myth, you should boil the corn in plain water. Introducing a chef’s secret trick that will take your corn cooking technique to new heights, we are sharing this hidden trick with you today.

Can’t We Just Have Water? As a general rule, the majority of us just place our corn in a pot of water that is boiling and then call it a day. Despite the fact that this approach does cook the corn, it does not contribute much to the flavour of the corn. As a matter of fact, cooking maize in water might cause some of the inherent sweetness of the maize to be diluted.

The Milk and Butter Bath is a Culinary Cunning Technique Cooking corn in a mixture of milk, butter and water is the secret to achieving the most delectably sweet and delicate corn possible without sacrificing flavour. By using this approach, the natural flavours of the corn are enhanced, resulting in a corn that is irresistibly delicious. Here is how you can replicate this procedure in your own home:

Parts and pieces

  1. Harvested ears of corn, with the husks detached
  2. Wetness
  3. One gallon of milk
  4. 2 teaspoons of butter that has not been salted
  5. For an additional dose of sweetness, a pinch of sugar is optional.

Details to follow:

Getting the Corn Ready:

To clean the maize, remove the husks and the silk from the kernels. To ensure that the ears are clean and ready to be cooked, it is recommended that they be washed under cold water.

Mix the liquid used for cooking:

The water should be filled up to nearly half of a large pot. Place the milk, butter, and a little bit of sugar, if you are using it, into the mixture. The milk contributes a luxurious quality, the butter gives the dish a smooth texture, and the sugar has the potential to enhance the natural sweetness of the corn.

Simmer till it boils:

Bring the mixture to a boil by heating the saucepan over medium-high heat until it happens. Make sure the butter is completely melted and incorporated by stirring it in at regular intervals.

To prepare the maize:

Corn ears should be added to the mixture that is boiling. To cook the corn in a gentle manner for six to eight minutes, reduce the heat to a simmer and let it to cook. The corn should be soft, but it should still have a little bit of a bite to it.

Heat and serve:

Remove the corn from the pot using tongs, and then allow it to drain for a short period of time. The dish should be served hot, with additional butter or the seasonings of your choice.

Take pleasure in your meal: Although this milk and butter method may appear to be a little odd, once you experience the difference, you will understand why it is a technique that is suggested by cooking experts. One cannot reach the same level of richness in the maize that can be achieved by cooking it in water alone. The maize turns out extremely flavorful.

You can attempt this chef’s method the next time you are intending to serve corn, and you should get ready to receive some comments from your guests at the dinner table. Everything you do with maize will never be the same again!

Discover the Ingenious Trick of Putting an Onion in Your Sock

Discover the Ingenious Trick of Putting an Onion in Your Sock

Is there a tradition of leaving an onion inside your sock overnight? Although it may sound like an old wives’ tale, this straightforward DIY cure has been used for many years and is supposed to have several health advantages. Let’s investigate what occurs when you attempt this odd yet intriguing method.

What Makes an Onion?

In addition to being common culinary items, onions are also a powerful source of vitamins, minerals, and other nutrients that have long been utilized in traditional medicine. They include sulfur-containing chemicals that are thought to have antibacterial characteristics along with antioxidants.

The Idea Behind the Trick of the Onion Socks

According to the theory, applying a piece of onion to your feet can assist to detoxify your body, cleanse your blood, and even relieve some conditions. In Eastern medicine, the feet are considered to be one of the body’s most important places, connected to different internal organs by meridians. It is believed that energy travels through these meridians and distributes throughout the body.

How to Give It a Try

Get the onion ready:

  • Select a fresh onion, ideally one that is organic. Either red or white onions work well.
  • To make the onion easy to place against the soles of your feet, peel and chop into large, flat slices.

Get your socks ready:

  • To ensure the onion slices stay in place all night, choose socks that fit snugly.

Positioning:

  • Put a piece of onion in the arch of each sock before you turn in. The onion is said to interact with your foot’s nerve endings most effectively when it is pressed up against your soles.

Take a nap on it:

  • Put on your socks and head to bed as normal. While you’re asleep, the onion purportedly draws out toxins and has health advantages.

What to Anticipate

  • After attempting this, some people say they feel more rested or that their complexion looks clearer. Some find it calming for mild illnesses. Even if this remedy’s efficacy hasn’t been scientifically demonstrated, it’s a straightforward and safe approach to try, and at worst, you might find it to be an entertaining experiment!

Unlock the Power of Chia: A Refreshing Way to Support Weight Loss

Unlock the Power of Chia: A Refreshing Way to Support Weight Loss

Want to get in shape and feel amazing? Small chia seeds may hold the key to unlocking this mystery. These tiny but powerful seeds have been connected to several health advantages, including possible weight loss. They are a veritable gold mine of nutrients. When you mix them with water, you’ll have a delightful concoction that’s simple to prepare and may support you in your quest for a smaller waist.

Why Use Seeds from Chia? Omega-3 fatty acids, fibre, and protein are all important components in the weight loss process, and chia seeds are high in all three. Your stomach’s ability to hold onto fibre helps you feel full and content, which encourages you to eat fewer snacks and fewer additional calories throughout the day.

Components:

  1. a pair of teaspoons chia seeds
  2. One glass (8 ounces) of water
  3. Add some flavour with lemon juice or a slice of cucumber if desired.


Guidelines:

  • Get the Chia Mixture Ready: Transfer the chia seeds into the water glass. Add a slice of cucumber for a spa-like refreshment or a squeeze of lemon for a zesty citrus flavour. Give the mixture a good stir.
  • Let It Sit: Give the seeds 20 to 30 minutes to soak in the water. They will swell and become gel-like as they absorb the water, giving the texture a similarity to tapioca pearls.
  • Savour Your Chia Drink: Remix the concoction and consume it as a nutritious lunchtime snack or as part of your breakfast. Your stomach is coated with the gel from the seeds, which might help curb appetite and stop overindulging.
  • Benefits Beyond Weight Loss: Because of its capacity to absorb water, chia seeds are not only excellent for managing weight but also for promoting hydration. They are an excellent supplement to your regular diet for general health because they are also a terrific source of antioxidants, calcium, and magnesium.
  • Advice for Optimal Results: Include this chia water in your everyday routine together with a healthy diet and frequent exercise. Although it’s not a miracle cure, it can be a beneficial supplement to a healthy way of living.
  • Concluding Remarks: A straightforward yet potent beverage combining chia seeds and water might bolster your attempts to lose weight. Not only is this simple recipe healthy, but it’s also a fun way to change up your water intake. Why not give it a shot and see how this tiny superfood can support your health objectives? Cheers to a happy, healthier self on your journey!

The Age-Defying Powers of Parsley: Boost Your Collagen Naturally

The Age-Defying Powers of Parsley: Boost Your Collagen Naturally

Searching for a natural solution to increase the brightness and vitality of your skin? Parsley may be the herb you’ve been looking for! Though parsley is frequently thought of as merely a garnish, it is actually a nutritional powerhouse with amazing skin benefits, particularly when it comes to encouraging the formation of collagen. Find out how to keep the firmness and youthful radiance of your skin by include parsley in your daily regimen.

Why might Parsley be used? Vitamin C, which is abundant in parsley, is necessary for the formation of collagen, which keeps skin firm and young-looking. It also has a lot of antioxidants, which help shield the skin from environmental toxins and free radical damage.

Components of an Easy Parsley Face Mask:

  1. Several just plucked parsley leaves
  2. two tsp plain yoghurt
  3. One tsp honey

Guidelines:

  • To prepare the parsley, give it a thorough wash to get rid of any dirt or pesticides. Ensuring that the purest form of this herb comes into contact with your skin is why this step is so important.
  • Blend the Ingredients: Put the yoghurt, honey, and fresh parsley leaves in a blender. Blend until a creamy, smooth paste forms. The natural antibacterial and calming qualities of honey are combined with the moisturising effect of yoghurt in this mask.
  • Before applying the mask, wash your face to get rid of any makeup or pollutants. Avoid the region around your eyes and evenly apply the parsley face mask over your face. This is a really refreshing experience because of the stimulating, fresh aroma of parsley.
  • Unwind and Rinse: Give the mask 15 to 20 minutes to rest on your face. This allows adequate time for the active substances to do their magic. After rinsing the mask off with lukewarm water, gently towel dry your face.
  • Apply your preferred moisturiser afterwards to seal in the advantages of the mask. Happy skin is hydrated skin!
  • Benefits Beyond Beauty: Including parsley in your diet will greatly improve your health in addition to its benefits for your skin. Because of its high vitamin and mineral content, it can enhance general health and preserve the beauty of your skin from the inside out.
  • Including parsley in your diet and skincare routine is a simple and efficient method to maintain the best-looking skin possible. A fantastic herb that promotes skin health and renewal, parsley can be added to smoothies or used as a face mask. Try it out, and you’ll see your skin glow naturally and youthfully!

The Remarkable Benefits of Drinking Raisin Water

The Remarkable Benefits of Drinking Raisin Water Daily on an Empty Stomach

It may seem strange to start your day with a glass of sultana water, but this straightforward routine could have a number of unexpected health advantages. Raisins are sweet, wrinkled dried fruits that we typically eat as snacks. They are rich in nutrients, which you may extract and add to water to make a nutritious morning beverage. Here are some reasons why you might wish to incorporate sultana water into your everyday routine.

What Made Raisin Water? Dried grapes, or raisins, are concentrated little grapes that have all the benefits of fresh fruit. They contain high levels of antioxidants, potassium, and iron. Soaking them in water releases these nutrients, which your body can absorb more easily.

Benefits of Raisin Water for Your Health:

  • Enhances Digestion: The high fibre content of raisins aids in regular bowel motions and the avoidance of constipation. Regularly consuming sultana water, especially on an empty stomach, can help your digestive system function more normally.
  • Promotes Heart Health: Potassium from raisins helps lower blood pressure and balance bodily fluids. So, by regulating blood pressure and averting heart-related problems, a regular consumption of sultana water can promote heart health.
  • Boosts Energy: Natural sugars, like those found in raisins, are a good way to get a quick energy boost. You may start your day with a healthy energy boost without experiencing the crash that comes with drinking caffeinated beverages by sipping sultana water in the morning.
  • Promotes Bone Health: Calcium, which is necessary for strong bones, is found in raisins. Additionally, they contain a lot of boron, a vitamin that aids in the development and upkeep of bone structure. Because of this, sultana water is a fantastic beverage to maintain long-term bone health.
  • Enhances Skin Health: By lowering oxidative stress and slowing the ageing process, the antioxidants in raisins assist your body’s defence against free radicals. Frequent use of sultana water can help promote skin that is more radiant and clear.

The Recipe for Raisin Water

Components:

  1. A small handful (about 150 grammes) of raisins
  2. two glasses of water

Guidelines:

  • Thoroughly rinse the raisins under running water.
  • After cleaning, put the raisins in a cup and add water. Soak them for the entire night.
  • Strain the raisins and preheat the water in the morning. For optimal effects, drink it without food while you’re empty.
  • A quick and natural way to improve your general health is to drink sultana water. Including this little step in your morning routine could be the difference between feeling refreshed and prepared to face the day. Try it out and see for yourself the advantages!

Discover the Natural Secret for Luxurious Hair Growth: Cloves, Bay Leaf, and Water

Discover the Natural Secret for Luxurious Hair Growth: Cloves, Bay Leaf, and Water

Are you looking for a natural solution to lessen hair loss and promote hair growth? Your kitchen pantry is the best place to start! Your key to healthier, thicker, and more robust hair may be a straightforward mixture of cloves, bay leaves, and water. Using just three simple components, this cure helps strengthen your hair and nourish your scalp by utilising their natural characteristics. Here’s how to make this incredible hair tonic at home.

Why This Particular Combination?

  • Because of its antibacterial qualities and plenty of antioxidants, cloves assist to cleanse the scalp, preventing dandruff and bacterial growth that can cause hair loss.
  • Rich in vitamins and minerals, bay leaves are well-known for their ability to stimulate hair follicles, encourage hair growth, and enhance the overall health of hair.
  • Applying this treatment to your hair and scalp is made easier by the use of water as a medium to extract the powerful chemicals from the bay leaves and cloves.

Components:

  1. One tablespoon of whole cloves
  2. Six dried bay leaves
  3. two glasses of water

Guidelines:

Get the Infusion Ready:

  • Put the water, bay leaves, and cloves in a small saucepan.
  • After bringing the mixture to a boil, lower the heat, and simmer it for 20 minutes. This enables the nutrients from the bay leaves and cloves to seep into the water.

Calm and Tense:

  • Once the mixture has simmered, take the pan off of the hob and allow it to cool to room temperature.
  • After the liquid cools, strain it to get rid of the bay leaves and cloves. The result will be strong, ready-to-use infused water.

Use:

  • Apply the chilled infusion to your scalp following your usual hair washing regimen.
  • For many minutes, gently massage all over the scalp, being sure to increase circulation and cover all the areas.
  • You can let your hair air dry naturally without having to rinse it out.

The relationship between frequency and storage

  • Use this treatment at least twice a week for optimal benefits.
  • Any remaining infusion should be refrigerated. Before using, reheat the tonic slightly because applying a warm, not hot, tonic can improve absorption and effectiveness.
  • Benefits: This home remedy not only encourages quick hair growth but also considerably lowers hair loss. You might observe that your hair gets healthier, shinier, and thicker with continued use.
  • See how the health and appearance of your hair improve by trying this easy, three-ingredient hair growth tonic as part of your beauty routine. It’s an inexpensive, satisfying, and all-natural method to encourage hair growth without baldness!