In order to create a strong dishwashing detergent that is effective for a long time, I combined sugar and salt.

In order to create a strong dishwashing detergent that is effective for a long time, I combined sugar and salt.

Would you be interested in discovering today, with the aid of this wonderful do-it-yourself method, how to create a homemade detergent that is effective and extends its shelf life in a way that is both useful and simple? This detergent is strong and has a long shelf life, therefore by using this method you may still get an effective product at a lower cost.

directions for making your own laundry detergent!

  • We’re going to build a homemade detergent today that will allow us to increase its useable life by over four times without sacrificing its effectiveness and quality.
  • The components needed for its preparation are as follows:
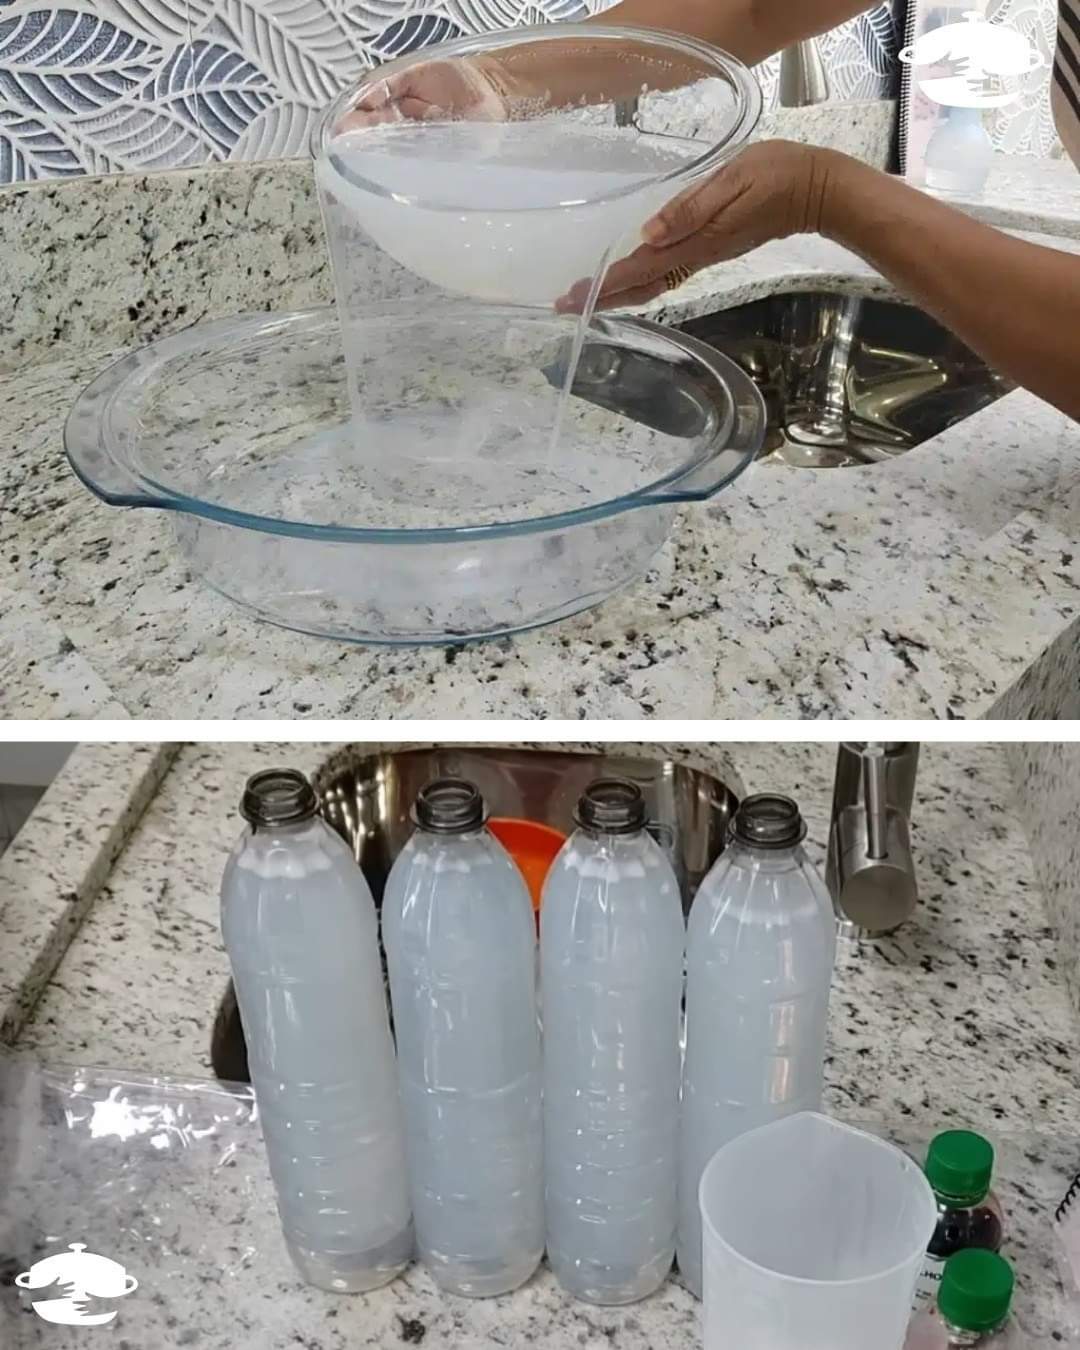
  • The contents are detergent, coloring, sugar, salt, and cold water. You are free to choose whether or not to add colorant, and doing so has no bearing on the product’s effectiveness.
  • Firstly, we will fill a large container with water and dissolve the salt and sugar in it before starting to make this homemade detergent.
  • We will gradually add the detergent while gently swirling it once the sugar and salt have completely dissolved, which is a sign that they have been thoroughly diluted
  • . By then, the amount of our homemade detergent will have grown without acquiring any of its traits! Remember to review each of the stages that are indicated below!

Would you like to get the skills required to create a delicious recipe?

I’ll walk you through each of the crucial components step-by-step if you follow along. I’m sure you’ll grow to appreciate it and add this masterpiece to your menu. Make sure you follow the instructions provided here to ensure success. Of course, don’t forget to post your changes in the comments section as well. The following ingredients are used to make homemade detergent: It’s not necessary to use color. Two teaspoons of salt Just one detergent is available. Sweetener comparable to two tablespoons 1.75 liters of ice water in total Method of approaching the preparation:

The Perfect Fusion: Turmeric and Honey Blend

The Perfect Fusion: Turmeric and Honey Blend

The Ideal Combination: Honey and Turmeric

Within the vast field of natural treatments, there is a mixture that shines with extraordinary healing powers. This incredible combination of honey, turmeric, and a hint of black pepper goes beyond conventional medicine to represent a powerful potion that is highly valued for its ability to boost general health and energy levels. Let’s investigate this golden mixture more; it’s well known for having nourishing, anti-inflammatory, and antiviral qualities.

Turmeric and Honey: An Effective Blend

Two highly regarded components of traditional medicine, turmeric, known for its curative properties, and honey, hailed as nature’s sweet cure, are the foundation of this golden elixir. Together, these elements create a beautiful union that satisfies the senses and offers a host of health advantages.

One natural remedy is turmeric.

antioxidant, increases endurance, promotes heart muscle regeneration, and successfully lowers inflammation in the body. Meanwhile, honey’s many uses include helping with digestion, relieving colds and coughs, and acting as a mild but effective treatment for a number of illnesses.

Exposing the Principal Component

The inclusion of black pepper, which is high in piperine—a substance that increases the absorption of curcumin, the active ingredient in turmeric—adds to the blend’s attractiveness. Black pepper guarantees that the therapeutic properties of the elixir are maximized by unlocking the potent properties of turmeric.

  • Rafting the Pot of Gold
  • Making this enlightening concoction is a simple procedure. What you’ll need is as follows:
  • One tablespoon of turmeric
  • fifty grams of honey
  • freshly ground black pepper
  • Once the honey and turmeric have been well combined, add a splash of

in order to release the curcumin. Shake vigorously and store the mixture in a glass container. Take one spoonful whenever you need a pick-me-up or are feeling under the weather.

Using the Restorative Process

This golden elixir is a wonderful example of the synergistic interactions and remarkable healing properties of natural compounds. Beyond its therapeutic value, this combination is a tribute to the wonders of complementary medicine, whether it is used to support the immune system, ease digestive issues, or nourish the body with organic antioxidants.

Accept the Core of Well-Being

Accept the benefits of nature’s medicine by accepting this golden elixir, which is a representation of health and energy.

A Delicious Way to Help Manage Blood Sugar

A Delicious Way to Help Manage Blood Sugar

A Delicious Way to Help Manage Blood Sugar

Red lentils are a great option for a satisfying dinner that also helps control blood sugar levels. This adaptable legume is a great addition to your diet because it is tasty and full of health advantages. This is a quick and healthy red lentil recipe that will be a great asset to your menus.

Why Red Lentils?

Fibre, which is abundant in red lentils, is essential for controlling blood sugar levels because it reduces the rate at which sugar enters the bloodstream. Additionally, they are high in vital vitamins, minerals, and proteins, which help you feel content and full without consuming a lot of calories. In addition, red lentils cook quickly and don’t need to be soaked like other legumes, which makes them a practical choice for hectic days.

Easy Recipe for Red Lentils

To get you started, try this simple yet comforting red lentil recipe:

  • 1 cup red lentils
  • 2 cups water or broth
  • 1 medium onion, diced
  • 2 cloves garlic, minced
  • 1 teaspoon turmeric
  • 1 teaspoon cumin
  • Salt and pepper to taste
  • 2 tablespoons olive oil
  • Fresh cilantro or parsley for garnish

Instructions:

Prepare the Lentils:

  • After the water runs clean, rinse the red lentils under cold water. This aids in clearing away any dust or dirt.

Cook the Aromatics:

  • Heat the olive oil in a saucepan over medium heat. When the onions and garlic are tender and transparent, add them and sauté.
  • Add the cumin and turmeric, and simmer for a further minute, or until the spices release their aroma.

Simmer the Lentils:

  • Fill the pot with water or broth and add the rinsed lentils. Bring the mixture to a boil, then reduce the heat and let it simmer uncovered for about 15-20 minutes, or until the lentils are soft and the liquid is mostly absorbed.

Season and Serve:

  • To taste, add salt and pepper to the cooked lentils. To get the right consistency, you can add a little extra water or broth if the mixture appears too thick.
    Before serving, garnish with freshly cut parsley or cilantro.
  • You can eat this meal of red lentils as a side dish with flatbread or rice, or as a substantial soup. Not only is it a comfort food, but it’s also a wise decision to keep blood sugar levels steady.

Savour Your Food!

Red lentils are a great way to enjoy a meal that is high in nutrients and helps with blood sugar control. Include them in your diet. This red lentil meal is a tasty and simple choice if you’re trying to increase the variety of foods you cook or discover new strategies for controlling your blood sugar. Savour this fantastic legume’s inherent flavours and health advantages with your next meal!

Celery Cucumber Detox for a Healthier Gut

Celery Cucumber Detox for a Healthier Gut

Refresh Your System: Celery Cucumber Detox for a Healthier Gut

First of all, Do you want to improve your general health and revitalise your digestive system? You might benefit from a simple detox juice made with cucumber and celery. This light and invigorating combination is ideal for clearing your digestive tract and boosting your energy levels. Let’s look at how to make this simple detox drink that’s great for promoting intestinal health.

How to Make Celery Cucumber Detox Juice:

Ingredients:

  1. Three fresh celery stalks
  2. One huge cucumber
  3. One green apple, optional but sweet
  4. One tsp lemon juice
  5. A handful of mint leaves (for a really cool flavour)

Getting ready:

  1. Thoroughly wash the green apple, cucumber, and celery.
  2. Dice the celery and cucumber into small pieces. Slice the apple after removing the core.
  3. Put everything into a blender or juicer. Incorporate the mint leaves and lemon juice.
  4. Process till smooth. If using a blender, you might need to strain the juice to remove the pulp.

Serving Suggestions:

  • For best results, drink this detox juice first thing in the morning on an empty stomach.
  • In order to maximise the nutrients, consume it fresh. Before serving, place it in the refrigerator for a brief while or add a few ice cubes if you like it cold.

Tips for a Successful Detox:

  • Keep Yourself Hydrated: Although this detox juice is hydrating, make sure you consume lots of water during the day to aid in the detoxification process.
  • Eat Light: To get the most out of your detox juice and give your digestive system a break, combine it with light, unprocessed foods.
  • Regular Intake: Include this drink in your regimen for a few days to get the finest effects. But keep in mind that eating in moderation is essential to keeping your diet balanced.

In summary, this detox juice made from celery and cucumber is not only a delicious drink but also a potent health tool that can help you clear your system and get a flatter stomach and healthier gut. It’s a great complement to your wellness routine, easy to make, and enjoyable to drink. Feel refreshed from the inside out by trying this cool detox juice!

Why Do Bananas Have Those Tiny Strings

Why Do Bananas Have Those Tiny Strings

Why Do Bananas Have Those Tiny Strings?

Have you ever wondered why the small strings on bananas are so bothersome? The ones that, when you peel off the yellow skin, appear to follow you around? Those are referred to as “phloem bundles,” and they do have a function.

Nutrients are transferred from a plant’s leaves to its fruit by phloem bundles, which includes bananas. They are essential to the plant’s development and well-being because they make sure it gets the nutrition it needs. However, what about the actual strings? Are they palatable?

You can eat those strings, yes! It’s not required to take them out before eating a banana, though. As a matter of fact, they include vital nutrients like fibre, potassium, vitamin A, and vitamin B6. So go ahead and enjoy the nutritious benefits of the strings on your next banana by leaving them in place.

Remarkably, new studies indicate that bananas with brown spots are in fact healthier than those without. So, take your time throwing out those bananas that are a little too ripe. Because of their high potassium level, they contain a chemical that has been shown to kill cancer cells and help manage blood pressure.

Therefore, keep in mind that those small strings—while a little annoying—have a purpose the next time you enjoy a banana. They supply crucial nutrients and aid in the fruit’s development. Accept the benefits of phloem bundles for your health and enjoy them!

The Power of Dried Apricots

The Power of Dried Apricots

The Power of Dried Apricots

A Delicious Path to a Healthy Life

We frequently look for the keys to the lives of individuals who have accomplished this amazing feat as we strive to live long and healthy lives. One dietary decision that sticks out for these people is the addition of dried apricots.

This humble fruit is a vital component of lifespan and good health, with its delightfully sweet taste and chewy texture making it more than just a great snack.

Why Choose Dried Apricots?

Not only are dried apricots delicious, but they are also a great source of nutrients that help maintain essential bodily functions and prevent illnesses, such as the modern-day cancer epidemic. Their secret is a powerful defence against a range of health conditions created by a mix of dietary fibre, vitamins, and antioxidants.

1. A Nutrient Powerhouse

Vitamin A, which is essential for maintaining healthy skin, eyes, and immune system function, is abundant in dried apricots. They are also a fantastic source of fibre, which helps control weight by keeping you fuller for longer periods of time and supports digestive health. Dried apricots are also a great option for preventing anaemia because of their high iron content, especially for those who are at risk of iron deficiency.

2. Abundant Antioxidants

Antioxidants abound in these golden dried fruits, including flavonoids and beta-carotene. These substances are important in lowering inflammation and shielding the body’s cells from damaging free radicals. Antioxidants in dried apricots help reduce the incidence of chronic illnesses, including some forms of cancer, by preventing oxidative stress.

3. Heart Health and More

Including dried apricots in your diet has heart-healthy benefits as well. Apricots’ potassium and fibre content both contribute to blood pressure regulation and LDL (bad) cholesterol reduction. All of these benefits add up to a more robust cardiovascular system.

How to Include Dried Apricots in Your Diet

Not only are dried apricots healthy for you, but they’re also tasty and simple to incorporate into your diet. These delicious fruits are great on their own as a snack or added to salads for a tangy and sweet twist. They can also be added to yoghurt and breakfast cereals for extra nutrients.

Conclusion:

Accepting the small but effective addition of dried apricots to your regular diet may hold the secret to a longer and healthier life. It supports the theory that sometimes the simplest health strategies also happen to be the most effective ones. So let’s raise a glass to living life to the fullest, one dried apricot at a time!

Exploring the Quirky Practice of Sleeping with Onion in Your Socks

Exploring the Quirky Practice of Sleeping with Onion in Your Socks

Exploring the Quirky Practice of Sleeping with Onion in Your Socks

Is there a tradition in your family to stuff onions into your socks before bed? Although it may sound a little strange, some people have hailed this method as a natural cure with a host of health advantages. This intriguing strategy can appeal to you if you’re fascinated by folklore or seeking for all-natural solutions to improve your health. Let’s examine what happens and why some people swear by the nightly practice of tucking an onion into your socks.

ORIGINS AND CLAIMS

The belief that onions might absorb toxins and purify the body may have given rise to the custom of stuffing slices of onion inside socks. This technique is supposed to take advantage of the antioxidants, vitamin C, and anti-inflammatory substances that onions are known to have.

The belief that onions might absorb toxins and purify the body may have given rise to the custom of stuffing slices of onion inside socks. This technique is supposed to take advantage of the antioxidants, vitamin C, and anti-inflammatory substances that onions are known to have.

HOW IT’S DONE:

Preparation:

  1. Cut a fresh, clean onion into even slices.
  2. Put a piece of bread in each foot’s arch.
  3. Put on some socks to keep the slices in place while you sleep.

The theory goes that as you sleep, the inherent healing properties of onions enter your circulation through your skin.

REPORTED BENEFITS

  • Purification: Because onions have potent antibacterial qualities, proponents of this practice contend that onions help cleanse the blood by eliminating pollutants.
  • Enhanced Circulation: It is believed that applying the onion slice to the feet, a reflexology point linked to numerous body processes, will stimulate these regions.
  • Cold Prevention: According to some users, the powerful natural vitamins and minerals in onions have an immune-boosting impact, which helps prevent colds and the flu.

SCIENTIFIC BACKING AND SKEPTICISM

Even while it’s a fascinating habit, it’s vital to remember that there isn’t much scientific proof that sleeping with onions in your socks works. People’s stated advantages could be the product of placebo effects or just their belief in the treatment’s effectiveness.

CONCLUSION: HARMLESS BUT QUESTIONABLE EFFICACY

It’s normally harmless to sleep with onions in your socks, and if it helps you feel better, it might be worth a try only for the placebo effect. However, concentrating on tried-and-true tactics like a balanced diet, consistent exercise, and enough sleep may be more advantageous for people searching for scientifically supported ways to improve their health.

Finding out about the history and origins of many home cures is always intriguing, regardless of whether putting onions in your socks becomes a nightly ritual for you. Who knows? Perhaps there is some truth to this strange story about onions!

Burning cloves drive away all Insects in a matter of seconds

Burning cloves drive away all Insects in a matter of seconds

Burning cloves drive away all Insects in a matter of seconds Are you tired of fighting flies, mosquitoes, and cockroaches in your house all the time? What if I told you there was a quick fix that would cause them to vanish in just ten seconds? You can use the powerful properties of cloves as a natural bug deterrent and to make your home more pleasant by burning them. Let’s examine how burning cloves functions and how you can quickly implement this technique into your regular pest management regimen.

The Instantaneous Relief of Burning Cloves:

Insects find the rich, perfumed scent that cloves emit when burned intolerable. As soon as cloves are burned, the strong smell will cause flies, mosquitoes, and cockroaches to quickly leave the area.

  • Easy Application: Not much work or equipment is needed to burn cloves. Just use a match or lighter to light a few cloves on fire, then let them smoulder for a short while. Burning cloves releases a thick smoke that quickly fills the surrounding space and chases pests away.
  • Temporary Solution: Burning cloves will instantly protect you from pests, but the benefits are just momentary. Burning cloves can be used in conjunction with other preventive techniques, such caulking gaps and crevices, eliminating food and water sources, and keeping your home clean, to provide long-term pest management.


Method of Burning Cloves for Pest Control:

  1. Prepare a heatproof dish and container to hold the burning cloves, along with a handful of entire cloves.
  2. Burning Procedure: Using a match or lighter, place the cloves in the dish or container and burn them on fire. When the cloves start to emit smoke, give them a few seconds to burn.
  3. Application: Place the burning cloves in the kitchen, bathroom or entryway areas of your house where bugs are most of a problem. To avoid smoke accumulation, maintain a safe distance from the flames and make sure there is enough ventilation.

Accept Instant Pest Reduction:

You may quickly and easily get rid of cockroaches, mosquitoes, and flies from your home by burning cloves. Savour the instant pest relief and the peace of mind that comes from knowing you have a fast and practical fix at your disposal. Take back control of your home from trespassers by harnessing the power of burning cloves.

Unlock the Magic of Castor Oil Before Bed

Unlock the Magic of Castor Oil Before Bed

Unlock the Magic of Castor Oil Before Bed: 12 Compelling Reasons to Give It a Try

First of all, Are you trying to find a natural way to improve your health and appearance? Castor oil is the only place to look! For millennia, people have treasured this modest oil due to its remarkable advantages. Find out why using castor oil before bed could be the best choice you ever make for your appearance and well-being.

The Benefits:

  1. Encourages Hair Growth: Putting castor oil on your scalp before bed will help to wake up hair follicles, which will eventually result in thicker, healthier hair.
  2. Skin Moisturiser: Due to its high fatty acid content, castor oil is a great moisturiser for dry skin. It can leave your skin feeling moisturised, silky, and soft after use right before bed.
    Reduces Wrinkles: Using castor oil on a regular basis will help make wrinkles and fine lines less noticeable, leaving your skin looking bright and young.
  3. Fights Acne: The antibacterial qualities of castor oil can aid in the fight against bacteria that cause acne. Applying it to trouble spots prior to going to bed will help lessen swelling and pimples.
  4. Reduces Muscle Soreness: Applying castor oil to painful muscles before bed will reduce discomfort and inflammation, which will help you relax and get a better night’s sleep.
  5. For brittle nails, see Strengthens Nails. Not any longer! Before going to bed, apply castor oil to your nails to strengthen them, avoiding breakage and encouraging healthy development.
  6. Relieves Joint Pain: Castor oil is a calming treatment for joint pain because of its anti-inflammatory qualities. For comfort and relief, massage it into sore joints before going to bed.
  7. Enhances Sleep Quality: Applying castor oil to your body before bed will help you unwind mentally and physically, which will lead to a deeper, more restful sleep.
  8. Treats Dry Eyes: To help relieve dryness and irritation and wake up with refreshed eyes, use a tiny amount of castor oil around your eyes before bed.
  9. Detoxifies the Body: By encouraging bowel motions and activating the lymphatic system, castor oil packs given to the belly before bed can help with detoxification.
  10. Diminishes Dark Circles: Applying a light layer of castor oil beneath your eyes prior to sleep will aid in diminishing the visibility of puffiness and dark circles, leaving you with a more rested appearance in the morning.
  11. Nourishes Lips: Bid adieu to dry lips! Before going to bed, apply castor oil on your lips to keep them hydrated and kissably smooth.

A quick and easy strategy to improve your health and appearance is to incorporate castor oil into your nightly regimen. Try it out and see the life-changing results for yourself!

In conclusion, there are a plethora of amazing advantages of applying castor oil before bed, ranging from stimulating hair growth to enhancing the quality of sleep. This adaptable oil has benefits for all skin types, including nourishing skin, relieving muscular soreness, and improving general wellbeing. Why not attempt it now and discover a more contented and well-being in the morning?

Recipe for Natural Anti-Aging Cream and Tonic Tea

Recipe for Natural Anti-Aging Cream and Tonic Tea

Recipe for Natural Anti-Aging Cream and Tonic Tea

Are creases and other ageing indicators getting to you? For you, we have a simple and practical solution today! We’re going to be making a fantastic tonic tea and a natural anti-aging face cream that will help fight the signs of ageing and leave you feeling refreshed.

Recipe for Anti-Aging Face Cream
First, let’s discuss the anti-aging face cream. What you’ll need is as follows:

  1. One big orange
  2. one medium-sized carrot
  3. Six bay leaves
  4. One tablespoon of coconut oil
  5. Four tsp olive oil

Here’s how to make the cream now:

  1. Rinse the orange well with baking soda and warm water.
  2. Grate the orange peel finely and save.
  3. The medium carrot should be grated.
  4. Make sure the water in the saucepan doesn’t get inside the cream while it’s cooking by placing a towel at the bottom and adding water.
  5. To the pot, add the olive oil, coconut oil, chopped carrot, bay leaves, and grated orange peel.
  6. Boil the water and cook over medium heat for forty minutes.
  7. Pour the mixture via a strainer.
  8. Place the cream in the refrigerator to chill.
  9. After use, place the cream in the refrigerator.

This orange cream works wonders for wrinkle reduction and anti-aging. The orange’s essential oils enhance cellular regeneration by penetrating the skin deeply and stimulating metabolic processes. Its first application will make your skin noticeably softer. But be sure to try it on a small portion of your skin first before putting it all over your face.

Tonic Tea Recipe

Let’s go on to the tonic tea now. The ingredients are as follows:

  1. One lemon’s juice
  2. lemon slices that have been squeezed
  3. An item of ginger
  4. 700 millilitres of water
  5. One cinnamon stick
  6. One tsp of paprika

To make the tea, just follow these easy steps:

  1. Place the water, ginger, cinnamon stick, and lemon slices in a pot and bring to a boil.
  2. After letting it simmer for a bit, let it to cool.
  3. To the cooled tea, add a teaspoon of paprika and little lemon juice.
  4. Savour the revitalising and refreshing tonic tea!
    Not only is this tea wonderful, but it also boosts immunity, tones the body, and quickens metabolism. Particularly ginger tea offers incredible health advantages, including antimicrobial and relaxing properties.

Try these simple DIY tonic tea and natural anti-aging lotion recipes. They are beneficial for your skin and general health in addition to being effective. Watch this space for more delicious recipes. To ensure that you don’t miss any new videos, remember to subscribe and turn on notifications. Let’s toast to a young, energetic you!