How to Make Perfect Lemongrass Tea at Home

How to Make Perfect Lemongrass Tea at Home

In addition to being a pleasant beverage, lemongrass tea has other health advantages. Lemongrass tea, well-known for its immune-boosting, digestive, and soothing qualities, is a great addition to your daily regimen. Its anti-inflammatory and antioxidant-rich qualities can help reduce anxiety and encourage relaxation. After meals, a cup of lemongrass tea can also help with digestion and soothe the stomach.

Items You’ll Require
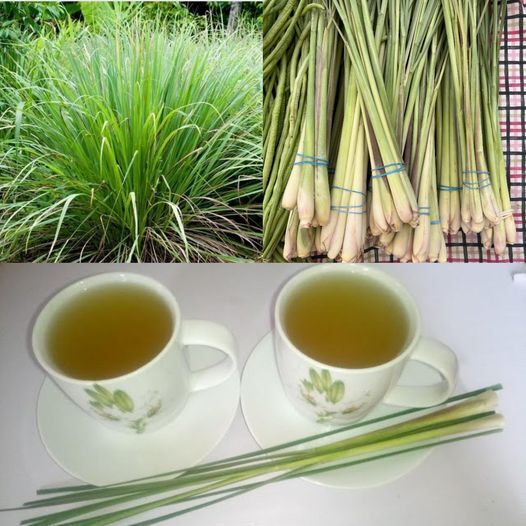
Fresh Lemongrass:

  1. To make the best cup of tea,
  2. use two stalks of fresh lemongrass.
  3. In the event that fresh lemongrass is not available, dried lemongrass or tea bags containing lemongrass can be used.

Water: For brewing, use around two cups of water.
Honey or Lemon (Optional): You can add a spoonful of honey or a squeeze of lemon to improve the flavour to your preference.

Instructions for Brewing

First step: Get the lemongrass ready.

  • When working with fresh lemongrass, begin by removing the rough, fibrous outer layers. Use only the stalk’s fragile sections.
    Slice the stalks into 2 to 3 inch lengths, and then use the flat side of a knife to gently smash them. This improves the flavour and aids in the release of the oils.

Step 2: Bring to a boil

  • After the lemongrass is ready, put it in a pot with about two glasses of water.
  • After bringing the water to a boil, lower the heat, and simmer it for five to ten minutes.
  • Keep in mind that the flavour will get stronger the longer it simmers.

Step 3: Pour and Garnish

  • Take the tea off the heat after it reaches the strength you like.
  • After removing the chunks of lemongrass from the water, transfer the steaming tea into a cup.
  • For more sweetness and tang, feel free to squeeze in some lemon or add a teaspoon of honey.

Taking Pleasure in Your Tea

  • Hot lemongrass tea is a fantastic match for a restful evening.
  • Alternatively, chill it and pour it over ice for a nice beverage on a hot day.

In summary
The procedure of preparing lemongrass tea at home is easy and calming. In addition to its many health benefits, this tasty herbal tea offers a moment of relaxation during your hectic day. Either unsweetened or mildly sweetened, lemongrass tea is a wonderful beverage that can calm your nerves and improve your mood. Now is the perfect time to make your own lemongrass tea and enjoy all of its fantastic health benefits!

Celebrating the Simple Delights of a Top Onion Recipe

Weekend Wonder: Celebrating the Simple Delights of a Top Onion Recipe

Every weekend offers the chance to savor small joys that add flavour to life. A straightforward onion recipe that has become a kitchen staple is one such delight. This recipe transforms regular onions into a meal you’ll look forward to every weekend thanks to its simple ingredients and preparation process.

The Pleasures of Onion Cooking

This simple meal features onions, which are usually only a supporting role. Onions have a sweet, mellow flavour that complements any dish when cooked slowly. Onions are incredibly adaptable and delicious, as this weekend meal demonstrates.

How the Onion Recipe Is Made

Although the procedure is as easy as it gets, the outcomes are tremendously fulfilling:

  • Choose Wisely When Choosing Onions: Select medium-sized to large onions; sweet types, such as Vidalia or Walla Walla, work well because they caramelize wonderfully.
  • Peel and cut the onions into thick, even rings or half-moons to start the preparation process. Their shape can affect how they cook; rings are ideal for a uniform caramelization.
  • Heat a non-stick skillet over medium-low heat to begin the slow cooking process. After a little butter or olive oil has been added, add your onions to the pan.
  • The secret is in the long cooking; put a lid on them and let them caramelize slowly, stirring from time to time to make sure they don’t burn or stick.
  • Although it could take some time, patience is essential for this process. When the onions acquire a deep golden color and a soft, almost buttery feel, they are done.

Serving Suggestions

This is such a versatile dish made with onions. A few ways to enjoy it are as follows:

  • As a Side Dish: Excellent with grilled or roast meats.
  • In Sandwiches: Add a layer of these onions to your sandwiches or wraps to give them a delicious and savoury taste.
  • With Eggs: For a tasty twist, add them to your scrambled eggs or morning omelets.

Why This Recipe Is Worth Saving

Onions are not only delicious but also nutrient-dense. They are an excellent source of folic acid, dietary fibre, and vitamin C. They also include quercetin, an antioxidant that has anti-inflammatory and immune-boosting properties.

A Custom for the Weekends

Making these onions has evolved into a weekend ritual that brings flavour and cosines to the table, rather than just a cooking endeavor. It serves as a reminder that often the most joyous recipes are the simplest. So why not incorporate it into your weekly routine? It’s an easy pleasure that never lets you down.

New Salad Recipe: The Irresistible Beetroot, Carrot, and Cabbage Blend

New Salad Recipe: The Irresistible Beetroot, Carrot, and Cabbage Blend

When you find a salad that you can’t stop eating, it’s something really unique. This salad of beetroot, carrot, and cabbage is very remarkable due to its vivid combination of flavours and colours. This salad will wow you whether you’re looking for a light side to lighten up your meal or a nutritious dish that doesn’t sacrifice flavour.

Reasons to Love This Salad

This salad is nutrient-dense in addition to being a culinary delight. Rich in fiber, vitamins, and minerals, beetroots are well-known for their health advantages, which include lowered blood pressure and better blood flow. Beta-carotene, which is abundant in carrots and beneficial for eye health, and vitamins C and K, which are abundant in cabbage, have anti-inflammatory and antioxidant properties.

Components:

  1. Two medium-sized beetroots, grated and peeled
  2. three big carrots, sliced and peeled.
  3. Two cups of finely chopped cabbage
  4. Two tsp olive oil
  5. Twice as much apple cider vinegar
  6. One tablespoon honey, or more according to taste
  7. To taste, add salt and pepper.
  8. a small handful of recently cut parsley
  9. Walnuts or sunflower seeds are optional but add crunch.

Guidelines:

  • Combine the Veggies: Combine the shredded cabbage, carrots, and grated beets in a large mixing basin. This meal will shine just from the colors alone!
  • To make the dressing, combine the olive oil, honey, and apple cider vinegar in a small bowl. To taste, add more salt and pepper. The dressing’s sweetness and tang should be nicely balanced.
  • Mix It Up: Drizzle the vegetables with the dressing, making sure to mix everything thoroughly to coat everything equally.
  • Add the Finishing Touches: For a burst of flavour, scatter chopped parsley on top. You can add chopped walnuts or sunflower seeds if you’d like a little more texture.
  • Let It Sit: Before serving, let the salad sit for at least thirty minutes. The flavors merge together delightfully during this period of rest.

Ideal for Any Occasion

This salad of beetroot, carrot, and cabbage is ideal for a festive get-together, a family meal, or even as a wholesome lunch choice. It’s visually appealing, simple to prepare, and quite tasty.

A Well-Being Decision

Try this dish the next time you want a salad that is both incredibly delicious and healthful. It’s a great way to savour your veggies and maintain culinary excitement.

Delightful Pickled Watermelon Rinds

Delightful Pickled Watermelon Rinds: A Must-Try in Home Cooking

Because of its juicy and cool flavour, watermelon is a popular fruit, especially in the hot months. However, many are shocked to hear that the rinds—which are frequently thrown away—can be made into a delicious pickled delight. Watermelon rind pickles are a novel take on classic pickles, delivering a delightfully sweet, acidic, and slightly crispy treat that can enhance any dish. These are worth the effort, and here’s how to make them at home.

The Advantages of Preserving Watermelon Rinds
Pickled watermelon rinds are not only delicious, but they also utilise the whole fruit, cutting down on waste. They are a good source of citrulline, an amino acid that may enhance blood flow and general cardiovascular health, and they are loaded with vitamins B and C. They are a great complement to salads, charcuterie boards, or as a standalone snack because of their distinct flavour and texture.

Components and Equipment

You’ll need the following to make your own pickled watermelon rinds:

  1. Watermelon rinds, which are primarily white with some red flesh
  2. Vinegar—white vinegar or apple cider work well—
  3. Water
  4. Sugar (adjustable according to desired level of sweetness)
  5. Spices (including allspice, cloves, and cinnamon sticks)
  6. Salt
  7. Optional: lemon peel for extra zest
  8. In addition, a few culinary tools are required:
  9. Boiling pot for the ingredients
  10. Jars to keep the pickles fresh

Easy Steps for Preserving Watermelon Rinds

  • Get the Rinds Ready: Cut the white portion of the watermelon rinds into tiny, bite-sized pieces after trimming off the outer layer of green skin.
  • Boil the Rinds: Simmer the rinds for approximately five minutes, or until they become soft. After draining, set away.
  • To prepare the pickling solution, put vinegar, water, sugar, spices, and a small amount of salt in a pot. After bringing to a boil, reduce the heat, and simmer the sugar until it dissolves.
  • Pickle the Rinds: Simmer the boiling rinds for an additional ten minutes after adding them to the pickling solution. Add some lemon peel for an extra tangy taste.
  • Put the pickles in clean jars by carefully transferring the rinds and liquid. Before refrigerating, seal and allow them to cool.
  • Rest: Before consuming the pickled rinds, let them sit in the fridge for a minimum of one week. This enables a wonderful blending of flavors.

In summary
Watermelon rinds pickled in vinegar are a delicious addition to any cook’s toolkit. They’re tasty, simple to prepare, and a great way to use up every part of the fruit. Their distinct flavour and texture will wow you whether you eat them as a snack or include them into meals. Thus, keep in mind to conserve the rinds for this delicious treat the next time you enjoy a watermelon!

Discover the Delight of Bread Soaked in Boiling Milk

Discover the Delight of Bread Soaked in Boiling Milk

Ever consider soaking your day-old bread in boiling milk to bring it back to life? This easy recipe technique may turn regular bread into an incredibly soft and delectable delicacy. It’s an excellent method to revitalise stale bread and make a cosy meal that’s ideal for a light breakfast or a calming snack. Let’s look at how simple it is to prepare this delicious meal at home.

Bread Soaked in Milk: Its Magic
Not only does soaking bread in boiling milk help to soften stale bread, but it also gives the bread a creamy richness that improves both its flavour and texture. The hard crust of the bread is softened and moistened by the milk’s gentle warmth. This method not only prevents leftover bread from going to waste but also transforms it into a wonderful, comforting, and nostalgic treat.

Components:

  1. One cup of whole milk, or any other milk of your preference
  2. two to three stale bread pieces
  3. Additions of sugar,
  4. cinnamon,
  5. vanilla essence,
  6. or honey are optional.

Guidelines:

  • Bring the milk to a boil by pouring it into a small pot and heating it up. As the milk heated, mix in a tablespoon of sugar, a teaspoon of vanilla essence, or a pinch of cinnamon if you’d like to add some sweetness.
  • Prepare the Bread: You may choose to cut the larger bread slices into smaller pieces. They will be able to absorb the milk more efficiently as a result.
  • Soak the Bread: Lower the heat to a simmer after the milk reaches a boiling point. Put the bread pieces into the heated milk gently. Depending on how soft you like your bread, let them soak for one to two minutes on either side.
  • Serve right away by using a slotted spoon to carefully remove the bread pieces and letting any extra milk fall off. Warm bread should be served.

Serving Ideas
Savor this bread drenched in milk either by itself or with your preferred toppings. A spoonful of your favourite jam or a sprinkle of honey can offer a wonderful sweetness. Sprinkle some powdered sugar on top, and garnish with a few fresh fruit pieces or a dollop of whipped cream for an even more delectable treat.

In summary
Use this boiling milk method to make a tasty and cosy supper out of stale bread. It’s a simple and comfortable method to savor bread in a novel and intriguing way. Savour the smooth, calming flavors of milk-soaked bread by making this easy recipe today.

Revitalize Your Health: Lemon and Garlic, a Dynamic Duo

Revitalize Your Health: Lemon and Garlic, a Dynamic Duo

When it comes to natural health cures, lemon and garlic are two standouts that have been used for millennia to promote wellness. These basic cooking components when combined can do wonders, particularly for the veins and liver. It’s true that you may rejuvenate your system in just three days with a straightforward program with thesecomponents!

Why Garlic and Lemon?

  • Lemon: Packed with vitamin C and antioxidants, this citrus fruit is not only hydrating but also aids in liver cleansing, bile production, and fat digestion. Because of its high acidity, lemons have an alkalising impact on the body and help control blood sugar, which can enhance liver function in general.
  • Garlic: Well-known for its strong anti-inflammatory qualities, garlic also includes allicin, a substance that can lower cholesterol and aid in blood purification. Because of this, it is especially beneficial for preserving the health of veins and guaranteeing smooth blood flow, which lowers the possibility of vein blockages.

How to Make a Day 1 to Day 3 Morning Ritual with Lemon and Garlic for Cleaning

  • Get a drink ready:Pour one fresh lemon’s juice into a glass of warm water. To release the allicin, crush one to two garlic cloves and let them sit for around ten minutes.
  • Mix and Drink: Each morning, on an empty stomach, combine the crushed garlic with the lemon water. Your liver and digestive system are stimulated by this combo, which gets them ready to start eliminating pollutants.
  • During the Whole Day: Maintain your high water intake to stay hydrated and aid in the body’s cleansing.
  • Add fresh lemons and garlic to your food in the form of marinades, sauces, or even just roasting them with vegetables.
  • What to Anticipate You might experience better digestion, more energy, and possibly even healthier skin over the course of three days.
  • These symptoms show that your body is successfully getting rid of pollutants.
  • Move Carefully Garlic and lemon are healthy in general, but they can be strong. Start with lesser doses of garlic if you have a sensitive stomach.
  • It’s advisable to speak with a healthcare professional before beginning any natural remedy, particularly if you take medication or have pre-existing medical conditions.

In summary Garlic and lemon may be the most basic yet effective weapons in your health kit. This natural combination may hold the answer to detoxifying your body, increasing overall vitality, and rejuvenating your veins and liver.

10 Amazing Benefits of Turmeric Tea You Need to Know!

10 Amazing Benefits of Turmeric Tea You Need to Know!

With its deep golden colour and warming spice, turmeric tea is not just a calming drink but also a powerhouse of health advantages that can completely change your life. This potent beverage, which has roots in both science and tradition, has several benefits, including improved digestion and strengthened immunity.

Let’s examine the top 10 advantages of including turmeric tea into your daily routine.

1. Reduces Inflammation: Curcumin, a chemical found in turmeric, is well known for its anti-inflammatory qualities. Turmeric tea can help lessen pain and inflammation, especially in the joints.

2. Boosts Immunity: Turmeric tea, which is high in antioxidants, is a fantastic method to fortify your immune system. By preventing cell damage, these antioxidants shield you from common ailments.

3. Supports Digestion: By assisting in the breakdown of dietary lipids, turmeric helps to support a healthy digestive system. After a meal, sipping a cup of turmeric tea can aid with digestion and minimise discomfort.

4. Promotes Better Heart Health: Research has demonstrated that the curcumin in turmeric enhances the function of the endothelium, the lining of your blood vessels, improving heart health and lowering your risk of heart disease.

5. Liver Detoxification: By boosting the liver’s ability to metabolise lipids and toxins, turmeric tea can also help with liver detoxification.

6. Cognitive Boost: Curcumin can directly enter the brain and benefit its cells by crossing the blood-brain barrier, which helps to enhance memory and cognitive performance.

7. Mood Enhancer: Research indicates that turmeric may serve as a natural remedy for depression by enhancing mood.

8. Promotes Skin Health: Regular consumption of turmeric’s anti-inflammatory and antioxidant qualities will help promote clearer, more vibrant skin.

9. Helps with Weight Loss: Turmeric tea can aid with weight loss by increasing metabolism and encouraging the breakdown of fat.

10. Aids in Diabetes Management: Turmeric is useful in the management of diabetes since it can help control insulin levels and enhance insulin resistance.

To make turmeric tea, just soak one or two tablespoons of ground turmeric in ten minutes or so of hot water. For a tasty and therapeutic drink, strain and taste and add honey or lemon. Turmeric tea is more than just a drink; with so many health benefits in just one cup, it’s a vibrant elixir of health. Having a cup of turmeric tea may be a pleasant way to nourish your body and soul, whether you’re drinking it in the morning or while you’re ending your day.

Revive Your Phone Screen with Lemon: A Zesty Trick!

Revive Your Phone Screen with Lemon: A Zesty Trick

Is the screen on your phone a little boring? Before considering pricey fixes or replacements, consider this easy, all-natural solution that just requires a lemon! Yes, that’s correct—lemons can help restore the clarity and vibrancy to your phone screen in addition to bringing a zest to your meals and beverages.

Here’s how to utilise this citrus wonder to clean and care for your smartphone. Lemon, why?

  • Because of its acidity, lemon juice is well-known for having natural cleaning qualities.
  • It is an ideal, environmentally responsible way to clean your phone’s screen because it can delicately remove greasy fingerprints, smudges, and even some bacteria from surfaces.

What You Require

  1. One lemon,
  2. fresh lint-free, soft cloth Water is optional.
  3. tiny bowl (if using water to dilute)

Guidelines:

  • Squeeze the lemon juice into a basin to prepare your cleaning solution. You can dilute the lemon juice with a little water to get a cleaner that is less intense.
  • This can guarantee that the protective layers on the screen are unaffected by the acidity.
  • To clean the screen, dunk a soft cloth into either diluted lemon solution or lemon juice.
  • To prevent any liquid from seeping into the gadget, wring it out until it’s damp, not wet.
  • Use the cloth to gently clean the screen of your phone.
  • To remove oily residue and dirt, move in circular, smooth strokes. Dry the Screen: To remove any last traces of moisture from the screen after cleaning, use a dry portion of the cloth or another clean, dry cloth. It’s essential to follow this step to prevent watermarks.
  • Polish for Extra Shine: Gently rub your screen with a brand-new piece of soft cloth to provide extra shine. It will appear even brighter and clearer as a result.
  • Savour the Outcomes: You can turn a dirty phone screen back to a shiny one with just a few wipes. Lemon is an excellent natural cleaning that not only saves you money but also gives your gadget a wonderful, clean smell. Always remember that although though lemon is usually safe for screens, it’s best to test on a small, discrete area first to make sure there are no negative responses, particularly if your screens have special coatings. You can select for a cost-effective and eco-friendly solution that leaves your phone feeling and looking brand new by cleaning the screen with a lemon. It’s also a cute little trick that you may teach your loved ones, who could find this spicy advice useful!

Hatching Eggs at Home Without an Incubator

Hatching Eggs at Home Without an Incubator: A Natural Approach

Have there ever been times when you wanted to hatch eggs at home but lacked an incubator? It is totally feasible to return to the origins and give birth to those tiny chicks via natural means. This tutorial will show you how to hatch eggs at home without an incubator using easy methods. This can be a fun project to work on, regardless of your experience level as a chicken keeper or whether you’re a curious novice.

What You Require fertile eggs (be sure the source has the chickens in close proximity to a rooster)

  1. A cosy, secure place A source of heat (such as a heating pad or lamp) a thermocouple An indicator of humidity A container or a tiny, enclosed space

How to Naturally Hatch Eggs:

  • Pick the Correct Eggs: Choose fresh, viable eggs from a trustworthy supplier. While washing might remove the protective covering that keeps bacteria at bay, eggs should only be cleaned.
  • Create a Warm Space: Decide on a peaceful, secure area in your house where the eggs can stay safe.
  • Prepare a box by filling it with a layer of wood shavings or straw for comfortable bedding.
  • It should always be heated, preferably between 99 and 101 degrees Fahrenheit.
  • To reach this temperature, you can use a heating pad or a lamp, but make sure to keep a constant eye on it using your thermometer.
  • Maintain Humidity: For proper hatching, eggs require the ideal humidity level. For the majority of the incubation period, aim for 50–55% humidity; in the final few days before hatching, this should rise to roughly 65%. A tiny dish of water placed next to the heat source can aid in preserving the appropriate level of humidity.
  • Turn the Eggs: Gently turn the eggs at least three times a day for the first eighteen days. By doing this, the embryo is kept from adhering to the shell. Give the eggs a break after eighteen days so the chick can orient itself for hatching.
  • Keep an eye out for Hatching: Although this might vary, eggs usually hatch after 21 days. Keep an ear out for peeping noises and wait for the eggs to crack. This is a thrilling moment!
  • To ensure the chicks get all leftover nutrients, keep the environment constant and resist the impulse to assist them in emerging from their shells.
  • Savour the Procedure: One pleasant experience that helps you feel more connected to nature is hatching eggs without the use of an incubator.
  • It’s an intriguing activity that may infuse your home with happiness and excitement, as well as a gentle reminder of life’s wonders. So prepare to witness the wonder of life being revealed in your living room as you gather your materials and erect your nesting box.
  • Cheers to a smooth hatch and the exciting sight of fresh chicks shortly!


How to Spot Plastic Rice

How to Spot Plastic Rice: A Guide for Your Safety

Concerns over the availability of plastic rice on the market have grown in recent years. Even if most of these rumours are unfounded, it makes sense that they have worried customers. Knowing how to differentiate authentic rice from potentially contaminated items is essential for ensuring the safety and quality of your meals, particularly during these uncertain times. This is a short guide explaining how to identify plastic rice.

Comprehending Plastic Rice: It is said that plastic rice is composed of artificial materials that mimic the look of actual rice. It is purportedly produced in violation of food safety laws in order to make money. Being aware of how to test rice at home is a proactive step in protecting your health, even though confirmed occurrences are uncommon.

Identifying Plastic Rice:

  • 1. The Examination of Water:
    Pour a glass of water with a tablespoon of your rice and stir. Since plastic grains have a lower density than real rice, they are more likely to float. Real rice grains will sink to the bottom.
  • 2. The Fire Test: Using a pair of tongs, hold a few grains of rice over a flame. Real rice will burn and char, giving off a toasted aroma. Plastic rice, on the other hand, will melt and can smell like plastic.
  • 3. The Mortar and Pestle Test: Use a mortar and pestle to smash a few grains. Genuine rice ought to feel grainy and powder easily. Plastic grains, on the other hand, might have a more elastic texture and break down more slowly.
  • 4. The Boil Test: Watch the water while you boil a tiny quantity of rice. Impurities may be indicated if a thick coating of strange residue is observed. Though some starch will float to the top, real rice shouldn’t leave much of a residue in its wake.
  • 5. The Mold Test: After cooking some rice, let it for two or three days in a warm location. It will mould if it’s genuine rice. However, plastic rice won’t grow mould because it is inorganic.

Reasons for Its Significance:
It goes without saying that eating plastic has major health concerns. Verifying the authenticity of rice ensures that you’re ingesting grains that are good for you nutritionally in addition to safeguarding your health.

Buying Advice:

It’s best to purchase rice from reliable sources, including local markets or respected grocery stores, to reduce dangers. Well-known companies that follow food safety regulations are less likely to offer tainted goods.

Conclusion:

Understanding how to verify the authenticity of your rice can bring you peace of mind, even though the notion of ubiquitous plastic rice may be more myth than fact. Make sure your rice is safe to consume by using these easy tests. You’ve made wise decisions for your health, so enjoy your meals without worrying.