The Culinary Magic of Boiling Dough A Delightful Surprise Awaits

The Culinary Magic of Boiling Dough A Delightful Surprise Awaits

Although boiling dough may seem strange, it’s a technique that opens up a world of delectable culinary options. Baking by itself is unable to provide the distinctive textures and aromas that boiling dough produces, from light and fluffy dumplings to soft and chewy bagels. Let’s investigate the wonders of boiling dough and how this unexpected method may be used to produce delicious dishes.

Why Bring Dough to a Boil?

Dough’s texture and flavor are altered by boiling it before baking or frying, which has various advantages:

  • Enhanced feel: Baking gives baked items like bagels a chewy, thick feel that makes them incredibly gratifying.
  • Glossy Finish: Boiling certain food contributes to the development of a glossy crust, which adds a visually and texturally pleasing feature.
  • Faster Cooking: Parboiling the dough can partially cook it, cutting down on the total baking time and maintaining consistent cooking all the way through.

Techniques and Recipes
Ideal Bagels:

Components:

  1. Two tsp of dried active yeast
  2. 1 ½ cups split warm water
  3. and 1 ½ teaspoons sugar
  4. 1/3 cup bread flour
  5. A tsp of salt and two tbsp of optional honey (for boiling)

Guidelines:

  1. To make the dough, combine the sugar and yeast in a basin with a quarter cup of warm water. Allow it to rest until foamy, about 5 minutes. Flour and salt should be combined in a large mixing dish. Add the remaining warm water and the yeast mixture. Stir to make a dough.
  2. Knead and Rise: Until the dough is smooth and elastic, knead it for approximately ten minutes on a floured surface. It should rise for about an hour or so if you put it in an oiled bowl, cover it with a moist towel, and until the size has doubled.
  3. To shape the bagels, press down on the dough and separate it into eight equal portions. Each portion should be rolled into a ball, pierced in the middle, and then gently stretched to resemble a bagel.
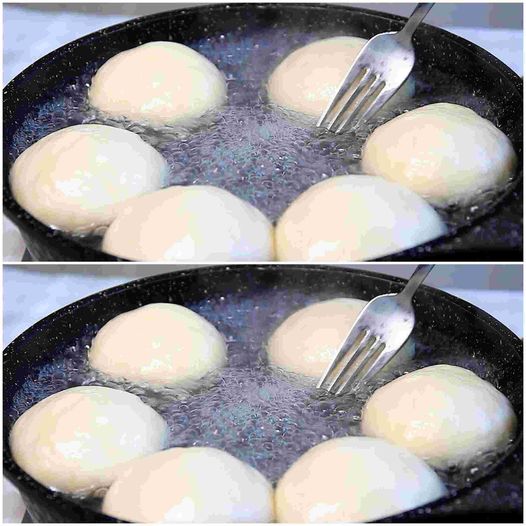
  4. Bring the bagels to a boil: Set the oven temperature to 425°F (220°C). Heat the water in a big saucepan until it boils, then stir in the honey, if desired. In batches, boil the bagels for one minute on each side. Using a slotted spoon, remove and transfer to a baking sheet.
  5. Bake: Until golden brown, bake the boiling bagels for 20 to 25 minutes. Chill on a cooling rack prior to serving.

Soft Dumplings:
Components:

  • a quarter-cup all-purpose flour
  • One tsp baking powder
  • Half a teaspoon salt
  • and two tablespoons of cold, diced butter
  • One-fourth cup milk

Guidelines:

  • To make the dough, combine the flour, baking powder, and salt in a bowl. Until the mixture resembles coarse crumbs, cut in the butter. Add the milk and stir to create a soft dough.
  • Bring a saucepan of water or broth to a moderate boil in order to cook the dumplings. Make sure the dough does not touch the boiling liquid when you drop spoonfuls of it in. After 15 minutes, when the dumplings are cooked through and puffy, cover and simmer.
  • Serve: For a hearty dinner, serve the cooked dumplings with soups or stews.

Easy Pretzels:

Components:

  • a half-cup of hot water
  • 1 tablespoon sugar
  • 2 teaspoons salt
  • One box of dried active yeast
  • 4 and a half cups all-purpose flour
  • two-thirds cup baking soda (to boil)
  • For brushing, whip one egg yolk with one tablespoon of water.

Grassy salt Directions: (for sprinkling)

  • To make the dough, dissolve the salt and sugar in a dish of warm water. After scattering the yeast on top, leave it for five minutes to get frothy. Mix in the flour until a dough forms.
  • Knead and Rise: Until the dough is smooth, knead it for approximately eight minutes on a floured surface. Transfer to a covered, oiled basin and allow to rise until twice in size, about 1 hour.
  • Form the pretzels: Turn the oven on to 450°F, or 230°C. Cut the dough into eight equal pieces. Create a long rope out of each component and roll it into a pretzel form.
  • Bring a big saucepan of water to a boil and add the baking soda to the pretzels. One by one, boil the pretzels. thirty seconds at a time. Using a slotted spoon, remove and transfer to a baking sheet.
  • Pour the egg yolk mixture over the boiling pretzels and season with coarse salt before baking. Cook for 12 to 15 minutes, or until well-browned. Chill on a cooling rack prior to serving.

In summary
A straightforward yet incredibly effective method to improve your handmade baked items and meals is boiling dough. It’s the distinct textures and tastes that boiling dough produces that make it magical for anything from soft pretzels to fluffy dumplings and chewy bagels. Enjoy the gastronomic wonders that lie for you in your home when you try these recipes!

Natural Remedies for Bronchitis: Lemons’ and Pineapple’s Power

Natural Remedies for Bronchitis: Lemons’ and Pineapple’s Power

Bronchitis may cause a great deal of difficulty because to its persistent cough and chest pain. While medication is typically necessary, natural remedies can help manage symptoms and speed up the healing process. Lemon and pineapple are two potent ingredients that are frequently available in your home. Let’s explore how these organic wonders could treat bronchitis naturally without the need for medicine.

Pineapple Power
Pineapple is not only a fantastic tropical fruit, but it also contains a lot of bromelain, an enzyme with anti-inflammatory and mucus-thinning properties. By assisting in the removal of mucus from your airways, bromelain aids to improve breathing conditions and ease the chronic cough associated with bronchitis.

Pineapple juice recipe:

Components:

  1. One whole pineapple or one cup of pineapple juice without sugar
  2. optional cayenne pepper for a dash of extra heat

instruction

  • If using fresh pineapple, peel and chop it into small pieces.
  • Blend the pineapple chunks or pour the pineapple juice into a glass.
  • Add some cayenne pepper for extra anti-inflammatory benefits and if you like your food spicy.
  • Drink this juice twice a day to help remove congestion and soothe your throat.
  • Lemons, which are high in vitamin C, boost immunity and make it easier for the body to fight illness. Furthermore, their antibacterial properties enable them to help eliminate the germs exacerbating your bronchitis symptoms. The acidity of lemon juice also aids in breaking up mucus and promoting ejection.

Recipe for Honey-Lemon Tea:

Changeable:

  1. Just one lime, fresh.
  2. A single cup of heated water

Directions for one tablespoon of honey:

  • Pour the juice of one lemon into a cup of hot water.
    Include a
  • tablespoon of honey, which has soothing and antibacterial properties in addition to being sweetening.

Instructions:

  • Stir well and slowly pour. Drink this tea two or three times a day to help relieve symptoms.
  • mixing lemon and pineapple
  • For an extra kick-back, combine the healing properties of lemon and pineapple in a refreshing drink.

Ingredients for Pineapple-Lemon Drink Recipe:

  1. Pineapple juice, one cup
  2. The juice of one lemon
  3. a single teaspoon of honey
  4. one cup of optionally diluted water;

Directions:

Mix the pineapple juice, lemon juice, and honey in a glass.
If you prefer a less potent beverage, dilute it with water.
Stir well and drink this tangy, immune-boosting beverage twice a day.

Finally
Treating bronchitis may be challenging, but there are some excellent natural remedies you can make in your kitchen. Pineapple and lemon are two excellent meals that boost your immune system, clear your throat, and reduce congestion. If you incorporate these home remedies into your regimen, your bronchitis symptoms will lessen and you’ll feel better sooner. Remember that seeing a healthcare professional is always a good idea, especially if your symptoms persist. Cheers to effortless breathing and getting back to your best self!

Discover the Hidden Benefits of Watermelon Seeds

Discover the Hidden Benefits of Watermelon Seeds

Few of us think about the advantages of watermelon’s frequently-discarded seeds, even though many of us appreciate the fruit’s sweet, refreshing taste. Nutrient-rich watermelon seeds can provide a number of health advantages. These are some reasons why you ought to think about consuming watermelon seeds rather than throwing them out, from strengthening your heart to offering skin benefits.

Powerhouses of Nutrition

Rich in minerals including iron, zinc, and magnesium are watermelon seeds. They are also a rich source of healthy fats and protein. These seeds are a rich concentration of vital vitamins and minerals, making them more than simply a snack.

1. Promotes Heart Health

Watermelon seeds, which are high in magnesium, can help control blood pressure and support heart health. Magnesium is essential for avoiding high blood pressure and cardiovascular conditions, hence choosing these seeds is heart-healthy.

2. Boosts Vitality

Watermelon seeds have a high iron concentration that contributes to increased energy. Hemoglobin contains iron, which aids in the body’s ability to carry oxygen, which is necessary for the synthesis of energy and general health.

3. Encourages the Immune System

Another essential component present in watermelon seeds is zinc. It is essential for the development of cells, the immune system, and healing. Eating watermelon seeds on a regular basis helps strengthen your body’s resistance to illnesses.

4. Improving Digestive Well-Being

Dietary fiber, which is excellent for the digestive system, is included in watermelon seeds. Fiber aids in avoiding constipation and encouraging regular bowel motions.

5. Encourages Skin Health

The watermelon seeds’ antioxidants in combination with their beneficial fats may help promote better skin. These nutrients aid in protecting the skin from UV radiation, pollutants, and aging.

How to Eat Seeds from Watermelon

You may consume watermelon seeds raw, sprouted, or roasted to get their health advantages. A delicious and nutritious snack may be made by roasting them with a little salt. For an added nutritious boost, you can also powder them and add them to yogurt, cereal, and smoothies.

In summary

Watermelon seeds are a veritable gold mine of nutrients that have several health benefits. The next time you relish a piece of watermelon, consider carefully before discarding the seeds. Watermelon seeds are a great addition to your diet when eaten as a snack or in addition to meals. a little but potent component that offers several health advantages.

Discover the Golden Value of Used Sponges for Your Home and Garden

Discover the Golden Value of Used Sponges for Your Home and Garden

Consider reconsidering the possibilities of old sponges if you’re used to discarding them. The discarded sponges hold a secret gem for your garden and houseplants. You may put these adaptable things to good use in your green areas if you have a little imagination and concern for the environment. This is how to turn your old sponges into something useful for your plants.

1. Enhanced Moisture Retention and Soil Aeration
Sponges are great at holding onto moisture, which is especially useful for garden beds or potted plants that dry out easily. Sponge cuttings, when broken into little pieces and incorporated into the soil, assist sustain moisture levels, lowering the frequency of watering and guaranteeing that your plants stay well-hydrated.

2. Root Development and Support
The delicate, permeable The texture of sponges offers the perfect setting for the growth of roots. This is very useful for beginning seeds or multiplying cuttings. The fragments of sponge form air pockets in the soil that enhance soil structure and encourage root development.

3. Elimination of Weeds

Bigger bits of sponge can be used as a mulch to the soil surface surrounding plants, keeping the soil wet and suppressing weeds. This organic barrier can shorten the time you spend weeding by slowing the development of undesirable plants.

4. Prevention of Pests
Additionally useful in the control of pests are sponges. You may stop the stress that makes plants vulnerable to pests by keeping the soil’s moisture levels more uniform. Furthermore, the way sponges are made might discourage a few insects that crawl.

How to Use and Prepare Your Sponges for Cleaning in the

  • Garden: Make sure the sponges are clean and devoid of any chemical or soap residues before using them. To get rid of all the food particles and detergents, give them a thorough rinse under water.
  • Cutting: Cut the sponges into the proper sizes based on the planned application. While bigger bits can be utilized as mulch, smaller pieces work well for adding into potting soil.
  • Placement: Before planting, include tiny bits of sponge into the potting soil to help retain moisture. Place bigger pieces on the soil’s surface surrounding the plants to be mulched.
  • Monitoring: Keep an eye on the soil’s moisture content, particularly when utilizing sponge pieces for the first time, to make sure it doesn’t get too wet, which might lead to decay of the roots.

In summary
Think about the various advantages a used sponge may have for your house and garden before you discard it. Reusing old sponges for new purposes not only promotes sustainable gardening but also improves the appearance and health of your plants. Recycle your old sponges and see how much better your garden does as a consequence.

Effortless Lemon Ice Cream

Effortless Lemon Ice Cream

Happy days, ice cream lovers! Imagine spending less than five minutes at home making delectable, sugar-free lemon ice cream with just three ingredients. With no added sugar, this easy dish not only fulfills your sweet taste but also accomplishes it in a healthier manner. This is such a simple and delicious recipe for refreshing treat that you might never want to buy store-bought ice cream again!

1. Advantages of Making Your Own Lemon Ice Cream

  • Healthier: Since you are in charge of the ingredients, you can make sure there are no unnecessary sugars or additives when you make your own ice cream.
  • Refreshing: On a hot day, lemon brings a naturally sweet zest that is energizing and enjoyable.
  • Simple Ingredients: This dish is quick and easy to make with just three ingredients, making it perfect for impromptu craves for dessert.

2. Required Ingredients

In order to make your own lemon ice cream, you’ll need:

  1. One cup of thickened cream
  2. two tsp freshly squeezed lemon juice
  3. Three tablespoons of honey, or more to taste, based on your desired level of sweetness

3. A Recipe for Lemon Ice Cream

This is a great last-minute dessert choice because it’s simple to make and takes little time.

Guidelines:

  • 1.Mix the ingredients: Put the heavy cream, honey, and fresh lemon juice in a medium-sized mixing basin. Stir well until all of the honey is dissolved.
  • 2. Whip or Blend: Beat the mixture with a hand mixer or a blender until it thickens and gets creamy. Usually, this requires three to four minutes.
  • 3.Freeze: Transfer the mixture to a container that can be frozen. If you may start eating it right away if you’d like a soft-serve consistency. If you like a harder ice cream, freeze it for approximately one hour, mix it, and then freeze it once more to achieve the right consistency.
  • 4. Suggestions for Serving Pour the lemon gelato into cones or bowls. A sprig of mint or some fresh berries go really well with this ice cream to add a little something extra elegant and youthful. It’s a delicious dessert to have after dinner or as a refreshing treat on a bright afternoon.
  • 5. Storage Advice Any remaining ice cream should be frozen in an airtight container. Allow it to hang out for a few minutes to soften somewhat so that scooping is easier before serving again.

In summary

This sugar-free, three-ingredient lemon ice cream is a proof of the maxim that finest things come from simplicity. It’s a quick, simple, and incredibly refreshing treat that’s ideal for anybody who wants to satisfy their sweet taste without going overboard with sugar. Try this recipe; you could find it to be your new go-to method for staying cool and enjoying light, zesty desserts!

Discover the Delight of Purslane A Tasty Turkish Recipe

Discover the Delight of Purslane A Tasty Turkish Recipe

Have you ever used purslane in a recipe? This much-ignored plant, which is sometimes seen as a weed, is a nutritious powerhouse and may taste surprisingly good. I was first exposed to this adaptable item by my Turkish neighbors, who also showed me how to use it to make a meal that tastes better than meat. Here’s how to savor this tasty and nutritious plant at home.

1. REASONS FOR PURSLANE?
Omega-3 fatty acids, as well as minerals like calcium, potassium, and magnesium, as well as vitamins A, C, and E, are abundant in purslane. It adds a pleasant flavor and crisp texture to a variety of foods. It tastes somewhat acidic and lemony. It’s also very simple to grow and frequently available in markets and gardens.

2. COMPOSITION OF A SMALL PURSLANE DISH
To make a tasty dish with Turkish influences

Purslane dish, you will require:

  1. Two cups of young purslane leaves with delicate stalks
  2. One big onion, diced finely
  3. two minced garlic cloves
  4. two medium-sized sliced tomatoes
  5. One-third cup olive oil
  6. One tsp of paprika
  7. To taste, add salt and pepper.
  8. Juice from lemons (optional)

3. CULINARY GUIDELINES

  • Get the purse ready: To get rid of any grit or grime, give the purslane a good rinse. Preserve the fragile leaves and stems and trim any tough ones.
  • Sauté the Garlic and Onion: Heat the olive oil in a big pan over medium heat. Add the chopped garlic and onion and sauté until aromatic and tender.
  • Add the Tomatoes: Cook the diced tomatoes for five to seven minutes, or until they begin to break down and produce a sauce.
  • When cooking purslane, add the purslane to the pan and thoroughly combine it with the combination of tomatoes. Add the pepper, salt, and paprika. Cook until the purslane is soft but still somewhat crunchy, approximately 5 minutes.
  • Finish with Lemon Juice: Right before serving, drizzle a little lemon juice over the dish to add even more flavor.
  • 4. SUGGESTIONS FOR SERVING
    This is such a versatile meal made with purslane. It is delicious cold as a component of a cool salad or heated as a side dish. It tastes great on its own with a slice of crusty bread or as an accompaniment to fish or grilled meats.

FINAL VERDICT
Purslane is a tasty and healthy complement to any dish, with a distinct flavor that can compete with even the best succulent meats. This easy yet tasty meal, with Turkish influences, is a great way to incorporate this amazing plant into your diet. Try it and savor the delicious tastes and health advantages of purslane!

How to Pick a Perfectly Sweet Watermelon Easy Tips at a Glance

How to Pick a Perfectly Sweet Watermelon Easy Tips at a Glance

Overview

Selecting the ideal watermelon might occasionally seem like a hit-or-miss situation, particularly if you’re eager to taste its juicy, sweet flesh. But if you follow a few easy guidelines, you can select a sweet watermelon nearly every time, guaranteeing that every bite will taste as good as it sounds. Here’s how to masterfully choose the tastiest watermelon out of the bunch.

Visual and Tangible Indications of Sweetness

  • Find the “Field Spot“: The location where the watermelon grew on the ground is known as the “Field Spot.” Seek for a watermelon with a field spot that is creamy yellow or perhaps slightly orange. Underripeness is sometimes indicated by a white or light green patch.
  • Verify the Weight: The watermelon should feel weighty when you pick it up. for its size, which suggests that it is hydrated and probably sweet and juicy.
  • Analyze the Form: Select a watermelon with a consistent shape. Watermelons with unusual shapes may have grown unevenly, which might have affected their maturity and flavor.
  • Sound Check #4: Tap It Please tap or knock on the watermelon. A watermelon that is ripe and delicious will sound hollow and deep. Melons that are overripe or underripe often thump less loudly.
  • Examine the Texture 5. Examine the Rind The watermelon’s rind ought to be rather tough and resistant to scratches. A watermelon that has a firm rind is not overripe.
  • Search for Sugar Spots and Webbing: These dark, spider-web-like streaks on the skin are indicators of that the watermelon is delicious and that sugars have leaked out.
  • Tips for Storage and Usage
  • Once your flawlessly selected watermelon is home, store it in a cool location. Once chopped, store in the refrigerator and use within a few days for optimal flavor.
  • Watermelon tastes great raw, but it may also be juiced for a cool drink, mixed into salads, or blended into smoothies.

In summary

You may confidently select a delightfully sweet watermelon with the help of these helpful hints. Don’t forget to search for a nice field site, examine the rind and peel, check the weight and form, and tap for a hollow sound. Once you’ve mastered these suggestions, going to the farmer’s market or grocery shop will be easier. a breeze, and before you know it, you’ll be relishing luscious, juicy watermelon. Happy plucking watermelons!

Euphorbia Hirta The Mighty Herb with Remarkable Health Benefits

Euphorbia Hirta The Mighty Herb with Remarkable Health Benefits

Overview

Often disregarded in the broad realm of medicinal plants, Euphorbia hirta is a little plant with remarkable powers. This plant, which has long been utilized for its therapeutic qualities across many cultures, is becoming more well-known for its ability to treat a variety of illnesses, such as diabetes, high cholesterol, inflammation, and more.

Euphorbia Hirta: What is it? Euphorbia hirta, sometimes referred to as snakeweed or asthma weed, is a widely used herbal plant with several medicinal use. It is easily identified by its tiny, oblong leaves and hairy stem, which thrive mostly in tropical climates.

Advantages of Euphorbia Horta for Health

  • Diabetes management: Euphorbia hirta may be helpful in treating diabetes because research has shown that it naturally lowers blood glucose levels.
  • Controlling Cholesterol: This herb is renowned for having lipid-lowering qualities as well. By lowering harmful cholesterol levels, it can enhance cardiovascular health.
  • Anti-Inflammatory Properties: The plant is helpful for those with inflammatory diseases since it has natural anti-inflammatory chemicals that can lessen discomfort and swelling.
  • Weight management: Research in this area is still lacking, however some studies indicate that Euphorbia hirta may help with weight reduction by influencing fat metabolism.
  • Preventing Ulcers: It is well recognized to aid in ulcer repair and has been used traditionally to treat gastrointestinal issues.
  • Safe Use of Euphorbia Hirta Euphorbia hirta is a useful supplement for your health routine, but it must be used properly.
  • Speak with a Healthcare Professional: Prior to beginning any new herbal remedy, particularly for long-term ailments such diabetes or elevated cholesterol, speak with a medical professional.
  • Appropriate Recognition and Readying: Make sure the plant species you are using is the right one, since certain types of Euphorbia might be hazardous. Using preparations from reliable sources is preferable.

In summary

Although euphorbia hirta is not as well-known as other plants, there are a lot of possible health advantages to consider. Including Euphorbia hirta in your daily regimen may provide safe and efficient treatment from conditions including diabetes, high cholesterol, chronic inflammation, and digestive problems. Always remember that knowledge and advice from medical professionals are essential for utilizing any herbal medicine properly.

Unleashing Baking Soda’s Power for Optimal Oral Health

Unleashing Baking Soda’s Power for Optimal Oral Health

If you’re looking for a versatile and effective dental care solution to promote better oral health and a brighter smile, all you need to do is raid your kitchen cupboard for some baking soda. There are several advantages to using baking soda for maintaining good dental hygiene, from tooth whitening to breath refreshing. Let’s examine the several ways that using baking soda to your dental care regimen might improve it and give you a whiter, more radiant smile.

The Various Advantages of Baking Soda for Dental Health

  • Natural Teeth Whitening: Without the use of harsh chemicals, baking soda’s moderate abrasiveness helps remove surface stains from teeth, producing a brighter and whiter smile.
    Neutralizing Acids: The alkaline properties of baking soda aid in neutralizing oral acids, lowering the risk of tooth decay and enamel erosion brought on by acidic meals. and drinks.
  • Freshening Breath: By eradicating germs that cause odor in the mouth and neutralizing offensive-smelling substances, baking soda’s odor-neutralizing qualities help prevent bad breath.
  • Plaque Removal: The mild abrasive action of baking soda helps to remove plaque from teeth and the gum line, encouraging healthier gums and lowering the risk of gum disease.
  • Relieving Gum Irritation: The anti-inflammatory qualities of baking soda can aid in relieving gum irritation and the pain brought on by mouth infections and gum disease.
    Including Baking Soda in Your Fluoride Therapy Practice
  • Baking Soda Toothpaste: As an alternative to conventional toothpaste, make a paste by mixing baking soda and water. Using the baking soda paste, gently brush your teeth to get rid of plaque and make your smile seem brighter.
  • Add one teaspoon to the baking soda mouthwash. teaspoon baking soda to a glass of water, then use the mixture as a mouthwash to neutralize oral acids and freshen breath. Before spitting the solution out, swish it around your mouth for 30 to 60 seconds.
  • Gum massage with baking soda: To help decrease inflammation and alleviate irritation, mix a tiny quantity of baking soda with water to make a paste, then gently massage it over your gums.
  • Teeth Whitening Treatment using Baking Soda: Mix baking soda and hydrogen peroxide to make a paste, then use a toothbrush or cotton swab to clean your teeth. For a whiter smile, let the paste on for a few minutes and then thoroughly rinse.
  • Dental floss coated in baking soda: Apply a thin layer of baking soda to strengthen its cleaning capabilities and more successfully remove plaque from in between teeth.
  • Accept Baking Soda’s Power for a Healthier Smile
    When it comes to dental health, baking soda is a real powerhouse because of its many advantages and adaptability.
  • Without the need for pricey procedures or harsh chemicals, you may have healthier gums, a whiter smile, and fresher breath by adding baking soda to your dental care regimen.
  • Discover baking soda’s potential and the impact it may have on your dental health journey.

Embracing Nature’s Defense: Harnessing Bay Leaves and Cloves to Ward Off Pests

Embracing Nature’s Defense: Harnessing Bay Leaves and Cloves to Ward Off Pests

Picture yourself enjoying a quiet afternoon at home without being bothered by mosquito bites or the constant buzzing of flies. What if your spice cupboard held the key to creating this peaceful atmosphere? Presenting bay leaves and cloves, a fragrant, all-natural deterrent against cockroaches, mosquitoes, and flies. Highly regarded in kitchens around the globe for millennia, these inexpensive ingredients not only improve your cooking but also act as effective deterrents against unwanted intruders. Let’s look at some ways to use cloves and bay leaves’ insect repellent qualities to rid your home of pests.

Cloves and Bay Leaves, the Dynamic Pair

  • Beyond their culinary fame, cloves and bay leaves have intrinsic attributes that go beyond taste. Giving out scents that are enticing to people yet disgusting to a lot of home pests, these
  • Aromatic spices use their inherent oils and chemicals to create an atmosphere that is uninviting to insects.

How to Make Your Own Natural Barrier

The ingredients to make this repellant are probably already in your possession, and it’s easy to make.

Here’s how to move forward:

  • Assemble the Ingredients: Gather a tablespoon of cloves and a handful of dried bay leaves. It doesn’t matter how much is used exactly as long as the desired area is filled with a strong smell.
  • Blend and Apply: These components can be applied in a few different ways. One method is to put whole cloves and bay leaves in little bowls or sachets and place them throughout your house in strategic locations, especially in areas where bugs hang out. As an alternative, slowly simmer a pot of water with cloves and bay leaves for a more concentrated solution. for sixty minutes. The repellant scent will spread throughout your house as a consequence of the following steam.