Homemade Delights: Crafting Irresistible Oatmeal

Homemade Delights: Crafting Irresistible Oatmeal and Dried Fruit Sweets

In a world when store shelves are laden with tempting temptations, making your own sweets from scratch is incredibly fulfilling. We’ll explore the delicious world of handmade confections today, teaching you how to make delicious oatmeal and dried fruit candies that are not only incredibly simple to make but also have a flavour that well exceeds that of store-bought alternatives.

Components of the Base:

  1. Eighty grams, or 2.8 ounces, of oat flakes
  2. 100 grams, or 3.5 ounces, of walnuts
  3. 150 grams, or 5.3 oz, of dates
  4. 15 grams or 0.5 ounces of cocoa powder
  5. 80 grams, or 2.8 ounces, of honey

Regarding the Icing:

  • One hundred grammes or 3.5 ounces of dark chocolate
  • One spoonful of oil

instructions

let’s grab our ingredients before we set out on our culinary adventure:

  • Making Your Own Delicious Treats
    First, prepare the oatmeal flour.
    We start by turning the oat flakes into flour. In order to do this, put the oat flakes in a blender and process them until they resemble flour.
  • Step 2: For a Nutty Twist, Add Walnuts
    Then, add the walnuts to the blender with the oat flour. Keep blending until the nuts are very finely minced, leaving a few small pieces for flavour and texture.
  • Step 3: Get the mix of dried fruits ready.
    Let us now proceed with our blend of dried fruits. After the dates have been pitted, put them to the blender bowl. Add the cocoa powder and a small teaspoon of salt to achieve the ideal ratio of richness to sweetness. Mix the ingredients in a blender until well blended.
  • Step 4: Mix and add sugar
    Pour the chocolate mixture and crushed fruit into a big container. The liquid honey should then be drizzled on top. If your honey is solid, you can use a bain-marie to softly dissolve it. After combining the ingredients, use your hands to work the mixture into a cohesive mass.
  • Step 5: Construct Your Candy
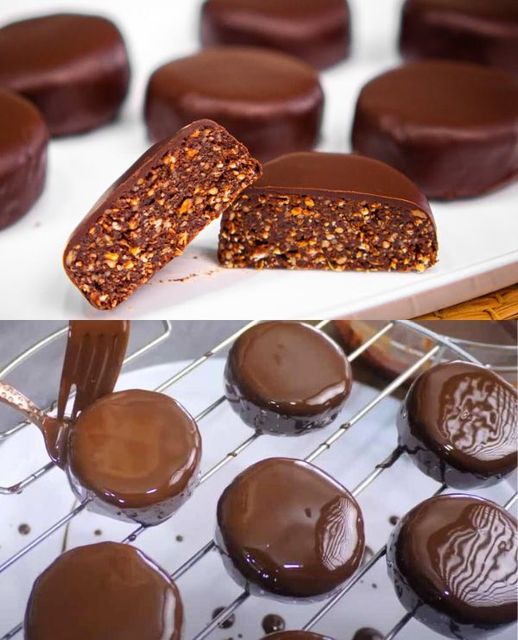
    Now that the dough-like stuff is prepared, feel free to use your imagination. Your future sweets can be shaped into any shape you like, such an oval, a circle, or a straightforward bar.
  • Step 6: Ice the Cake
    Next, let’s get started on the icing. Finely chop the dark chocolate and mix in the butter or oil. After 35 seconds in the microwave, whisk the ingredients until it becomes smooth.
  • Now, delicately coat each sweet with the chocolate frosting, making sure to cover both sides, using two forks. For easy drying, you can put them on a piece of parchment paper or a wire rack.
  • Step 7: Unwind and Have Fun
    To allow the icing to set, refrigerate the completed candies for approximately 20 minutes. When they’re ready, remove them and enjoy the delicious outcome. When you cut or bite into these candies, the frosting won’t break off, and they keep their shape beautifully. You will even notice delicious oats and almond crumbs in the filling.

In summary
Making your own candies may be a fulfilling activity that provides you with the satisfaction of making something unique with your own hands in addition to a tasty treat. The delights of making homemade treats are exemplified by these dried fruit sweets and muesli. So, the next time store-bought sweets tempt you, think about trying this delicious recipe!

Tiramisu Recipe Mascarpone Filling Serve your homemade

Tiramisu Recipe Mascarpone Filling Serve your homemade

Components:

For the Filling of Mascarpone:

  1. Cups and half of mascarpone cheese
  2. 1/2 cup of sugar, granulated
  3. Two tsp vanilla extract and four big egg yolks
  4. One cup of heavy cream

Regarding the Coffee Soaking Blend:

  • 1 1/2 cups of strongly brewed coffee or espresso, chilled
  • Two tablespoons of optional coffee liqueur
  • 1/4 cup of sugar, granulated

For Putting Together:

  • 24–30 Savoyard ladyfinger biscuits;
  • powdered unsweetened chocolate for dusting

Instructions:

  • 1. Pour the brewed coffee or espresso, coffee liqueur (if using), and 1/4 cup of granulated sugar into a shallow dish. Until the sugar dissolves, stir. Put aside to cool.
  • 2. Beat the vanilla essence, 1/2 cup granulated sugar, and mascarpone cheese in a mixing bowl until creamy and well mixed.
  • 3. Whisk the egg yolks in a another basin until they lighten in color.
  • 4. Gently fold, until completely mixed, the whisked egg yolks into the mascarpone mixture.
  • 5. Whip the heavy cream in a another dish until firm peaks form.
  • 6. Gently stir the whipped cream into the mascarpone mixture just until the filling is creamy and smooth. To keep the texture light, use gentleness.
  • 7.Drop each ladyfinger into the coffee mixture very quickly. Just give them a brief dip to moisten them; take care not to soak them for too long.
  • 8. Line a serving dish or individual dessert cups with a layer of dipped ladyfingers.
  • 9. Cover the ladyfingers with half of the mascarpone filling.
  • 10. Repeat using the remaining mascarpone filling and another layer of dipped ladyfingers.
  • 11. Refrigerate the tiramisu for a minimum of four hours or overnight, covered. This enables the dessert to solidify and the flavours to combine.
  • 12. Dust the tiramisu’s top with unsweetened cocoa powder before serving.
  • 13. Present your homemade tiramisu cold so you can enjoy its layers of rich, creamy flavour enhanced by coffee.

Natural BOMB for Cleansing the Liver and Blood Vessels: 4 Powerful Ingredients

Natural BOMB for Cleansing the Liver and Blood Vessels: 4 Powerful Ingredients

Our bodies can easily acquire pollutants that can harm our health in today’s fast-paced society. But worry not, nature has given us powerful allies to fight these pollutants and detoxify our interior environment. Beetroot, parsley, carrots, ginger root, and Peruvian strawberries make a powerful ally. Let’s explore this natural bomb’s liver and blood vessel revitalization benefits.

1. Introduction

  • For best health, we must care for our liver and blood arteries. Body detoxification and circulation depend on these critical organs. Modern life exposes us to poisons and chemicals that might strain these organs. The natural bomb of beetroot, parsley, carrots, ginger root, and Peruvian strawberry fruits is a simple but effective treatment.

2. Beetroot Power

  • Beetroot’s bright colour and earthy flavour go beyond salads. Beetroot boosts liver function and blood flow with antioxidants and nitrates. It detoxifies and rejuvenates liver cells, and its nitrates widen blood vessels to lower blood pressure and improve circulation.

    3. Nature’s Cleanser Parsley

  • Parsley has vitamins, minerals, and chlorophyll, making it more than a garnish. Diuretics remove toxins from the kidneys and liver, while vitamin C increases immunity and collagen formation for healthy blood vessels.

4. Carrots: Colourful Detoxifier

  • Carrots benefit your liver, blood arteries, and eyes. Carrots’ beta-carotene and antioxidants neutralise free radicals and decrease inflammation, aiding liver detoxification. Soluble fibre helps regulate cholesterol, boosting heart health.

5. Spice Up Detox with Ginger

  • Ginger root adds heat and health benefits to this cleansing drink. It reduces liver and blood vessel oxidative stress and inflammation with its antioxidant and anti-inflammatory effects. Ginger improves digestion and reduces nausea, improving health.

6.Peruvian strawberry fruits

  • (aguaymanto or goldenberries) add a unique edge to this detox drink. These exotic fruits enhance liver health and immunity with vitamins, minerals, and phytonutrients. Their tartness lightens the combination, making it tasty and healthy.

7. Preparation Method

Follow these simple methods to detoxify with these ingredients:

  • Thoroughly wash the components.
  • Smaller bits make mixing simpler.
  • Blend beetroot, parsley, carrots, ginger root, and Peruvian strawberries.
  • Adding 300 ml water helps mix.
  • Blend until smooth and mixed.
  • Remove pulp by sieving or cheese clothing the mixture.
  • Refrigerate liquid in a glass container for freshness.

8. Consumption Procedure

  • Drink one glass of this natural bomb on an empty stomach in the morning to maximize its advantages. Drink it gently to get the nutrients. To avoid overloading your system, sip it over 10-15 minutes. Use this drink everyday, especially during flu and virus seasons, to boost your immune system and improve your health.

9. Benefits of Regular Use

Regularly drinking this natural detox drink has several health benefits:

  • Clears toxins and promotes liver function.
  • Improved Circulation: Vascular dilation increases blood flow.
  • Antioxidants and vitamins boost immunity.
  • Anti-inflammatory qualities reduce inflammation.
  • Digestive Support: Improves gut health.
  • Natural energy boost for a productive day.
  • Heart Health: Manages cholesterol for cardiovascular health.

10. Precautions

  • Hypersensitive people should avoid this natural bomb, but it is normally safe.
  • If you have a medical problem or take medications,
  • check a doctor before adding it to your diet.
  • To avoid side effects, consume in moderation.

Air Fryer Catfish

Air Fryer Catfish

Make this Crispy Air Fryer Fish as soon as possible with your air fryer. Fried fish, coated in a crispy, delectable coating, can be enjoyed guilt-free, whenever you like. The whitefish is flakey and comes out wonderfully seasoned. Enjoy that fried taste while using far less oil!

  • My favorite events to attend are the fish fries in the summer. I mean, that perch, whiting, and catfish are so delicious! There are times when I want that delicious fish at home but don’t want to cope with oil-frying.
  • I now have the ability to prepare beautiful golden fried fish fillets whenever I want without all the grease owing to my air fryer, which I bought on a whim during my pregnancy.
  • The floured and seasoned white fish is really easy to prepare and cook, and it has an incredibly tasty and crispy crust.

Which fish is ideal for use?
This recipe calls for whiting fish, but you may use any other white fish using the same technique. Use my method for soaking in milk first if you’re cooking fried catfish.

Is it possible to use frozen fish in this recipe?
For this recipe, I would recommend using either fresh fish fillets or high-quality freezer fillets. If using frozen, be sure to completely thaw them before seasoning and press dry with a paper towel to eliminate any remaining moisture.

Is it more wholesome?
In order to maintain a well-balanced diet, it is advised that you eat two meals of fish every week. Fish is a fantastic high-protein, low-fat cuisine. This air fryer makes fried fish far crispier than baking it in the oven, yet it uses a fraction of the oil needed for standard frying. The finest of both worlds, indeed!

With what do you serve it?
Serve this crispy air fryer fish with potato and vegetable sides, along with some tartar sauce, remoulade sauce, and spicy sauce, for a simple evening family meal. Present it alongside a few of these beloved dishes:

Components

  1. Whiting 4-6 Cut fish fillets in half.
  2. from oil to mist
  3. Seasoning Fish
  4. ¾ cup finely ground cornmeal,
  5. ¼ cup flour, and 2 tsp old bay
  6. One-and-a-half teaspoons of salt
  7. One tsp of paprika
  8. 1/4 teaspoon powdered garlic
  9. One-half teaspoon of black pepper

Your preferred fish spice recipe directions

  • Shake the fish seasoning ingredients in a Ziplock bag. Place aside. Alternatively, you might season the fish with your preferred spice.
  • Use paper towels to rinse and pat dry your fish fillets. They ought to remain moist.
  • Fish fillets should be placed in a ziplock bag and shaken to ensure the fillets are completely covered in seasoning.
    To enable any extra flour to drip off the fillets, place them on a baking rack.
  • After putting the fillets inside the air fryer basket, grease its bottom. Sear fillets for 7 to 10 minutes at 400 degrees.
  • Before flipping, open the basket and give the fish a good spray to make sure it is completely covered on the side that is facing up.
  • Cook for 7-8 minutes on the opposite side after flipping. Fish should be taken out and served.

Save Money and DIY: Making Avocado Oil at Home

Save Money and DIY: Making Avocado Oil at Home

Because of its health advantages and creamy texture, avocado oil is a favorite in kitchens and beauty regimens, but did you know that you can produce your own at home? It is true, indeed! You may extract all of the nutritional content from your avocados by using their seeds and peels in addition to making your own oil. Let’s explore how you can accomplish this while also saving money.

Let’s start by discussing the motivation behind making your own avocado oil. Avocado oil is a healthy option for frying and sautéing because of its reputation for withstanding high heat without degrading. It’s praised for its moisturizing qualities in hair and skin care as well. You have control over the process and can stay away from any additives present in store-bought goods by manufacturing your own.

Here’s a quick method for removing oil from avocado peels and seeds:

  • Gather the Seeds and Peels: Keep the seed and the peel from your avocados the next time you use one. They’ll be necessary in large quantities, so freeze them until you have them all.
  • Dry Them Out: After gathering a group, it’s time to dry them. To achieve this, spread them out on a baking sheet and put them in a low-temperature oven, or just leave them in the sun till they dry out.
  • Grind the Dry Ingredients: Pulverise the dry seeds and peels into a fine powder using a food processor or a powerful blender.
  • To extract the oil, put the powder in a pot and cover it with just enough water. Allow the oil to separate from the powder by simmering over low heat for a few hours. To extract the oil, strain the mixture through cheesecloth or fine mesh when it has cooled.
  • Keep Your Oil Stored: Transfer the oil into a dry, spotless bottle or jar. Store it somewhere cold and dark. You’re all set to use your homemade avocado oil!
  • Not only is it cost-effective to make your own avocado oil, but it’s also a fun activity that gives you control over the quality of oil you put on or eat. This handcrafted gem is a pleasant addition to your daily routine, whether it’s used as a dressing for salad or as a skin care product. Try it out and get the rewards of your hard work!

LEMON CAKE Preheat the oven

LEMON CAKE Preheat the oven

Recipe calls for four eggs.

  1. Extra virgin olive oil or butter, 100 milliliters in volume
  2. 18 gm of sugar
  3. 280 gm of flour
  4. 20 gram of baking powder
  5. 175 gm of plain yoghurt It is NOT Greek yoghurt.
  6. 60 milliliters of lemon juice
  7. This is the grated zest of two lemons.

Advance planning:

  • Put the oven on to preheat. Prepare a round mold by greasing it with butter and then dusting it with flour.
  • Remove any extra flour (you can use baking paper in place of flour and butter if you feel more comfortable). 20 centimeters is the diameter of the mold.
  • Using a mixer, beat the egg with the sugar until it becomes creamy and white. Continue pounding while gradually adding the oil to the mixture.
  •  Add the yoghurt, lemon juice, and grated lemon peel to the mixture. In order to ensure that the mixture is uniform, give it a little additional beating.
  • Mix in the baking powder and flour. Continue to beat until the mixture is completely smooth.
  • In the mold, pour the lemon cake batter and make sure it is well distributed. Bake for approximately forty-five minutes. Bake at 180 degrees Celsius.
  • After removing the cake from the oven, allow it to cool for ten minutes in the pan before removing the pan and placing the cake on a wire rack to finish cooling.


We Don’t Buy Bread Anymore! Bread Without an Oven!

We Don’t Buy Bread Anymore! Bread Without an Oven! Incredibly Delicious!

Embrace the goodness of handmade bread and bid adieu to store-bought bread! We’ll walk you through the easy stages of baking bread without an oven in this article. A pan and a few staple ingredients are all you need to make fresh, warm bread right in your own kitchen.

Getting the Ingredients Ready

Before you start baking bread, gather the following ingredients:

  • 400 gm of plain flour
  • 220 milliliter of water
  • Six gm of instant yeast
  • Two tablespoons of sugar
  • One teaspoon of salt
  • One teaspoon of cumin
  • Plant-Based Oil:
  • as required

combining the dough

  • STEP: Start by combining sugar, quick yeast, and warm water. Mix the yeast until it dissolves.
  • STEP: Add cumin and salt after sifting plain flour into the yeast mixture. By hand, knead the ingredients into a thick, sticky dough.
    Grasping and Lifting
  • STEP: To avoid sticking, grease your hands and work surface with oil. Work the dough into a smooth, elastic ball.
  • STEP: After the dough has doubled in size, place it in a basin that has been greased, cover it, and let it rise in a warm location for about an hour.
    Getting the Pan and Dough Ready
  • STEP: Place the rising dough into a big pan that has been lightly oiled.
  • STEP: Using your fingers, evenly distribute the dough across the pan’s surface. For an additional thirty minutes, cover the pan with a cloth and leave it to rest.
  • Check out Grandma’s Recipe for Delicious Chicken Thighs as well! Juicy and tasty beyond words!
    Fry the Bread in a Pan
  • STEP: Set the pan over low heat in the stove and cover it with a lid. Let the bread fry until the bottom is golden brown.
  • STEP: After the bread readily removes from the pan’s bottom, turn it over using a plate and continue cooking it until the other side is also golden brown.
  • Providing and Gratifying
    Well done! Your bread is ready! Take it out of the pan, let it to cool down, and then serve it like you would any other bread. This handcrafted invention is sure to please your palate whether you choose to eat it plain, with butter, or with your favourite cuisine!

Quick and Delicious: Easy Breakfast Recipe in 5 Minutes

Quick and Delicious: Easy Breakfast Recipe in 5 Minutes

It might be difficult to find time for a substantial breakfast in the rush of our everyday life. What if I told you, though, that you could make a delectable breakfast in under five minutes? You did really read correctly! Not only is this simple breakfast meal really excellent, but it comes together quickly. You may make a tasty and satisfying start to your day with a few basic ingredients and little work.

Ingredients for a 5-Minute Easy Breakfast Recipe:

  1. three eggs
  2. 50 gm, or about 1/4 cup, of white cheese
  3. 50 gm, or almost half a cup, of grated cheddar cheese
  4. One glass of milk, or roughly one cup
  5. Six parsley sprigs
  6. One spicy pepper
  7. One tsp red pepper flakes
  8. One tsp salt
  9. One baking powder packet
  10. Four and a half cups flour For frying: emulsion

How to Prepare a Simple Breakfast Dish in Five Minutes:

  • Combining the Ingredients:
    Place the eggs in the kneading bowl and well combine.
    Incorporate grated cheddar and white cheeses into the basin and well blend.
  • Add the grated capias pepper, milk, chili pepper, green pepper, finely chopped parsley, baking powder, and salt to the mixture. Blend until thoroughly blended.
  • Knead the Dough: While kneading, gradually incorporate flour into the mixture.
  • Knead the dough until it becomes a soft dough that clings to your hands just a little bit.
  • Splitting and Forming the Dough: Separate the dough into two identical portions.
  • To make meringues, dust the table with flour and gently press the dough.
  • To cut the dough into triangle-shaped pieces, use a cutting card.
    Frying the Delights of Breakfast:
  • Heat a pan with liquid oil after adding it.
    The dough pieces should be added to the pan after the oil is heated.
  • Make sure the dough is cooked completely by cooking it until it turns golden brown on both sides.
  • Present and Savor:
  • After they are cooked, take the breakfast goodies out of the pan.
  • Warm up and savor with your preferred beverage!
    It only takes a few easy steps and basic items to prepare a tasty breakfast in no time. For hectic mornings when you need a quick and filling meal to start your day, this simple breakfast recipe is ideal. Why then wait? Take a look at it and enjoy a delicious breakfast!

Whisk Banana with Cookies

Whisk Banana with Cookies! You’ll be Amazed! Delicious Dessert in 5 Minutes Without Baking

Who doesn’t enjoy a simple, quick dessert fix? Particularly when it involves the delectable pairing of cookies and bananas. We’ll explore a straightforward yet delicious dessert recipe in this post that will entice your palate and leave you wanting more. Prepare to make a delicious treat in under five minutes!

Ingredients:

  1. two bananas
  2. 120 gm of cookies
  3. 35 gm of butter
  4. 75 gm of whipped cream
  5. 200 gm of concentrate milk
  6. 35 gm of sugar
  7. refined sugar
  8. Flakes of chocolate

Guidelines

Let’s examine the procedures for making this delicious dessert:

  • Smashing the Biscuits
    Scoop up a few of your preferred cookies and put them into a plastic bag. Crush them into fine crumbs with a rolling pin. This step gives our dessert a delicious crunch.
  • Setting Up the Base
    Using a potato masher, put the mashed bananas and crushed cookies in a mixing basin. After thoroughly mixing, pour the batter into a circular cake pan to create the base.
  • Preparing the Creamy Filling
    Melt the butter and sugar together in a saucepan. After melting, thoroughly combine with the milk concentrate. Simmer it for around five minutes, stirring all the time. This will be our dessert’s filling, this creamy mixture.
  • Putting the Dessert Together
    Over the prepared cookie and banana base in the cake pan, pour the creamy mixture. For an additional flavour boost, arrange slices of banana on top.
  • Using chocolate flakes for decoration
    Beat the cream with a teaspoon of powdered sugar in a separate bowl until stiff peaks form. Drizzle the completed dish with this deliciously creamy mixture. For a delicious garnish, generously sprinkle chocolate flakes on top.
  • Serving Ideas
    After assembling, place the dessert in the refrigerator for a short while to let it solidify. To enjoy the greatest flavour, serve cold. You can also experiment with different toppings, such as more fruits or a caramel sauce drizzle.

In summary
You’ve made a delicious dessert that will satisfy even the pickiest eaters in just five minutes. It’s impossible to resist the combination of cookies, bananas, and creamy delight. Why then wait? Make this delicious dessert now and experience ultimate happiness!

Banana Cake with Caramel Sauce

Banana Cake with Caramel Sauce

Components:

  1. – 2 and a half cups flour;
  2. – 2 and a half teaspoons baking powder
  3. Half a teaspoon baking soda,
  4. half a teaspoon salt,
  5. half a cup butter, one and a quarter cups sugar,
  6. two eggs, and one and a half teaspoons vanilla
  7. – Half a cup of yoghurt
  8. One cup of ready-made caramel sauce;
  9. one cup of mashed bananas

instruction

  •  Preheat the cake pan by brushing it with butter and lightly flouring it. Set oven temperature to 350°F, or 180°C.
  • In a deep bowl, sift the flour twice together with the baking soda, baking powder, and salt.
  • Using an electric mixer set to medium speed, beat the butter until it becomes frothy and creamy.
  • Beat the butter for two minutes after adding the sugar. Next, add the vanilla and the eggs, one at a time.
  • Lower the speed of the mixer and gradually add one-third of the flour, followed by one-third of the yoghurt and the mashed bananas. Repeat this process until all of the flour has been added, and whip the mixture until it becomes homogenous.
  • Transfer the mixture into the ready pan and bake for 25 to 30 minutes, or until thoroughly done. Give it time to cool.
  • To make two layers, split the cake in half. Spoon half of the caramel onto the bottom half, then top with the top half. Next, cover the sides and top with the leftover caramel.
  • Savor the delectable Caramel Sauced Banana Cake!