The Wonders of Garlic Water

The Wonders of Garlic Water: A Natural Boost for Your Well-being

Have you ever thought of garlic water’s amazing health benefits? This is a very easy to make, but very effective mixture that has several health benefits. Let’s explore the reasons why adding garlic water to your daily regimen can be among the healthiest choices you ever make.

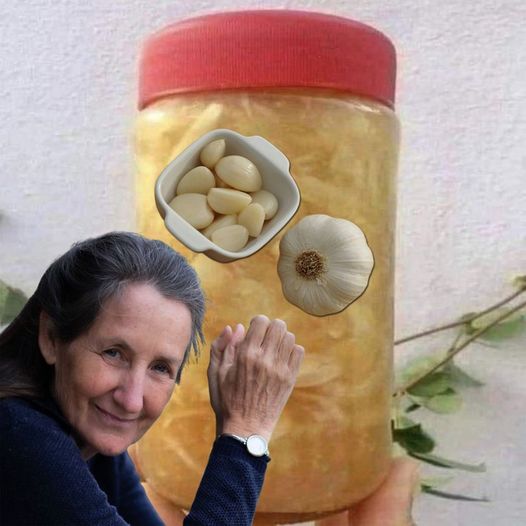
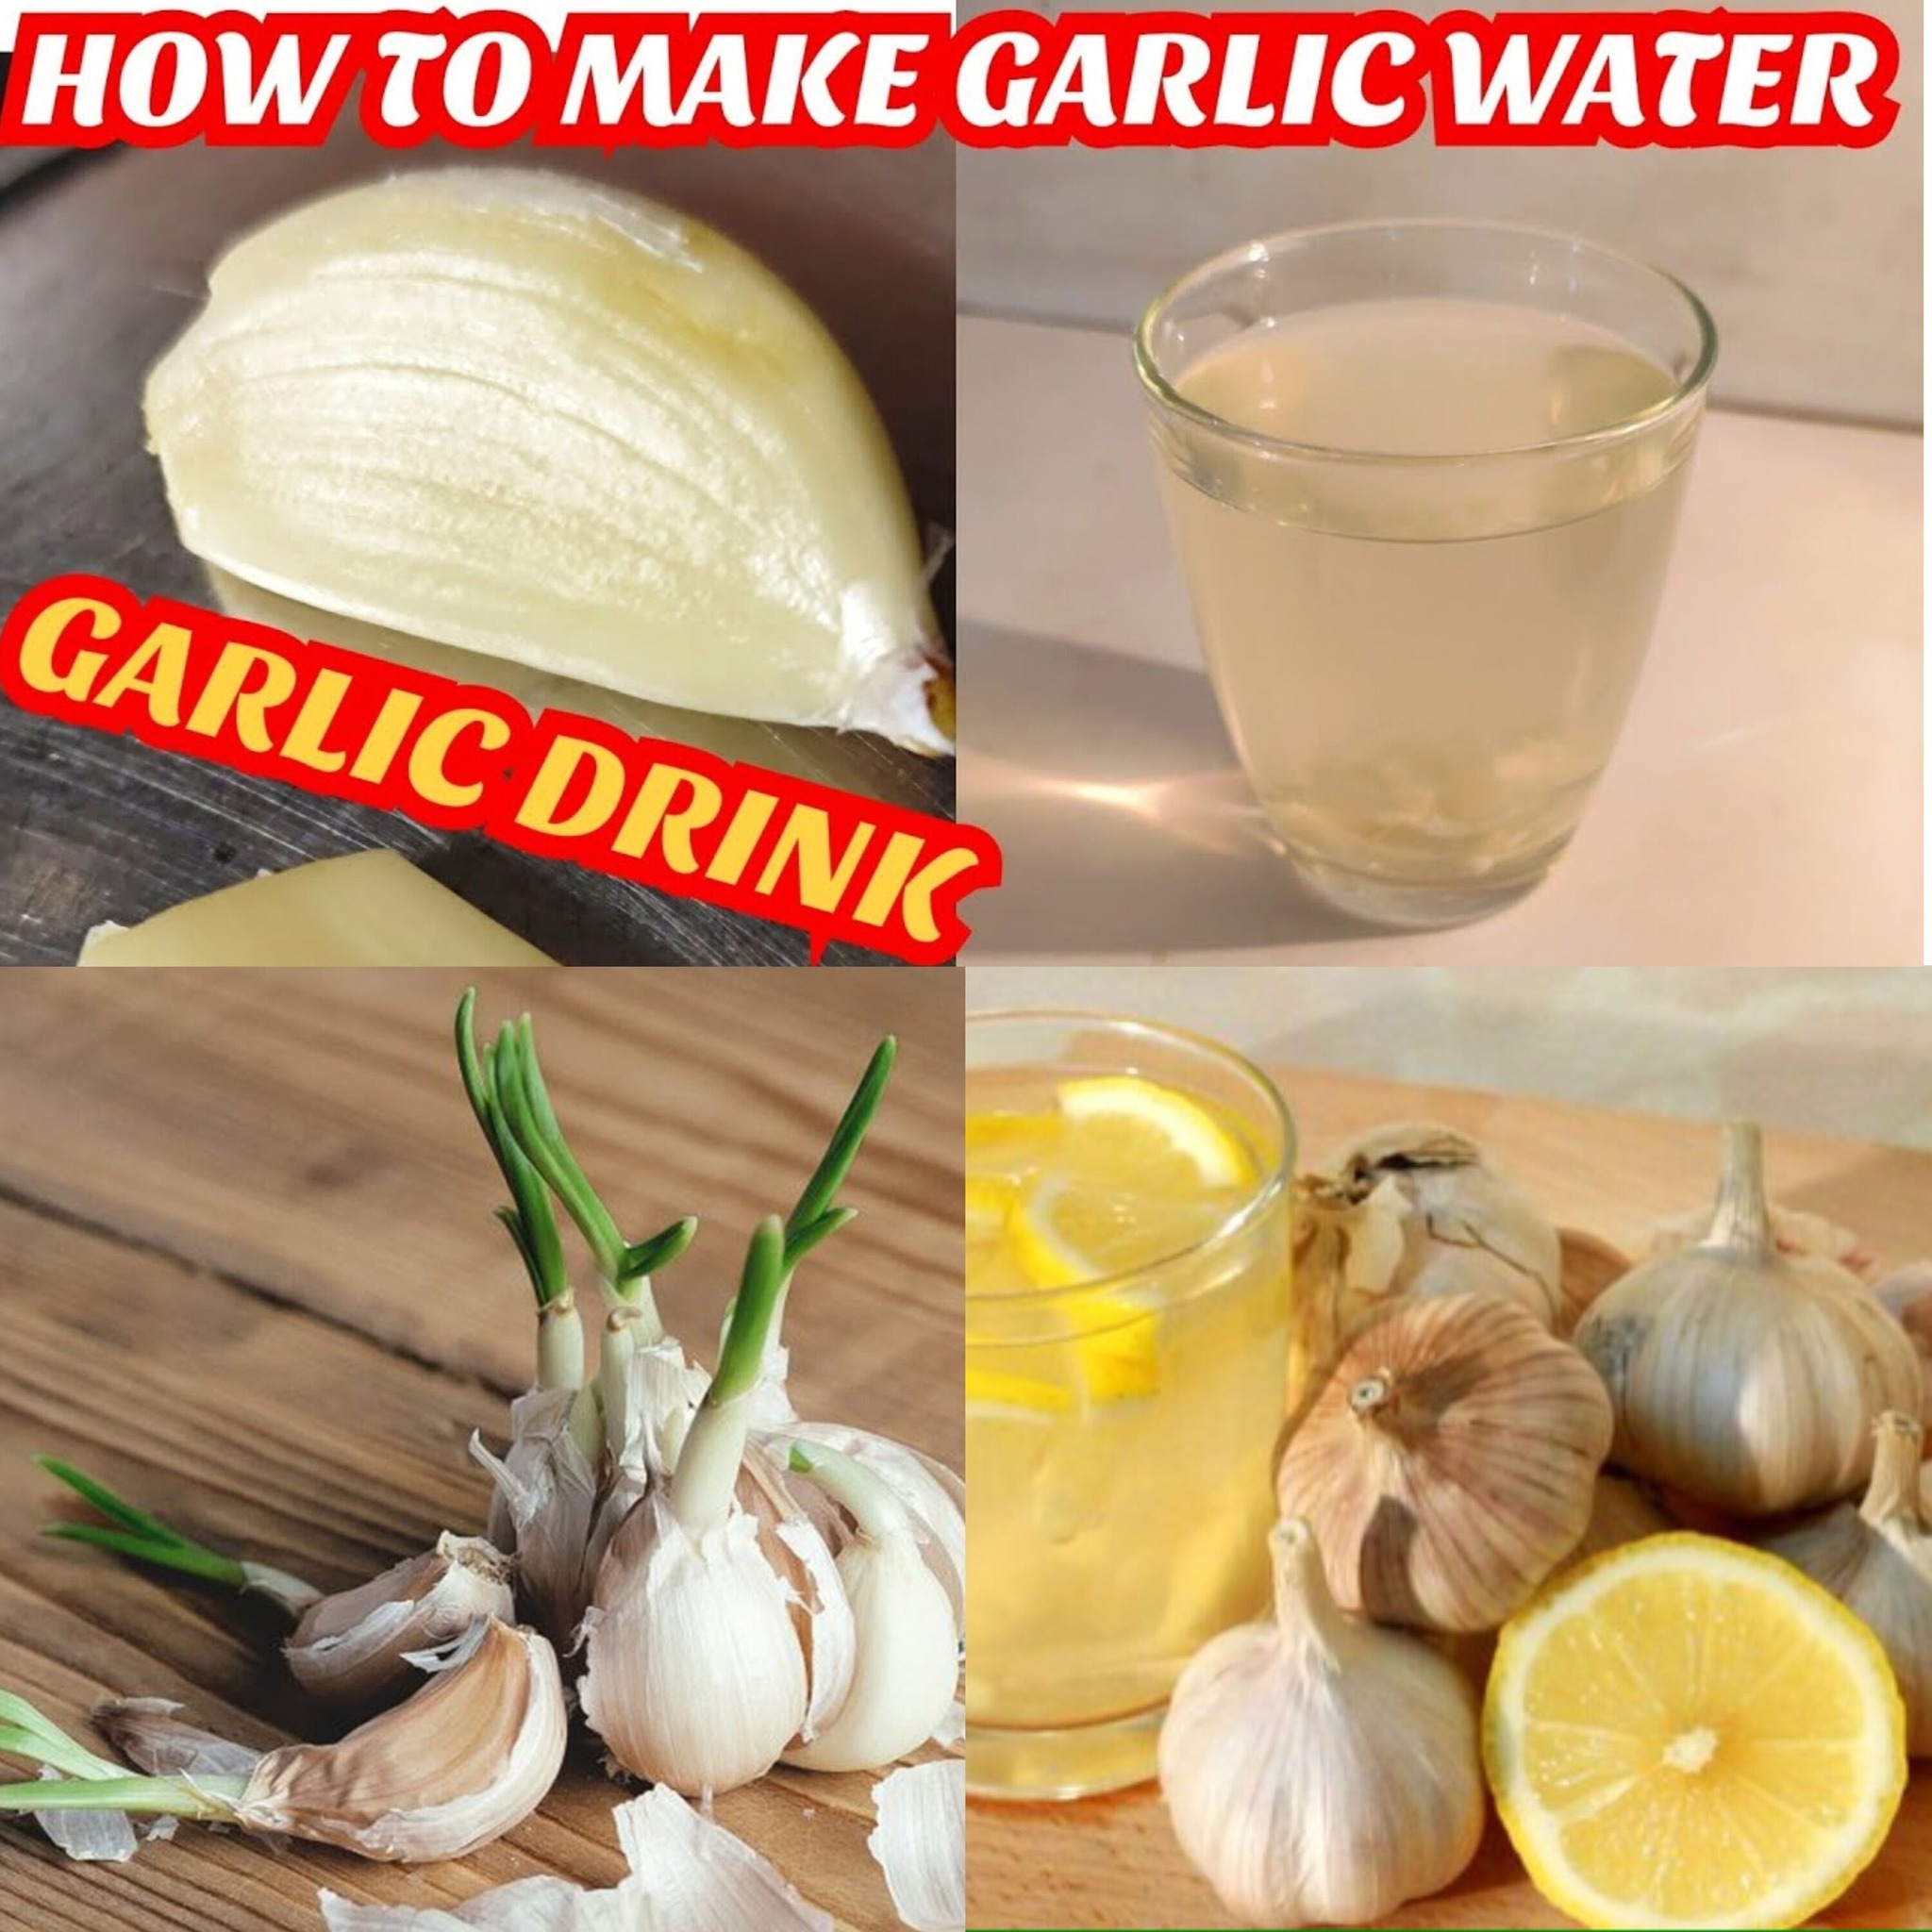
Garlic Water: What Is It?

Raw garlic cloves are infused with water to create garlic water. Garlic’s powerful qualities are harnessed in this blend to make them conveniently accessible in a drinking form. It’s a practical method to reap the advantages without either cooking or consuming cloves.

Boosted Defence Response

When it comes to strengthening your immune system, garlic is a superfood. It is brimming with antioxidants, minerals, and vitamins that fight off common ailments. Having a glass of garlic water every day could help prevent those pesky colds.

A Heart-Healthy Option

Garlic’s effect on heart health is among its most well-known advantages. Garlic water can help improve cholesterol profiles and help maintain healthy blood pressure levels when used on a regular basis. It’s an easy, all-natural way to help keep your heart healthy.

The Unique Advantage of Garlic Sprouts

Let’s now discuss about the garlic’s unique feature: its sprouts. Garlic generates little green shoots when it starts to sprout. Not only are they safe to eat, but compared to their more mature counterparts, they have more antioxidants. Garlic sprouts are an additional source of nutrients that fortify the health advantages of water by shielding your cells from harm.

Simple Recipe to Get You Started

Garlic water is simple to make:

  • Slice thinly two to three fresh garlic cloves.
  • After adding the slices, pour around a litre of water into the jar.
  • To give the flavours time to fully infuse, let the mixture lie overnight.
  • Pour the water through a strainer into a glass in the morning. For a refreshing touch, you can add a squeeze of lemon or a sprig of fresh mint.

Including Garlic Water in Your Everyday Activities

  • Drinking a glass of garlic water first thing in the morning might be a refreshing habit. It has numerous health advantages in addition to being hydrated. Garlic water is a great option if you want to strengthen your heart health, increase your immune system, or just enjoy a natural, health-promoting beverage.
  • Why not attempt it then? It’s an easy addition that can have a big impact on your health. Recall that the healthiest practices are frequently those that are simple to do and have their roots in the pantry of nature.

Boiling Eggs Made Easy

Boiling Eggs Made Easy: Flawless Results Every Time

Have you had enough of battling to achieve the ideal boiled egg? There’s nowhere else to look! We use a straightforward technique that ensures perfectly fried eggs that are customised to your preferences. Whether you like them soft, medium, or hard-boiled, this tried-and-true method will never let you down.

Not only are boiled eggs delicious, but they are also a great source of protein, vitamins, and minerals, making them a great option for a nutritious dinner. Now for the main course: the ideal boiled egg.

What you’ll need is as follows:

  1. pristine eggs
  2. A covered pot
  3. A cooling bowl of ice water
  4. A stopwatch

Let’s now explore the detailed method for preparing perfect boiled eggs:

  • Eggs at Room Temperature: Begin with eggs that are at room temperature. This little tip keeps the shells from breaking when they come into contact with boiling water.
  • Boiling Water: Add enough water to a pot so that the eggs are completely submerged. Over high heat, bring the water to a full boil.
  • Adding the Eggs: After the water reaches a boil, use a spoon or ladle to carefully drop the eggs into the water while reducing the heat to a simmer. This stops them from moving and stops any unintentional cracks.
  • Cooking Time: Depending on the consistency you want, the cooking time varies:
  • Cook for four to six minutes for soft-boiled eggs.
    Cook eggs until medium-cooked, 6 to 9 minutes.
    Cook hard-boiled eggs for ten to twelve minutes.
    Don’t forget to modify the cooking time accordingly depending on your altitude and the size of the egg.
  • Cooling the Eggs: Using a slotted spoon, take the perfectly cooked eggs out of the hot water and drop them into a dish of icy water right away. This rapid chilling action halts the cooking process and facilitates easy peeling.
  • Peeling: Crack the eggs’ shells gently and peel them under a little stream of running water after they have cooled in the ice water for about five minutes. It is easier to peel the egg when the water helps separate the shell from the egg.

To guarantee consistent outcomes, bear in mind these useful suggestions:

  • Freshness: Use eggs that are reasonably fresh rather than the freshest ones you can locate. Peeling eggs that are a little older is easier.
  • Stick to your preferred level of doneness consistently once you’ve determined the ideal timing and approach.
  • Storage: Boiled eggs can be kept for up to a week in the refrigerator. To preserve their freshness, keep them in their shells until you’re ready to eat them.
  • Perfect egg boiling may take some getting used to, but the benefits are substantial. Embrace consistently well cooked eggs and bid adieu to overcooked or undercooked ones.
  • This technique aims to bring out the finest in an ordinary egg, not just make it simple. Why not attempt it then?
  • Every time you boil eggs, you will be astounded by their amazing taste and texture!

Rejuvenate Your Hands with Vaseline and Tomato

Rejuvenate Your Hands with Vaseline and Tomato

Do your hands feel dry and harsh to the touch? Rest assured, we have an easy fix for you! You can restore your hands’ natural softness and smoothness with a few items from your kitchen. Let’s get started and discover how to make this useful cure.

Why Tomato and Vaseline?

  • Vaseline: Due to its moisturising and protecting qualities, this age-old skincare product has been relied upon for years. It fortifies your skin, trapping moisture and promoting healing while averting cracks and dryness.
  • Tomato: Tomatoes are a great source of vitamins A, C, and E, all of which are essential for healthy skin. Additionally, they have antioxidants in them that help to keep skin looking young and less wrinkled. Tomatoes’ natural acids even aid in skin brightening and exfoliation.

How to Prepare and Use the Ingredients for the Remedy:

  1. One ripe tomato
  2. One spoonful of Vaseline

Guidelines:

Get the tomato ready:

After giving the tomato a good wash, cut it in half.
Pour the juice and pulp from half of the fruit into a small bowl or, for a smoother texture, mix in a blender.
Combine with Vaseline:

Stir the tomato pulp and juice together with the tablespoon of Vaseline.
Blend thoroughly until a uniform, silky texture is achieved.

Use:

  • After washing your hands with a gentle soap and warm water, pat dry.
  • Spread a liberal amount of the tomato and Vaseline mixture over your hands, making sure to get into the nooks and crannies.
  • Apply the mixture on your skin with light circular strokes. This guarantees that the chemicals are well absorbed and aids in stimulating circulation.

Keep it turned on:

  • Let the mixture sit on your hands for at least 20 to 30 minutes for optimal effects. For an even more thorough treatment, you can even put on cotton gloves and leave them on all night.
    After washing, moisturise:
  • After giving your hands a quick rinse with warm water, gently pat them dry.
    To lock in the moisture, use your go-to hand cream or lotion afterward.

Advantages and Advice:

  • Frequent Utilisation: Use this solution two to three times a week to keep your hands wrinkle-free and silky.
  • Patch Test: Make sure you don’t have an allergic reaction to the ingredients by doing a patch test before using any new medication.
  • Extra Care: Wear gloves to shield your hands from abrasive detergents and severe weather. Maintaining the softness and smoothness of your hands is also facilitated by routine hand hydration.

Using this easy yet powerful recipe, which combines tomato and Vaseline, you can get gorgeously soft hands that look young. The finest aspect? This is a quick and simple natural remedy that nourishes and hydrates the skin. Try it out and see the results you deserve—rejuvenated hands!

DIY Remedies for Clearing Mucus and Phlegm

Discover the Power of Nature: DIY Remedies for Clearing Mucus and Phlegm – Stay Naturally Healthy

Having the flu can be very uncomfortable, especially if you have to deal with annoying mucous and congestion in your chest. Investigating natural options can offer mild yet efficient strategies to handle these concerns, even when traditional treatments offer relief. This post will provide you a natural method of symptom alleviation by highlighting easy home remedies that are well-known for their effectiveness in removing mucus and phlegm.

First-aid remedy: An elixir of ginger, honey, and black pepper
Not only is this elixir simple to prepare, but it is also loaded with healthy elements that have been shown to have medicinal benefits.

Components:

  1. One tablespoon of pepper, black
  2. One tablespoon of honey
  3. two tsp finely chopped ginger
  4. three cups of water

How to Prepare and Use It:

  • After bringing the water to a boil, add the grated ginger and black pepper.
  • After three minutes of simmering, let the mixture cool somewhat.
  • Add honey to taste to sweeten.
  • Use this elixir as needed to relieve cough and congestion symptoms.
  • Recommended Dosage:
  • To get rid of congestion and cough effectively, drink three to four cups a day. On an empty stomach, one cup may be sufficient for moderate symptoms.
  • An Extra Natural Cure: Strong Tonic for Colds and Flu
    This tonic is an effective treatment for cold and flu symptoms since it contains a number of strong

 components.

Ingredients: Chopped or crushed fresh garlic

  1. chopped fresh onion
  2. freshly grated ginger root
  3. freshly grated horseradish
  4. Freshly chopped or sliced cayenne pepper with seeds

How to Prepare and Use It:

  • Mix each component well after completely combining them.
  • Shake the mixture once a day for two weeks after transferring it to an airtight glass jar.
  • Strain the mixture to remove the useful liquid after two weeks.

In brief
A natural and comprehensive approach to treating flu symptoms including mucous and chest congestion is provided by these do-it-yourself solutions. Through the use of substances such as ginger, honey, black pepper, and other powerful herbs and spices, these cures offer a reassuring substitute for traditional pharmaceuticals. Combining these herbal remedies with conventional therapies can help create a more all-encompassing plan for flu season symptom management. These natural solutions are worth looking into as part of your health regimen, whether you’re looking for gentle daily preventive measures or immediate relief from severe symptoms.

Refresh Your Day with Beetroot Apple Juice:

Refresh Your Day with Beetroot Apple Juice: A Detoxing and Hydrating Delight

It’s not always necessary to use difficult-to-find products or complex recipes to feel renewed and invigorated. Sometimes all you need to reenergize your body and mind is a simple mixture of crisp apples and earthy beets. Not only is our beetroot apple juice wonderful, but it also has a plethora of hydrating and detoxifying properties that will make you feel as though you’re drinking straight from the healthiest spring in the world.

Why Apple and Beetroot?

A wonderful root vegetable, beetroot has several health advantages in addition to a rich, vivid colour. It has an abundance of vitamins, minerals, and antioxidants that can promote better blood flow and liver purification. Conversely, apples are a delicious way to stay hydrated. They are ideal for a mild digestive system cleansing because they are high in vitamin C and essential nutritional fibre.

How to Make Apple-Beet Juice

You’ll need the following to make this delicious juice:

  1. Two medium-sized beetroots, chopped into bits after peeling
  2. Two large apples (of any kind you like) cored and sliced
  3. A tiny bit of ginger, optional for a spicy burst
  4. fresh juice extracted from half of a lemon
  • First, juice the apples and beetroots together in a juicer. After the juice is extracted, add the lemon juice and finely chop some ginger to give the mixture an additional burst of freshness. You can adjust the juice’s flavour by adding a little water to thin it out if you think the flavours are too strong.

Numerous Health Benefits

  • Not only is this juice tasty, but it’s also healthy! A great hydrator to start the day or as a mid-afternoon pick-me-up is beetroot apple juice. In addition to tasting fantastic, beetroot and apple go well together to improve heart health, help you maintain a healthy weight, and increase stamina.
  • Regular consumption of this juice can also result in improved skin. Your skin looks brighter and more radiant when the detoxifying qualities of beetroot and the moisturising qualities of apples are combined. In addition, adding lemon not only improves the flavour but also increases the amount of vitamin C, which is excellent for your immune system.

A Word About Readying

  • When making juice, always use organic, fresh beetroot and apples for maximum health benefits and flavour. To get rid of any pesticides and undesired residues, give them a thorough wash. Straining the liquid after blending might remove extra fibre for individuals who want a smoother texture, but leaving it in guarantees you get the most benefits.

To Sum Up

  • Accept the strength and simplicity of beetroot apple juice. The benefits are immense, despite the blend’s simplicity. This juice is proof of the ability to combine flavour and nutrition—it may detoxify the body and increase hydration. Today, raise your spirits with each drink of your glass!

Purple Basil Lemon Tea

Purple Basil Lemon Tea: A Delicious, Budget-Friendly Immune Booster

is not only delicious, but it’s also nutrient- and antioxidant-rich, strengthening your body’s defense’s without breaking the bank.

Why Is Purple Basil Lemon Tea Better?

Purple basil is more than just a colorful variation of regular green basil; it contains more anthocyanins, an antioxidant that gives purple basil its vivid color and health-promoting qualities. The addition of vitamin C-rich lemon to this tea makes it a powerful immune-boosting brew.

Purple Basil Lemon Tea Ingredients

It’s easy and affordable to gather the ingredients for this immune-boosting tea:

A few fresh leaves of purple basil

  1. One lemon’s juice
  2. two glasses of water
  3. Honey (for sweetness, optional)
  4. A dash of black pepper (to improve nutrient absorption)

Getting Your Tea Ready

  • Boil the Water: First, fill a small saucepan with water and bring it to a boil.
  • When the water reaches a boil, add the purple basil leaves to the saucepan and turn down the heat. Simmer it for five to seven minutes on low heat. This lets the flavours and vital oils of the basil seep into the water.
  • Stir in the fresh lemon juice and seasonings after removing the saucepan from the heat after it has finished simmering. To improve the absorption of nutrients, add a pinch of black pepper and, if preferred, a teaspoon of honey for sweetness.
  • Pour the tea into cups, being careful not to get any leaves in them. Warm up and enjoy a soothing and nutritious beverage.

Advantages for Health

Purple basil lemon tea is a health elixir rather than merely a tasty drink. The antibacterial and anti-inflammatory qualities of purple basil can help prevent illnesses. Lemons are rich in vitamin C, which boosts collagen synthesis and strengthens the immune system to improve skin health. When combined, they provide a synergistic blend that promotes immune function, eases stress, and facilitates digestion.

Convenience and Economies

Making this tea is highly cost-effective. You may cultivate purple basil in your garden or purchase it from nearby shops, and lemons are both readily accessible and reasonably priced. Making this tea at home allows you to take advantage of all the benefits of using fresh, natural ingredients without having to pay extra for store-bought immune boosters.

To Sum Up

Accept the tasty flavours and advantageous health properties of purple basil lemon tea. This inexpensive, simple-to-make beverage is a great addition to your regular routine because it promises to improve your general health and immune system with each sip. Today, give it a try and let its distinct flavour and healing qualities revitalise you!

Turbocharge Your Weight Loss

Turbocharge Your Weight Loss with a Simple Turmeric Water Recipe

First of all,

Are you trying to lose weight and seeking for a natural strategy to support yourself? You should definitely include turmeric water in your regular regimen. This easy drink, which only has two components (turmeric and water), has a lot of health benefits and can help with weight management.

Why Use Turmeric?

The vibrant yellow spice turmeric has been used in traditional medicine and culinary for ages. It is widely recognised for its antioxidant and anti-inflammatory qualities, mostly because of the active ingredient curcumin.

Benefits of Turmeric Water for Health:

  • Supports Weight Loss: By increasing fat burning, turmeric can help you lose weight more quickly.
  • Improves Digestion: Consistent intake can help maintain a healthy digestive tract, which is essential for successful weight control.
  • Anti-inflammatory Properties: Turmeric’s capacity to lower inflammation can aid in the prevention of a variety of conditions linked to inflammation, hence promoting general health.

The Recipe for Turmeric Water:

Components:

  1. One teaspoon of powdered turmeric
  2. One glass of water, warm or room temperature

Guidelines:

Get the Turmeric Solution Ready:

In a glass of warm or room temperature water, thoroughly mix the turmeric powder until it dissolves.

Use:

  • To get the most out of turmeric water, drink it first thing in the morning on an empty stomach.
  • Squeeze in some lemon juice or add a teaspoon of honey for extra health benefits and a more palatable taste.

Advice for Often Utilised:

  • The secret to success is consistency: incorporate drinking turmeric water into your daily routine for optimal effects.
  • Modify to Taste: You can add more honey or lemon, or you can reduce the amount of turmeric if you think it tastes too earthy.
  • Keep an Eye on Your Body: Pay attention to how your body reacts to any nutritional changes. Though generally safe, it’s crucial to pay attention to your body’s needs and make any necessary adjustments.

In summary:

An easy-to-make but powerful tool for anyone trying to improve their natural weight loss journey is turmeric water. This “natural bomb” has major health advantages, including better digestion and less inflammation, in addition to aiding in weight loss. You might find yourself appreciating each spoonful of turmeric water for its benefits to your health and wellbeing if you try including it into your daily routine!

The Warming Benefits of Prune Water: A Winter Wellness Ritual

The Warming Benefits of Prune Water: A Winter Wellness Ritual

Finding strategies to stay warm and healthy becomes more important as winter’s chill sets in. Adding prune water to your daily routine is an easy yet powerful method to improve your health during these chilly months. Let’s explore the advantages of this understated but potent beverage.

1. Organic Digestion Assist: Prunes are well recognised for their natural digestion aid properties. Prunes’ fibre content aids in the regulation of bowel motions, which can be especially helpful in the winter when we may be less active. Pruning water is a good way to keep your digestive system comfy and running smoothly.

2. Rich in Antioxidants: Antioxidants, which assist the body fight against inflammation and oxidative stress, are abundant in prunes. Pruning water can help you prevent chronic diseases and preserve your cells from damage by raising your general antioxidant levels on a regular basis.

3. Boosts Mood and Energy: Prunes’ natural sugars give off a rapid energy boost, and their iron content helps ward off fatigue—a benefit that’s particularly helpful on short, gloomy winter days. Keeping your iron levels consistent might also improve your mood and cognitive abilities.

4. Promotes Bone Health: Vitamin K and manganese, two micronutrients that are necessary for strong bones, are found in prunes. This is especially crucial in the winter, when less sunlight can result in decreased vitamin D levels, which can harm bones.

5. Heart-healthy and hydrated: Even in the winter, it’s important to stay hydrated. In addition to helping you get the recommended amount of fluids each day, prune water has potassium, which helps to control blood pressure and promote heart health.

How to Make Prune Water: A Basic Recipe

  • To begin, let a few prunes steep in a cup of water for the entire night.
  • Move the prunes and their soaking water to a pot first thing in the morning.
  • Let the water gently simmer for several minutes until it becomes a rich, dark hue.
  • Press on the prunes to extract as much goodness as possible while straining the mixture.
  • Warm up and enjoy for a soothing, nutritious beverage.
  • A delicious and warming beverage, prune water has several health benefits in addition to tasting wonderful. Including it in your winter regimen will help you stay hydrated, improve the health of your digestive system, and maintain a positive attitude. Thus, why not begin this easy tradition right now and drink your way to a more robust winter?

Baked Cabbage and Potato Casserole with Cheese

Baked Cabbage and Potato Casserole with Cheese

Layers of soft cabbage, potatoes, and melting cheese combine to make a cosy and filling baked cabbage and potato casserole with cheese. This is a tasty recipe that you should try:

Ingredients:

  1. 1 small head of thinly sliced cabbage
  2. Three big potatoes, thinly sliced and peeled
  3. One finely sliced onion
  4. two minced garlic cloves
  5. One cup of shredded cheddar cheese, or any other preferred cheese
  6. Grated Parmesan cheese, half a cup
  7. One cup of heavy cream
  8. Half a cup of vegetable or chicken broth
  9. two tsp butter
  10. Two tablespoons of flour (all-purpose)
  11. To taste, add salt and pepper.
  12. Chopped fresh parsley (for garnish)

Guidelines:

  • Turn on the Oven: Set the oven’s temperature to 375°F, or 190°C. Coat a 9-by-13-inch baking dish with cooking spray or butter.
  • To prepare the vegetables, melt one tablespoon of butter over medium heat in a large skillet.
  • Add the potatoes, onion, minced garlic, and thinly sliced cabbage. Simmer for 5 to 7 minutes, or until the veggies are starting to get tender, stirring once and then. To taste, add salt and pepper for seasoning.
  • Prepare the Cheese Sauce:
  • Melt the remaining tablespoon of butter in a separate pot over medium heat. After whisking in the flour, cook for one to two minutes, or until gently golden.
  • Whisk in the heavy cream and broth (either chicken or veggie) gradually. Cook until the sauce thickens and starts to bubble, stirring regularly.
  • Take the pot off of the burner and mix in all of the grated Parmesan cheese and half of the shredded cheddar cheese until they are smooth and melted. To taste, add salt and pepper for seasoning.
  • To assemble the casserole, line the bottom of the baking dish with an even layer of half of the cooked vegetables.
    Evenly cover the vegetables with half of the cheese sauce.
    Proceed with the leftover veggies and cheese dressing.
    Bake: Bake the baking dish for 30 minutes in a preheated oven, covered with aluminium foil.
  • Take off the foil and cover the dish with the remaining shredded cheddar cheese.
  • Bake, uncovered, for a further 15 to 20 minutes, or until the potatoes are soft and the cheese is melted and bubbling.
  • Serve: Take the dish out of the oven and let it a few minutes to cool down before cutting into portions.
    If preferred, garnish with finely chopped fresh parsley and serve warm.

Advice:

  • Changes: To add more flavour and protein, add cooked  gammon or sausage. For a variation in flavour, you can also use different cheeses like Gruyere or Swiss.
  • Make-Ahead: The casserole can be made in advance and chilled for the night. Just bake it as instructed the following day.
  • Storage: Keep any leftover casserole in the fridge for up to three days by placing it in an airtight container. Reheat in the microwave or oven until well heated.
  • This meal, which is ideal for a potluck or family supper, is a soothing and fulfilling baked cabbage and potato
  • casserole with cheese. Savour the flavour of creamy, cheesy richness and the filling combination of potatoes and cabbage!

Baked Garlic Butter Potatoes

Baked Garlic Butter Potatoes

An really tasty and soothing side dish that goes well with a variety of meals is baked garlic butter potatoes. Here’s a quick and tasty recipe for you:

Ingredients:

  1. 1 pound, or roughly 700 grammes, of baby potatoes, quartered if larger, and then cleaned.
  2. Four teaspoons of melted unsalted butter
  3. four minced garlic cloves
  4. One teaspoon of dried thyme (or, if desired, rosemary)
  5. To taste, add salt and pepper.
  6. Chop some fresh parsley for garnish (optional).

Guidelines:

  • Warm up the oven:
  • Set oven temperature to 400°F, or 200°C.
    Get the potatoes ready:
  • After giving the young potatoes a good wash, cut them in
  • half. Quarter the larger ones if there are any to ensure that the overall size is fairly uniform.
  • To make the Garlic Butter Mixture, place the minced garlic, melted butter, salt, pepper, and dried thyme (or rosemary) in a small bowl. Make sure the herbs and garlic are fully combined with the butter by thoroughly mixing.
  • To coat the potatoes, cut them in half and put them in a big mixing basin. After adding the garlic butter mixture to the potatoes, toss them around to coat them all equally.
  • Bake: For easier cleanup, arrange the potatoes in a single layer on a baking sheet covered with aluminium foil or parchment paper.
  • Bake the potatoes for 30 to 35 minutes in a preheated
  • oven, tossing them halfway through to ensure equal cooking, or until they are soft and golden brown.
  • After baking, take out the baked garlic butter potatoes and garnish and serve.
  • If preferred, top with finely chopped fresh parsley for an additional burst of colour and freshness.
    Serve Warm: Move the potatoes to a platter and enjoy them warm as a delectable accompaniment to your preferred main entrée.

Advice:

  • Changes: For extra flavour, you can toss the potatoes with crispy bacon bits or grated Parmesan cheese before baking.
  • Herb Choices: You are welcome to use any of your preferred herbs, such as thyme, oregano, rosemary, or a blend of herbs.
  • Plan Ahead: Before serving, make the garlic butter combination and stir it with the potatoes. In the meantime, cover and chill until baking time.
  • These flavor-filled, easy-to-make baked garlic butter potatoes are a great side dish for any meal. Have fun!