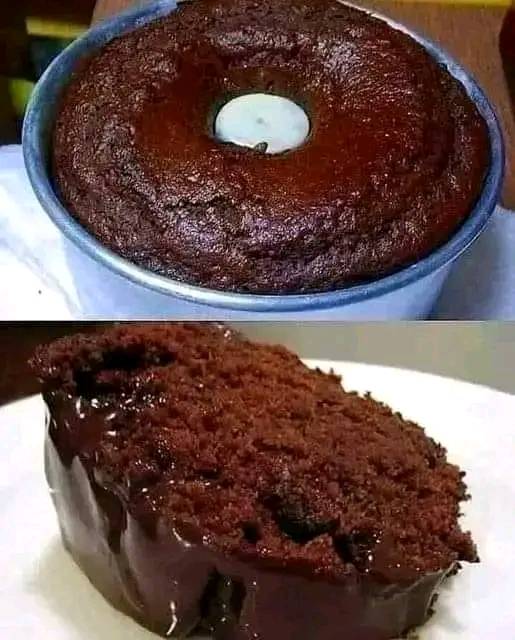
Chocolate Cake

Chocolate Cake

Are you ready to embark on an adventure that will take you into the world of chocolate pleasure, where each bite is a symphony of flavour and texture? Experience the enchantment of making your own chocolate cake from scratch, where each step is infused with passion and creativity. Embrace the experience. We are going to go into the art of preparing chocolate cake in this post, covering everything from the process of hand-picking premium ingredients to the process of orchestrating a harmonic balance of flavours and sensations. As we embark on our journey into the world of heavenly chocolate pleasures, you should get ready to reawaken your senses and embrace the pastry artist that lies within you.

Ingredients:

  1. – Two cups of all-purpose flour that has been sifted very finely
  2. – One cup of granulated sugar that has been weighed with great care
  3. – One cup of brown sugar that has been carefully packed
  4. – Three quarters of a cup of premium unsweetened cocoa powder
  5. – Two teaspoons of baking powder that has been carefully measured out
  6. – One and a half teaspoons of baking soda that has been carefully measured out
  7. One teaspoon of salt that has been gently dusted,
  8. two large eggs that have been cracked with precision,
  9. one cup of buttermilk that is silky smooth,
  10. half a cup of vegetable oil that has been precisely poured,
  11. two teaspoons of vanilla extract that has been ingeniously mixed,
  12. and one cup of hot water that has been infused with warmth have all been required.

To prepare the frosting: The following ingredients are required: –

  1. 1 cup of butter that has been perfectly softened and unsalted
  2. – 3 and a half cups of powdered sugar that has been carefully sifted
  3. – 1/2 cup of finely sieved unsweetened cocoa powder
  4. – 1/2 teaspoon of salt that has been carefully balanced
  5. – 2 teaspoons of vanilla extract that has been expertly combined
  6. – 4-6 tablespoons of heavy cream or milk that has been meticulously measured

instructions

Follow these instructions to get started on your culinary adventure: 1. Preheat your oven to 350 degrees Fahrenheit (175 degrees Celsius) and carefully grease and flour two round cake pans measuring 9 inches in diameter. This will ensure that your chocolate masterpiece is prepared perfectly.

2. In a mixing bowl that has been meticulously cleaned and organised, combine the all-purpose flour that has been finely sifted, the granulated sugar that has been meticulously measured, the brown sugar that has been carefully packed, the premium unsweetened cocoa powder, the baking powder that has been precisely levelled, the baking soda that has been meticulously balanced, and the salt that has been delicately sprinkled. This will ensure that the dry ingredients are perfectly blended together.

3. Place the large eggs, buttermilk that is silky smooth, vegetable oil that has been precisely poured, and vanilla extract that has been ingeniously blended into a separate vessel and whisk them together until they are harmoniously integrated.

4. While stirring carefully, gradually incorporate the liquid components into the blend of dry ingredients. Continue doing this until the batter is completely smooth and uniform.

5. While exercising extreme caution, gradually incorporate the hot water into the batter, mixing it in until it reaches a consistency that is lusciously smooth at the conclusion of the process.

6. Distribute the perfection-crafted batter in an equitable manner across the cake pans that have been properly prepped, making sure that the batter is distributed evenly for the best possible baking results.

7. Put the pans into the oven that has been warmed and bake them for fifteen to thirty-five minutes, or until a toothpick that has been inserted into the middle of each cake comes out clean, indicating that they are completely ready to be served.

The cakes should be removed from the oven and allowed to cool for exactly ten minutes in their respective pans before being carefully transferred to wire racks to finish cooling. This will ensure that the cakes maintain their immaculate texture.

9. While the cakes are cooling, attentively prepare the icing by beating the unsalted butter that has been softened until it meets the desired consistency of faultless creaminess.

10. Using a precise blending technique, gradually incorporate the powdered sugar that has been sifted, the unsweetened cocoa powder that has been finely sieved, the salt that has been properly balanced, and the vanilla extract that has been expertly blended. Continue to blend until a smooth and velvety consistency is reached.

11. Make the frosting to the required consistency by carefully adding four to six teaspoons of heavy cream or milk, one tablespoon at a time, until the frosting reaches the desired level of perfection.

12. Once the cakes have been perfectly cooled, carefully coat the top of one of the cake layers with the exquisite chocolate frosting. This will ensure that the frosting is evenly distributed and that the cake is presented in an impeccable manner.

13. Place the second cake layer on top of the first one in a gentle manner, and then use the remaining frosting to delicately frost the top and edges of the cake, demonstrating your exceptional attention to detail.

14. For an experience that is unrivalled in terms of its sensory appeal, slice and serve your painstakingly prepared chocolate cake with the utmost care and accuracy, accompanied by a tall glass of cold milk or a scoop of silky vanilla ice cream.

A Tasty and Nutritious Recipe to Make Bread at Home for Breakfast

A Tasty and Nutritious Recipe to Make Bread at Home for Breakfast

One of the simple pleasures that life has to offer is the opportunity to start your day with a slice of freshly baked bread. Making your own bread at home is a great option if you are looking for a healthy alternative to commercial loaves that contain additional substances. Over the course of more than two decades, this scrumptious bread recipe has been a favourite for breakfast, and it never fails to bring happiness. Not only does it taste good, but it is also loaded with nutritious components.

Why should you bake your own bread at home?

You have the ability to select the ingredients that you will use when you make bread at home, and you may avoid adding any sugars, fats, or preservatives that are not beneficial to your health. Your morning meal will be more nutrient-dense with fibre, essential nutrients, and a touch of natural sweetness if you make use of this recipe, which calls for whole grains and natural ingredients.

A list of the components

  1. 2 cups of flour made from whole wheat
  2. a single cup of muesli
  3. 1 teaspoon of yeast that has been dried
  4. Salt, one teaspoon’s worth
  5. Honey or maple syrup, to taste, or two tablespoons
  6. Olive oil, one tablespoon’s worth
  7. Water that is lukewarm, one and a quarter cups
  8. To finish it off, you can sprinkle some seeds or nuts on top, such as chopped walnuts, flaxseeds, or sunflower seeds.

Methods:

  • To prepare the yeast mixture, combine the yeast with warm water and a teaspoon of honey or maple syrup in a small basin. Stir the mixture until the yeast is completely dissolved. In order for it to become frothy, you should leave it for around five to ten minutes. Due to the fact that it causes the yeast to begin functioning, this stage is of utmost significance.
  • It is necessary to combine the dry ingredients. In a large bowl, combine the oats, whole wheat flour, and salt. Take a thorough stir.
  • Combining the components in this manner: Combine the yeast mixture, the remaining honey or syrup, and the olive oil with the elements that are considered to be dry goods. Continue to mix until a dough of some kind begins to form. It ought to have a slight degree of stickiness, but it should be simple to work with.
  • In order to work the dough, place it on a surface that has been dusted with flour and work it for approximately ten minutes. You should add some additional flour to the dough if it is too wet. Kneading the bread dough helps to make it elastic, which will result in your bread having a texture that is pleasing to the palate.
  • The first thing you need to do is place the dough in a bowl that has been greased, cover it with a damp cloth, and place it in a warm location for approximately one hour, or until it has grown to be twice as big as it was before.
  • The dough should be shaped into a loaf once it has been punched down. Allow it to rise for a further half an hour after placing it in a baking pan that has been buttered.
  • Bake: Before using, preheat your oven to 375 degrees Fahrenheit (190 degrees Celsius). You have the option of topping the bread with walnuts or seeds if you so desire. Put the bread in the oven and bake it for about half an hour, or until the top is golden brown and the bread makes a hollow sound when you tap it.
  • The bread should be allowed to cool down before being cut. Take pleasure in a slice of bread topped with the spread or topping of your choice.
  • A delicious way to start the day is with this loaf of bread. Not only is it delicious, but it is also beneficial to your health, providing you with long-lasting energy and nutrients. Have fun while you’re creating it, and then savour the delicious end result!

Refreshing Watermelon Juice with Ginger: A Summer Delight for Health and Hydration

Refreshing Watermelon Juice with Ginger: A Summer Delight for Health and Hydration

To put it simply, there is nothing quite as invigorating as a tall glass of watermelon juice as the heat of summer begins to set in. However, why should we stop there? This time-honored beverage is transformed into a revitalising elixir by the addition of ginger, which not only satisfies your thirst but also improves your overall health. In this article, we will explore the benefits of watermelon juice with ginger and find out why it is the ideal beverage to drink throughout the summer.

What are the advantages of drinking watermelon juice with ginger?

  • Hydration: Watermelon, with its high water content, is nature’s way of keeping you hydrated during the scorching summer months through its ability to keep you hydrated. Not only does the addition of ginger to the mixture improve the flavour, but it also gives additional hydration, which results in you feeling refreshed and revitalized throughout the process.
  • Increase in Nutrients: Watermelon is an excellent source of vitamins A and C, as well as antioxidants such as lycopene, which are known to assist in the defense of the body against oxidative stress and inflammation. Ginger brings its own set of health advantages to the table, including anti-inflammatory and digestive characteristics. As a result, watermelon juice that contains ginger is a veritable treasure trove of nutrients that contribute to overall wellness.
  • Digestive Support Ginger is well-known for its ability to alleviate discomfort in the digestive tract and to promote good digestion. By combining it with watermelon juice, not only does it offer a fiery kick, but it also helps reduce bloating, gas, and nausea, making it a perfect choice for people who have stomachs that are sensitive.
  • Ginger will be used in the preparation of watermelon juice. Putting together this mouthwatering beverage is a straightforward process that calls for only a few components. It can be done as follows:

Parts and pieces:

  1. Cubes of fresh watermelon that have been cut up
  2. Ginger root that has been peeled and cut fresh
  3. For the purpose of dilution, water is optional.

Details to follow:

  • puree the Watermelon: Put the watermelon cubes that have been diced into a blender and puree them until they are completely smooth and liquid.
  • To incorporate ginger into the watermelon juice, add a few slices of fresh ginger root to the blender and combine it with the watermelon juice once more until the ginger is completely incorporated.
  • If you want to remove any pulp or ginger fibers from the watermelon juice, you can strain it through a fine mesh sieve. This step is available as an optional step. You are free to skip this step if you would rather have a different texture with your food.
  • In a chilled state: For an additional dose of revitalization, pour the watermelon juice with ginger into glasses that are already filled with ice cubes. In the event that you so wish, garnish the drink with a slice of watermelon or a sprig of fresh mint.
  • Because of its ability to hydrate the body, its high vitamin content, and the digestive benefits it offers,

in conclusion

watermelon juice with ginger is the best way to relieve your thirst and improve your health throughout the summer. What could be more enjoyable than indulging in this lovely beverage and savoring the pleasures of summer with each successive sip? Drink up to your health and stay hydrated!

The Surprising Health Benefits of Pickle Juice

The Surprising Health Benefits of Pickle Juice

Although it can appear to be nothing more than a normal leftover in your refrigerator, pickle juice is actually packed with a variety of beneficial properties that might improve your health. Before you throw out that extra juice, here is a brief summary of the reasons why you might want to reconsider your decision.

  • Highly Effective Source of Hydration
    Because it is so rich in electrolytes, particularly sodium and potassium, pickle juice is an excellent choice for individuals who are looking to stay hydrated. For the purpose of maintaining the fluid equilibrium of the body, electrolytes are particularly important, particularly after engaging in physical activity or when the temperature is extremely high. A small amount of pickle juice can help restore these essential nutrients and give you a boost of energy without requiring much effort.
  • Provides Relief from Muscle Spasms
    Did you ever suffer cramping in your muscles? Pickle juice has the potential to be soothing! Because it has a high amount of salt, it can quickly ease cramps. It has been suggested by a number of athletes that pickle juice is an effective natural remedy for muscular spasms. In light of this, the next time you feel a cramp, you should try a small amount of pickle juice to determine whether or not it is effective.
  • Helps with Digestion
    Pickle juice contains vinegar, which is known to aid digestion and is included in pickle juice. As a result, it can promote higher acidity in your stomach, which in turn makes the process of disintegrating and assimilating food more effective. In the event that you are suffering mild bloating or discomfort in your stomach, a serving of pickle juice may provide you with some relief.
  • Controls the Sugar Level in the Blood
    According to the findings of several studies, the vinegar included in pickle juice may be able to assist in the regulation of blood sugar levels. The consumption of a little quantity prior to a meal has the potential to increase insulin sensitivity and reduce spikes in blood sugar levels. It is possible that this will be of great assistance in preserving consistent levels of energy throughout the day.
  • Antioxidants’ sources of origin
    Pickle juice is loaded with antioxidants, which are substances that protect your body from the harmful effects of free radicals. These antioxidants have the potential to improve your overall health and may even be able to help reduce inflammation.
  • Recovery from a Hangover
    Consuming pickle juice may be beneficial in the event that you have overindulged and are experiencing the consequences of your actions the following day. Because it contains a high concentration of electrolytes, it can help your body regain its moisture and alleviate some of the symptoms of a hangover.

in summary
pickle juice is more than just a sour marinade for your cucumbers; it brings forth their full potential. This versatile and beneficial addition to your diet has the potential to improve a variety of aspects, including hydration, muscle function, digestion, and the management of blood sugar levels, among others. Therefore, the next time you use up a jar of pickles, make sure to remember to keep the juice by your side, and take pleasure in the unexpected health benefits it offers!

Refreshing Papaya Smoothie Health Benefits and Easy Recipe

Refreshing Papaya Smoothie Health Benefits and Easy Recipe

A papaya smoothie is full of health advantages in addition to being delicious. This delicious treat from the tropics can make a welcome addition to your daily regimen. Here’s a basic recipe to get you started, along with some reasons to think about creating papaya smoothies!

  • Delightful Digestive: Papayas are rich in papain, an enzyme that breaks down proteins to help in digestion. This can support gut health and ease digestive problems. For improved digestion, a papaya smoothie can be especially helpful after meals.
  • Packed with Antioxidants and Vitamins: Papayas are a great source of antioxidants, including vitamins C, E, and A. These nutrients promote general health and wellbeing by shielding your cells from harm brought on by free radicals. Additionally strengthening your immune system, vitamin C promotes year-round wellness.
  • Anti-Inflammatory Properties: Papayas include anti-inflammatory substances that may aid in the body’s reduction of inflammation. Smoothies made from papayas can be a regular way to control inflammatory disorders like joint discomfort.
  • Heart Health: Papayas’ potassium, fibre, and antioxidants are excellent for heart health. They can support a healthier cardiovascular system by lowering blood pressure and cholesterol. Papayas are a great source of vitamin A and other important nutrients that help maintain eye health. Papaya smoothie consumption on a regular basis can help preserve clear vision and lower the chance of age-related vision problems.
  • Skin Glow: Papayas’ high vitamin C content encourages the creation of collagen, which keeps your skin appearing young and radiant. A delightful addition to your skincare regimen might be a papaya smoothie!
  • How to Make a Papaya Smoothie: Only a few ingredients are needed to make this simple drink. Here’s a quick recipe you can try:

Components:

  1. One cup of ripe papaya, diced and peeling
  2. One banana
  3. Half a cup of Greek yoghurt, or any other type of yoghurt
  4. half a cup of orange juice
  5. One teaspoon honey, if desired
  6. A couple of ice cubes

Guidelines:

  • In a blender, combine the Greek yoghurt, banana, orange juice, cubed papaya, and honey (if using).
  • Process till smooth. To get the right consistency, thin down any excess mixture by adding a small amount of extra orange juice or water.
  • Blend again after adding a few ice cubes until smooth and foamy.
  • Transfer the contents into a glass, add a papaya slice or a sprig of mint as a garnish, and savor!

To sum up

, a papaya smoothie is a tasty and nourishing method to improve your health. It’s a terrific addition to your daily routine because of its many advantages and simplicity of preparation. So why not give it a shot and savour the deliciousness of the tropics?


Unveil the Secret to Radiant, Youthful Skin with Geranium

Unveil the Secret to Radiant, Youthful Skin with Geranium

Strong natural remedies like geranium essential oil are well-known for their amazing benefits to the skin. You can attain vibrant, youthful skin by adding geranium oil to your skincare regimen. Here are some ideas for incorporating geranium into your daily routine and how it might improve your skin.

Advantages of Geranium for Anti-Aging Properties of the Skin:

  • Reduces Wrinkles: Antioxidants included in geranium oil work to fight free radicals, which in turn lessens the appearance of fine lines and wrinkles.
  • Increases Collagen Production: By increasing collagen production, skin firmness and elasticity are enhanced.

Nourishes and Hydrates:

  • Effects on Moisturization: Geranium oil keeps the skin moisturized and supple by assisting in the retention of moisture.
  • Rich in Nutrients: It offers vital nutrients that support the skin’s natural radiance and nourishment.

Balances the Production of Oil:

  • Controls Sebum: Geranium oil is good for both dry and oily skin types because it balances the skin’s oil production.
  • Prevents Acne: It maintains the skin clear and helps stop breakouts of acne by controlling sebum production.

Enhances Skin Texture and Tone:

  • Evens Out Complexion: Geranium oil promotes a more uniform skin tone by reducing hyperpigmentation and dark patches.
  • Skin Smoothing: It smooths and refines the texture of the skin.

Cuts Down on Inflammation

  • Anti-Inflammatory: The anti-inflammatory qualities of geranium oil help calm sensitive skin and lessen redness.
  • Heals Wounds: It encourages minor cuts and wounds to heal more quickly while avoiding infections and scars.

Boosts the Natural Radiance of the Skin:

  • Skin Revitalization: Geranium oil gives life to lifeless skin, making it look younger and more radiant.
  • Brightens Complexion: Consistent application can enhance the skin’s inherent brightness.

How to Apply Geranium Oil to a Facial Serum for Skin Care:

Components:

  • A couple of drops of essential geranium oil
  • One tablespoon of a carrier oil, such as almond, jojoba, or argan oil;

directions:

  • combine the geranium oil with the oil.
  • A few drops should be applied to your face and neck, then gently massaged into the skin.
  • For optimal effects, use this serum once a day, ideally at night.

Face Mask: Components:

  • Two drops of essential geranium oil
  • One tablespoon of honey or yoghurt

Instructions:

  • Combine honey or yoghurt with the geranium oil.
  • Avert the eye region when applying the mixture on your face.
  • After leaving it on for ten to fifteen minutes, rinse it off with warm water.
  • For glowing skin, use this mask once or twice a week.

Toner: Components:

  • Five drops of essential geranium oil
  • half a cup of distilled or rose water

Instructions:

  • Mix the rose water with geranium oil.
  • Transfer the blend into a spray bottle and give it a good shake.

After cleansing your face, spray it on or use a cotton pad to apply.

  • Toner: Use once a day to revitalize and balance your skin.
  • Ingredients for Spot Treatment: 1 drop essential geranium oil One-teaspoon carrier oil
  • Instructions: Use the carrier oil to dilute the geranium oil.
    Using a cotton swab, apply a tiny amount immediately on dark patches or blemishes.
  • Apply this treatment as needed to address particular skin issues.

Extra Advice

  • Patch Test: To make sure you don’t experience an allergic response, always undergo a patch test prior to using geranium oil.
  • Dilution: Avoid using pure geranium oil on your skin. Never combine it without a carrier oil.
  • Consistency: For optimal effects, geranium oil should be used consistently. For best results, incorporate it into your normal skincare regimen.

In summary
A powerful and adaptable ally for obtaining youthful, glowing skin is geranium essential oil. It is a great complement to any skincare routine because of its anti-aging, moisturising, and balancing qualities.

Chia Seeds vs. Flax Seeds Which Is Better For Diabetics

Chia Seeds vs. Flax Seeds Which Is Better For Diabetics

Managing Nutrition: Differentiating the Advantages of Flax and Chia Seeds for People with Diabetes

When it comes to managing diabetes, every dietary choice matters, and superfoods like chia and flax seeds are highly recommended. They are both treasure troves of nutrients, but which one offers more benefits to those who have diabetes? The benefits of each seed and how you could incorporate them into your regular meals are covered in detail in this article.

  • Chia Seeds: Tiny Sources of Power
    Chia seeds have received a lot of attention lately, and rightfully so. These small seeds are packed full of antioxidants, omega-3 fatty acids, and fiber. The high fiber content of chia seeds is very beneficial for diabetes. It helps to maintain stable blood sugar levels by slowing down the pace at which sugar is absorbed.
  • In addition, chia seeds have the unusual ability to swell and absorb water, producing a gel-like substance. This function can help you feel fuller for longer, which is beneficial for controlling your weight—a crucial aspect of managing diabetes. Furthermore, the abundant omega-3 fatty acids found in chia seeds are advantageous for preserving heart health—a relevant matter considering the increased risk of heart disease in those with diabetes.
  • Flax Seeds: Novel Nutrient-Dense
    For decades, flax seeds have held a stable place in healthful diets. They are high in fiber and omega-3 fatty acids and are similar to chia seeds in many ways. Still, there are unique advantages to flax seeds. They are home to lignin’s, which have anti-inflammatory and antioxidant qualities.
  • The fiber in flax seeds helps with blood sugar management when a person has diabetes. Because they include both soluble and insoluble fiber, flax seeds—which are particularly well-known for their potential to improve digestive health—advance proper bowel function and promote overall digestive wellbeing. Flax seeds also have the added benefit of lowering cholesterol, which is a common worry for diabetics. This makes them an easy addition to the diet to help with this problem.
  • Which is better, flax or chia?
    Since both varieties offer substantial advantages to diabetics, it is difficult to declare one to be the clear winner. The best option may depend on your own goals and preferences about your health. For people who are eager to easily add extra fiber and omega-3s to their diet, chia seeds are a great choice. They may add flavor to a wide variety of dishes without changing their flavor. On the other hand, flax seeds, which provide extra antioxidant effects, might provide better benefits for cholesterol management and digestive health.
  • Including These Seeds in Your Diet Every Day
    It is simple and adaptable to incorporate these seeds into your regular meals. Chia seeds can be combined with muesli, added to smoothies or sprinkled over yoghurt. You may combine ground flax seeds into smoothies, mix them into cereal, and add them to baked goods. Feel free to try both seeds and evaluate which suits you the best, regardless of your choice.

In conclusion

chia and flax seeds are both beneficial additions to a diet that is suitable for diabetics. Each has special advantages to offer, so it can just come down to your personal preferences and demands in terms of health. Whichever you choose, you may be confident that you’ve chosen wisely in terms of managing your diabetes.

DRINK THIS Everyday and See What Happens Turmeric Water

DRINK THIS Everyday and See What Happens Turmeric Water

Turmeric water may be the answer for you if you’re searching for an easy-to-make, all-natural way to improve your health. Because of its amazing health advantages, this golden drink has been celebrated for generations. Here’s why incorporating a daily glass of turmeric water into your routine might completely transform your life.

  • What Is All-Purmeric?
    The brilliant yellow spice known as turmeric is derived from the roots of the Curcuma longa plant. Although it’s frequently used in cooking, particularly Indian food, its applications go well beyond the kitchen. Curcumin, the primary component of turmeric, possesses potent antioxidant and anti-inflammatory qualities.
  • Benefits of Consuming Turmeric Water:
  • Inflammation is Reduced
    Although the body naturally responds to injury and infection with inflammation, persistent inflammation can result in a number of health problems. Turmeric’s curcumin is well-known for its capacity to lessen inflammation, which aids in the treatment of ailments like arthritis and enhances joint health in general.
  • Increases Immunity
    Staying healthy requires a robust immune system, which turmeric water can support. Turmeric’s antioxidants boost immunity and help stave against diseases and infections.
  • Facilitates Digestion
    For millennia, people have used turmeric to help with digestion. It increases bile production, which facilitates better food digestion and nutritional absorption. Additionally, using turmeric water might help relax the digestive system and lessen gas and bloating symptoms.
  • Encourages Heart Health
    Your heart can gain from turmeric water in a number of ways. It lowers harmful cholesterol levels and stops cholesterol from oxidising, which increases the risk of heart disease. Its anti-inflammatory qualities also promote cardiovascular health in general.
  • Promotes Skin Health
    Turmeric water may become your new best buddy if you want to keep your complexion looking radiant. Clearer, healthier skin is encouraged by its anti-inflammatory and antioxidant qualities, which also aid to lessen redness and blemishes.
  • How to Prepare Water with Turmeric
    Turmeric water is simple and quick to make. To help you get started, consider this easy recipe:

Components:

  1. One cup of heated water
  2. half a teaspoon of powdered turmeric
  3. A small pinch of black pepper (optional, but aids in curcumin absorption)
  4. To taste, add honey or lemon (optional).

Directions:

  • Stir the powdered turmeric into the hot water.
  • Put some black pepper on it.
  • Till the turmeric is completely dissolved, stir thoroughly.
  • If you want more flavour, add more honey or lemon.
  • For optimal effects, drink it first thing in the morning on an empty stomach.

Advice for the Best Outcomes
The Secret Is Consistency: To reap the greatest benefits of turmeric water, incorporate it into your regular regimen.

Quality Counts: To make sure you’re getting the maximum curcumin, use premium turmeric powder.

While drinking lots of ordinary water throughout the day is important, turmeric water is fantastic as well.

in summary

Including turmeric water in your everyday routine is an easy yet effective method to improve your health. You can feel your best with the many benefits this golden drink offers, which range from boosting your immune system to lowering inflammation. Try it out and observe the impact it has on your life. To your well-being, cheers!

Air Fryer Flatbread

Air Fryer Flatbread

A great way to enjoy fresh, handmade bread with little effort is to make Air Fryer Flatbread. This recipe makes soft, fluffy flatbread that is great as an appetizer with your favorite dishes, as a base for pizzas, or as a side dish for dips. This is how to achieve it:

Meals for Air Fryer Flatbread:

  1. Two cups of all-purpose flour
  2. One tsp baking powder
  3. One tsp salt
  4. 3/4 cup plain Greek yoghurt
  5. Two tsp olive oil
  6. Add ons: cheese, herbs, garlic butter, etc.

Guidelines:

  • First step: Get the dough ready.
    Combine the dry ingredients:
  • Mix the flour, baking powder, and salt together in a big bowl.
  • Mix Wet Ingredients: Combine the dry ingredients with the Greek yoghurt and stir until a dough forms. Add a little more yoghurt if the dough is too dry, and a little more flour if it is too wet.
  • Work the Dough:
    The dough should be smooth and elastic after five minutes of kneading on a floured surface.
  • Remain in the Dough:
    Re-fill the bowl with the dough, cover it with a damp cloth, and let it sit for ten to fifteen minutes.
  • Second Step: Form the Flatbreads
  • Split the dough: Depending on how big you want your flatbreads to be, divide the dough into 6–8 equal sections after it has rested.
  • Roll out each portion of the dough into a thin, round or oval form that is about 1/4 inch thick on a floured surface.
    Step 3: Let the flatbreads air fry.
  • Warm up the air fryer.
  • For around five minutes, preheat your air fryer to 375°F (190°C).
  • Prepare the Flatbreads: Spread some olive oil on one side of the flatbread and put it, oiled side down, in the air fryer basket. Apply some olive oil to the opposite side.
  • In an air fryer, cook for 3–4 minutes, then turn and continue cooking for 2–3 more minutes, or until puffed and golden brown. Proceed with the leftover flatbreads.
    Step Four: Present
  • Serve heated: Garlic butter, fresh herbs, or cheese, if preferred, can be drizzled over the heated flatbreads.

Advice for Making Perfect Flatbreads:

  • Even Thickness: To guarantee even frying, roll out the dough equally. Some flatbreads may be overdone in places and undercooked in others due to uneven cooking.
  • Personalise Toppings: Before air-frying, add different toppings to your flatbreads. Try adding some shredded cheese, chopped garlic, fresh herbs, or even a dash of sea salt.
  • Make Ahead: The dough can be made up to 24 hours in advance and stored in the refrigerator. Allow to come to room temperature before cooking or rolling out.
  • Serving Ideas: Flatbreads from an air fryer are quite adaptable. Serve them with your preferred dip, tzatziki, or hummus. Serve them as a side dish with salads and soups, or as the crust for small pizzas.

Not required Butter Garlic Garnish:

Components

  1. Two tablespoons of melted butter,
  2. one minced clove of garlic,
  3. and one tablespoon of chopped (optional) fresh parsley

Guidelines:

Get the garlic butter ready:

Combine the chopped parsley, minced garlic, and melted butter in a small basin.
Flatbreads: To add even more flavour, brush the warm flatbreads with the garlic butter right before serving.
Savour creating and indulging in these mouthwatering Air Fryer Flatbreads. They are very satisfying and simple to make, making them ideal for any meal or snack time.

Discover the Wonders of Bay Leaves

Discover the Wonders of Bay Leaves: A Natural Remedy for Everyday Ailments

Although bay leaves are frequently considered to be merely an aromatic spice that gives soups and stews more depth and flavour, their uses are far more widespread than that. Bay leaves have been used for centuries in traditional medicine to treat a wide range of conditions, from digestive discomforts to respiratory illnesses. These leaves, which are often found in spice cabinets, have powerful healing qualities that help alleviate a number of ailments.

Bay leaves have the most noteworthy health benefit of being able to relieve respiratory conditions like asthma and bronchitis. The leaves are rich in substances that are thought to have anti-inflammatory qualities, which may aid in lowering respiratory tract inflammation. People with asthma and bronchitis may find it easier to breathe and experience symptoms relief as a result of this decrease in inflammation. Inhaling steam is one efficient way to use bay leaves for respiratory relief. You can accomplish this by adding a few bay leaves to a boiling kettle of water. Allow the water to simmer and then carefully inhale the steam, which can help clear your airways and provide a soothing effect on your respiratory system.

Bay leaves have advantages for the respiratory system as well as for the digestive system. Bay leaves contain essential oils that are well-known for their capacity to calm the stomach and reduce symptoms like bloating, gas and the pain that comes with colic. A straightforward tea made with bay leaves is one method to take advantage of these digestive advantages. Crush a few bay leaves and steep them in boiling water for around 20 minutes to prepare the tea. After a meal, this tea can be a reassuring cure that eases stomach problems and boosts wellbeing.

One other, less well-known advantage of bay leaves is their ability to help those with haemorrhoids. Bay leaves’ anti-inflammatory and antioxidant qualities can aid in lowering the discomfort and swelling brought on by this illness. Boil a few bay leaves in water, drain the liquid, then pour it into a warm bath to make a calming bath. Haemorrhoids can be uncomfortable, so taking a soak in this bath infused with bay leaves might help bring much-needed relief.

Even while bay leaves are usually seen as safe to use, it is wise to speak with a healthcare professional before starting any new treatment regimen, particularly if you are on medication or already have a medical issue. By taking this precaution, you can use the leaves safely, successfully, and without experiencing any negative interactions.

The next time you see that forgotten jar in your kitchen containing bay leaves, keep in mind that these small leaves are much more than just a means of enhancing the flavour of your food. They might offer a number of health advantages that could enhance your general wellbeing. Bay leaves may provide a quick and all-natural solution for any number of ailments, including hemorrhoidal pain, intestinal discomfort, and respiratory problems. You may discover that bay leaves improve your everyday life and general health when you include them in your wellness regimen. So don’t be afraid to learn about the health advantages of bay leaves and discover how this adaptable spice may improve your well-being.