The Ultimate Quick Fix Homemade Pita Bread

The Ultimate Quick Fix Homemade Pita Bread

Finding quick and tasty recipes is like finding secret treasures in today’s busy world. Our recipe for fresh pita bread is a hidden gem that will make your taste buds dance without taking hours to prepare. In just 6 minutes, you can make fresh, fluffy pita bread with just a few simple items and an easy recipe.

What’s in it

Get the following items ready to start this delicious cooking adventure:

  1. 1/4 teaspoon of sugar, broken up
  2. One teaspoon of salt
  3. 1 tablespoon of oil from plants
  4. 1 tablespoon of milk
  5. 6.8 ounces, which is about 3/4 cup, of milk
  6. 10.6 ounces of plain flour, which is about 2 1/4 cups
  7. 1 teaspoon of yeast

How the food is prepared

Let us get into the process of getting ready:

Putting the Ingredients Together: In a big bowl, mix the sugar, salt, and oil together first. Stir in the yogurt and warm milk until all of the sugar and salt are gone.
Adding Flour and Yeast: Next, add the dry yeast and flour to the mixture. Mix the items together until they are well mixed.
Kneading the Dough: Work the dough with your hands for four to five minutes, or until it is smooth and doesn’t stick to your hands anymore.
Letting the Dough Rise: Put a lid on top of the dough and let it rise for 20 minutes. It should double in size during this time.
How to Roll and Shape: Once the dough has risen, gently deflate it and place it on a floured surface. Make 12 equal pieces out of it and roll each one into a ball.
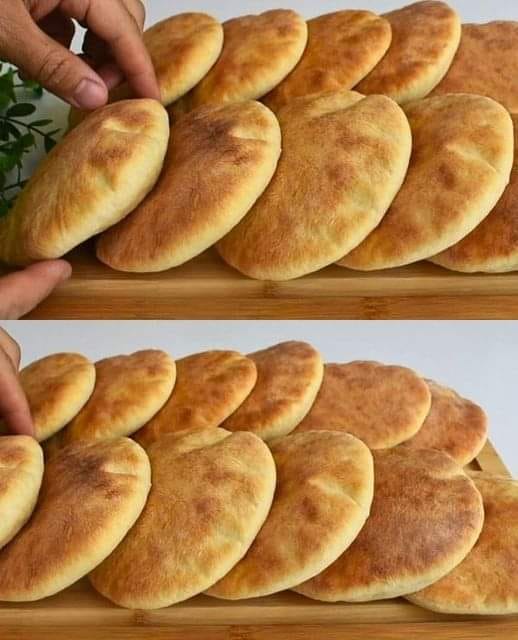
For baking, use a rolling pin to make a small circle out of each ball. Lay them out on a baking sheet that has been lined with parchment paper. Then, cover them with a tea towel. Set the oven to 250°C and bake for 6 minutes.
Serving: After baking, let the pita bread cool down a bit before cutting and serving. Enjoy the warm, fluffy goodness of pita bread you made yourself!

Shape and Rolling
A very important part of making the perfect pita bread is rolling and forming the dough. Spread out each piece of dough and roll it into a ball between your hands. Then, use a rolling pin to smooth each ball into a smaller circle, making sure that they are all the same thickness.

Making baked goods
There’s magic in the oven! Set your oven to 250°C and put the pita bread that you rolled out on a baking sheet. These doughy discs will turn into golden-brown pockets of deliciousness after only 6 minutes of baking.

Giving
When your fresh pita bread is done baking, try not to eat it right out of the oven (but don’t worry, we won’t judge!). Let them cool down for a while before you serve them. You can eat these tasty treats by themselves, with your favorite fillings inside, or with dips and spreads for a great snack or meal.

Pros of Making Your Own Pita

Quick and useful.
It’s easy and quick to make homemade pita bread that can be used in a lot of different ways. When you want a rich sandwich, a tasty wrap, or just a simple snack, pita bread is the best choice. Plus, you can change the ingredients to suit your tastes, so everyone at the table will enjoy it.

Value for Nutrition
If you make your own pita bread instead of buying one from the store, you can be sure that the ingredients are of higher quality. It’s a healthy way to fuel your body and fill your hunger because it’s full of nutrients like carbs, protein, and fiber.

In conclusion
When time is of the essence, homemade pita bread stands out as a bright example of how easy and tasty it can be. You can enjoy the pleasure of baking your own bread with just a few simple materials and a few minutes of your time. Why wait then? Start this cooking adventure and give yourself the deliciousness of fresh, home-made pita bread.

Just 1 Avocado and 4 Eggs A Delicious Breakfast

Just 1 Avocado and 4 Eggs A Delicious Breakfast

Eggs and avocado go together like peanut butter and jelly. We’ll look at how to make a tasty breakfast treat with just one avocado and four eggs in this piece. If you’re making for yourself or having people over, these avocado appetizer ideas will be a hit.

What’s in it

To begin, get the following things together:

  1. 4 eggs
  2. 1/2 lemon
  3. One bunch of green onions
  4. 1.8 ounces yogurt
  5. 1.8 ounces Mustard sauce
  6. Black pepper powder
  7. Salt
  8. There are six baguettes.
  9. 1-2 avocados (it depends on how big they are and what you like)

Getting ready

  • Boil the Eggs: For 10 to 12 minutes, cook the eggs until they are hard. Get the other things ready while the eggs are cooking.
  • Get the avocado ready: Cut the avocado in half, take out the pit, and scoop out the meat. Take the avocado and cut it into cubes about the size of a golf ball. Add half a lemon’s juice to the avocado and mix it in slowly.
  • Get the dressing ready: Cut the green onions into small pieces and put them in a bowl with the yogurt, mayonnaise, black pepper, salt, and the rest of the lemon juice. Use your hands to make a smooth sauce.

Getting it Going

  • Put Eggs and Avocado Together: Peel the hard-boiled eggs and cut them into chunks about the same size as the avocado cubes. Put the eggs in the bowl with the avocado.
  • Put on the Dressing: Cover the eggs and avocado with the creamy sauce. Toss everything together gently until it’s all well mixed.

Getting the Goodness Out

  • Get the baguette ready: Cut the bread into six pieces and lightly toast them to make them crunchy.
  • Spread the Mixture: Put the avocado and egg mix on the toasted bread pieces in an even layer.
  • Quick and Easy Preparation That Works: You can quickly make a tasty breakfast or snack with just a few easy steps. This recipe is great for busy mornings when you need something healthy and filling.

Good for your health
Ingredients High in Nutrients: Eggs are a good source of energy, and avocados are full of healthy fats, vitamins, and minerals. When you eat them together, they make a healthy meal that will keep you going all day.

Some changes
Make it Your Own: Feel free to change this recipe to fit your tastes. To make it taste better, add diced tomatoes or fried bacon. For a tangy twist, put feta cheese on top.

Ideas for Serving
These avocado appetizers can be served for breakfast, lunch, or as a tasty afternoon snack. They go well with a salad or fresh fruit as a side dish.

In conclusion
Last but not least, you can make a delicious and healthy breakfast or snack with just one avocado and four eggs. These avocado starter ideas are great whether you’re cooking them for one person or for a group.

Discover the Recipe for Irresistible Chicken Rolls with Mozzarella and a Refreshing Salad

Discover the Recipe for Irresistible Chicken Rolls with Mozzarella and a Refreshing Salad

Find out how to make delicious chicken rolls with mozzarella and a cool salad! Easy to make and tasty!

For the chicken rolls, you’ll need:

  1. – 700g (25 oz) 7g (0.2 oz) of chicken breast
  2. 10 grams (0.4 oz) of black pepper
  3. 100g (3.5 oz) of salt The cheese mozzarella

To make the filling:

  • – 150g (5.3 oz) One hundred grams
  • (5.3 oz) of mozzarella cheese
  • 15 grams (0.5 ounces) of carrot
  • 150 grams (5.3 ounces) of parsley yogurt

For the salad:

  • 200g (7.1 oz) 200g (7.1 oz) of cabbage
  • 150 grams (5.3 oz) of red cabbage,
  • equal to two cucumbers
  • 100 grams (3.5 oz) of cherry
  • tomatoes 30g
  • (1.1 oz) of corn in a can
  • 8 grams (0.3 ounces) of mayonnaise
  • 10 grams (0.4 oz) of salt a garlic

For the chicken rolls, follow these steps:

  • 1. Warm the oven up to 350°F (181°C).
  • 2. Gently pound the chicken breasts between pieces of plastic wrap or parchment paper until they are all the same thickness.
  • 3. Add salt and black pepper to the chicken breasts.
  • 4. Cover each chicken breast with a layer of milk cheese.
  • 5. Tear the chicken breasts into tight rolls and use toothpicks to keep their shape.
  • 6. Put the chicken rolls in an oven that has already been heated up. Bake them for 20 to 25 minutes, or until they are fully cooked and the cheese is melted and bubbly.

To make the filling:

  • Grate the carrots and cut the parsley into small pieces.
  • 2. To make the filling, put the diced carrots, chopped parsley, mozzarella cheese, and yogurt in a bowl and mix them together.

For the salad:

  • Also check out Banana Bread Without Eggs: A Vegan Recipe for Fluffy and Moist Bread
  • 1. Cut the cabbage and red cabbage into small shreds.
  • 2. Cut the small tomatoes in half and the cucumbers into big chunks.
  • 3. To make the sauce, mix the mayonnaise, salt, and garlic powder in a different bowl.
  • 4. In a big salad bowl, mix the red cabbage, shred cabbage, chopped cucumbers, cherry tomatoes, and canned corn.
  • 5. Pour the ready-made sauce over the salad and mix everything together until it’s well covered.

To Serve:

  • 1. Take the toothpicks out of the chicken rolls.
  • 2. Serve the chicken rolls with the light salad and the carrot-and-mozzarella filling.
  • Have fun with your easy-to-make Chicken Rolls with Mozzarella and a fresh salad!

A Natural Way to Keep Pests Away Bay Leaves and Cloves

A Natural Way to Keep Pests Away Bay Leaves and Cloves

Are you sick of bugs like ants, flies, and mosquitoes? There is a simple, natural way to get rid of these bugs. Putting cloves and bay leaves in the air can make it unbearable for these unwanted guests.

Why do people use bay leaves and cloves?

  • Bay leaves are pleasant and can be used for more than just seasoning soups and stews. Pests stay away from bay leaves because they smell strong, which is nice for people. Because they contain essential oils, they are known to keep pests away.
  • Cloves are small buds that pack a lot of heat and are used by many cooks for how they taste. But eugenol, which is found in cloves, is very unpleasant to many bugs and therefore very good at keeping them away.

How to Use Cloves and Bay Leaves to Keep Pests Away

  • Cloves and bay leaves can be used to make a mixture that keeps pests away. You probably already have the ingredients on hand.

Get all the things you need:

  1. A handful of dried bay leaves
  2. Several whole cloves

Beginning:

  • Put the bay leaves and cloves in a small jar or bag. It could be a simple cloth bag or even just a piece of airy fabric sewn together with thread.

Where to Put:

  • Put the bowl or bag in places where you see a lot of bugs, flies, or mosquitoes. In front of doors, on kitchen tables, and near windows are all good places to put them.
  • Making and carefully placing a lot of small packages around your house might give off a bigger impression.

How It Works

  • After 30 minutes, the strong smells of the cloves and bay leaves will fill the room, making these natural bug sprays a must-have. Flies, mosquitoes, and cockroaches naturally don’t like these pests because they have strong senses of smell. It works right away and keeps pests away for a long time.

Some Extra Tips

  • Change the bay leaves and cloves every two weeks to keep them working. Their smells might get weaker over time.
  • Bay leaves and cloves are strong natural pesticides that work well on their own, but they will work even better if you also follow other good cleanliness habits, like keeping your home clean and storing food properly.

To sum up
Bay leaves and cloves are an all-natural, smelly way to get rid of bugs, flies, and mosquitoes in your home. It’s not necessary to use dangerous chemicals when this easy and cheap method will do the job just as well. Check it out and enjoy a bug-free space!

Embrace Winter with Black Currants 3 Awesome Recipes

Embrace Winter with Black Currants 3 Awesome Recipes

Black currants taste best in the winter, when they are sweet and sour. These tiny berries are full of good things for you and can make your winter meals taste even better. Here are three great black berry recipes that are simple to make and great for the fall and winter.

1. Ingredients for Black Currant Compote:

  1. 2 cups black currants
  2. 1/2 cup of water
  3. 1 tablespoon of honey
  4. 1 teaspoon of lemon juice

How to Do It:

  • Mix the Ingredients: Put the black currants, water, honey, and lemon juice in a medium pot.
  • Cook: Over medium-low heat, bring to a boil. Then, lower the heat and cook for 10 to 15 minutes, until the berries are soft and the sauce gets a little thicker.
  • Get it ready to serve: Let the sauce cool down. You can put it on yogurt, cereal, eggs, or yogurt when it’s warm or cold.

2. Things that go into black currant tea:

  1. 1 cup black currants, either fresh or dried
  2. 4 cups of water
  3. As much honey or sugar as you like
  4. Slices of lemon (not required)

How to Do It:

  • Boil Water: In a big pot, bring the water to a boil.
  • Black cherries should be added, and the heat should be turned down. For about 10 minutes, let it cook slowly.
  • Serve: Pour the tea through a strainer into cups. If you want, you can add a slice of lemon and honey or another sweetener of your choice. Enjoy a warm drink that will make you feel better on a cold winter night.

3. Black currant sauce for meat What you need:

  1. 1 cup black currants
  2. 1 and a half cups red wine
  3. 1/4 cup vinegar made from grapes
  4. 2 teaspoons of honey
  5. 1 teaspoon chopped fresh rosemary
  6. Add salt and pepper to taste.

How to Do It:

  • Mix the Ingredients: Put the rosemary, black currants, red wine, balsamic vinegar, and honey in a pot and mix them together.
  • Cook: Bring the sauce to a boil, then lower the heat and let it cook for about 15 minutes, until it gets thicker.
  • Add seasonings and serve: Add salt and pepper to taste. To add a fancy touch to roasted chicken, pork, or beef, serve the sauce warm on top.

In conclusion
This winter, these three black berry recipes will not only make your table taste great, but they are also very easy to make. Black currants can be the star ingredient that makes your meals better, whether you’re making a sweet cobbler, a warm tea, or a spicy sauce. This wonderful berry tastes great and is good for you. Enjoy it all winter long.

Aloe Vera A Natural Powerhouse for Hair Growth and Strength

Aloe Vera A Natural Powerhouse for Hair Growth and Strength

There are many important vitamins, minerals, and enzymes in aloe vera that are great for your hair and skin. It has been used for hundreds of years to treat a wide range of hair and skin problems, which makes it a safe natural hair care ingredient.

Getting the Most Out of Aloe Vera for Hair: It Helps Hair Grow:

  • Aloe vera is full of enzymes that get rid of dead skin cells on the head. This makes it easier for hair to grow. The plant also improves blood flow, which makes sure that your hair roots get the nutrients they need.
  • Helps Stop Hair Loss: Aloe vera’s many nutrients, such as vitamins A, C, and E, strengthen hair strands and keep them from breaking, which greatly reduces hair loss.
  • Feeds Hair and Scalp: Because it is mostly water and has moisturizing qualities, aloe vera feeds your hair and scalp and stops them from getting dry and flaky.
  • Maintains Scalp pH Balance: Aloe vera helps keep the pH balance on your scalp stable, which is an important part of keeping dandruff and other scalp problems at bay.
  • As a result of the protease enzymes found in aloe vera, dead skin cells on the head are replaced. This makes your hair healthier overall and stronger.

How to Use Aloe Vera to Take Care of Your Hair 1. Aloe Vera Gel: What It Is Made Of One brand-new aloe leaf

  • To get ready, take a new aloe vera leaf and scrape out the gel inside. Put it on your head and hair, rub it in gently, and wait 30 minutes before washing it out with a mild shampoo. Do this two or three times a week for great benefits.
  • Aloe Vera and Coconut Oil Mask: Two tablespoons of aloe vera juice and two tablespoons of coconut oil.
  • To make it, mix the coconut oil and aloe vera juice together. Dot your skin and hair with this mixture, focusing on the roots. After an hour, wash it out with a light shampoo. This mask not only deeply conditions hair, but it also makes it stronger.
  • A conditioner made of aloe vera gel and honey: 3 tablespoons of aloe vera gel and 2 tablespoons of honey.
  • To make it, mix the honey and aloe vera gel together. Use it on hair that is still damp. Put it on for 20 minutes, and then wash your face really well. This conditioner makes your hair shine and feel soft.

In the end, medicinal-garden-kit
That being said, aloe vera in its natural state could help your hair grow faster and stop falling out. Because it nourishes and moisturizes, it’s a great addition to your hair care routine. Try these easy aloe vera treatments and enjoy hair that is stronger, healthier, and shines. Say goodbye to hair problems and hello to the powerful aloe vera!

Uncover the Benefits of Pineapple Skin Drink for Bone and Joint Health

Uncover the Benefits of Pineapple Skin Drink for Bone and Joint Health

People often throw away the skin of a pineapple, but it is full of nutrients and health benefits that can really help your bones and joints. The outside of this tropical fruit is full of enzymes, vitamins, and minerals that are good for your health. Here are some of the great things about pineapple skin drink and how it can help your bones and joints.

What’s Good for You in Pineapple Skin

The peels of pineapples are full of:

  • Vitamin C strengthens the immune system and helps the body make collagen, which is important for healthy joints.
  • Bromelain is an enzyme that can effectively reduce swelling and ease pain.
  • Antioxidants help keep the body healthy by protecting it from reactive stress.
  • Manganese is necessary for building and keeping bones healthy.

Pineapple Skin Drink is Good for You

  • Reduces Inflammation: The bromelain in pineapple skin helps reduce inflammation, which is good for people with arthritis or joint pain. It can help reduce swelling and make it easier to move around.
  • Supports Bone Health: Pineapple skins have a lot of manganese, which is an important mineral for building and maintaining bones. Regular use can help keep bones strong and stop diseases like osteoporosis from happening.
  • Increases Collagen Production: The vitamin C in pineapple skins helps the body make collagen, which is important for keeping joints and connecting parts healthy.
  • Helps Digest: Bromelain also helps digestion by breaking down proteins. This makes the digestive system healthy and lowers gas and pain.
  • Improves Immune Function: The vitamin C and antioxidants in pineapple skins help the immune system work better, keeping the body healthy and free of infections.

What You Need to Make Pineapple Skin Drink:

  1. Skins from one to two pineapples
  2. 4 to 6 cups of water
  3. Possible: For extra taste, add honey, ginger, or cinnamon.

How to Do It:

Get the Skins Ready:

  • Wash the pineapple skins well to get rid of any dirt or chemicals.
  • To make it easier to boil, cut the skins into smaller pieces.
  • Bring the Skins to a boil:
  • Bring the water to a boil in a big pot.
  • Bring the water to a boil and add the pineapple skins.
  • Turn down the heat and let the food cook for twenty to thirty minutes.
  • Pour out the Mixture: After letting it boil, strain it to get rid of the pineapple skins.
    This juice has been strained. Put it in a bowl or bottle.
  • Add Flavor (Not Required): You can add honey, ginger, or cinnamon to the drink if you want to make it taste better and make it healthier.
  • Serve and Have Fun: You can drink the pineapple skin drink hot or cold. If you have any drink left over, put it in the fridge.

Some extra tips

  • Use Organic Pineapples: To avoid herbicides and chemicals on the skins, buy organic pineapples if you can.
  • Drink Often: To get the best effects, make the pineapple skin drink a part of your daily practice.
  • Pair with a Healthy Diet: The pineapple skin drink is good for you in many ways, but for the best bone and joint health, you should also eat a healthy, balanced diet full of other nutrients.

In conclusion
The skin of a pineapple, which is often ignored, can be turned into a tasty, nutrient-dense drink that is good for your bones and joints. This natural treatment can help you live a healthy and busy life by lowering inflammation, increasing collagen production, and giving you important vitamins and minerals.


Mix Detergent with Salt You Won’t Believe the Incredible Results

Mix Detergent with Salt You Won’t Believe the Incredible Results

Did you know that a simple thing like salt can make your laundry soap work better? It’s real! If you mix soap with salt, your clothes will be cleaner, brighter, and smell better. Now let’s talk about how this works and how easy it is to use in your cleaning routine.

HOW SALT DOES WHAT IT DOES

  1. To put on food, salt,
  2. or sodium chloride, does more than that.
  3. It’s natural qualities make it a great thing to use in your laundry.

Salt tin:

  • Makes Cleaning Power Better: Salt softens water, which can make your soap work better. When you wash your clothes in soft water, the soap works better to get rid of dirt and stains.
  • Brighten Colors: Salt helps colors stay put, so they don’t fade. It can help your clothes look fresh and new for longer.
    As a natural antibacterial, salt can help stop the growth of mildew and germs, which will keep your clothes cleaner.

What you’ll need

  • The washing soap you normally use Sea salt or table salt

HOW TO DO YOUR LAUNDRY WITH SALT, STEP BY STEP

  • Take the Detergent’s Size: Put in the washing machine the amount of laundry soap that the manufacturer says to use.
  • Put in the Salt: To wash a normal-sized load, put about a half cup of salt right into the drum of the washer. It’s possible that you should use a full cup for bigger loads.
  • Put the Clothes in: Like always, put your clothes in the washing machine.
  • Turn on the Cycle: Just pick the wash cycle you like and let the machine do its thing. The salt will mix with the water and make the soap work better at cleaning.

HOW TO GET THE BEST RESULTS

  • When you wash your clothes, use warm water if they can handle it. Warm water helps the salt breakdown better.
  • Before you use salt on new or highly colored clothes, try a small, hidden area to make sure the colors won’t run.
  • Usage Every Day: Adding salt to your laundry on a daily basis will help your clothes stay bright and clean.

IN THE END
A easy and inexpensive way to make your detergent work better is to add salt to your washing routine. This simple tip can make your clothes look brighter and smell better, and it can even help them last longer. You might be shocked at how useful this simple cooking item can be in your laundry room if you give it a try. Goodbye to clothes that look old and dull and hello to clothes that are brighter and better!

Unlock the Benefits Daily Consumption of Flax Seeds and Its Effects

Unlock the Benefits Daily Consumption of Flax Seeds and Its Effects

Linseeds, which are another name for flax seeds, are very small seeds that are very healthy. Adding flax seeds to your daily diet can help your health in many ways because they are full of fiber, omega-3 fatty acids, and other important nutrients. We’ll talk about what happens when you eat flax seeds every day and how they can help your health.

Flax seeds’ nutritional value

There are many important nutrients in flax seeds, such as

  • Omega-3 Fatty Acids: Alpha-linolenic acid (ALA) in particular is good for your heart.
  • Fiber: Both soluble and insoluble fiber help the digestive process and keep you normal.
  • Protein: Giving you a source of protein that comes from plants.
  • Lignin’s are phytoestrogens that can fight free radicals.
  • Some examples of minerals and vitamins are selenium, magnesium, phosphorus, vitamin B1, and vitamin B2.
  • Flax seed consumption every day is good for your health.

Helps your digestive health:

  • Flax seeds have a lot of fiber, which helps your body digest food and keeps you from getting constipated. Soluble fiber soaks up water and turns into a gel-like material that slows digestion. Insoluble fiber, on the other hand, makes stools bulkier and more regular.
  • Omega-3 fatty acids found in flax seeds help lower inflammation and the risk of getting heart disease. ALA has been shown in studies to lower cholesterol and improve heart health in general.
  • Helps with Weight Loss: The fiber in flax seeds makes you feel full, which can help you control your hunger and eat fewer calories overall. Because of this, flax seeds are a good way to help you lose weight.
  • Keeps Blood Sugar Levels Stable: Flax seeds’ low glycemic index and high fiber content can help keep blood sugar levels stable. This is especially helpful for people who already have diabetes or are at risk of getting it.
  • Better for your skin and hair: Flax seeds contain omega-3 fatty acids, vitamins, and lignans, all of which are good for your skin and hair. They can help your skin feel less dry and more flexible, and they can also help your hair grow and get stronger.
  • Reduces Inflammation: Flax seeds can help people with inflammatory diseases like gout because they have anti-inflammatory qualities. It is important to note that omega-3 fatty acids and lignans help lower inflammation in the body.
  • Backs up Hormone Balance: Flax seeds contain phytoestrogens, which can help keep hormone levels in check. This is especially helpful for women who are going through menopause.

Tips for Adding Flax Seeds to Your Diet

  • Flax seeds ground up: The nutrients in flax seeds can be better absorbed when they are ground up. You can put them in oatmeal, soups, yogurt, or baked goods.
  • Whole flax seeds: For a crunchy texture, sprinkle whole flax seeds on soups, cereals, or make your own cookies with them.
  • Flaxseed Oil: You can dress salads with flaxseed oil or put it in soups. When cooking, don’t use flaxseed oil because high temperatures can destroy its health benefits.

Some extra tips

  • Take your time: If you have never eaten flax seeds before, start with a small amount and slowly increase it so that you don’t have stomach problems.
  • Stay Hydrated: When you eat flax seeds, make sure you drink a lot of water because the high fiber content draws water and can make your stomach hurt if you’re not properly hydrated.
  • Properly Stored: To keep flax seeds and oil from going bad, keep them in a cool, dark place. Flax seeds that have been ground up should be kept in the fridge.

In conclusion
There are many health benefits to eating flax seeds every day, such as better gut health, heart health, skin health, and hormonal balance. These tiny seeds are full of nutrients that are good for you and can improve your health as a whole.

“Adding natural foods like flax seeds to your diet can lead to amazing health benefits, making your life healthier and more vibrant,” says Barbara O’Neill.


Refreshing Cucumber Salad: A Simple Addition to Your Daily Lunch

Refreshing Cucumber Salad: A Simple Addition to Your Daily Lunch

Overview Do you want to try something new for lunch every day that’s quick, healthy, and satisfying to make? A cucumber salad with a hint of delicious dill may be exactly what you need. It helps with weight management, among its many other health advantages, in addition to being delicious.

What Makes Cucumber Salad Unique? Because they are low in calories and high in nutrients, cucumbers are a great addition to any diet that focuses on losing weight. The addition of dill, a herb renowned for its digestive and antioxidant qualities, boosts the nutritional value of the salad tremendously. For you to feel satisfied for extended periods of time without consuming extra calories, try this easy recipe. Eating a healthy weight is important.

Advantages of Consuming Cucumber Salad Hydration: Since cucumbers are mostly composed of water, this salad is a great way to remain hydrated. Hydration is vital for every biological process, including metabolism. Digestive Health: Cucumber fiber promotes healthy digestion, wards off constipation, and keeps the digestive tract in good condition.

  • Low Calorie: This salad’s low calorie content aids in controlling calorie consumption, a crucial component of weight management. Packed with
  • Nutrients: Vitamin K, B vitamins, potassium, and magnesium are all found in good amounts in cucumbers and are essential for general health. How to Prepare a Veggie Salad Cucumber salad is really simple to prepare.

This is a basic recipe:

Ingredients:

  1. 2 large, thinly sliced cucumbers
  2. Two tablespoons of freshly chopped fresh dill
  3. Two tsp olive oil
  4. One tablespoon white or apple cider vinegar
  5. To taste, add salt and pepper.

Guidelines:

  • Combine the chopped dill and the cucumber slices in a mixing dish.
  • Mix the vinegar, salt, pepper, and olive oil in a small bowl. Drizzle the cucumbers and dill with the dressing, then gently toss to coat.
  • To bring out the flavors, refrigerate for approximately half an hour before serving.

In summary

Adding cucumber salad to your lunch every day is a fun approach to support a healthy eating habit. This recipe promotes digestive health and hydration in addition to helping you maintain a healthy weight. Cucumber salad is a great addition to any meal because of its many health advantages and refreshing taste, especially for people who are concerned about their overall well-being. Why not give this easy-to-make, delicious dish a try and savor its crisp, fresh flavors for lunch?