Gluten-Free Delight: 3-Ingredient Flourless and Sugar-Free Cookies in Just 5 Minutes

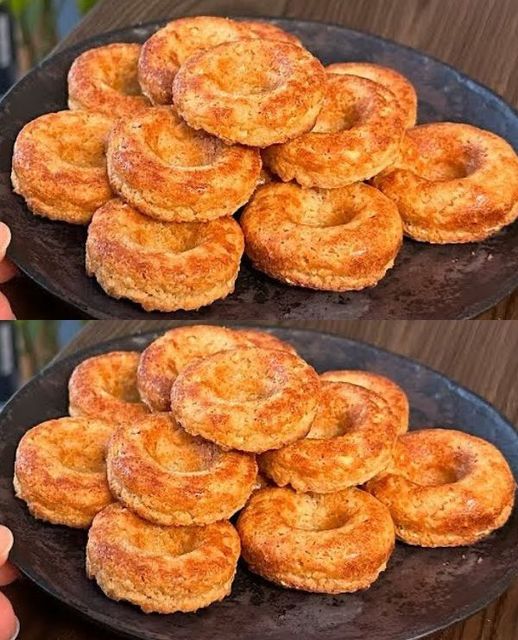
Gluten-Free Delight: 3-Ingredient Flourless and Sugar-Free Cookies in Just 5 Minutes!

Within the culinary arts, cookies have long occupied a unique place in our hearts. Whether it’s a get-together with friends or a nice evening at home, they’re the ideal treat for any occasion. But what if I told you that you could indulge in delectable cookies without feeling bad about using sugar and flour? You did really hear correctly! We’ll take you on a trip to make gluten-free cookies with just three basic ingredients in this post. Prepare to have your taste senses enticed by this quick recipe—it only requires five minutes!

Ingredients Required

Gathering our three magic components is the first step before we get into the detailed instructions:

  1. 130 grams of sesame seeds
    The flavor of sesame seeds is nutty and somewhat sweet. to these biscuits. They are a nutritious powerhouse, providing protein, healthy fats, and important minerals in addition to being a flavor enhancer.
  2. 130g Pumpkin Seeds
    Our cookies have a lovely crunch from the pumpkin seeds, along with earthy notes. They are a great option for a guilt-free snack because they are high in antioxidants, vitamins, and minerals.
  3. Banana ripe (145 g pulp)
    In this dish, the natural sweetness of the ripe banana replaces the need for additional sugar. It also gives our components a cohesive, creamy feel.

Steps in Preparation

  • Mix Everything Into One.
  • Put 145 g of ripe banana pulp, 130 g of pumpkin seeds, and 130 g of sesame seeds in a blender.
  • Process until a smooth, well-combined dough is achieved. The Banana pulp will serve as the ideal binder, guaranteeing a smooth combination.
  • Form Your Cookies
  • Set the oven temperature to 180°C (350°F).
  • To make cleaning easier, line a baking sheet with silicone paper.
  • Scoop out sections of the dough with a spoon and form them into round cookies by placing them on the prepared baking sheet.

Cook to Glory

  • When your cookies are done and formed, put them into the oven that has been prepared.
  • Bake for fifteen to twenty minutes, or until golden brown. Watch them carefully so they don’t overcook.
  • Savor Your Gluten-Free Joy!
    Best wishes! In little time at all, you’ve made a wonderful batch of gluten-free cookies. These cookies are really delicious in addition to being a healthy option. The blend includes pumpkin seeds, sesame seeds,  and ripe banana offers a distinct taste profile that satisfies your cravings.
  • Therefore, these cookies are an excellent option whether you have dietary limitations or just want to try something different. They are appropriate for anyone trying to reduce their intake of gluten and sugar as well as vegans. Serve them as a guilt-free dessert after dinner or with your preferred beverage.

In summary
It is essential to have readily available, healthful snack alternatives in the fast-paced world of today. These flourless, sugarless, and gluten-free cookies provide the ideal remedy. In just a few minutes and with only three easy ingredients, you can indulge in a tasty treat without sacrificing your health.

Perfect No-Knead Bread

Perfect No-Knead Bread

Because no-knead bread makes baking at home accessible to everyone, regardless of skill level, it has revolutionized home baking. This handcrafted bread is a monument to the beauty of simplicity, with its crunchy top and light, airy inside. This tutorial will assist you in producing a visually appealing and tasty loaf of bread, regardless of your level of baking experience.

No-Knead Bread’s Past
Jim Lahey of New York City’s Sullivan Street Bakery pioneered the idea of no-knead bread. His ground-breaking technique, unveiled in the early 2000s, demonstrated that anybody could make a great loaf of bread at home with just a few simple ingredients and a little work. The lengthy fermentation phase, which enables the dough to acquire taste and texture without requiring a lot of kneading.

Ingredients:

  1. 3 1/4 cups of flour, all-purpose
  2. 1 1/3 cups warm water
  3. , 1/2 teaspoon dry yeast,
  4. and 1 teaspoon salt
  5. Iron pan

Nutritional Information for Baking Paper:

  1. 120 calories a slice.
  2. 4g of protein
  3. 24g of carbohydrates
  4. 0.5g of fat
  5. 1g of fiber

Detailed Instructions

combining the dough

  • Mix the Ingredients Together: 3 1/4 cups all-purpose flour, 1/2 teaspoon dry yeast, and 1 teaspoon salt should all be added to a large mixing basin. Add one and a third cups of warm water. Mix all the ingredients together with a wooden spoon until no dry flour is left. This dough is ideal for no-knead bread since it will be sticky and shaggy.
  • First-stage fermentation: Use a fresh tea towel or a lid to cover the dish. Put the bowl inside.
  • Allow the dough to rise for approximately 12 hours in a warm, draft-free space. Because of the extended fermentation time, the yeast is able to create chewy texture and rich, nuanced tastes gradually.

Forming the Dough

  • Prepare the Countertop: Dust the countertop liberally with flour once the dough has risen and doubled in size. Using a spatula, carefully remove the dough from the bowl.
    When folding the dough, dust the dough’s surface and your hands with flour. To make layers, fold the dough in half many times. This stage aids in giving the dough structure.
  • How to Shape the Dough Ball: Tuck the dough’s edges under to form it into a ball. The dough ball should be placed on a sheet of baking paper. Add a small amount of flour to the top and Put a fresh tea towel on top of it. Give the dough two more hours to rise.
  • Making the Bread
    warm the Oven and Pan: Place the cast iron pan inside the oven and warm it to 250°C (482°F) approximately 30 minutes prior to the conclusion of the second rise. For the outside to get crusty, the high heat is essential.
  • Move the Dough: The hot cast iron pan should be taken out of the oven carefully. Lift the dough and transfer it to the pan using the baking paper. The pan will be incredibly hot, so proceed with caution.
  • Keep the lid on and bake: After covering the pan, put it back in the oven. Bake for thirty minutes at 200°C (392°F), lowering the oven temperature. The pan’s trapped steam aids in making a crispy crust.
  • Close the Lid and Continue Baking: After 30 minutes, take off the lid and continue baking for 15 more minutes. This last stage guarantees a completely cooked inside and a golden-brown crust.
  • Cooling the Bread: After baking, take the bread out of the pan gently and place it on a wire rack to cool. The bread sets and slices more easily when cooled.

The Greatest No-Knead Bread Recipes

  • Use Fresh Yeast: For the finest rise, make sure your yeast is active and fresh.
  • Water Temperature: Warm water encourages yeast growth without destroying it. A temperature of between 38 and 43°C (100 and 110°F) is ideal.
  • Length of Fermentation: A longer fermentation results in a more flavorful product. Don’t hurry this undertaking.
  • Type of Flour: Try experimenting with several flour varieties, such as whole wheat or rye, providing a range of textures and tastes.
  • Steam for Crust: To generate steam in a pan without a cover, put a small pan of water inside the oven.

In summary
Baking bread without kneading is a satisfying experience that requires little work and brings the art of baking into your home. Using this approach gives you a sense of success in addition to producing a wonderful loaf. This bread’s crispy exterior and soft crumb make it ideal for a variety of dishes, from a straightforward breakfast toast to a sophisticated dinner side.

This is the Best Thing I’ve Ever Eaten Dessert in Minutes, No Oven, No Condensed Milk

This is the Best Thing I’ve Ever Eaten Dessert in Minutes, No Oven, No Condensed Milk

Who doesn’t enjoy a good dessert, especially when it comes together quickly and doesn’t need an oven? This recipe is perfect if you’re craving something sweet but don’t want to spend a lot of time in the kitchen! All you need are a few basic ingredients and simple instructions to make a delicious treat that will make you desire more. Now let’s get started on creating this delicious dessert that will quickly become a new favorite of yours!

Ingredients:

  1. 3.5 ounces of biscuits without added sugar
  2. One and a quarter cups of milk
  3. Three ounces of chocolate
  4. One teaspoon + three tablespoons of light cream
  5. 3 tablespoons of stevia sweetener (or 5.5 tablespoons of regular sugar as an option)
  6. two yolks from eggs
  7. One ounce of corn flour
  8. One ounce of butter
  9. Half an ounce of cocoa

Steps in Preparation

Let’s now explore the detailed instructions for making this delicious dessert:

  • Arranging the Biscuits in Layers
    Start by lining a 16 x 16 cm square glass baking dish with a layer of sugar-free biscuits. This is going to be your dessert’s foundation. While you create the creamy filling, set aside the dish.
  • Preparing the Creamy Filling
    Whisk together the egg yolks and stevia sweetener (or sugar) in a saucepan. Pour in the milk and corn starch and whisk until smooth. It should take one to two minutes for the mixture to start to bubble and thicken, during which you should stir continually over medium heat. Then, include the butter into the mixture and let it melt fully. Take the pot off of the burner after it has melted.
  • Pour half of the creamy mixture into the cocoa layer.
  • covering the biscuit layer in the baking dish, taking care to coat each one equally. Next, cover with another layer of biscuits. Add the cocoa powder to the remaining creamy filling and stir until thoroughly combined. Evenly distribute this cocoa mixture over the second layer of biscuits in the plate.
  • Using chocolate cream as a garnish
    Melt the chocolate in a bowl that is safe to put in the microwave. Rich chocolate cream is created by whisking in the light cream until it’s smooth. Spread this chocolate cream evenly on the baking dish’s cocoa layer as you pour it on to cover the dessert’s surface.
  • Cooling Off the Dessert
    After preparing, put the dessert in the fridge and let it cool for at least half an hour. This will enable the layering to occur.
  • Allow the flavors to combine, creating an incredibly decadent delicacy.

Serving Ideas
After the dessert has cooled, take it out of the fridge and present it to your excited guests. This dessert’s rich tastes and luscious layers will wow you whether you eat it by itself or with a dollop of vanilla ice cream.

In summary
To sum up, this dish is revolutionary for anyone with a sweet taste and a tight schedule. Make a masterpiece that beats any bakery delight with only a few ingredients and easy preparation techniques. Why then wait? Experience the thrill of enjoying the tastiest dish you’ve ever eaten by giving this recipe a try!

Zucchini Delights A Recipe to Savor

Zucchini Delights A Recipe to Savor

Are you prepared to master the art of cooking and wow your palate with an array of flavors? Try these delicious zucchini treats first! This dish will wow even the most experienced cook, regardless of experience level. Together, let’s go on this gastronomic trip!

ingredients

Items:

  1. 3 medium-sized zucchini
  2. 200 grams (7 ounces) of thinly sliced ham
  3. 150 grams, or 5.3 ounces, of thinly sliced cheese
  4. three eggs
  5. 100 grams, or 3.5 ounces, of flour
  6. 250 grams, or 8.8 ounces, of breadcrumbs
  7. To taste, add salt and black pepper.
  8. Cooking oil

Getting Ready

Let’s examine each phase of the preparation procedure in detail:

  • Get the zucchini ready.
    Make sure your zucchini are fresh and clean first. After giving them a good cleaning, cut off the stems and tips. Cut each zucchini into slices. cut them into thin, 2-3 millimeter-thick strips after cutting them in half lengthwise.
  • Put the Delights Together
    Add a dash of salt and pepper to each zucchini slice. Arrange a ham slice and a cheese slice one on top of each of the strips. To finish, add another zucchini strip on top to make a delicious sandwich.
  • Cover and Fry
    Arrange three bowls for breading: one for flour, one for beaten eggs, and one for breadcrumbs. After dredging each zucchini sandwich in flour and eggs, liberally cover it with breadcrumbs. Deep-fry them in hot oil until crispy and golden brown.

Baking vs. Frying

There are two ways to prepare these delicious zucchini treats: frying or baking.

Let’s investigate the variations:

Healthy or Crispy?
Baking provides a healthier option with equally tasty results, whilst frying produces a crispy surface and a soft inside. You may have the delicious crunch of fried zucchini treats or go for a lighter, guilt-free option by baking them to perfection.

Techniques of Cooking

How to Fry
A golden-brown coating sealed in flavors is produced by deep-frying these delicious zucchini in hot oil, giving each mouthful of zucchini a delightful crunch. For individuals in the mood for a rich dessert, this is the ideal choice.

Method of Baking
Go with the baking procedure for a healthy spin. Put the prepared treats on a baking sheet that has been oiled, and bake for 25 to 30 minutes at 200 degrees Celsius, or until golden brown. Cooking keeps the while lowering the total fat amount, maintaining the unique tastes of the components.

Serving Ideas:

A Variety of Delights These delicious zucchini may be prepared in a variety of ways and are quite adaptable. Serve them as an appetizer at your next get-together, take them for a picnic, or have them as a substantial dinner with a crisp green salad.

Benefits to Health of Nutrient-Rich Zucchinis
Not only are zucchini tasty, but they are also a great source of important nutrients. They are an excellent complement to any diet since they are low in calories and high in antioxidants, potassium, vitamins A and C, and other nutrients.

Sugar-Free Chocolate Delight The Talk of the Town

Sugar-Free Chocolate Delight The Talk of the Town

Components:

  1. 290g of dates
  2. Cold water to be soaked in
  3. 180 grams of almonds
  4. 200g black chocolate without sugar
  5. two tsp of vegetable oil
  6. 40g of gently toasted sesame seeds

Guidelines:

  • For 15 minutes, soak 290g of dates in cold water to remove preservatives and activate healthy ingredients.
  • 180g of almonds should be gently toasted in a frying pan in the meanwhile. Next, use a blender to ground them into a fine powder.
  • Once the dates have soaked, take the seeds out and use a blender to crush them into a paste.
  • To make a dough-like substance, thoroughly combine the powdered almonds and date paste.
  • To firm up, form the mixture into tiny cylinders and refrigerate for 30 minutes.
  • Melt 200g of sugar-free dark chocolate in a water bath.
  • Include two tsp of vegetable oil. and stir until well combined.
  • To ensure a uniform coating, dip the date-almond cylinders into the melted chocolate.
  • To set, put the covered candies in the fridge for five minutes.
  • Draw lines of chocolate on the candies and scatter 40g of gently toasted sesame seeds on top.
  • To enable the chocolate to solidify, put the dessert back in the refrigerator for a few more minutes.
  • This guilt-free, sugar-free chocolate treat melts on your tongue when served using paper forms.

The best cake I’ve ever eaten You will be amazed Quick and easy recipe

The best cake I’ve ever eaten You will be amazed Quick and easy recipe

Materials (20-cm mold):

Regarding the Cake:

  1. Two medium eggs
  2. , one teaspoon of salt,
  3. three tablespoons of sugar
  4. , fifty grams of all-purpose flour (two tablespoons plus one tablespoon),
  5. ten grams of unsweetened cocoa (one teaspoon)

To Soak:

Two tablespoons of sugar and 160ml of coffee  For the Chocolate Mousse:

  • 400g dark chocolate,
  • 200g butter,
  • 20ml coffee (2 teaspoons)
  • , 40g sugar (2 tablespoons),
  • 4 eggs, and so on

Regarding the Ganache de Chocolate:

Dark chocolate (60g) 40ml milk

Guidelines:

Regarding the Cake:

  • Turn the oven on to 180°C, or 350°F.
  • Two medium eggs should be separated. Add a sprinkle of salt to egg yolks and beat.
  • While beating, gradually add 60g of sugar and beat until light and creamy.
  • Add 10g of cocoa and 50g of all-purpose flour and sift. Blend until well blended.
  • Beat the egg whites in a another dish until firm peaks form. shape.
  • The egg whites should be gently folded into the cocoa mixture.
  • Fill a 20 cm mold with batter, and bake for 25 to 30 minutes, or until a toothpick inserted into the center comes out clean.
  • Allow the cake to cool.

To Soak:

  • 160ml of coffee and 2 tablespoons of sugar should be combined. Let it cool.
  • In a double boiler, melt 200g of dark chocolate and 100g of butter to make the chocolate mousse. Pour in 20ml of coffee and well stir.
  • Beat 4 eggs with 40g sugar until frothy in a different basin.
    Fold the chocolate mixture that has melted gradually into the beaten eggs.
  • Over the cake that has cooled, spread the chocolate mousse.

Regarding the Ganache de Chocolate:

  • In a saucepan, heat 40ml of milk and 60g of dark chocolate until smooth.
  • Transfer the chocolate mousse with chocolate ganache on top.
  • The cake needs to set for a few hours, so refrigerate.
  • Savor this delectable Christmas cake that will wow your palate!

Discovering the Health Benefits of Lamb’s Quarters

Discovering the Health Benefits of Lamb’s Quarters

There is a long history of culinary and therapeutic use for lamb’s quarters, also known as Chenopodium album or wild spinach. Though sometimes overlooked as a common weed, this little green plant has several health benefits that make it a wonderful supplement to your diet and herbal wellness regimen.

Health Advantages: A Powerhouse of Nutrition

Lamb’s Quarters provide a wealth of vital nutrients, including calcium, iron, magnesium, potassium, and vitamins A, C, and K. For general health and wellbeing, this makes it an excellent dietary supplement.

An All-Natural Antioxidant
Packed with antioxidants like quercetin and beta-carotene, lamb’s quarters can shield your cells from oxidative stress and may even lower your chance of developing chronic illnesses like cancer and heart issues.

A Pain Relieving Medication Many thanks to

Because of its anti-inflammatory qualities, lamb’s quarters may be able to lessen the symptoms of inflammatory illnesses such inflammatory bowel disease and arthritis. It could work as a natural treatment to ease discomfort and lessen inflammation.

Assistance with Digestive Health
Lamb’s quarters have long been used to support digestive health. The plant’s high fiber content supports a healthy gut, eases constipation, and restores regular bowel processes.

Assistance with Weight Management
Lamb’s Quarters’ high fiber content can aid in your feeling full and content, which may help you consume less calories overall and aid in your weight control efforts.

Blood Sugar Regulation
According to preliminary research, lamb’s quarters may assist in controlling blood sugar levels. Because of this, it presents a promising natural supplement for diabetics or those at the likelihood of getting the illness.

Uses in Cooking: Light and Tangy Salads
Lamb’s quarters’ tender leaves may provide a cool, somewhat tart flavor to salads. To add taste and nutrients to your favorite salad combinations, you can use them raw or blanched.

As an Alternative to Cooking Greens
Lamb’s quarters can be used in a variety of culinary recipes in place of spinach or collard greens. It enhances the flavor and nutritional value of your foods when it is steamed or sautéed.

Healthy Drinks
To add even more nourishment to your smoothies, including lamb’s quarters. It complements the sweetness of the fruits in your smoothie nicely and adds another health advantage.

scrumptious stews and soups
Improve the taste and nutritious content of your stews and soups by adding the Quarters of Lamb. Because of its adaptability, it works well with a variety of meals.

Uses in Medicines: Calming Herbal Infusion
Leaves from lamb’s quarters can be infused to create a calming elixir for the digestive system. Savor it to relieve indigestion and lessen the body’s oxidative stress.

Natural Skin Treatment
Leaves from lamb’s quarters can be used to make a poultice that helps soothe minor burns, rashes, bites, and skin irritations. Use topically to provide a calming effect.

Concentrated Tincture
Lamb’s quarters can be used to make tinctures for a stronger therapeutic effect. But proceed with caution and seek expert advice, particularly if you are already ill or using medication.

Warnings and Things to Think About

  • Accurate identification is essential to prevent ingestion of dangerous species that resemble them.
  • Introduce Lamb’s Quarters gradually in order to watch for any allergic responses.
  • Gather from places devoid of chemicals and contamination to guarantee purity.
  • Before using Lamb’s Quarters medicinally, speak with your doctor or a licensed herbalist, particularly if you take medication or have recurring health issues.
  • Once disregarded, lamb’s quarters are becoming more well-known for their numerous health advantages and adaptability in the kitchen. With careful consideration and consultation for its therapeutic purposes, lamb’s quarters is a versatile herb worth exploring, whether you wish to improve your nutritional intake, manage certain health concerns, or try new culinary pleasures.

Combine coffee and vinegar. The reason why all French ladies do this

Combine coffee and vinegar. The reason why all French ladies do this

What happens when coffee and vinegar are combined? Housewives adore this combination, which provides amazing effects. Discover why you should prepare it at home as well.

With such potent substances found in nature, why spend a lot on skincare products? Your skin will feel renewed and revitalized after trying this easy DIY concoction made with apple cider vinegar and coffee grounds. It won’t break the bank, too!

This is how to make the mask at home:

Ingredients:

  1. Ground coffee
  2. vinegar made from apples
  3. flakes of nutritional yeast
  4. Honey is optional.

Guidelines:

  • In a basin, combine equal parts apple cider vinegar and coffee grinds.
  • Mix well after adding one tablespoon of nutritional yeast flakes.
  • Optional: You may also add a spoonful of honey for additional moisturizing effects.
  • Don’t get any of the mixture near your eyes while applying it to your face.
  • Put the mask on for ten to fifteen minutes.
  • After using warm water to rinse, softly pat dry your skin.
  • You can apply this mask once or twice a week, according on the requirements of your skin. You’ll start to notice
  • changes in your skin’s texture and look over time. Why not attempt it then? Your skin will be appreciative!

Honey, lemon juice, onion, garlic, and grated ginger

Honey, lemon juice, onion, garlic, and grated ginger!

Natural Ways to Treat Flu Symptoms
The flu is a common viral infection that can be uncomfortable since it frequently causes annoying symptoms including mucous and chest congestion. Even though there are many pharmaceutical options accessible, looking into simple, natural alternatives can help reduce these symptoms effectively.

Good Home Remedies for Phlegm and Mucus Removal

Ingredients:

  1. One tablespoon of pepper, black
  2. One tsp honey
  3. two tsp well cut ginger
  4. three water cups

How to Use and Prepare It:

  • In a saucepan of boiling water, add the ginger and black pepper.
  • After three minutes of simmering, turn off the heat and let the liquid cool somewhat.
  • Use honey to sweeten the mixture.
  • To help with coughing and congestion, drink this solution as required.

Recommended Quantity:

  • For best results, drink three to four cups each day, especially when symptoms are at their worst.
  • On an empty stomach, one cup may be sufficient for moderate symptoms.
  • An Additional Natural Remedies for Colds and Flu

Components:

  1. fresh garlic, chopped or crushed
  2. chopped onion, fresh
  3. ginger root that has been freshly grated
  4. fresh horseradish grated
  5. fresh cayenne pepper with seeds, diced or sliced

How to Use and Prepare It:

Blend all components well until they are smooth.
Pour the mixture into a glass jar that is sealed.
For two weeks, shake the jar every day.
Strain the mixture to remove the useful liquid after two weeks.

Benefits of Using Home Treatments for Flu Symptoms

There are several benefits to using these DIY cures for common flu symptoms:

  • Natural components: These cures’ components are easily obtainable.
  • They has inherent qualities that can aid in reducing mucous and chest congestion.
  • Ease of Preparation: Using ordinary household components, these cures are easy to make at home.
  • Effectiveness: Using these natural medicines, many people experience relief from symptoms including coughing and congestion.

Playing with Do-It-Yourself Solutions

  • While trying these do-it-yourself cures might supplement normal treatments for a more thorough approach, orthodox therapies do have a role in flu care. They provide a healthy and mild substitute for pharmaceuticals, relieving symptoms and promoting the body’s own healing mechanisms.
  • Through the use of these natural medicines in conjunction with traditional treatments, people may proactively manage flu symptoms and foster general health. Before beginning any new treatment plan, always get medical advice, especially if you are on medication or have underlying medical issues.

Exploring the Delightful World of German Oatmeal Recipe: 1 Cup Oatmeal and 2 Apples

Exploring the Delightful World of German Oatmeal Recipe: 1 Cup Oatmeal and 2 Apples

There’s nothing quite like the ease of preparation and nutritional value of a big bowl of oats for a healthy start to the day. Additionally, we have the perfect recipe for you if you want to spice up your breakfast: the German oatmeal dish, which calls for one cup of oats and two apples. This delicious meal is a great option for breakfast or even as a nutritious snack since it mixes the natural sweetness of apples with the benefits of oats.

We’ll walk you through making this delicious German oatmeal dish step-by-step in this post. We have everything you need, including the exact directions and supplies. So grab your chef’s hat and prepare to go on a gastronomic adventure.

Components

You’ll Require
Let’s gather all the ingredients for this tasty German oatmeal dish before we begin cooking:

  1. Two apples
  2. two tsp water
  3. One cup of rolled oats
  4. About half a cup of almonds
  5. essence of vanilla
  6. avocado oil

The Get Ready

  • Getting the Apples Ready
    First, peel and core the two apples, then cut each one into quarters. Cut the apple quarters into smaller, easier-to-handle pieces after removing the cores.
  • Mixing the Apples
    Add 30 milliliters of water to a blender container with the cut apples inside. Process the apples in a blender until they form a smooth purée.
  • Getting the Oats Ready
    Next, place the 1 cup of rolled oats in a another dish and process them into a fine powder. This action guarantees a more velvety texture for your oatmeal.
  • Combining the Substances
    Place the 50 g of almonds in the same dish as the powdered oats. Make sure the almonds are evenly distributed throughout the mixture by thoroughly mixing them.
  • Blending Everything Together
    Now add the apple puree to the oat and almond mixture. A sprinkling of vanilla essence will improve the taste. Once all the ingredients are fully blended, you should have a smooth oatmeal mixture.
  • Getting the Baking Tin Ready
    Grease a biscuit pan well with avocado oil before adding your oatmeal mixture to it. This keeps the oats from sticking and makes it easier to remove when it’s finished.
  • Preparing the oatmeal for baking
    Spread the oatmeal mixture evenly in the biscuit pan that has been prepared. Next, set the bake the tin for about 30 minutes at 200°C in a preheated oven.

In summary
There you have it: a delicious and healthful recipe for German oatmeal that combines the flavor of apples, the crunch of almonds, and the healthiness of oats. It’s the ideal way to start the day or have a nutritious snack at any time.

Try this dish the next time you have a longing for something tasty and nourishing. Your body and taste senses will appreciate it!