Air Fryer Popcorn

Air Fryer Popcorn

A quick and easy popcorn recipe that requires less oil is to make air fryer popcorn. It’s a great way to enjoy healthy snacks on movie nights!


Writer: Julia;

3 minutes of preparation
Five minutes to cook
Eight minutes in total
Productivity: 2
Type: Snack;

American Cuisine;

Ingredients

  1. ½ cup kernels for popcorn
  2. One tsp olive oil
  3. Add-on toppings
  4. spices for popcorn and salt butter

Guidelines

  • Set the air fryer’s temperature to 400 degrees. After the air fryer has been warmed, place a layer of foil over the basket. Keep the basket’s sides unobstructed.
  • To the foil, add the popcorn and olive oil. After distributing the kernels evenly, drizzle with oil.
  • For 5-7 minutes, air fry popcorn at 400 degrees Fahrenheit. Pay attention for the kernels popping, and once they’ve all popped, take the basket out.

A Lemon and Egg Recipe

A Lemon and Egg Recipe

This recipe is a celebration of natural goodness, offering a host of health benefits wrapped in simplicity. In a world where culinary complexity often steals the show, let’s focus on a simple yet potent blend of two common ingredients: lemon and egg.

Lemons: These vibrant fruits are more than just flavour enhancers. Rich in Vitamin C, they boost immunity, aid digestion, promote skin health, and help balance the body’s pH levels

. Eggs: Eggs are nutritional powerhouses, packed with high-quality protein, vital vitamins like B2 and B12, minerals like selenium, and advantageous omega-3 fatty acids.

Crafting the Golden Mixture

  • Squeeze the juice from one fresh lemon to extract fresh lemon juice.
  • Divide the Egg: Crack an egg carefully, making sure the white and yolk are separated. Retain both sections.
  • Beat the egg white: After beating the egg white until foamy, slowly mix in the lemon juice.
  • Add the Yolk: Add the egg yolk and beat with a whisk until it’s smooth.

    Adaptable Application
    This golden mixture is more than simply a beverage. It might be a zesty spread for morning toast, an interesting vinaigrette for salads, or a healthy ingredient to smoothies.

    The Diverse Advantages of Digestive Assistance This mixture is known to aid digestion.

    Energy Booster: It provides a natural energy kick, perfect for starting your day.

    Skin Health: Regular consumption can contribute to healthier, glowing skin.

Embrace the Simplicity

This recipe for lemon and egg serves as a gentle reminder of the significant health advantages concealed in common, organic foods. This dish is notable for its simplicity and efficacy at a time when complexity frequently obscures simplicity.

Cheers to Good Health and Easy Living
Learn about the amazing advantages of this combination of lemon and egg. It is evidence of the knowledge found in natural substances in their purest forms. Assimilate this concoction into your everyday regimen and see the beneficial effects on your general health. After all, often the simplest things may hold the most important secrets. Let’s embrace pleasure and health by utilising the benefits of egg and lemon!


quick sweet potato and egg recipe

quick sweet potato and egg recipe

For those moments when you crave something different, something that breaks the routine without the need for bread, let me introduce you to a delightful alternative: a sweet potato and egg recipe that is as nourishing as it is delicious.
Sweet potatoes, with their rich, creamy texture and a sweet, earthy flavor, make an excellent base for a variety of dishes. When paired with the humble egg, they transform into a meal that is both satisfying and wholesome. This combination is not just a treat for the palate but also a feast for the eyes, with the vibrant orange of the sweet potato beautifully complementing the sunny hue of a perfectly cooked egg.
The beauty of this recipe lies in its simplicity and the quick preparation time. Whether you’re starting your day with a hearty breakfast or looking for a nutritious meal to enjoy at any time, this sweet potato and egg dish is sure to hit the spot. It’s a fantastic way to enjoy the rich flavors and health benefits of these two ingredients without the heaviness of bread.
To make this delightful dish,
start by slicing sweet potatoes into thin rounds and baking them until they’re tender and slightly crisp on the edges. Meanwhile, fry, poach, or scramble eggs according to your preference. The combination of the soft, sweet potato with the creamy, rich egg creates a perfect harmony of textures and flavors.
Not only is this recipe easy and quick to prepare, but it’s also incredibly versatile. Feel free to add your favorite herbs, spices, or toppings to personalize your dish. Whether you’re a fan of a dash of cinnamon for a sweet touch or a sprinkle of chives for a savory flair, the possibilities are endless.
In embracing the sweet potato and egg duo, you’re not just opting for a bread-free meal; you’re choosing a path of culinary creativity and simplicity. It’s a reminder that sometimes, the most satisfying dishes are those that are straightforward yet bursting with flavor.
So, next time you’re pondering over meal choices and wish to skip the bread, remember this sweet potato and egg recipe. It’s a wholesome, nutritious, and delicious option that’s bound to become a cherished addition to your recipe collection.

grilled chicken

grilled chicken

I can assist you in making the grilled chicken dish that looks as it’s in the photos. This is a quick and tasty recipe for grilled chicken:

the elements

  1. – One entire chicken divided into eight pieces
  2. – Two teaspoons lemon juice – Four tablespoons olive oil
  3. – 4 minced cloves of garlic
  4. – Two tsp of paprika
  5. – One teaspoon each of cumin and turmeric
  6. – One teaspoon of salt; – One teaspoon of dried thyme
  7. – Half a teaspoon of black pepper

instructions

  • Method: 1. **Making the marinade:- In a big bowl, thoroughly combine olive oil, lemon juice, paprika, garlic, cumin, turmeric, thyme, salt, and black pepper.
    2. **Seasoning the chicken:- Transfer the chicken pieces to the bowl, making sure the marinade coats them fully. Give the chicken at least one to two hours to marinate in the marinade. and for optimal flavor, it is best to refrigerate it for four hours or overnight.
    3. **Getting ready for grilling:– Set the oven’s temperature to 200°C (400°F).
    Arrange the chicken pieces that have been marinated on a baking pan that has baking paper on it.
    4. **Barbecue: Bake the chicken for 35 to 45 minutes, or until it’s cooked through and well browned, in a preheated oven. To make sure the pieces cook evenly, you can turn them after half the cooking time.
    5. **Submission: Present the hot grilled chicken with salad and bread or rice.
    Tip: Feel free to add other spices, like ginger or saffron, if you’d like.
    – Before the cooking time is finished, you may turn on the grill in the oven for a few minutes to achieve a crispy crust.

The Magic Trick to Turning Milk into Whipped Cream

The Magic Trick to Turning Milk into Whipped Cream

Have you ever been in a tight spot and wanted the decadent flavour of whipped cream but all you had in your refrigerator was a glass of milk? Do not be alarmed! In only ten minutes or less, you can turn a plain glass of milk into a fluffy, delectable whipped cream with this clever DIY recipe. Whether you want to add a dash of happiness to your favourite dessert or add a little of decadence to your afternoon coffee, this easy tip can rescue the day.

What You’ll Need:

  1. 1 glass of milk (preferably cold)
  2. 1-2 tablespoons of powdered sugar (adjust to taste)
  3. 1/2 teaspoon of vanilla extract (for that classic whipped cream flavor)
  4. A pinch of cornstarch (to help stabilize and thicken, optional)

The Magic Transformation:

  1. Chill Your Tools: To get the best results, first chill your mixer’s bowl and beaters in the refrigerator for ten to fifteen minutes. This small trick helps the milk whip up properly and makes a significant impact.
  2. .Combine Ingredients: Add the glass of milk to your chilled bowl. Stir in the cornflour (if using), vanilla extract, and powdered sugar. Your cream is sweetened by the sugar, flavoured by the vanilla, and stabilised by the cornflour.
  3. .Whip It Up: Whip the mixture using the mixer set to the maximum speed. It will begin to take on more volume and thicken. Patience is essential since this procedure could take a little longer than making regular whipped cream. Continue whisking until the mixture has the consistency of soft, creamy.
  4. Enjoy Straight Away: This handmade whipped cream makes a delicious and fresh topping for pies, cakes, fruits, or even your morning cup of coffee. It is best served right away.

Reasons to Love This Recipe:
This is not just a creative kitchen tip for generating whipped cream from milk; it’s also a better option than store-bought varieties as you can regulate the sugar content and keep additives out. In addition, it’s a cheap and practical fix if you run out of heavy cream in the refrigerator.

This dairy-based whipped cream is a show-stopper whether you’re serving it to guests or just indulging yourself to a little extra sweetness. It’s evidence that regular items may seem a little more exceptional with a little imagination. So feel free to try it out and revel in the miracle of turning milk into whipped cream!

Freezing Lemons: An Unexpected Kitchen Tip You Must Try

Freezing Lemons: An Unexpected Kitchen Tip You Must Try!

Innovative Ways to Use Frozen Lemons

You’ll find a number of inventive applications for frozen lemon wedges in your kitchen once you have a supply on hand. Here are some suggestions to get you going:

1. Drinks That Refresh
For a blast of refreshing taste, drop a frozen lemon slice into a glass of water, soda, or your preferred beverage. It’s a fantastic way to give your regular drinks a new look.

2. Cocktails with a Citrus Twist
When crafting a mixed drink, consider utilizing a frozen slice of lemon. The refreshing citrus twist will give your cocktail a delicious tang and wow your visitors with a surprising touch.

3. Elevate Your Cooking
One secret might be frozen lemons. component of several recipes. To give your meals a zesty boost, grate some frozen zest into marinades, sauces, or baked goods. You will be astounded by the taste it imparts!
You can always enjoy the convenience of fresh lemons with a simple freezer technique. So go ahead and freeze those lemons to open up a whole new gastronomic realm!

Advantages of Consuming Frozen Lemons

  • Although lemons have a strong sour taste when eaten raw, they have several health advantages.
  • The zest of the lemon contains the largest concentration of substances that are beneficial to health, despite the common belief that the juice is the heart of the fruit.
  • Compared to the juice, the peel of a lemon has a lot more nutrients, especially antioxidants. and limonoids.
  • Lemons taste somewhat different when frozen, which makes them simpler to eat. When they defrost, the acidity returns, but somewhat diminished before. To maintain the freshness of the lemons, it is advised to wash and clean them before freezing.
  • In reality, freezing lemons is a very widespread family tradition. The zest that is frozen retains its flavor longer and tastes better than the zest that has thawed. Both your health and your taste senses will benefit from it!

5 Herbs to Combat Parasites

5 Herbs to Combat Parasites

Some herbs stand out for their potent qualities in the broad field of natural treatments, particularly when it comes to supporting gut health and combating parasites. Imagine enhancing your well-being and cleansing your body with the abundance of nature. In just three days, these five amazing herbs have been shown to help the body get rid of parasites. Let’s explore the plant companions that might assist you in naturally regaining your health.

1. Black Walnut Hulls

The hulls of black walnuts are well known to have strong antiparasitic effects. Juglone, a substance that is very efficient against worms and other parasitic creatures, is present in them. Taking a black walnut hull-containing tincture or pill can help clear your digestive tract and make your environment uninhabitable for parasites.

2. The Wormwood
With its bitter properties, wormwood is a potent plant that has been used for generations to combat parasites and intestinal worms. Thujone, its active component, aids in the evacuation of parasites from the body by weakening their membranes. Wormwood is a powerful herb that should be taken according to suggested quantities. It may be taken as a tea or in pill form.

3. Clove

Clove is a spice that works wonders against parasites in addition to adding flavour to your food. Clove contains eugenol, which works well to destroy parasite eggs and larvae and stop new infestations. Clove can be taken as an oil or added to your food to increase its antiparasitic properties.

4. Oil of Oregano
Strong and adaptable, oregano oil is prized for its antibacterial and antiparasitic qualities. Carvacrol and thymol, two of its active ingredients, work well to interfere with parasite life cycles. An effective remedy for internal parasites is a few drops of oregano oil diluted in water.

5. Garlic

Not only is garlic a common ingredient in kitchens all around the world, but it’s also an effective natural parasite cure. Allicin, one of its sulfur-containing components, has potent antibacterial and antiparasitic properties. Garlic pills or raw garlic consumption might help clear your system of unwelcome visitors.

Accepting Herbal Remedies
Using these five herbs to manage parasites helps your body’s natural defence mechanisms while also harnessing the power of nature. But always keep in mind that although herbs might have a lot to offer your health, you should utilise them carefully and respectfully. Before beginning any new herbal regimen, it is advisable to speak with a healthcare provider to be sure it is safe and suitable for your particular health condition. Naturally, here’s to your well-being!

Simply Mix Watermelon with Milk

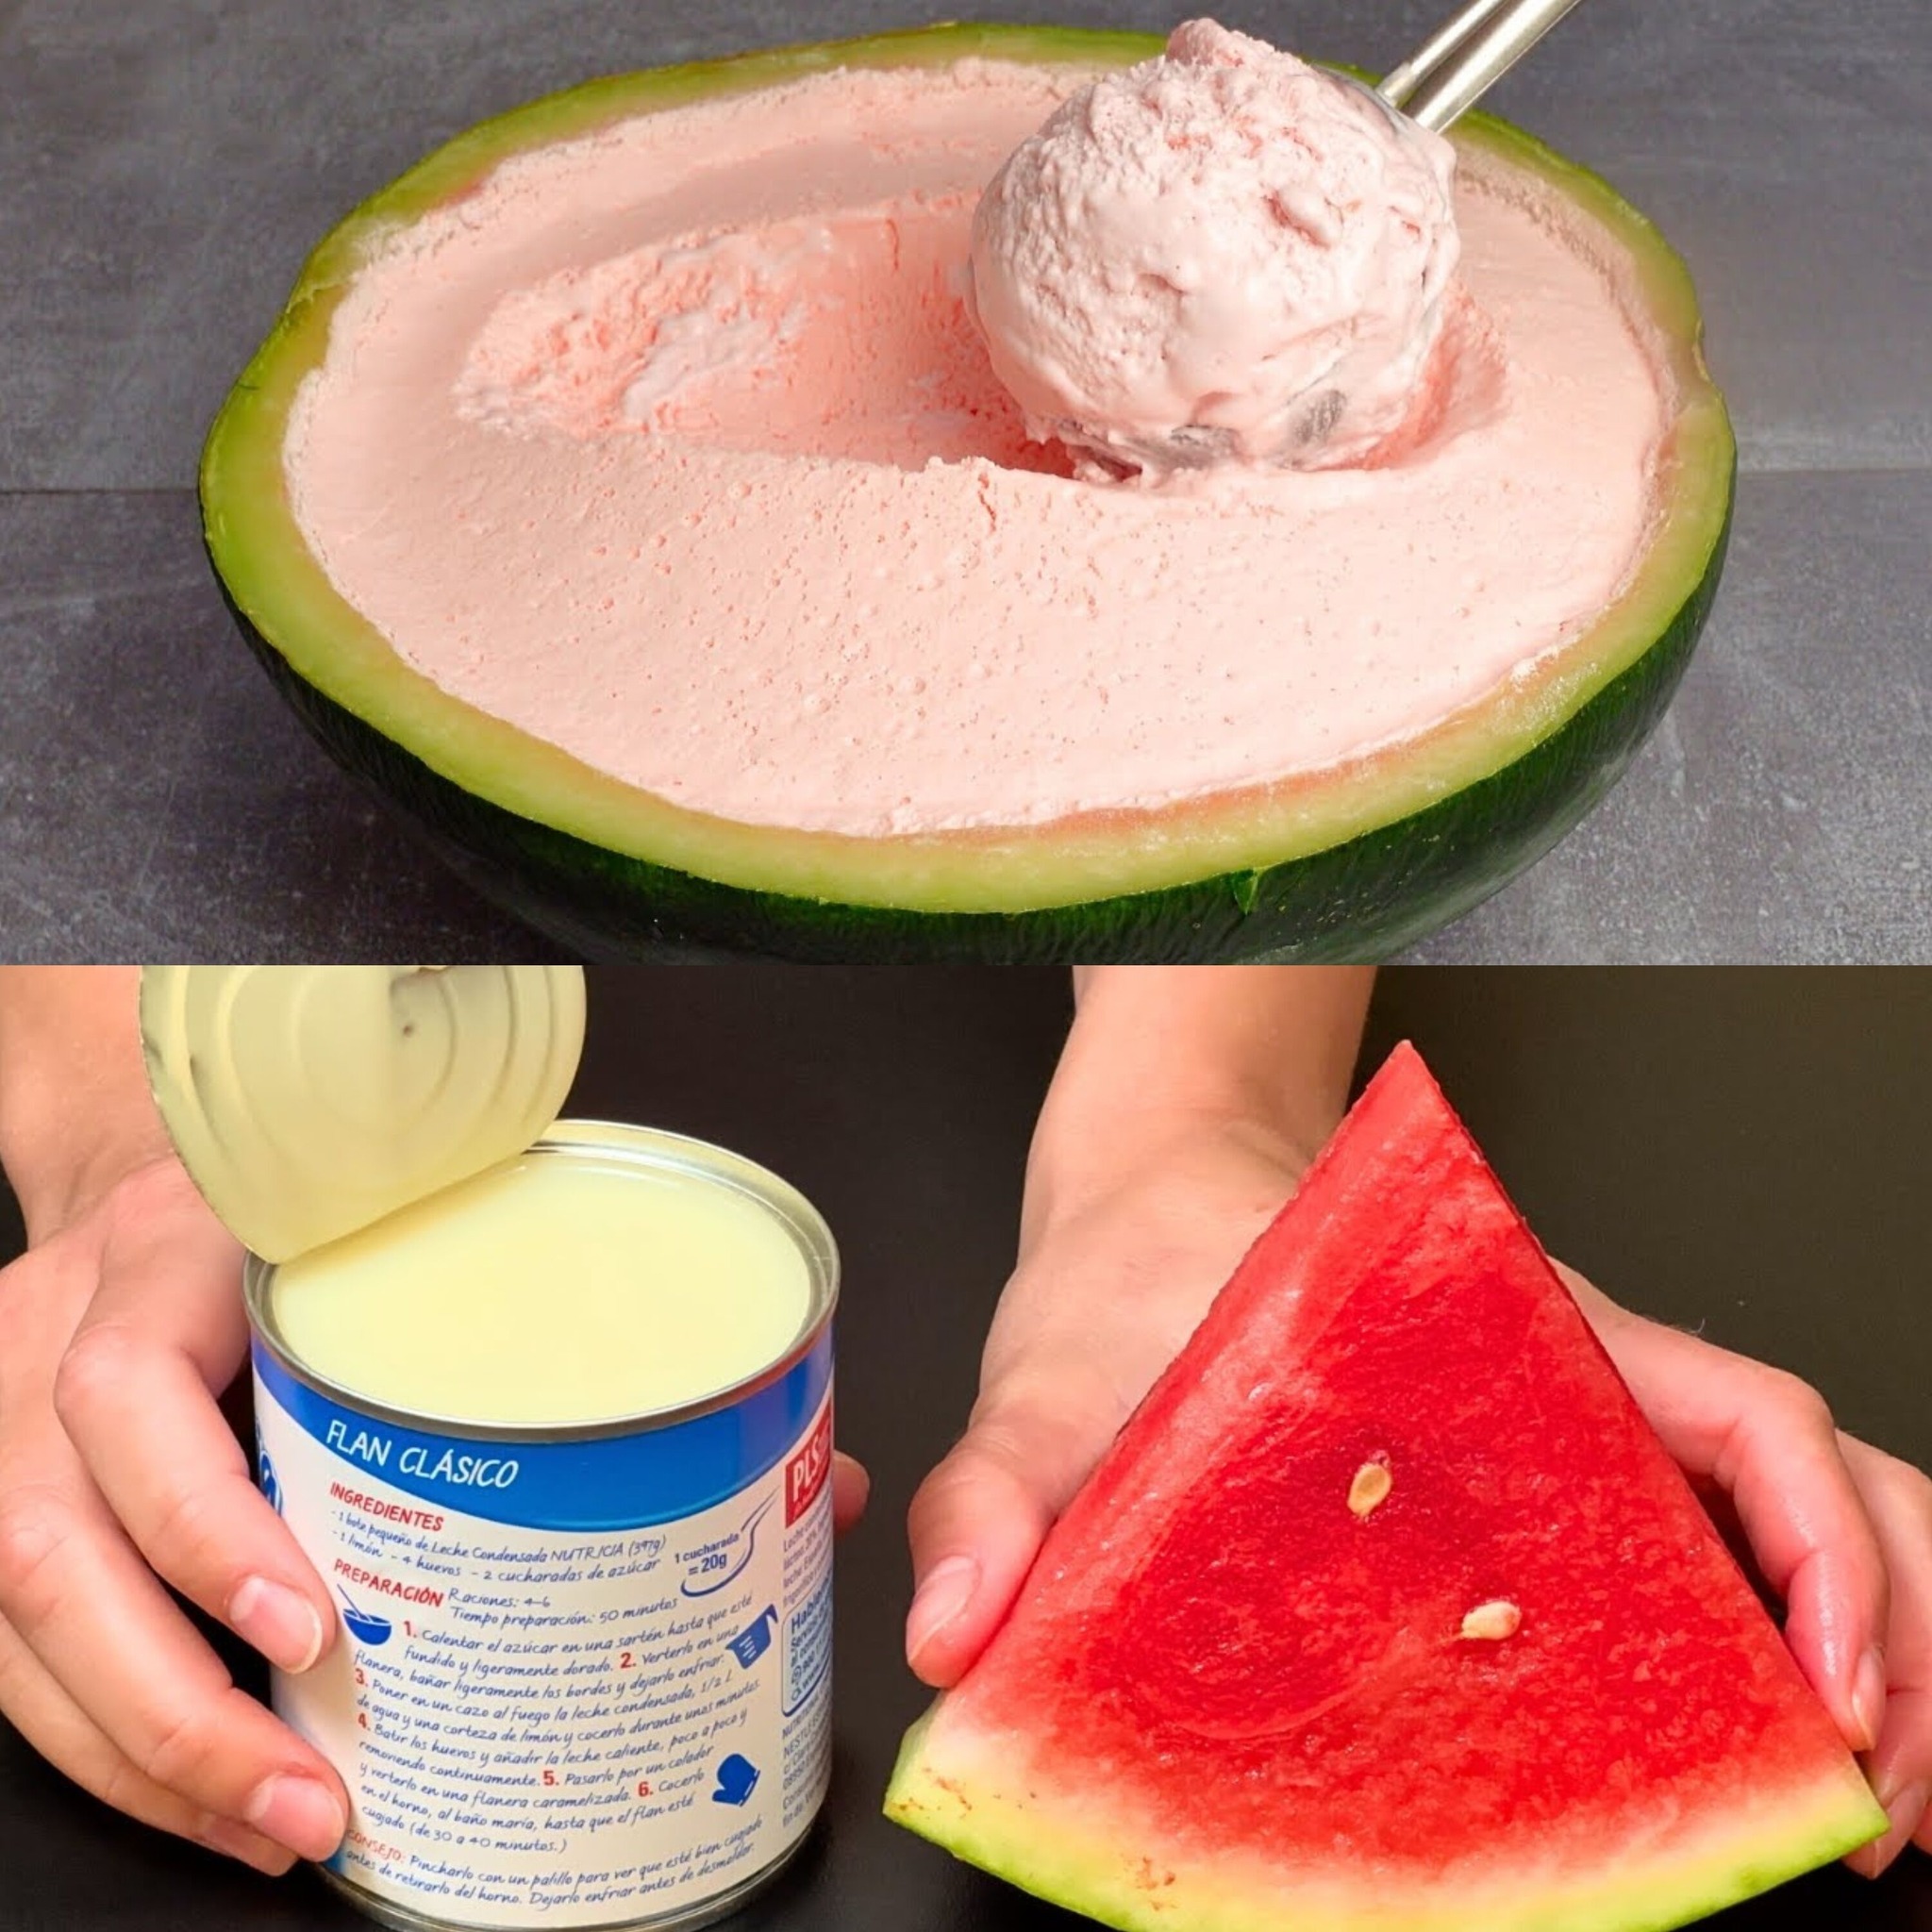
Simply Mix Watermelon with Milk – It Tastes Delicious!

Has the idea of blending milk and watermelon ever occurred to you? Though it may sound strange, this tasty and cool treat is great for any time of day. This is a really easy, flavorful, and healthful mix because it contains no added sugar. This is a pleasant way to savour the natural sweetness of watermelon, and I make it every day. Now let’s get started on this tasty and simple dish.

Ingredients:

  1. 2 cups watermelon, cubed and seeds removed
  2. 1 cup cold milk (use your preferred type – cow’s milk, almond milk, or any other milk substitute)
  3. A few ice cubes (optional)
  4. Fresh mint leaves for garnish (optional)

Instructions:

1.Prepare the Watermelon:

First, remove any seeds from the watermelon and cut it into little pieces. The main ingredient in this dish is fresh, juicy watermelon, which provides a blast of natural sweetness and moisture.

2. Mix the Components:

Put the chilled milk and the cubes of watermelon in a blender. The cool watermelon tastes great with the creamy smoothness that the milk brings.

Blend until the mixture is smooth and well combined. Include a few ice cubes in the blender as well if you like your drink to be really cold.

3.Serve:

Fill a glass with the watermelon milk combination. If desired, add some fresh mint leaves as a garnish to provide some colour and a bit of freshness.

Pour over the creamy, tasty, and revitalising beverage right away.

Advantages for Health:

Watermelon: Rich in vitamins A and C, this fruit provides vital nutrients and water while being low in calories. It has a tonne of antioxidants as well.

Milk: Depending on the variety you choose, milk can enhance your beverage’s protein, calcium, and vitamins D and B12 levels, which can help maintain your bones and general health.

The Reason This Recipe Is Effective:

Not only is this straightforward watermelon and milk combination tasty, but it’s also really simple to make. Watermelon is naturally sweet, so you don’t need to add any sugar, which makes it a healthier choice. It’s a flavor-bursting and refreshing way to remain hydrated.

Advice on Having Fun:

Blend in a frozen banana for a thicker, smoothie-like consistency.

Try varying the milk types—almond, soy, or coconut—to see what works best for you.

For a tangy touch, pour in some lemon or lime juice.

Conclusion:

Watermelon and milk together may seem like an odd combination, but it’s a tasty and cool treat that works well any time of day. This easy-to-make, sugar-free dish is bursting with natural flavours and minerals. Try it and appreciate the delicious flavour and health advantages of this simple-to-make beverage. Let’s toast to a tasty and healthful dessert!

Cinnamon possesses natural anti-inflammatory properties

Cinnamon possesses natural anti-inflammatory properties

I used cinnamon for a long time, and it seemed to make my heart quite happy.

Due to the inherent anti-inflammatory qualities of cinnamon, cinnamon tea is an excellent option for relieving sore throats and lowering overall body inflammation. You may benefit from the calming properties of cinnamon tea and encourage a healthier you by enjoying a warm cup of it.

Improved Digestibility
Drinking a cup of cinnamon tea after a meal helps improve digestion and reduce gas and bloating. Cinnamon’s natural ingredients aid in stimulating the digestive system, which facilitates the body’s ability to absorb and break down nutrients. It’s now easier than ever to keep your digestive tract healthy with cinnamon tea.
Help for Losing Weight
Even if there isn’t any magic If you’re looking for a weight reduction option, adding cinnamon tea to your diet may be beneficial. Blood sugar regulation, which lowers sugar cravings and overeating, is aided by cinnamon tea. You may get the health advantages of this delicious tea while indulging in a cozy, warm beverage by integrating it into your weight reduction regimen.
The technique of making a cup of cinnamon tea is simple. To brew the ideal cup, just follow these easy steps:

  • Heat up a glass of water to a boil.
  • To the water, add a cinnamon stick or a teaspoon of cinnamon powder.
  • Take 8 to 10 minutes to let it steep.
  • If you used powdered tea, remove the cinnamon stick or drain the drink.
  • You may also add a slice of lemon or a spoonful of honey to improve the flavor.of lemon.
  • Recall that including cinnamon tea into your regular routine is a tasty and simple approach to promote your overall health and wellbeing. So why not begin taking advantage of this delectable beverage’s advantages right now? To many years of wonderful health!

Garlic Lemon Juice Grated Ginger and Honey

Garlic, Lemon Juice, Grated Ginger and Honey: Just one teaspoon every day, and prepare to be amazed

 The flu is a common viral infection that frequently causes painful symptoms including congestion in the chest and mucous accumulation. Even though there are many pharmacological solutions available, it might be helpful to think about simple natural alternatives when trying to properly manage these symptoms. The following are two effective home cures for phlegm and mucus clearing:

Home Remedies for Phlegm and Mucus Removal Ingredients:

  1. 1 tsp ground pepper
  2. two tsp finely chopped ginger
  3. One spoonful of honey
  4. three cups of water

Getting ready:

  1. Grated ginger and black pepper should be added to a kettle of boiling water.
  2. Simmer the mixture for around three minutes.
  3. Allow it cool somewhat before adding honey to sweeten.

How to Use:

  1. As required, sip this mixture to relieve discomfort.
    Recommended Dosage:
  2. Drink three to four cups a day to help with congestion and cough alleviation.
  3. For milder symptoms, one cup on an empty stomach could be sufficient.

Benefits: The natural expectorant qualities of black pepper and ginger in this tea might help relieve chest congestion and release mucus. Honey has a calming effect and could lessen sore throats.

. Natural Cold and Flu Remedy

Ingredients:

  1. Fresh garlic, chopped or crushed
  2. Fresh onion, chopped
  3. Grated fresh ginger root
  4. Grated fresh horseradish
  5. Fresh cayenne pepper, seeded and chopped or sliced

Preparation:

  1. Blend every component until it’s smooth.
  2. Transfer to a glass jar that is airtight, and shake every day for two weeks.
  3. After the two weeks, strain to remove the useful liquid.

How to Apply:

  • Use the recommended dosage when consuming the extracted liquid orally.

Benefits:

Garlic, onion, ginger, horseradish, and cayenne pepper all have antibacterial and immune-boosting qualities that are combined in this natural medicine. Together, these components strengthen the body’s defences against viruses that cause colds and the flu.

Advantages of Home Remedies

There are several benefits to using these DIY cures for flu symptoms:

All of the ingredients are widely available and natural, which means that they are not harsh on the body.
Expectorant Properties: By facilitating the release of mucus, both treatments assist to reduce congestion.

Immune Support: With its powerful combination of substances, the second treatment in particular helps to support the immune system.
Complementary Approach: Combining these treatments with traditional therapy can offer a complete strategy for managing symptoms.

Conclusion

Try these do-it-yourself methods to relieve typical flu symptoms like mucous and chest congestion in addition to standard treatments. Stress how important it is to decide what is best for each person’s requirements and to seek expert advice from healthcare providers as needed. Through the integration of these natural substitutes into flu prevention regimens, people may investigate comprehensive methods for enhancing their overall health throughout seasonal ailments.