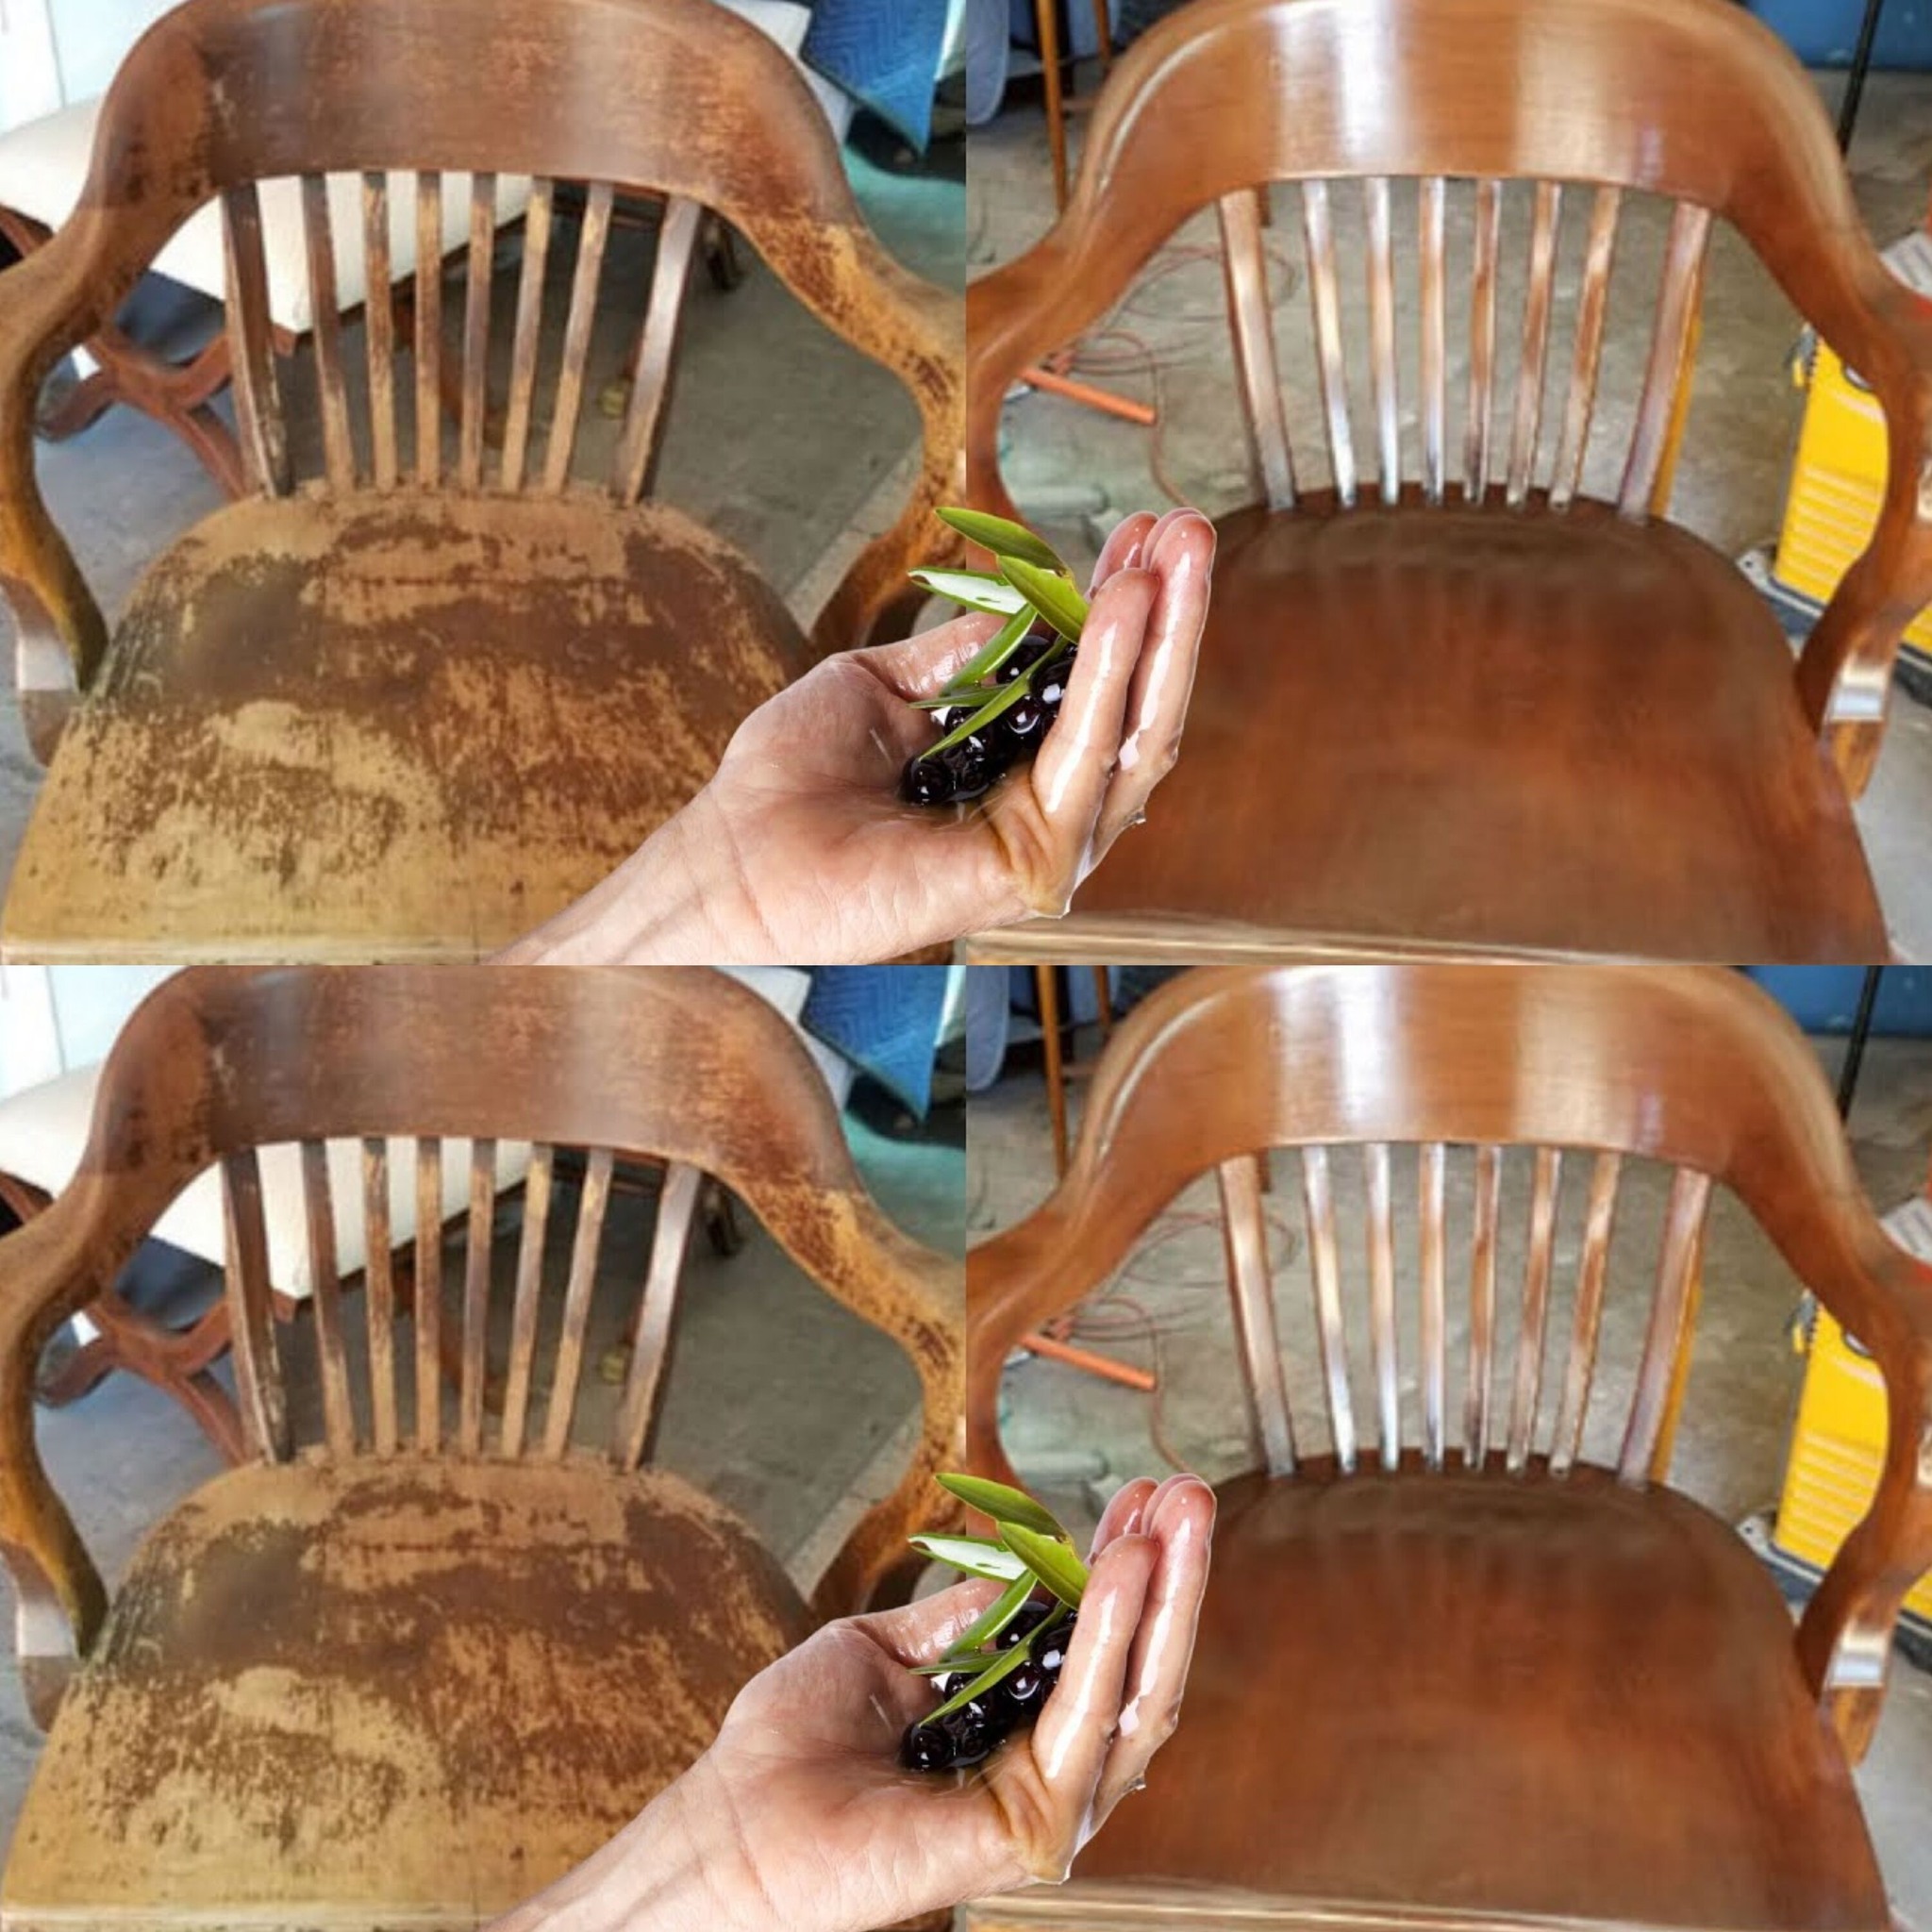
How to Get a Snake Plant to Flower

How to Get a Snake Plant to Flower

However, your snake plant may blossom with very little environmental stress. (Plants exercise caution in this way.)
Actually, you only need to make three precise changes to the growth conditions of a snake plant to enable it to bloom inside. There are just two of them that are stressful to the plant: watering less regularly and allowing the plant to get root-bound.

I’ll even apply it to situations involving human stress.

It’s similar to how you feel in the evening when you forget to drink water during the day, or like putting on that little too-tight pair of pants you have hidden in the back of your drawer since all your other pairs are in the laundry.

Uncomfortable? Sure. Insurmountable? Hardly.

Leave a glass of Water With Salt

Leave a glass of Water With Salt

To eliminate bad energy from your house, mix a simple solution of vinegar, salt, and water.

Your family and your pets may be impacted by negative energy. Fortunately, though, we were able to eliminate it for you.

Make your house more wholesome and your life better! You already have everything you need in your house.

You will need the following ingredients:

  1. 1 cup (it should be completely transparent)
  2. White vinegar
  3. baby sal
  4. water

Directions :

Simply fill the cup with a small amount of water, vinegar, and salt. That’s all that’s required. Put the glass in strategic locations where you spend a lot of time and receive a lot of visitors. Indeed, you ought to keep it there for a whole day.

Once some time has passed, see if the salt is still working or if the water has spilled. After a full day, rinse the cup well with water and repeat the process as frequently as needed. Put it all throughout your house until the salt stops rising.

Additionally, make sure the glass is hidden so it can efficiently absorb negative energy!

To eliminate any negative energy in your surroundings, simply use a cup of water mixed with vinegar and grain salt. And I can assure you that the outcomes will astound you.

We really hope that this information is helpful to you, and please remember to forward it to your friends and family.

Regards and have a nice day!

Simple and Natural Solution for Joint Pain

Simple and Natural Solution for Joint Pain

Are you sick and weary of joint, knee, and back pain? There’s nowhere else to look! Gelatin may be the solution you’ve been looking for. This ubiquitous cooking item has several health advantages that can help relieve pain and promote joint health, so it’s not just for desserts. Let’s look at how consuming gelatin may help you feel better and how to include it into your regular routine.

Rich in Collagen

Animal collagen, which is essential for the upkeep of your cartilage and connective tissues, is the source of gelatin. Our body produces less collagen as we get older, which causes stiffness and soreness in our joints. You may support your joints, lower discomfort, and increase collagen levels by consuming gelatin.

Anti-Inflammatory Characteristics

Natural anti-inflammatory amino acids like proline and glycine may be found in gelatin. These amino acids have the ability to lessen joint inflammation, which can ease pain and increase mobility generally.

Supports Bone Health

Essential minerals that are necessary for strong and healthy bones, such as calcium, magnesium, and phosphorus, are abundant in gelatin. People who suffer from diseases like osteoporosis may find this very helpful.

Ingredients:

  1. 1 tablespoon of unflavored gelatin powder
  2. 1/2 cup of cold water
  3. 1/2 cup of hot water
  4. Honey or lemon juice (optional, for taste)

Instructions:

Dissolve the Gelatin:

Combine half a cup of cold water with the gelatin powder. Give it a good stir, then let aside for a few minutes so the gelatin can bloom.
Pour in some hot water.
mix in 1/2 cup boiling water when the gelatin has bloomed, and mix until the gelatin is completely dissolved. This guarantees that the gelatin is completely activated and prepared to offer its advantages.

Taste (Optional):

To improve the flavour of your drink, feel free to add a squeeze of lemon juice or a spoonful of honey.

Have fun:

Once a day, consume your gelatin combination. Consistently include it in your everyday regimen for optimal outcomes.

Additional Tips:

  • Keep Yourself Hydrated: Getting enough water improves the lubricating properties of gelatin in your joints.
  • Pair with a Healthy Diet: Eating a diet full of fruits, vegetables, lean meats, and other nutrients promotes general health and can help with joint function.
  • Engage in Regular Exercise: Mild workouts, such as swimming or walking, can help strengthen the muscles around your joints and ease discomfort.

9 One easy-to-use, all-natural treatment for knee, back, and joint discomfort is gelatin. It’s a great option for maintaining joint health because of its high collagen content and anti-inflammatory qualities. Better mobility and less discomfort are possible if you include a daily gelatin drink in your regimen. Don’t hesitate any longer—try it out and see the advantages for yourself!

Unlocking the Profound Health Benefits of Thyme

Unlocking the Profound Health Benefits of Thyme: A Singular Plant Pharmacy

Thyme is more than just a flavour enhancer; it has a wealth of health benefits that extend beyond its gastronomic appeal.

This miracle plant has a plethora of health benefits, from reducing inflammation and acne to controlling hypertension and certain forms of cancer.

Here are some examples of how adding thyme to your health regimen may have a big impact:

Wonder Antibacterial:

According to research, thyme oil from Thymus vulgaris exhibits strong antibacterial qualities against a variety of bacteria, such as Pseudomonas, Staphylococcus, and Enterococcus. Notably, it addresses an important issue in contemporary healthcare by successfully combating types of bacteria resistant to antibiotics. Thyme’s antibacterial properties may be used to improve oral hygiene; a straightforward mouthwash can be made by combining thyme oil with warm water.

Anti-inflammatory Arsenal:

Notable Cyclooxygenase-2 (COX-2) inhibitors found in thyme essential oil are vital for reducing inflammation. This function also includes easing localised discomforts. Thyme oil may be combined with a carrier oil to create a calming topical solution that relieves headaches, inflammations, and aches in the muscles.

Enhance My Cognitive Ability:

Initial research using lab mice fed with thyme shows encouraging results. Supplementing with thyme increases antioxidant levels comparable to younger equivalents and raises Omega 3 levels, which are essential for maintaining mental health and cognitive function as one ages.

Acne Combatant:

Thyme tincture shows up as a formidable opponent to microorganisms that cause acne. This potent treatment is made by steeping wild thyme blossoms in brandy or alcohol and letting the mixture steep in sunshine for two weeks. Applying thyme to the skin gently cleanses it while utilising its powerful antibacterial and restorative effects.

Combatant of Cancer:

Thyme extract shows encouraging results in the fight against cancer cells, especially in individuals suffering from breast and colon cancer. Interestingly, thyme essential oil has exceptional cytotoxicity against breast cancer cells, suggesting that it might be used as a supportive treatment for cancer.

Respiratory Relief:

Combining thyme extract with ivy leaf extract significantly reduces cough intensity and relieves symptoms of acute bronchitis. If you have respiratory distress, adding thyme tea to your regimen can help, as will breathing steam that has been infused with thyme oil.

Control of Blood Pressure:

Some varieties, including Himalayan and Wild Thyme, have the ability to lower blood pressure, which might be reassuring to those who suffer from high blood pressure.

Essentially, thyme goes beyond its culinary use to become a holistic health ally that improves lives with a variety of therapeutic benefits.

EASY RASPBERRY JAM RECIPE

EASY RASPBERRY JAM RECIPE
Ingredients:

  1. 2.2 pounds raspberries 8 cups; use some underripe berries for added tart flavor and pectin
  2. 28 oz white sugar 4 cups
  3. 1/4 cup lemon juice fresh or bottled (the latter works best for canning)

Directions:PREPARE THE BERRIES AND JARS

  1. Sterilize all the jars and tools used for this recipe. Wash the jars, lids, and bands in hot, soapy water, rinse them well, and leave them to drain and dry. Or wash them in a dishwasher on the top rack- it’s best if they’re still warm when you go to use them.
  2. Also, place 1-2 small plates in the freezer (they’ll be used for the gel test).
  3. If you’re planning to can the jam, prepare the canner by adding the trivet/rack to the bottom of the canner and filling it with enough water to submerge the jars by an inch.
  4. Wash the raspberries well, removing any stems and berries that are spoiled, blemished, etc.
  5. SIMMER THE JAM
  6. Transfer the berries and sugar to a large, deep, heavy-based stainless-steel saucepan. Then use a potato masher (or a fork) to gently crush the berries, leaving some whole if preferred.
  7. Add the lemon juice and stir. Bring the mixture to a full rolling boil, stirring constantly to ensure the sugar dissolves and the jam doesn’t stick to the pan.
  8. As foam appears on the top of the jam, use a spoon to scoop it away, simmering until it thickens enough to coat the back of a spoon (about 15-20 minutes).

THE GEL TEST

  1. To test if the jam has reached the correct “set,” remove the saucepan from the heat and place about a teaspoon of the jam over the pre-chilled plate (from the freezer). Return it to the freezer for 1-2 minutes, then test the set. It should be set and wrinkle when pressed.
  2. Alternatively, use a candy thermometer vertically into the saucepan of jam (don’t touch the bottom!). It should reach 220ºF/104ºC.
  3. If it hasn’t set, continue to cook for a few minutes and test it again.

FILL THE JARS

  1. Place the sterilized, warm jars on a clean kitchen towel/wooden board (this will stop temperature shock from causing cracks).
  2. To make the jars hot, heat them up (with the lids on) in the water bath canner while bringing the water to an almost boil. Alternatively, warm the jars (not the lids) in the oven.
  3. Ladle the hot jam into the hot jars, leaving about ¼-inch headspace (0.5 cm). Tap the jar against your kitchen surface and/or use a knife to remove any air bubbles in the jam.
  4. Wipe the jar rims with a clean kitchen towel and place the lid on the jar, screwing the screw bands until they are fingertip-tight.
  5. At this point, the jam is ready to use immediately, transfer to the fridge for short-term storage, the freezer for 6 months, or be water bath canned to keep for up to a year!

WATER BATH CANNING

  1. Place the filled jars in the prepared canner, ensuring they’re submerged under at least 1 inch of water.
  2. Bring the water to a boil over medium-high heat, add a lid, and allow them to process for 10 minutes (adjust the time based on the altitude of where you live).
  3. Remove the canner lid and allow them to sit for 5 minutes before carefully using canning jar tongs to remove the jars from the water and set them onto a clean kitchen towel to drain and cool undisturbed for 24 hours.
  4. Once cooled, check the seal – the middle part of the lid should not pop up and down when pressed. Then store them in a cool, dark location (like your pantry) for up to a year and a half.Keep in jar refrigerated.
    Enjoy! ❤️

11 Powerful Reasons to Eat Flaxseeds Every Day

11 Powerful Reasons to Eat Flaxseeds Every Day

Flaxseeds are tiny, but they pack a powerful punch when it comes to health benefits. Adding these little seeds to your daily diet can have a significant positive impact on your overall well-being. Here are 11 compelling reasons to eat flaxseeds every day.

1. Rich in Omega-3 Fatty Acids
Flaxseeds are an excellent source of alpha-linolenic acid (ALA), a plant-based omega-3 fatty acid. Omega-3s are essential for heart health and help reduce inflammation in the body.

Tip: Sprinkle ground flaxseeds on your oatmeal or yogurt to boost your omega-3 intake.

2. High in Fiber
Flaxseeds are loaded with both soluble and insoluble fiber, which aids in digestion and helps maintain bowel regularity.

Tip: Add flaxseeds to your smoothies or baked goods for a fiber-rich treat.

3. Supports Heart Health
The combination of omega-3 fatty acids, fiber, and lignans in flaxseeds helps lower cholesterol levels and reduce the risk of heart disease.

Tip: Incorporate flaxseeds into your salads or cereal to support heart health.

4. Promotes Healthy Skin and Hair
The healthy fats and B vitamins in flaxseeds contribute to healthy skin and hair, reducing dryness and improving texture.

Tip: Use flaxseed oil as a dressing for your salads to nourish your skin and hair from within.

5. Aids in Weight Management
The fiber in flaxseeds helps you feel full longer, which can aid in weight management by reducing overall calorie intake.

Tip: Mix flaxseeds into your morning smoothie to help curb your appetite.

6. Stabilizes Blood Sugar Levels
Flaxseeds can help regulate blood sugar levels due to their high fiber content, making them beneficial for people with diabetes.

Tip: Add flaxseeds to your diet regularly to help manage blood sugar levels.

7. Reduces Inflammation
The omega-3 fatty acids and lignans in flaxseeds have anti-inflammatory properties that can help reduce inflammation in the body.

Tip: Include flaxseeds in your diet to help combat inflammation and related conditions.

8. Supports Digestive Health
The fiber in flaxseeds promotes a healthy digestive system by preventing constipation and promoting regular bowel movements.

Tip: Sprinkle ground flaxseeds on your cereal or yogurt to improve digestion.

9. Provides Antioxidants
Flaxseeds are rich in lignans, which are powerful antioxidants that protect your cells from damage and help reduce the risk of cancer.

Tip: Add flaxseeds to your daily diet to boost your antioxidant intake.

10. Hormonal Balance
Lignans in flaxseeds have estrogen-like properties that can help balance hormones, particularly in women.

Tip: Incorporate flaxseeds into your meals to support hormonal health.

11. Enhances Nutrient Absorption
Flaxseeds help improve the absorption of nutrients from other foods, enhancing your overall nutritional intake.

Tip: Combine flaxseeds with other nutrient-rich foods for maximum benefits.

Conclusion
Incorporating flaxseeds into your daily diet is a simple and effective way to improve your health. From promoting heart health to aiding digestion and balancing hormones, these tiny seeds offer a multitude of benefits. Try adding flaxseeds to your meals and enjoy the powerful health benefits they bring!

Easy Homemade Fresh Cheese Recipe for Cheese Lovers

Easy Homemade Fresh Cheese Recipe for Cheese Lovers

Easy Homemade Fresh Cheese Recipe for Cheese Lovers You don’t need to be afraid to make cheese at home if you love cheese! It’s actually very easy to make your own fresh cheese. Your friends and family will be amazed by the handmade cheese you can make with only a few simple ingredients. Let’s get started with a simple dish that will make you the life of the party at any event.

Fresh Cheese’s Health Benefits

Cottage cheese, or fresh cheese, has several health benefits.

  • Rich in Protein: It’s an excellent source of protein, which is necessary for immune system function and cell repair.
  • Rich in Calcium: The calcium content of fresh cheese is high, which is good for your teeth and bones.
  • Weight Loss Friendly: Provides nutrition and flavour without putting dieticians under pressure to lose weight, making it a favourite among them.
  • Adaptable to Meals: Whether it’s breakfast, lunch, or supper, fresh cheese tastes great added to any meal.

Creating Fresh Cheese at Home:

This dish simply requires three basic ingredients:

  1. One litre of milk from sheep
  2. One sugar-free, organic plain yogurt
  3. One-half of an organic lemon

Use probiotic pills in lieu of yogurt and a mixture of coconut and almond milk for a vegan substitute.

Essential Cutlery:

  • A metre of cotton gauze that is hydrophilic
  • One mould
  • One jar

Actions:

  1. Heat the milk gently (do not boil) for fifteen minutes.
  2. Juice the half of a lemon.
  3. Stir in the yogurt and lemon juice when the milk has heated.
  4. Give the mixture three hours to rest.
  5. Gather the curds by straining the mixture through the gauze.
  6. Put the gauze-covered curds in the refrigerator with a weight for half an hour.
  7. Put in a mould after seasoning with salt.
  8. Again, refrigerate for eight hours.

    And just like that, your very own fresh cheese is ready to eat! You may enjoy the satisfaction of creating and eating your own cheese with this simple recipe. Now go ahead and appreciate the wonderful world of cheese production by giving it a try. Salutations!

Identify Real Honey from Fake Honey

Identify Real Honey from Fake Honey

Identify Real Honey from Fake Honey For millennia, honey has been valued for its inherent qualities and well-being advantages. But given how many contaminated honey products there are on the market, it’s critical to understand how to tell the difference between genuine and fraudulent honey. You can make sure you’re getting the high-quality honey you deserve by doing these easy-to-use but powerful tests at home.

1. The Thumb Test Technique: Apply a tiny bit of honey on your thumb.
Anticipated Outcome: Unadulterated honey will remain intact and not disperse or run off rapidly. The honey can be tampered with if it drops or spreads.

2. The Water Test Method: Pour some water into a glass and stir in a spoonful of honey.
Anticipated outcome: Artificial or tampered honey will soon dissolve in water. Pure honey, on the other hand, will not readily dissolve and will sink to the bottom of the glass.

3. The Flame Test Method: Try lighting a match or cotton swab by dipping its end into honey.
Anticipated Outcome: The matchstick will burn or ignite when pure honey is present, suggesting that it has few contaminants. It may have additives like water that stop it from burning if it doesn’t ignite.

Method By; Wellness tips

Baking Soda and Honey

Honey and soda

Baking Soda and Honey Mixture My grandma had a basic concoction of baking soda and honey hidden away in her domestic arsenal. This miraculous mixture was useful for many things, including cooking, beauty, and health. Let’s examine some of her uses for this concoction in more detail, as well as the advantages it provided.

  • A Comforting Concoction

    My grandma would always grab for her go-to concoction when any of us had coughs, sore throats, or irritations. Several times a day, a tablespoon of the paste composed of baking soda and honey helped to alleviate these symptoms. The honey calmed our throats and the baking soda worked as a natural antibacterial.

  •  A Mild Exfoliation for Bright Skin

    This blend is the key to preserving smooth and glowing skin, as my grandma also understood. She got a healthy shine on her skin by using it as a gentle scrub. Honey moisturised and soothed the face, while baking soda’s abrasive qualities helped to remove dead skin cells from the skin.

  • More radiant smiles

    Grandma used her baking soda and honey paste as a secret weapon to keep her smile radiant and lovely. She would use this concoction to softly massage her teeth, and presto! Her grin gained confidence as her teeth got whiter.

  • Calm Insect Nibbles

    When bug bites were a frequent nuisance in the warm summer months, my grandma would use her special concoction. Itching was lessened by applying it to the afflicted regions, and the honey helped relieve skin irritation brought on by bug bites.

  • Adaptability in the Kitchen

    This wonderful concoction was used for more than just cosmetic and health reasons. My grandma also found that it could be used in cooking! Occasionally, she would include it in recipes to control the acidity or to give some foods a little sweet and salty taste. It was really a very adaptable component.

  • Medical Treatments

    This mixture has also historically been used as a homemade treatment for mild illnesses. Little burns or wounds can be healed with the help of baking soda’s calming powers and honey’s antibacterial qualities.

In conclusion, the method my grandmother used to combine honey with baking soda was a wealth of information that was passed down through the generations. It’s a natural cure with many applications in health, beauty, and even culinary. It is advisable to seek medical advice from a specialist before use this mixture frequently, particularly if you already have any health concerns. The knowledge of past generations still serves as an inspiration for easy-to-use solutions that improve our everyday health.

Method By: Wellness Tips

12 Common Mistakes When Cooking Vegetables

12 Common Mistakes When Cooking Vegetable & How to Fix Them

Here’s a look at some common mistakes and how to correct them, ensuring your vegetable dishes are as healthy as they are flavorful

  • Overcooking: Cooking vegetables for too long can deplete vitamins and minerals. Fix: Steam or blanch vegetables until they’re just tender.
  • Boiling: Boiling can cause water-soluble nutrients like vitamin C and B vitamins to leach into the water. Fix: Opt for steaming or sautéing instead.
  • Not Using the Cooking Water: If you do boil vegetables, you’re leaving nutrients in the water. Fix: Reuse the water in soups or sauces to recapture those lost nutrients.
  • Peeling Too Much: Many nutrients are found in the skin or just beneath it. Fix: Clean vegetables thoroughly instead of peeling them.
  • Cooking with Too Much Fat: Adding too much butter or oil can add unnecessary calories. Fix: Use herbs, spices, or a bit of broth to flavor your veggies instead.
  • Using High Heat: Cooking at high temperatures can destroy certain nutrients. Fix: Cook vegetables at lower temperatures when possible.
  • Not Varying Cooking Methods: Different methods can enhance different nutrients. Fix: Rotate between steaming, roasting, and raw preparations to keep meals interesting and nutritious.
  • Skipping the Seasoning: Vegetables can be bland on their own. Fix: Use a variety of herbs and spices to enhance their natural flavors without adding excess salt or fat.
  • Ignoring Frozen Vegetables: Frozen vegetables are often dismissed as less nutritious. Fix: Use frozen veggies when fresh aren’t available; they’re flash-frozen at peak ripeness to lock in nutrients.
  • Failing to Pair with Fat: Some vitamins are fat-soluble, meaning they require fat to be absorbed by the body. Fix: Include a healthy fat source, like olive oil or avocados, when eating veggies to maximize nutrient absorption.
  • Cooking All Vegetables the Same Way: Different vegetables benefit from different cooking methods. Fix: Research the best way to cook each type to preserve or enhance nutrient content.
  • Forgetting to Preheat the Pan: Adding vegetables to a cold pan can lead to uneven cooking. Fix: Preheat your pan to ensure vegetables cook quickly and evenly, retaining their texture and nutrients.


By adjusting how you cook your vegetables, you can enhance both their nutritional value and their taste, making your meals healthier and more enjoyable. Remember, the goal is to preserve the vibrant colors, textures, and flavors of your vegetables while keeping their nutrients intact. Happy cooking!