Banana and Yogurt

Banana and Yogurt! 🍌 A Dish You Can’t Get Tired Of! A Real Treat in Minutes

Are you looking for a tasty, nutritious, and time-saving snack or dessert? Yogurt and bananas make the ideal combo that you can prepare in a matter of minutes! Nutritious and flavorful, this recipe is simple yet fulfilling since it has sweet bananas and creamy yogurt. It’s a delightful delicacy that’s perfect for breakfast, a snack, or dessert and is sure to rejuvenate you.

Ingredients:

  1. 1 ripe banana
  2. 1 cup plain or Greek yogurt (unsweetened)
  3. 1 teaspoon honey (optional, avoid sugar)
  4. A pinch of cinnamon (optional)
  5. A handful of granola or nuts (optional for crunch)

METHOD:

Directions: Cut the banana into bite-sized pieces by slicing the peel off.

Mix with Yogurt.
Place the Greek or plain yogurt in a bowl. Place the banana slices on top and stir gently.

Enhance taste: To intensify the taste, put a little cinnamon on top and drizzle with honey, if desired. For texture, add a handful of chopped nuts or granola if you want a little crunch.

Assist
Savor your yogurt and banana delight right away! It’s ideal as a nutritious dessert, snack, or even a light breakfast.

Reasons to Love This Dish:
nourishing: This combination is a nutritional powerhouse, full of protein from the yogurt and potassium from the banana.

Digestive Health: The bacteria in yogurt assist to maintain gut health, while the high fiber content of bananas aids with digestion.

Filling and Satisfying: You won’t need to add manufactured sugar because of the natural sweetness and creaminess that keep you feeling full.

Ideas for Personalization:
Add Berries: Add some strawberries or blueberries for an added antioxidant boost and a splash of color.

Chia Seeds: A little pinch of chia seeds will increase the amount of fiber and omega-3 fatty acids.

Cocoa Powder: Sprinkle some unsweetened cocoa powder on top if you’re in the mood for something chocolaty.

Last Words
Yogurt and bananas make a simple, wholesome, and filling meal that can be enjoyed at any time of day. You won’t get bored of this delicacy because of its smooth texture, inherent sweetness, and many personalization possibilities!

Nail Fungus Removal

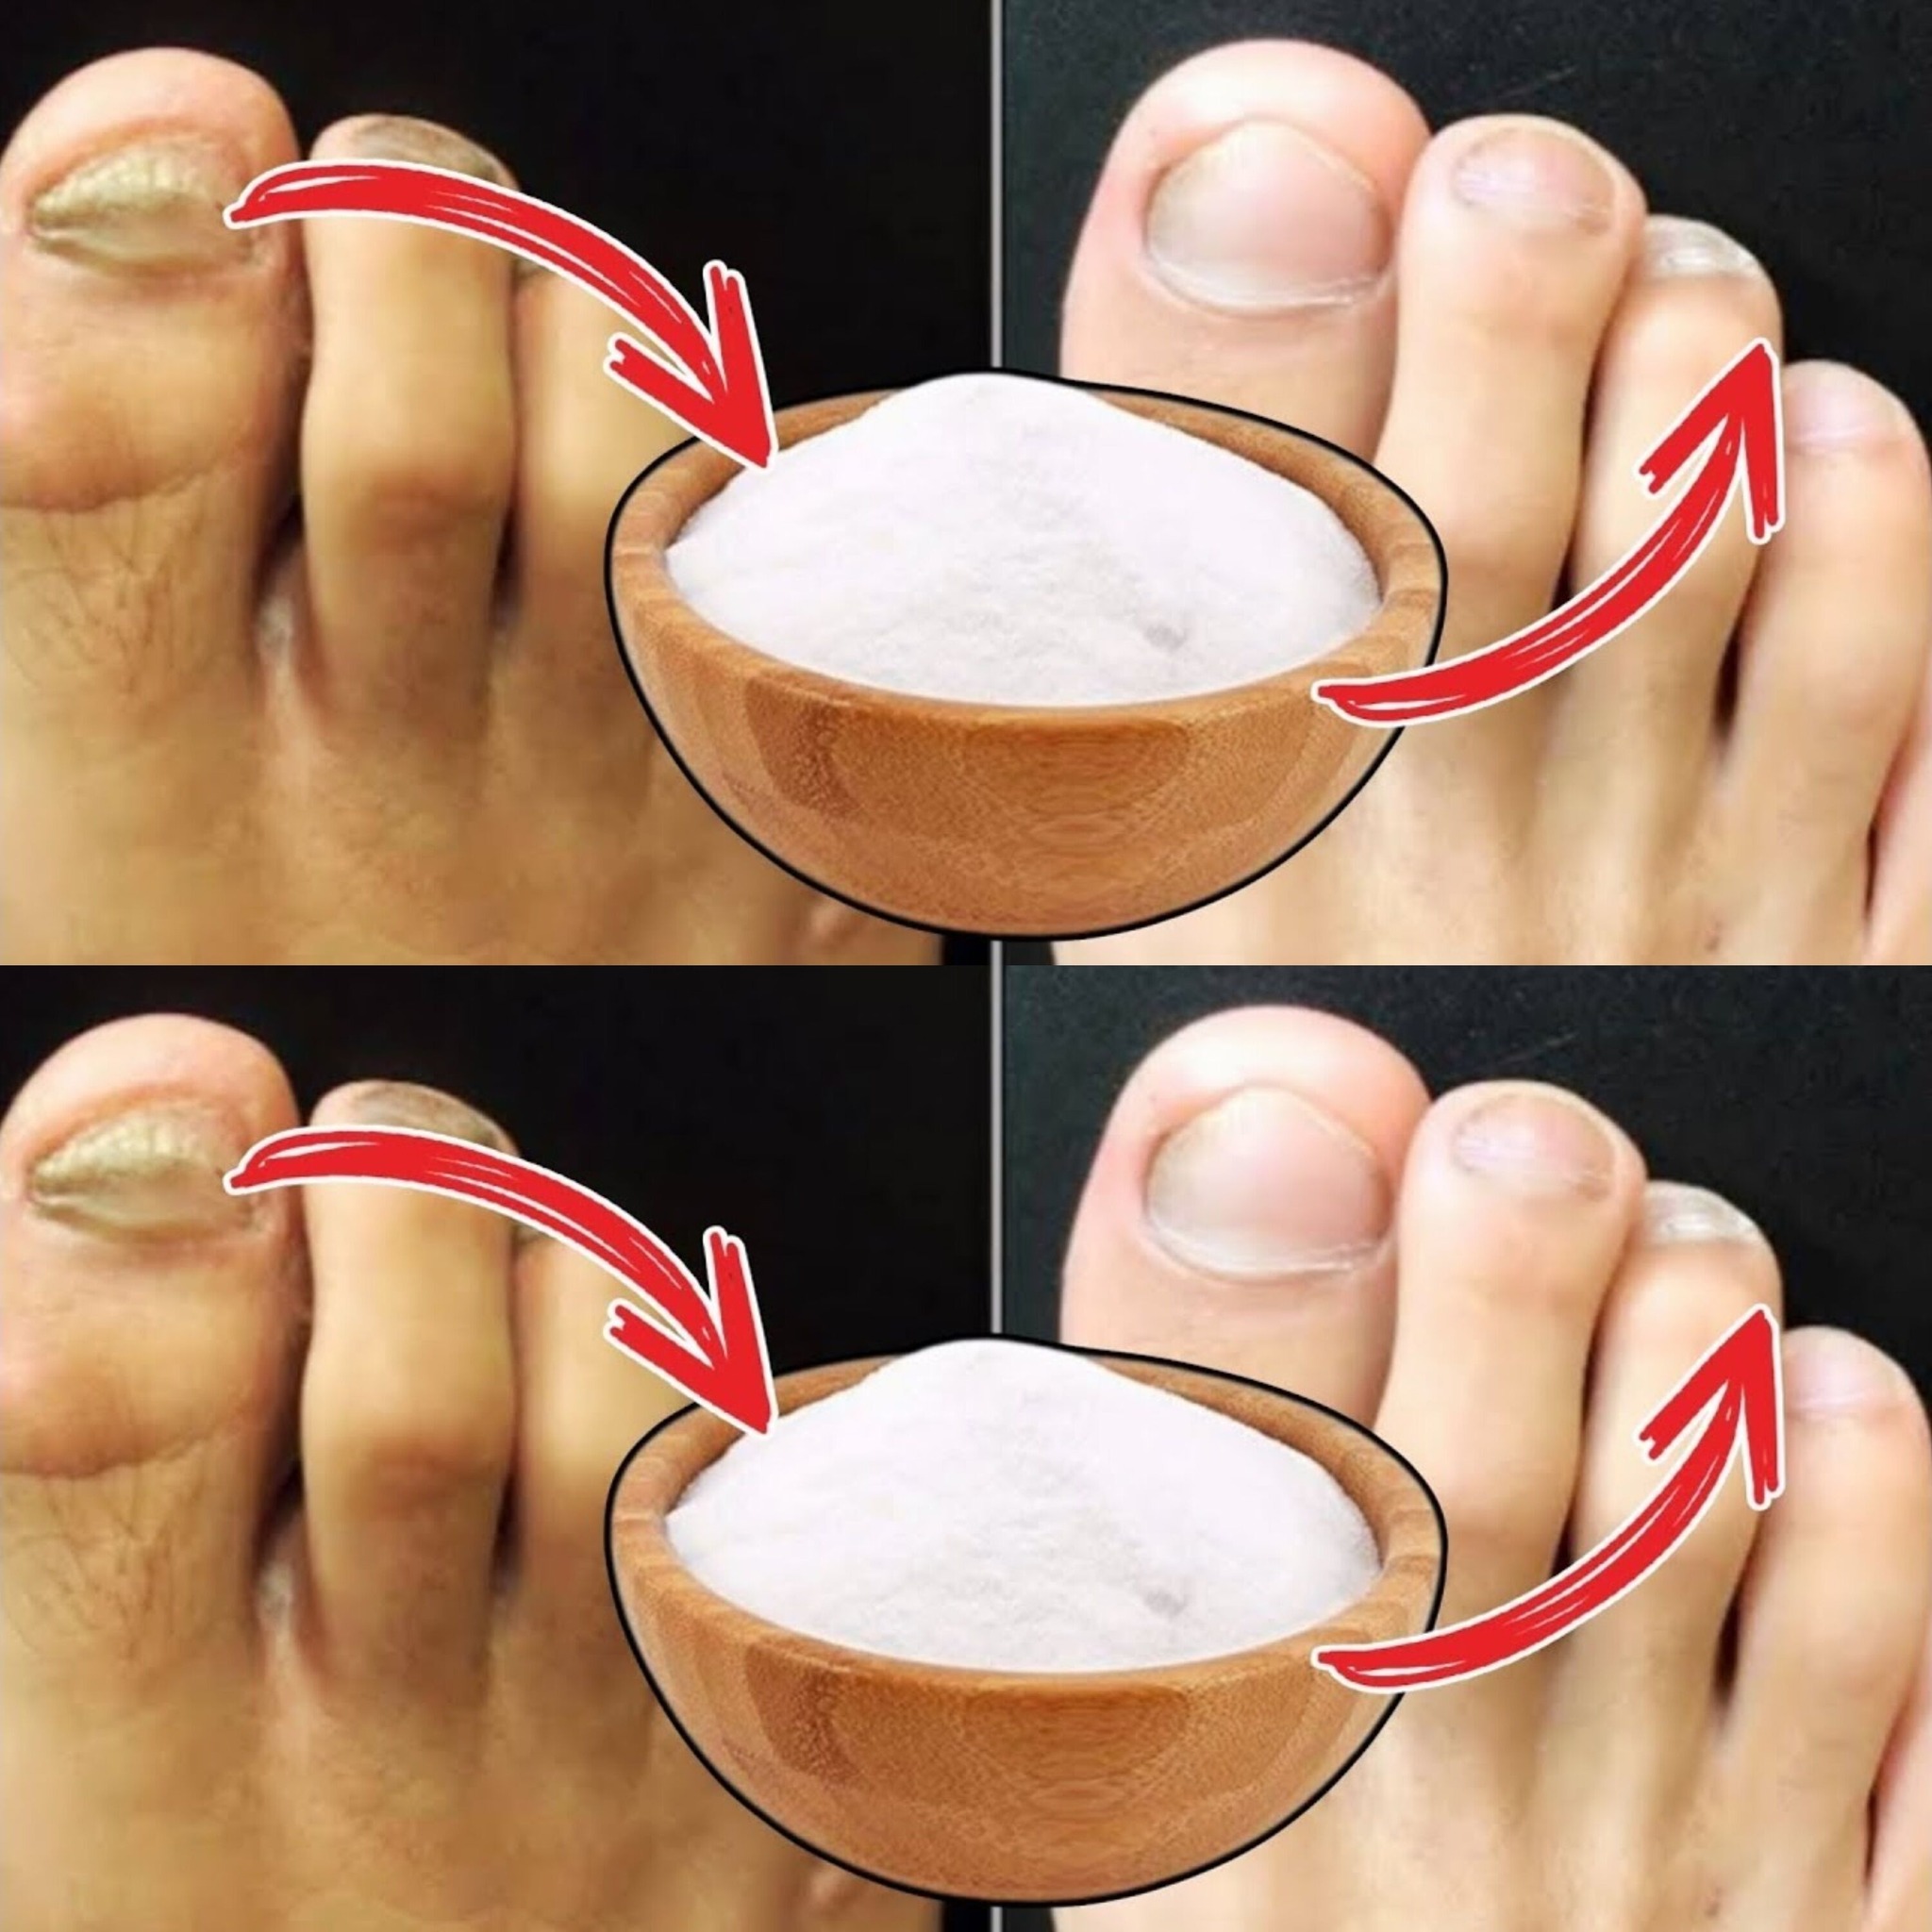
Nail Fungus Removal: 100% Natural Treatment for Toenail Fungus Using Baking Soda

Onychomycosis, or toenail fungus, may be difficult to treat and recover slowly. Because it is alkaline and has antifungal characteristics, baking soda is a common home ingredient that may be used as a strong natural cure. By drying out the afflicted regions and stopping more fungal development, it helps neutralize acidic situations where fungus flourishes. Here’s how to cure toenail fungus with baking soda—a completely natural remedy.
The Benefits of Baking Soda
Antifungal Characteristics: Baking soda increases pH and dries out moisture, which fungi need to exist, making the environment unfavorable for their development.

Deodorizing Effect: It also aids in odor absorption, which makes it very helpful for toenail fungus that produces unpleasant odors.

Baking soda is a mild exfoliant that keeps the region tidy and removes dead skin cells.

How to Treat Toenail Fungus with Baking Soda
Baking soda may be used in the following ways to treat toenail fungus:
Method 1: Making Paste with Soda

This paste helps efficiently target the fungus and is simple to apply straight to the infected toenails.

Ingredients:

  • two baking soda teaspoons
  • A few of water droplets
  • A little bowl

Guidelines:

Prepare the Paste:

In a bowl, mix the baking soda with a little amount of water to make a thick paste.

Put the Paste in Place:

Apply the paste directly to the impacted toenails and the surrounding region with your fingertips or a cotton swab.

If at all possible, be careful to cover the nail bed and the area under the nail.

Allow it to Sit:

Give the nail paste ten to fifteen minutes to cure.

Wash and Pat Dry:

Once the paste has set, carefully dry your feet and nails and rinse it off with warm water.

Again:

Apply this treatment twice a day until the infection starts to get better; depending on how bad it is, this might take a few weeks.

Method 2: Soda Foot Soak Baked
Soothing numerous toenails at once and preventing the fungus from spreading is possible with a foot bath.

Add ins: half a cup of baking soda

four cups warm water

A sink big enough to submerge your feet

Guidelines:

Get the Soak Ready:

Dissolve 1/2 cup baking soda in 4 cups warm water in a basin.

Allow Your Feet to Soak:

For fifteen to twenty minutes, soak your feet in the mixture. Ensure that the impacted toenails are completely immersed.

Wash and Pat Dry:

Rinse your feet well with clean water after soaking, being sure to completely dry the area around your toes and nails.

Again:

Once a day is the ideal time to repeat this bath. Two times a day, you may soak your feet to treat severe infections.

Method 3: Combining Baking Soda and Vinegar
When coupled with baking soda, vinegar—especially apple cider vinegar—is a well-known antifungal ingredient that improves the efficacy of the therapy.

Add ins: half a cup of baking soda

One cup white vinegar or apple cider vinegar

four cups warm water

Guidelines:

Get the Soak Ready:

Combine the vinegar and the warm water in a big bowl. Incorporate the baking soda into the blend.

Allow Your Feet to Soak:

Spend 15 to 20 minutes soaking your feet in the mixture.

Wash and Pat Dry:

After soaking, carefully dry and rinse your feet with clean water.

Again:

For optimal results, use this treatment once a day.

Additional Advice: Dry Your Feet: Since fungus likes damp conditions, keep your feet clean and dry. Regularly change your socks and stay away from moisture-retaining, tight-fitting shoes.

Cut Your Nails: To maintain your nails neat and short, cut them often. However, take care not to cut too near to the skin or nail bed to prevent discomfort.

Use Antifungal Powder: To stop fungus from forming in your shoes, add some baking soda or antifungal powder inside if they get wet or sweaty a lot.

Prevention: It’s all about consistency: It’s crucial to use natural therapies consistently and with patience since they might take some time to show results. It can take many weeks before you start to see results.

Speak with a Physician: It’s crucial to speak with a healthcare provider for more sophisticated treatment choices if the fungus continues or becomes worse, or if you have underlying medical conditions like diabetes.

Concluding Remarks: Treating toenail fungus naturally, simply, and effectively involves using baking soda. By using baking soda regularly, you may help dry up the fungus, stop it from growing, and eventually get your nails back to normal. To restore strong, healthy nails and fight toenail fungus naturally, try one of these techniques!


Spinach and Avocado Grilled Cheese

Spinach and Avocado Grilled Cheese A tasty and wholesome take on the traditional grilled cheese sandwich is this spinach and avocado grilled cheese. This is the ideal fast and simple dinner because of the delicious taste and texture that the creamy avocado and fresh spinach bring.

Ingredients For Spinach and Avocado Grilled Cheese

  • Two pieces of bread
  • Two to three slices of your favorite soft cheese, such as mild white
  • Cheddar, pepper jack, or American
  • Feel free to use half or a full avocado. 1/2-1
  • Six to ten fresh spinach leaves
  • Butter, as required

Instructions For Spinach and Avocado Grilled Cheese

  • While the spinach leaves are rinsing and patting dry, slice the avocado and cheese.
  • Place the two pieces of bread out. On one piece of bread, equally distribute the avocado slices.
  • Top the avocado with the spinach leaves.
  • Place the cheese slices on top of the spinach.
  • To seal the sandwich, place the second piece of bread on top.
  • Dredge the bread pieces in plenty of butter on their outsides.
  • A griddle or skillet should be heated to medium heat. Sandwich should be placed into the heated skillet.
  • Cook for 3–4 minutes on each side, or until the cheese has melted and the bread is golden brown.
  • Before slicing it in half, remove the sandwich from the griddle and let it a minute to rest.

A delicious blend of melty cheese, fresh spinach, and creamy avocado are all encased in crispy, buttery bread in this spinach and avocado grilled cheese. This fast and simple dish gives the traditional grilled cheese a healthier makeover. Savor this mouthwatering sandwich for a light supper or lunch!

Spinach and Egg Skillet with Cheese

Spinach and Egg Skillet with Cheese

Simple ingredients recognized for their health advantages and ability to help balance blood sugar levels are combined to create this nutrient-dense spinach and egg skillet meal. Rich in fiber, protein, and good fats, this food is not only tasty but also a nutritional gem for those who are controlling their blood sugar.

Ingredients:

  • Fresh spinach leaves (a handful or as desired)
  • 2-3 eggs (depending on your preference)
  • 1/2 cup shredded cheese (cheddar or your choice of similar variety)
  • 1 onion, finely chopped
  • Salt and pepper, to taste
  • Olive oil or butter for cooking

Instructions:
Prepare the spinach.

  • Thoroughly rinse the spinach leaves to get rid of any grit or debris. After draining, put away.
  • To cook the onion, melt some butter or a tiny quantity of olive oil in a pan over medium heat.
  • To the skillet, add the chopped onions. Sauté the onions for five to seven minutes, or until they are transparent and beginning to become golden.
  • Add the Spinach: Include the onions in a pan with some fresh spinach leaves. Simmer for 2 to 3 minutes, or until the spinach has wilted. Stirring often helps to blend the tastes.
  • Cook the Eggs: Make tiny wells in the combination of onions and spinach, then break one egg into each well. Add pepper and salt for seasoning.
  • After the eggs are cooked to your preferred doneness, cover the pan with a lid. Cook for roughly 3 to 5 minutes for set whites and runny yolks to form.
  • Add Cheese: After the eggs are almost done, top the spinach and eggs with the shredded cheese. To let the cheese melt, cover the pan once more for approximately a minute.
  • Serving: Take the pan off the burner as soon as the cheese is bubbling and melted. Serve hot straight out of the pan for a filling breakfast or a healthy dinner at any time of day.
  • Nutritional Benefits: Iron and potassium, which are abundant in spinach, are great for regulating blood pressure and blood health.
  • High-quality fats and proteins found in eggs may help control blood sugar levels and appetite.
  • Cheese improves the taste and nutritional content of the meal by adding calcium and extra protein.
  • Savor this easy-to-make, delicious, and health-promoting dish that helps with blood sugar control!

Miracle Seeds That Prevent Blood Clots and Heart Attacks!

A number of seeds have nutrients and chemicals that improve heart health, lessen blood clotting, reduce inflammation, and lower the risk of heart attacks and strokes. These are a few “miracle” seeds that are very effective in boosting cardiovascular health and warding off dangerous diseases.

First, Chia Seeds
Chia seeds are high in antioxidants, fiber, and omega-3 fatty acids, all of which support heart health. In addition to lowering cholesterol and decreasing inflammation, omega-3 fatty acids can help prevent blood clots and minimize the risk of heart disease.
How They Help: While omega-3s protect blood vessels and lower clotting, the high fiber content helps control blood pressure and cholesterol.

How to Use: Soak chia seeds in water to make chia pudding, or add them to smoothies, salads, or yogurt.

2. Nuts of Flax
Another great source of omega-3 fatty acids is flax seeds, particularly alpha-linolenic acid (ALA), which has been linked to a lower risk of heart disease. Additionally, lignans, which have antioxidant qualities and promote cardiovascular health, are abundant in these seeds.

How They Help: Flax seeds help lower blood pressure, raise cholesterol, and stop blood clots from forming.

Use: Ground flax seeds are more easily absorbed. When you want to add even more heart-healthy nutrients to baked goods, cereal, or smoothies, add them.

3. Seeds of Hemp
Omega-3 and omega-6 fatty acids, which support heart health and lower the risk of blood clots, are abundant in hemp seeds. Gamma-linolenic acid (GLA), an anti-inflammatory substance that promotes vascular health, is also present in these seeds.
How They Assist: Because hemp seeds decrease bad cholesterol and maintain healthy blood arteries, they may help prevent blood clot development.

How to Use: For a quick and wholesome addition, sprinkle hemp seeds over salads, cereals, or incorporate them into smoothies.

4. Seeds from pumpkins
Magnesium, which is abundant in pumpkin seeds, is essential for controlling blood pressure and avoiding blood clots. They also provide fiber, antioxidants, and good fats that support heart health.

How They Help: Magnesium promotes blood vessel dilatation and aids in the prevention of arterial clots, both of which may result in strokes or heart attacks.

How to Use: You may eat pumpkin seeds as a snack or use them into trail mixes, salads, and porridge.

5. Sunflower Seeds
Rich in unsaturated lipids, sesame seeds also contain sesamol, an antioxidant that lowers inflammation and inhibits the build-up of blood clots, protecting the heart.

How They can: By decreasing blood pressure, cholesterol, and inflammatory levels, sesame seeds can minimize the risk of blood clots.

How to Use It: Use sesame oil in cooking or as a garnish for salads and stir-fries.

6. Seeds of sunflowers
Vitamin E, an antioxidant that helps reduce oxidative stress, which may damage blood vessels and raise the risk of blood clots, is abundant in sunflower seeds. They also provide fiber and good fats that support heart health.

Use Castor Oil, but NEVER Make These 12 Mistakes

Although castor oil is well recognized for its amazing advantages for skin, hair, and general health, improper use might have unfavorable effects. To make sure you get the most out of this potent natural oil, there are a few common errors you should avoid when using castor oil for hair growth, skin care, or other cures. These are the top 12 castor oil blunders you should never make.

1. Excessive Use of Oil
If castor oil is used extensively, it might be hard to remove due to its thickness. When applying to the skin or for hair treatments, always start small. A little amount goes a long way, and excessive use may block pores or leave your hair oily.

2. Not Watering It Down
In particular, pure castor oil may be quite thick and difficult to distribute when used for hair treatments. It is recommended to dilute it with a lighter oil like as jojoba, coconut, or olive oil. This facilitates even application and facilitates washing off.

3. Using the Scalp Directly Without a Patch Test
Castor oil sensitivity or allergy may occur in some persons. Always do a patch test before putting it on your skin or scalp. Use a little quantity on a skin area (such as your wrist) and observe any response for a whole day.

4. Leaving It Too Long in the Hair
Although it could be tempting to leave castor oil in your hair overnight, doing so sometimes might lead to buildup or irritation of the scalp. If you’re a first-time user, consider using it for a few hours before washing it off. You may progressively extend the duration if your scalp allows it.

5. Making Daily Use of It
Overuse of castor oil may block pores or hair follicles, resulting in problems like acne or thinning hair. To avoid accumulation, use castor oil just once or twice a week for hair treatments. Use sparingly and as required on skin.

6. Not Thoroughly Cleaning It Out
Because castor oil is viscous, improper washing may make it difficult to remove. Make sure your hair is completely free of oil by using a clarifying shampoo. Your hair may get oily and thick if you don’t rinse it well.

7. Applying Castor Oil to Skin That Is Broken or Irritated
On regions of skin that are very sensitive, such as wounds or rashes, do not use castor oil immediately. Open wounds may become uncomfortable and aggravated by castor oil. Do not use it until the skin has healed.

8. Using Carelessly on Oily or Acne-Prone Skin
Applying castor oil straight to oily or acne-prone skin might sometimes make outbreaks worse, even though it can help balance skin. Make sure your skin is fresh and clean before applying, and use it sparingly. To avoid clogging pores, you may wish to combine it with a non-comedogenic oil.

9. Ignoring Adverse Reactions
Stop taking castor oil right away if you have discomfort, rashes, or hair loss. Not everyone reacts to castor oil in the same manner, so it’s important to pay attention to your body’s cues.

10. Applying Castor Oil Topically
Sometimes castor oil is used to alleviate dry eyes, but for safety reasons, it has to be cold-pressed and hexane-free. Never put non-pure or cosmetic-grade castor oil in your eyes as this might irritate or harm them. Before taking castor oil for eye-related therapies, always get medical advice.

11. Anticipating immediate outcomes
Particularly for promoting hair development or enhancing skin structure, castor oil acts gradually. Don’t give up if you don’t get results right away. To see noticeable effects, persistent usage for weeks or even months may be necessary. Try not to abuse it in an effort to expedite the procedure; instead, exercise patience.

12. Not Considering Hair Type
For those with dry or curly hair, castor oil works best since it has a rich moisture content. It should be used with caution, however, since it may weigh down and make hair seem greasy, especially on individuals with thin or oily hair. Think about combining castor oil with a lighter oil, such as almond or argan, if you have fine hair.

In summary
Although castor oil has many benefits for skin, hair, and general health, it must be used responsibly. You may maximize the advantages of castor oil without running the risk of discomfort, blocked pores, or unintended side effects by avoiding these 12 frequent blunders. Be mindful of your body’s response, dilute the oil when necessary, and use it in moderation for the best results

Miracle Seeds That Prevent Blood Clots and Heart Attacks

Miracle Seeds That Prevent Blood Clots and Heart Attacks

A number of seeds have nutrients and chemicals that improve heart health, lessen blood clotting, reduce inflammation, and lower the risk of heart attacks and strokes. These are a few “miracle” seeds that are extremely effective at boosting cardiovascular health and warding off dangerous diseases.

First, Chia Seeds

  • Chia seeds are high in antioxidants, fiber, and omega-3 fatty acids, all of which support heart health. In addition to lowering cholesterol and reducing inflammation, omega-3 fatty acids can help prevent blood clots and minimize the risk of heart disease.
  • How They Help: While omega-3s protect blood vessels and lower clotting, the high fiber content helps control blood pressure and cholesterol.
  • How to Use: Soak chia seeds in water to make chia pudding, or add them to smoothies, salads, or yogurt.

2. Nuts of Flax

  • Another great source of omega-3 fatty acids is flax seeds, particularly alpha-linolenic acid (ALA), which has been linked to a lower risk of heart disease. Additionally, lignans, which have antioxidant qualities and promote cardiovascular health, are abundant in these seeds.
  • How They Help: Flax seeds help lower blood pressure, raise cholesterol, and stop blood clots from forming.
  • Use: Ground flax seeds are more easily absorbed. When you want to add even more heart-healthy nutrients to baked goods, cereal, or smoothies, add them.

3. Seeds of Hemp

  • Omega-3 and omega-6 fatty acids, which support heart health and lower the risk of blood clots, are abundant in hemp seeds. Gamma-linolenic acid (GLA), an anti-inflammatory substance that promotes vascular health, is also present in these seeds.
  • How They Help: By maintaining healthy blood arteries and lowering harmful cholesterol, hemp seeds can help prevent blood clot development.
  • How to Use: For a quick and wholesome addition, sprinkle hemp seeds on salads, cereals, or incorporate them into smoothies.

4. Seeds from pumpkins

  • Magnesium, which is abundant in pumpkin seeds, is essential for controlling blood pressure and avoiding blood clots. They also provide fiber, antioxidants, and good fats that support heart health.
  • How They Help: Magnesium promotes blood vessel dilatation and aids in the prevention of arterial clots, both of which can result in strokes or heart attacks.
  • How to Use: You may eat pumpkin seeds as a snack or use them into trail mixes, salads, and porridge.

5. Sunflower Seeds

  • Rich in unsaturated lipids, sesame seeds also contain sesame, an antioxidant that lowers inflammation and inhibits the formation of blood clots, protecting the heart.
  • How They can: By lowering blood pressure, cholesterol, and inflammatory levels, sesame seeds can minimize the risk of blood clots.
  • How to Use It: Use sesame oil in cooking or as a garnish for salads and stir-fries.

6. Seeds of sunflowers

  • Vitamin E, an antioxidant that helps reduce oxidative stress, which can damage blood vessels and raise the risk of blood clots, is abundant in sunflower seeds. They also have fiber and good fats that support heart health.
  • How They Help: Sunflower seeds’ vitamin E keeps blood arteries flexible, which lowers the risk of blood clot development.
  • How to Use: For a crunchy, heart-healthy snack, mix sunflower seeds into salads, yogurt, or homemade granola.

7. Nigella sativa, or black cumin seeds

  • For generations, black cumin seeds have been utilized in traditional medicine due to their well-known therapeutic qualities. Their heart-protecting qualities stem from their anti-inflammatory and antioxidant-rich composition.
  • How They Help: Blood clots and the risk of heart disease are prevented by black cumin seeds’ ability to reduce inflammation, lower cholesterol, and enhance blood flow.
  • How to Use: You can eat whole black cumin seeds or grind them up and sprinkle them on food or add them to tea or smoothies.

Last Words

  • You can easily prevent blood clots, safeguard your heart, and improve your cardiovascular health by including these “miracle” seeds in your regular diet. These nutrient-dense seeds can significantly reduce the risk of heart attacks and enhance long-term heart health when added to smoothies, salads, or snacks.

Put 1 Rosemary on the Back of Your Neck

Put 1 Rosemary on the Back of Your Neck and Stop Spending Money at the Pharmacy

Rosemary offers surprising health advantages, especially when applied topically, and is not only a tasty culinary plant. A rosemary sprig placed on the back of your neck may help reduce tension, headaches, and enhance attention. This is a natural cure that may help you need fewer prescription drugs. Here’s how this easy method operates and why it merits a try.

Why Applying Rosemary on the Neck Is Beneficial

  • Benefits of Aromatherapy: Due to its capacity to relax tension, promote mental clarity, and lessen stress, rosemary has long been utilized in aromatherapy. You may feel the calming effects of the oils directly near your head by placing it on the back of your neck, which allows the oils to diffuse their calming aroma there.
  • Enhances Circulation: Rosemary, especially when applied to places like the neck, encourages blood flow. Increased circulation helps ease tense headaches and relax tense muscles.
  • Reduces Stress and Anxiety: Studies have found that the aroma of rosemary reduces cortisol levels, the hormone that causes stress. Simplifying the process to place a sprig on your neck may help you feel calmer and less anxious.

How to Use Natural Relief with Rosemary

What You’ll require:

  1. A fresh rosemary sprig
  2. A tiny piece of cloth or bandana to secure it

Guidelines:

  • Locate fresh rosemary. To release its natural oils, gently massage a small sprig of fresh rosemary between your fingers.
  • Put it on your neck: Lay the sprig across the area where you might experience stress on the back of your neck.
  • Tighten with a cloth: To ensure that the rosemary rests gently on your neck, tie it in place with a bandana or other soft material. Wear it for thirty to sixty minutes, or until its calming effects become apparent.

Advantages You’ll Observe

  • Headache Relief: Rosemary relieves headaches and migraines by easing tension in the muscles surrounding the head and neck.
  • Enhances Mental Clarity and Focus: The aroma of rosemary has the ability to enhance mental clarity and focus, which can facilitate concentration throughout the day.
  • Natural tension Relief: This easy method can naturally lower tension and anxiety without causing any negative side effects. There’s no need to buy over-the-counter stress pills.

A Hands-On, Natural Solution

  • This simple rosemary tip is an inexpensive, non-pharmaceutical method of relieving headaches, tension, and stress. The relaxing and invigorating properties of this potent herb can be felt by placing a small sprig of rosemary on the back of your neck. Try it out and reap the rewards of this age-old cure!

Do Not Throw Away Tangerine Peels

Do Not Throw Away Tangerine Peels. I Don’t Shop at the Pharmacy Anymore.

Peels from tangerines are frequently thrown away carelessly, but did you know that they provide a lot of health benefits? Strong nutrients included in these peels have the ability to strengthen your heart health, enhance digestion, and strengthen your immune system. Tangerine peels can be used in a variety of tasty ways that save you trips to the pharmacy rather than throwing them away. Here are some reasons to hang onto them and some ideas for incorporating them into your everyday life.

Benefits of Tangerine Peels for Health

  • Rich in Antioxidants: Vitamin C and flavonoids, which help shield your body from free radical damage and strengthen your immune system, are abundant in tangerine peels.
  • Supports Digestion: The inherent fibers in tangerine peels have the potential to improve digestion, lessen bloating, and ease indigestion.
  • Promotes Heart Health: Tangerine peels are excellent for heart health because they contain chemicals that can decrease cholesterol and enhance circulation.

How to Apply Peels of Tangerine

  • Here are some quick and tasty ways to use tangerine peels for your health instead of throwing them away.

1. Tea with Tangerine Peel

  • Making a tasty tea is one of the easiest ways to use tangerine peels.

How to Produce It:

  • After peeling the tangerines, either use fresh peels or allow the peels to dry naturally.
  • Add a few pieces of dried or fresh peels to a cup of boiling water.

Give it ten minutes to steep.

  • After straining, savor a delightful tea that improves immunity, facilitates digestion, and leaves you feeling revitalized.

2. Orange Peels Candied

  • Candied tangerine peels are a tasty and nutritious dessert. They are a healthy, natural snack that improves digestion and provides an increase in vitamin C.

How to Produce It:

  • The tangerine peels should be boiled in water until tender.
  • After draining, simmer them in a honey-water syrup.
  • Allow the peels to cool, then savor them as a nutritious, sugary snack!

3. Powdered Tangerine Peel

  • Tangerine peels can be dried and ground into a fine powder for use in cooking or as a garnish for teas and smoothies.

How to Produce It:

  • Use a low-temperature oven or the sun to dry the tangerine peels.
  • Pulverize them and save in a container. For added health benefits, try adding a teaspoon to your yogurt, smoothies, or tea.

The Reasons You Won’t Delete Your Tangerine Peels Again

  • Boosts Immune System: Rich in antioxidants and vitamin C, tangerine peels help fortify your immune system and stave off infections and colds.
  • Enhances Digestive Health: The peel’s fibers lessen bloating, enhance digestion, and strengthen the gut.
  • Natural and Delectable: These easy cures offer a healthy substitute for over-the-counter medications that are both tasty and effective.

A Easy and Healthful Complement to Your Life

  • Given all the advantages tangerine peels provide, there’s no reason to discard them. You may incorporate these peels into your daily routine to feel better naturally, whether it’s through tea or candied goodies. You’ll question why you threw them away in the first place!

Flax Seeds with Rice Face Mask for Skin Whitening

Flax Seeds with Rice Face Mask for Skin Whitening, Brightening, Anti-Aging | Natural Botox

This flax seed and rice face mask is the ideal remedy if you’re searching for a natural way to brighten your skin, minimize wrinkles, and get a youthful glow. This flax seed and rice mixture, sometimes known as “natural Botox,” produces remarkable results by brightening, lightening, and preventing wrinkles. Here’s how to make this easy-to-make yet highly powerful face mask at home.

The Reasons Rice and Flax Seeds Work So Well

  • Flax Seeds: Rich in antioxidants and omega-3 fatty acids, flax seeds assist to hydrate the skin, minimize fine wrinkles, and increase its elasticity. They increase the synthesis of collagen, which tightens the skin and makes wrinkles less noticeable.
  • Rice: Because of its ability to brighten skin and fight aging, rice is a well-known ingredient in skincare products. Ferulic acid and allantoin, which are found in it, assist to lighten dark spots and encourage a more even skin tone. Additionally, rice calms inflamed skin, leaving it glowing and smooth.

How to Prepare a Rice and Flax Seed Face Mask

Components:

  1. One spoonful of flaxseed meal
  2. One tablespoon of finely milled rice, or rice flour
  3. One tablespoon of rosewater or water
  4. One spoonful of honey (additional hydration optional)

Guidelines:

  • process the flax seeds: If you don’t have any already ground, you may use a blender or coffee grinder to process the whole flax seeds into a fine powder.
  • Combine the ingredients: Mix the rice flour, water, and ground flax seeds in a small bowl. To get a smooth paste, thoroughly mix. For additional hydration and anti-inflammatory properties, mix with a teaspoon of honey.
  • Apply the mask: Before using the mask, carefully wash your face. Spread the mixture over your face and neck gently, taking care not to get any in your eyes.
  • Sit down: To enable the nutrients to seep into your skin, keep the mask on for fifteen to twenty minutes. As the mask dries, you’ll notice that it tightens, lifting and firming the skin.
  • Rinse off: To remove the mask, use lukewarm water. After using a gentle towel to pat dry your skin, apply your preferred moisturizer.

Advantages of the Rice and Flax Seed Face Mask

  • Skin Whitening and Brightening: Rice flour helps balance your skin tone and lighten dark spots on the skin, making your complexion appear more radiant and brighter.
  • Anti-Aging: The antioxidants and omega-3 fatty acids in flax seeds and other substances help prevent wrinkles and fine lines, resulting in smooth, youthful skin.
  • Natural Botox Effect: Without the need for chemical treatments, regular application of this mask can help tighten the skin and give you a firmer, lifted appearance.

A Quick Fix for Youthful, Glowing Skin

  • This natural face mask made of rice and flax seed is a simple yet effective way to get skin that looks younger and more radiant. Regular use will result in less wrinkles, brighter skin, and improved skin texture. See for yourself the amazing advantages of rice and flax seeds by attempting this all-natural Botox substitute!