7 natural tips to get rid of mosquitoes in the kitchen

7 natural tips to get rid of mosquitoes in the kitchen

There are a few natural solutions that might help you get rid of mosquitoes in your kitchen fast and efficiently. We’re going to tell you today how to properly and environmentally dispose of them.

Refrain from putting food out in the open:

  • By keeping food out of sight in your kitchen, you may keep mosquitoes away. That is all there is to it. After you’ve eaten, put any leftovers in the fridge and cover them with plastic wrap.
  • Wash dishes as soon as possible since standing dirty dishes in the sink invite insects. Thus, wash the dishes right away and avoid letting them accumulate. To avoid attracting mosquitoes, place all of your dishes in the dishwasher and close it.

Empty Trash Cans Often:

  • Should you choose not to provide Mosquitoes in the room and board; frequently empty garbage cans. A conveniently located garbage can is a mosquito’s dream come true, since they use it to deposit their eggs in addition to finding cover.
  • Make sure your kitchen compost is well-covered and select a garbage can with a lid. Every day, clean and deodorize your garbage can, including the inside and outdoor ones.

Get rid of unhealthy plants:

  • This is a great idea if you cultivate aromatic plants at home, like parsley, chives, or basil! Don’t store them in the kitchen, though, if you see that they start to deteriorate. One of the reasons mosquitoes invade is plant decay.

Keep mosquitoes away from fruit:

  • It’s always pleasant to look at and consume from a lovely fruit basket in the kitchen. But the fruits serve as mosquito magnets. Just put some cloves or garlic next to the fruit to prevent this. These are real insect repellent scents. They may also be used to keep mosquitoes and flies away.

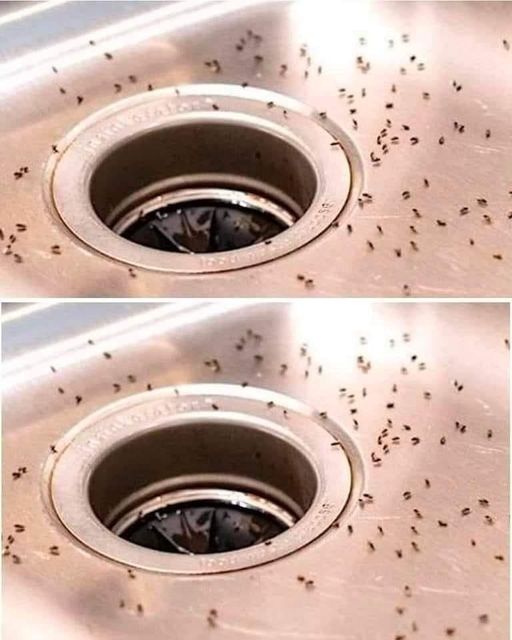
Get rid of mosquitoes in pipes:

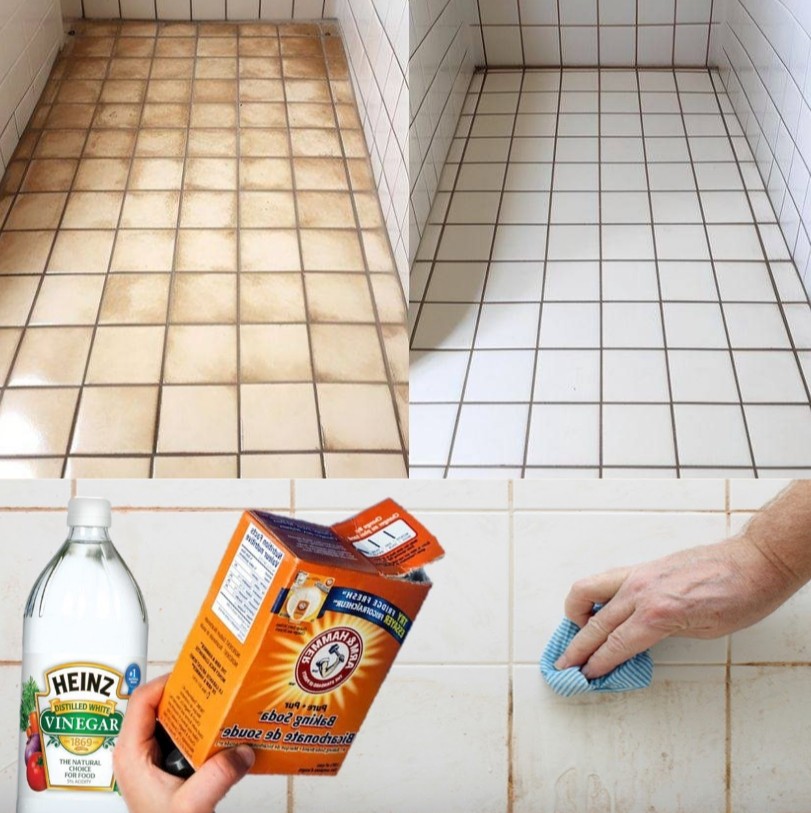
  • Mosquito larvae thrive in humid environments. And where in the home is the humidity the highest? The pipes, naturally! There, mosquitoes proliferate and deposit their eggs. In order to stop mosquitoes from hatching in the future, it is crucial to clean and maintain pipes properly. To clean them, use baking soda and white vinegar.

Make use of dishwashing liquid and white vinegar.

  • We go one step farther with the guidance of this grandma. We are not in the preventative field anymore! I
  • demonstrate how to create a homemade mosquito trap. to murder them—yes, it’s terrible. She pours a few drops of dishwashing liquid to a bowl of white vinegar. Put the bowl in the kitchen in a handy location, such next to the fruit. The mixture’s aroma draws traps and mosquitoes!

How to Clean and Shine Tiles

You should not worry if your tiles are corroded, unclean, and dull. They may be revitalised and restored to their former glory. The best part is that you can accomplish it without the need for pricey chemicals.

It was no secret that my grandma was a tile cleaning pro. I’m going to share a couple of her tried-and-true secrets with you. These techniques are easy to use, efficient, and low-effort.

1. Linseed Oil for Extra Shine

Tiles made of terracotta, cement, and ceramic often tarnish over time. However, linseed oil is a natural substance that can restore their shine. All you have to do is lightly massage the tiles with a clean cloth soaked in a few drops of linseed oil. Use of excessive oil should be avoided as this might cause the floor to become slick. Allow oil to seep into tiles and allow to dry. If necessary, you can reapply it. Your tiles will have an unparalleled sheen!

2. Potato Cooking Water for Grease Removal

Don’t discard the boiling water from potatoes the next time. Use it to clean your tiles instead. Grease and filth are more absorbed off the surface by the starch in the potato water. This technique works very well for keeping your tiles shiny. To keep your tiles appearing pristine, use the potato cooking water once a month.

3. To Get a Natural Clean, Use Black Soap

A multipurpose cleaner, black soap is excellent for parquet flooring, linoleum, and tiles alike. Because it is both a disinfectant and a degreaser, it is ideal for removing filth and grime. To use, combine one litre of water and black soap in a bucket. Take a mop and give every floor a gentle scrub. Your floors will not only be clean, but they’ll also have a beautiful shine that you won’t be able to resist.

4. White Vinegar for Stubborn Stains

Tiles with the most stubborn stains may be cleaned effectively by using white vinegar, a potent natural cleanser. In a spray bottle, combine equal parts white vinegar and water. After applying the solution, let it sit for a few minutes on the regions that are soiled. After that, use a brush or sponge to scrub the spots. Rinse with water, then take a look at your spotless, glossy tiles.

You now know four quick and easy ways to polish and clean your tiles. Bid adieu to expensive chemicals and welcome to miraculously effective natural treatments. See the difference for yourself by putting these strategies to use. Your tiles will be appreciative!


The Amazing Power of Onions

Why not give an age-old cure a try if you’re searching for a natural solution to maintain the health of your prostate and bladder? This easy dish that makes use of the common onion has shown to be helpful and is simple enough to implement into your daily routine. Try grandpa’s ancient cure and see the positive impact it may have on your life.

More than just a tasty addition to your food, onions are a powerhouse of nutrients and chemicals with a long list of health advantages. They are abundant in vitamins, minerals, and antioxidants, and they also have antibacterial and anti-inflammatory qualities. These qualities may be especially beneficial for maintaining the health of your prostate and bladder.

Reduces Inflammation: The potent antioxidant quercetin, which is found in onions, aids in the body’s reduction of inflammation. Onions can help with bladder and prostate pain and other disorders by lowering inflammation.

Supports Urinary Function: Onions’ inherent diuretic qualities encourage normal urine flow and may lower the incidence of UTIs.

Boosts Immune System: Packed with antioxidants like vitamin C, onions help to fortify your immune system. To prevent infections in the bladder and prostate, a robust immune system is necessary.

Ingredients:

  • 1 large onion
  • 1 liter of water
  • Honey (optional, for taste)

This simple onion-based remedy is easy to prepare and can be a great addition to your daily routine.

Instructions:

  1. Peel and cut the onion into tiny pieces to prepare it.
  2.  Boil the Onion: Put a litre of water to the boil in a big saucepan. When the water is boiling, add the diced onion.
  3.  Simmer: Lower the temperature and let the mixture to cook for ten to fifteen minutes. This will let the onion’s healthy chemicals seep into the water.
  4. Strain: After simmering, take the pot off of the hob and let it a little time to cool. To get a clear liquid with onion flavour, drain out the onion chunks using a strainer.
  5. .Add Honey: For extra taste and health advantages, feel free to stir in a teaspoon of honey.
  6. Drink:To help your prostate and bladder stay healthy, have a cup of this onion water once in the morning and once in the evening.

An easy and natural approach to keep your prostate and bladder healthy is to use Grandpa’s old onion treatment. This easy meal with anti-inflammatory, antibacterial, and immune-boosting benefits can help maintain a healthy urinary system. It fits well into your regular schedule and is simple to produce. Try it out and see the advantages for yourself!

Japanese rice mask for Skin Whitening

Japanese rice mask for Skin Whitening

A magic recipe to lighten the skin in a short time

Rice:a staple in Japanese skincare, is celebrated for its remarkable skin-brightening properties. Rich in vitamins B and E, rice aids in cell regeneration and slows down the aging process, making the skin appear more youthful and vibrant. The rice mask works wonders for lightening the skin, reducing the appearance of dark spots, and providing an overall brightening effect.

How to Create Your Own Japanese Rice Mask:

Preparing this magical mask is simple and requires just a few ingredients, most of which you might already have in your kitchen.

  1. Start by soaking two tablespoons of uncooked rice in water until it softens.
  2. Drain the rice, reserving the water, and grind the rice into a fine paste.
  3. Mix this paste with one tablespoon of honey and a little milk until you achieve a smooth, spreadable consistency.

Application for Radiant Results:

  1. Apply the mask to your face and neck, leaving it on for 20 to 30 minutes to allow the nutrients to penetrate deeply into your skin.
  2. Rinse off with the rice water you reserved earlier.
  3. This not only adds an extra boost of vitamins to your skincare routine but also acts as a natural toner, enhancing the skin-whitening effect of the mask.

The Benefits Are More Than Skin Deep:

Regular use of the Japanese rice mask can lead to visible improvements in skin tone and texture. The mask’s natural ingredients work in harmony to moisturize, exfoliate, and brighten the skin, making it look and feel rejuvenated. It’s a gentle yet effective way to achieve a lighter complexion without the harsh chemicals found in commercial whitening products.

In conclusion, the Japanese rice mask is a testament to the power of natural ingredients in achieving beautiful, glowing skin. This easy-to-make, magical recipe is not just a mask; it’s a centuries-old beauty secret that has been passed down through generations, allowing anyone to experience the luminous, even-toned complexion that is so admired in Japanese beauty culture. So, why not give it a try and see the transformative power of rice on your skin?

Combat Blood Sugar Drops with This Culinary Gem

Combat Blood Sugar Drops with This Culinary Gem

COMPOSITION

  1. 400 grams of shredded cabbage: Packed full of fiber and important minerals, cabbage is a vegetable with a low calorie count. Because of its high fiber content, it helps the blood absorb glucose gradually, which is essential for regulating blood sugar levels.
  2. One large onion, chopped finely: Known for their strong taste, onions contain a variety of sulfur-containing chemicals that combine to improve insulin sensitivity. These substances help to maintain metabolic balance by regulating blood sugar levels by increasing cellular glucose consumption.
  3. Three minced garlic cloves: Although garlic is known for its unique flavor and scent, its cloves also include a powerful ally against blood sugar swings. Garlic contains a chemical called allicin, which is rich in potential applications. lowering blood sugar by the reduction of insulin resistance and enhancement of insulin sensitivity.
  4. Seven medium-sized mushrooms, cut thinly: Though low in carbohydrates, mushrooms are high in fiber and antioxidants, making them strong competitors in the fight to control blood sugar. Their fiber-rich content and antioxidant capabilities work together to control blood sugar levels and improve insulin sensitivity.
  5. One finely chopped bell pepper Bright bell peppers, a veritable gold mine of vitamin C, become essential partners in the fight against unstable blood sugar. Bell peppers are high in vitamin C, which has a beneficial effect on blood sugar management and improves insulin sensitivity. Furthermore, bell peppers’ natural fiber content inhibits the absorption of glucose, reinforcing their function in preserving metabolic balance.
  6. Three ripe, quartered tomatoes: Tomatoes, which are practically stores of the powerful antioxidant lycopene, become heroes when it comes to blood sugar regulation. Tomatoes are a rich source of lycopene, which has the ability to reduce blood sugar levels by reducing inflammation and improving insulin resistance. This provides a strong defense against blood sugar swings.

DIRECTIONS

  • First, heat a nonstick skillet over medium heat. fire, preparing the palate for a gastronomic symphony. Carefully add the shredded cabbage to the skillet and let it soak up the heat. Stir occasionally to gently cook the cabbage until it reaches a soft succulence, about 5 minutes.
  • Gently stir the chopped onion into the pan so that it becomes part of the blending mixture. Let the onion cook until it develops a translucent layer, which is a sign that it is becoming soft. This usually takes about 3 minutes.
  • Add some minced garlic to the skillet to give it an aromatic touch that will make the meal taste even better. Gently stir the garlic until it releases its aromatic essence; this should take about one to two minutes.
  • Present the Sliced mushrooms were added to the skillet so they could participate in the cooking show. Stir the mushrooms to release their moisture and turn golden, which will take around 5 to 7 minutes. This will provide a deep earthiness to the dish.
  • Add the chopped bell pepper to the skillet with a flourish to bring some color and freshness to the whole dish. The bell pepper will get somewhat softer after 3–4 minutes of sautéing, which will improve its texture and appearance.
  • Once the tomatoes are quartered and added to the skillet, the flavor profile will finally come together with bright acidity and juicy sweetness. After around five minutes of simmering and softening, gently squeeze the tomatoes to release their delicious juices. giving the food a mouthwatering taste explosion.
  • Apply a light touch of salt and pepper to the mélange to create a flavorful symphony that dances on the tongue.
  • Taste and adjust the seasoning to get a pleasing harmony of tastes that satisfies the palate.
  • When the veggies are soft and have come together in a harmonious blend of flavors, turn the skillet off the heat and serve. This marks the completion of this culinary masterpiece. Present the meal hot so that excited guests may enjoy every delicious bite of this culinary marvel.

The Secret Health Bomb: Sharp Green Pepper Infused Water

The Secret Health Bomb: Sharp Green Pepper Infused Water

Did you know that you can utilize a basic household object, like a bottle, to make a drink that would improve your health? You may produce an infused water that is high in taste and health benefits by using sharp green peppers. Here’s a quick recipe for this colorful mixture, which is well-known for its ability to energize and offer a number of health advantages.

1. CHOOSING YOUR TEAMS
For optimal results, use sharp, fresh green peppers. The abundance of vitamins A and C in these peppers is great for strengthening immunity and preserving skin health. Verify that the peppers are spotless and unblemished.

2. GETTING THE INFUSION READY
You’ll need a dry, clean bottle; glass is better because it doesn’t hold chemicals or smells.

from earlier applications. If you want a less spicy infusion, finely slice your green peppers and remove the seeds. If you want an additional kick, feel free to remove the seeds and membranes!

3. PUDDING INTO THE WATER
After adding the chopped peppers to the bottle, top it over with cool, fresh water. Slices of pepper can be slightly crushed or bruised before being added to the water for a stronger infusion. More of their oils and tastes are released into the infusion as a result.

4. PERMITTING IT TO STAY
After sealing the bottle, leave it either in the refrigerated overnight or at room temperature for approximately one hour. This enables the peppers’ tastes and nutrients to completely combine with the water.

5. Savoring your infusion of water after

The spicy green pepper water is ready to be savored after the infusion period. You can drink it all day long. Because capsaicin in peppers is known to increase metabolic rate, it is not only refreshing but also provides a metabolism boost.

FINAL VERDICT
A straightforward yet efficient method to infuse your water with flavor and get the health benefits of green peppers is to use sharp green peppers. This beverage is a great method to arouse your taste buds and might be your hidden health tool. Try it and discover what a difference a bottle and some peppers can make in your everyday routine!

Uncover the Stunning Advantages of Boiling Bananas: An Easy and Tasty Recipe

Uncover the Stunning Advantages of Boiling Bananas: An Easy and Tasty Recipe

Boiled bananas are a fast, healthful, and delightfully tasty treat that’s sure to please. Without using any additional sugar, this easy dish highlights the sweetness and richness of bananas. It’s the ideal meal to have as a satisfying dessert or a healthy snack that will quickly become a family favorite.

Why Are Bananas Boiled?

Boiling bananas is a great method to take advantage of their many health advantages and savor their natural tastes. Because of their high vitamin, mineral, and fiber content, bananas are a great addition to any diet. They get much softer and sweeter when boiled, making for a filling and cozy meal.

Components:

  1. Two fully ripe bananas
  2. two glasses of water
  3. A little amount of cinnamon (more flavoring optional)
  4. A little bit of extractive vanilla (optional)

Guidelines:

  • Get the bananas ready: Begin by removing the banana peels. Depending on your preference, you may either chop them into half or thirds or leave them whole.
    Bring the water to a boil in a medium-sized saucepan over medium heat.
  • Put the bananas in there: The bananas should be carefully added to the boiling water. The bananas should be soft and readily punctured with a fork after 10 to 15 minutes of simmering over low heat.
  • To enhance the flavor, while the bananas are boiling, you may add a dash of vanilla essence and a touch of cinnamon to the water. The bananas will have a toasty, fragrant taste from these additions.
  • Assist Warm: Use a slotted spoon to take the bananas out of the water once they are soft. Before serving, put them on a dish and allow them to cool somewhat. Savor them just the way they are, or add a little more cinnamon on top for taste.

Reasons to Love This Recipe

  • Simple and Quick: This dish is ideal for a last-minute dessert or snack because it just needs a short amount of prep and cooking time.
  • Nutritious: This meal is a healthy option since bananas are a great source of potassium, vitamin C, and dietary fiber.
  • Of course Sweet: The inherent sweetness of bananas is enhanced by boiling them, which obviates the need for additional sugar.
  • Boiling bananas are a versatile food that may be eaten on its alone or combined with yogurt, cereal, or nut butter for a more delicious treat.

In summary
A quick and delectable nutritious snack or dessert is boiled bananas. You can make a dish that is both soothing and accentuates the natural sweetness and nutritional value of bananas with very few ingredients and very little work. After trying this simple dish, boiling bananas could just become your new favorite snack!

Enjoy the Perfect Cauliflower: Crispy Outside, Soft Inside

Enjoy the Perfect Cauliflower: Crispy Outside, Soft Inside

You’re in for a treat if you’ve been looking for a non-frying method for making cauliflower that is succulent on the inside and flawlessly crispy on the exterior! With this technique, regular cauliflower becomes a meal so delicious that people will be clamoring for your recipe. Here’s how to get the perfect texture and flavor without requiring deep frying and with very little work.

THE Key to the Ideal Cauliflower
It is not necessary to cook your cauliflower in bad fats or with complex methods to get the ideal texture. Roasting is the secret to bringing out a delicious depth of flavor and that perfect crispy texture. Now let’s discuss how you can accomplish this in your own kitchen.

RECIPES FOR TENDER AND CRISPY CAULIFLOWER
The main emphasis of this dish is Bring out the most in your cauliflower with a few key ingredients that combine simplicity and taste.

Components:

  1. One large cauliflower head, divided into florets
  2. Two to three teaspoons of olive oil
  3. To taste, add salt and pepper.
  4. Herbs for a savory twist, such thyme or rosemary, garlic
  5. powder, or Parmesan cheese, are optional.

Guidelines:

Preheat the Oven: Set the oven’s temperature to 425°F (220°C). To get that crispy, golden texture, a hot oven is essential.
Get the cauliflower ready: Make sure all of the cauliflower florets are equally covered by tossing them in a big bowl of olive oil. Add salt and pepper for seasoning, and feel free to add other herbs or spices.
Organize onto a Spread Sheet: Place the cauliflower on a baking pan in a single layer. Produce To guarantee that they roast rather than steam, make sure the florets are not packed.
Cook to Glory: Bake the cauliflower for twenty to twenty-five minutes. To achieve consistent browning, stir or turn them halfway through. The florets should be tender on the inside and golden and crispy on the outside.
Present and Savor: Serve right away after adding some more flavor with freshly grated Parmesan cheese on top.

Why This Recipe Is Effective
Cauliflower combines well as a side dish with almost any main course since roasting it changes its texture and brings out its natural tastes. The oven’s high heat crisps the surface while softening the interior with butter, producing a visually appealing contrast that very soft feel.

Changes to keep things interesting

  • You may experiment with different toppings or seasonings to keep this dish interesting and fresh. To add a little zing, try adding a squeeze of lemon, some chilli flakes, or even a drop of balsamic glaze for some sweetness.
  • This is a tasty and healthier alternative to fried cauliflower, which makes it an ideal side dish that is both filling and healthy. Try this recipe; you might find that it quickly becomes a family favorite!

Intestines Liver and Kidneys are Clean

Intestines, Liver, and Kidneys are Clean! Only 3 Days! All the Dirt Flies Out with Pineapple

This remedy has a strong cleaning impact on the kidneys, liver, and intestines because of the pineapple. In as little as three days, you may support your body’s detoxification and feel renewed. Pineapple’s high nutrient content and natural enzymes make it a great fruit for detoxification. Join me as I walk you through creating this effective cleanse and reaping its benefits.
There’s Nothing Like the Allure of Muslim Women Among Brain berries.

  1. One pineapple that is still in its fresh state
  2. one cucumber
  3. One inch of freshly chopped ginger root
  4. one lemon
  5. 2 quarts of water
  6. Mint leaves, fresh (if desired)

Instructions

1. Get Everything Ready:
  • Pineapple: Peel and remove the core from the
  • pineapple. Next, cut it into pieces.
  • After giving the cucumber a thorough wash, slice it. If you would like, you can omit peeling it.
  • Peel the ginger root and cut it into thin slices.
  • Squeeze the lemon to release its juice.

2. Mix the Elements Together:

  • Slice the cucumber, juice the lemon, add the water, add the pineapple chunks, and blend until smooth. Include the ginger. Mix the ingredients with a whisk until the required consistency is achieved.
Step 3: Pour and Enjoy!
Straining the Liquid Through a Fine Mesh Strainer Will Remove the Pulp and Fibres. The drink will get smoother as a result.
Pour the drink into each glass as a garnish. Garnish with a few fresh mint leaves, if desired.
4. Enjoy yourself:

Serving this detox drink fresh will yield the most benefits. On an empty stomach, start with a glass first thing in the morning and have another one right before bed for three days in a row.
A tropical fruit rich in vitamins, minerals, and the digestive enzyme bromelain, pineapples are good for your health.

Pineapple supports the liver’s detoxification process by assisting in the breakdown and removal of toxins.
Digestive Health: Bromelain from pineapples reduces inflammatory bowel syndrome and improves digestion.
Preserving a Healthy Kidney Function: By boosting urine production and removing toxins, the high water content contributes to the preservation of a healthy kidney function.

Sea cucumber: Known for its capacity to hydrate, cucumber helps:

Unlock the Secret to Radiant Skin with Collagen and Beets Every Night ‎‎

Unlock the Secret to Radiant Skin with Collagen and Beets Every Night ‎‎

1:Smoothie with Beets and Berries: Blend cooked beets with a range of berries, a banana, a spoonful of collagen powder, and a little quantity of water or almond milk to make a delicious smoothie to enjoy before bed. It tastes great and gives your body a significant health boost at the same time.

3. A Wholesome Beet Salad with Collagen Dressing: Add a salad of beets, greens, and almonds to complete your nutritious supper. Mix collagen powder, vinegar, mustard, olive oil, and lemon juice to make the dressing.

Benefits of Developing a Nightly Routine for This

Beets and collagen can help to improve skin hydration, reduce inflammation, and support general skin health when added to your nighttime routine. Additionally, a quicker rate of muscle regeneration and a healthier metabolism and faster muscle repair and recovery may be achieved by combining the antioxidant qualities of beets with the protein boost of collagen before bed.