pecan crusted chicken in the air fryer

pecan crusted chicken in the air fryer

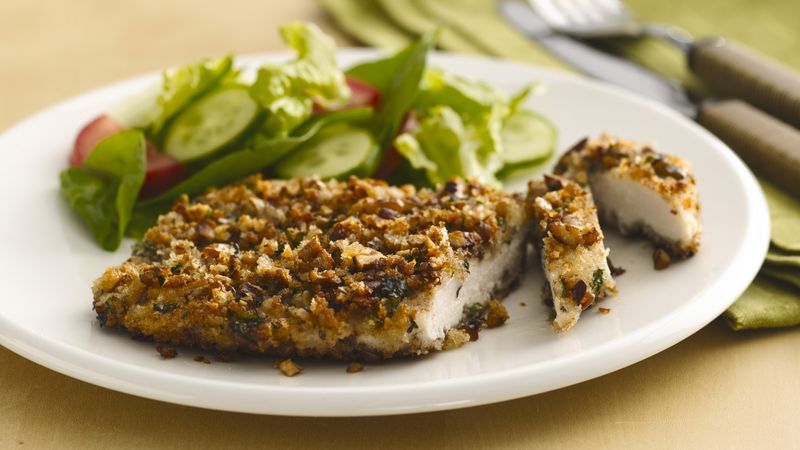
pecan crusted chicken in the air fryer With the addition of a few basic ingredients, this Pecan Crusted Chicken recipe transforms plain chicken breasts into a delicious meal that the whole family will enjoy. This is a simple pecan chicken dish that you will make again and again using a basic pecan combination.

For your next gathering, Pecan Crusted Chicken can be served as an appetiser or as part of the main course. In particular, I enjoy making a simple vinaigrette and topping a salad with it. This recipe for pecan-crusted chicken is sure to please your guests no matter how you serve it! The recipe is;

Basic Ingredients for the recipe.
Adaptable to various meals
Prepared in less than thirty minutes
Children-friendly

Ten minutes to prepare
Cook for Twelve minutes
Twenty-two minutes in total

4 servings are available.

Recipe By: Forktospoon


Ingredients for pecan crusted chicken in the air fryer:

  • One-pound chicken breast, sliced into tenderloins or breasts
  • Two eggs
  • Halves cup chopped pecans
  • One tsp powdered garlic
  • One tsp powdered onion
  • One tsp salt
  • Half a teaspoon of pepper, black


Instructions for pecan crusted chicken in the air fryer:

  1. Place the chicken on a chopping board.
  2. Combine the garlic powder, black pepper, and salt in a small bowl. Give your chicken a lot of seasoning.
  3. After beating, transfer the eggs to a shallow basin for dredging.
  4. Press the chopped pecans onto the chicken breast after dipping it into the beaten eggs. Press the pecans down firmly with your hands.
  5. Once the air fryer basket is filled with chicken, preheat the air fryer to 370 degrees F. Cook the chicken for 8 to 12 minutes, or until the internal temperature reaches 165 degrees F.


Tips for the Recipe:

I adore this dish since it’s so simple! I’ve made pecan crusted chicken breast a lot over the past few years, so here are some tips and tactics I’ve learned.

  • Crushing Pecans: Use a rolling pin or meat mallet to smash the nuts, or pulse them in a food processor or put them in a Ziploc bag. For a more consistent, delicate crust, crush them smaller or leave them rather lumpy.
  • Pat Chicken Dry: Before covering the chicken with the egg mixture, pat it dry with a paper towel. All elements will adhere to the surface more readily as a result.
  • Simple Cleanup: Cover the bottom of the air fryer basket with tin foil or spray it with cooking oil.
  • After the chicken has been dipped in the egg, put it in a freezer bag with the crushed pecans and shake well. One of the greatest methods to guarantee a uniform coating is this one.
  • Rest: Before slicing, let the pecan-crusted chicken from the air fryer sit for three to five minutes. That way, each bite will be just as juicy as the previous!
  • Employ a Thermometer with Instant Readout: If the interior temperature of poultry hits 165 degrees F, it is safe to consume. You may obtain fast and precise readings with an instant read thermometer.

Nourishment Facts of Recipe:
Serving: One Gram 218 kcal of calories 2 grams of carbohydrates 25g of protein 12g of fat One gram of saturated fat 3g of polyunsaturated fat 6g of monounsaturated fat Trans Fat: 0.01%73 mg of cholesterol 713 mg of sodium Potassium: 483 mg 1g of fibre 1g of sugar 42 IU of vitamin A Two milligrams of vitamin C Calcium: 16mg Iron: 1mg


Natural Remedies for Tonsillitis

Natural Remedies for Tonsillitis

Natural Remedies for Tonsillitis: Soothe Your Throat and Find Relief

It can be extremely painful to manage tonsillitis, quite literally. Feeling unpleasant can be caused by a number of symptoms, such as sore throat, difficulty swallowing, and general discomfort. Although rest and fluids are essential for recuperation, there are natural medicines found in nature that can assist reduce your symptoms and hasten the healing process. A unique mixture of basil, sage, white rose petals, garlic, and honey is one such treatment. Let’s dive into how you can prepare and use this natural remedy to find relief from tonsillitis.

  1. One tablespoon of recently harvested basil
  2. One tablespoon of sage
  3. One tablespoon of white rose petals
  4. two cloves of garlic
  5. half a cup of honey

Each component of this recipe has special therapeutic qualities that combine to fight tonsillitis.

  • Due to its well-known antibacterial and anti-inflammatory qualities, basil is a potent weapon against illnesses.
  • Sage has been used for centuries to treat throat infections due to its antiseptic and antibacterial qualities.
  • White rose petals not only make the treatment more attractive, but they also have calming qualities that lessen inflammation and irritation in the throat.
  • Garlic is a well-known natural immune system stimulant and antibiotic, which helps it fight off a variety of ailments.
  • Honey is a natural cough suppressant and throat soother that makes it the ideal foundation for a tonsillitis treatment.

Infuse the Herbs and Garlic

  1. Crush or finely chop the garlic cloves first. This produces allicin, which is garlic’s main medicinal ingredient.
  2. Add the garlic, sage, basil leaves, and white rose petals to a saucepan. Simmer the herbs for 15 to 20 minutes on low heat, adding enough water to cover them. This gentle heating process allows the herbs to release their medicinal properties.

Strain and Combine with Honey

  1. Once the mixture has simmered, drain it to extract the herbs, reserving the infusion in a basin.
  2. Stir in 1/2 cup honey while the liquid is still warm, but not hot. Once the honey has completely dissolved, stir.


This makes the medicine taste better and strengthens its medicinal qualities.

To achieve optimal outcomes and alleviate your symptoms:

  • Every few hours, take 1 tablespoon of the mixture.
  • Your throat discomfort, inflammation, and infection will all be lessened by the calming effects of the herbs and honey.

Although the symptoms of tonsillitis can be effectively relieved with this natural medication, it’s still vital to regularly check your status. Medical intervention may be required on occasion, particularly if symptoms intensify or persist.

This herbal honey cure is a gentle yet powerful technique to help your body heal from tonsillitis, embodying the wisdom of natural healing. Thus, the next time you’re suffering from a sore throat, use these natural remedies to give your body the gentle push it needs to recover.

The Benefits of Intestinal Cleansing with Dates

The Benefits of Intestinal Cleansing with Dates

The Benefits of Intestinal Cleansing with Dates

Overview Maintaining optimal gut health is essential for overall health and wellbeing. Eating dates is a delicious and natural method to promote digestive health. This delicious fruit not only brightens your day but also provides remarkable digestive tract cleaning advantages. Let’s look at how including dates in your diet might aid in intestinal cleansing and overall health promotion.

Why Pay Attention to Digestive Health? The ability of our body to efficiently remove toxins and absorb nutrients is largely dependent on a healthy digestive tract. Over time, our intestines can accumulate waste, which may affect overall health and vitality. Cleansing the intestines is a gentle way to support the body’s natural detoxification processes, enhancing vitality and energy.

The Purifying Effects of Dates Dates’ high fibre content makes them an excellent option for natural digestive cleansing. Fiber plays a key role in moving waste smoothly through the digestive tract and out of the body. Here’s why dates are particularly beneficial:

Rich in Soluble Fiber: Dates contain a significant amount of soluble fiber, which helps to bulk up stool and promote regular bowel movements, preventing constipation and helping to cleanse the colon.

Natural Sweetness: Their natural sweetness makes them an excellent alternative to sugary snacks, which can contribute to intestinal issues.

Including Dates in Your Nutrition Incorporating dates into your diet is a simple and tasty idea. Here are some ideas for savouring this adaptable fruit:

Snack: Consume a couple of dates as a midmorning or late afternoon snack. They are fulfilling and energising.

Smoothies: To make a high-fiber smoothie, blend dates with your preferred fruits, yoghurt, or milk.

With Yoghurt and Cereals: To add extra fibre, chop some dates and mix them into your yoghurt or porridge in the morning.

In summary Including dates in your diet on a regular basis is a tasty and practical strategy to support digestive health. This easy dietary supplement can improve your general health and energy levels by ensuring that your digestive system functions properly. Recall that having a healthy stomach is essential to living a happy and fulfilling life, and dates are a delicious ally in that regard. Savour the delightful advantages and maintain a sensation of renewal and rejuvenation in your digestive system!

The 3-Day Liver Cleanse: A Simple Detox Secret

The 3-Day Liver Cleanse: A Simple Detox Secret‎‎

Introduction You don’t need to use complicated therapies or prescription drugs to refresh and rejuvenate your liver. Sometimes all you need is a straightforward, organic approach. It’s possible to cleanse your liver in three days with just a few items from your kitchen. Lemons, celery, parsley, and water are used in this detox dish; this combination is well-known for its health-promoting qualities.

Why Are These Ingredients Used? Every component of this detox cleanse is essential to maintaining the function of the liver:

  • Lemons: Packed with vitamin C, lemons improve digestion and help your liver remove toxins.
  • Celery: By promoting liver enzymes, this low-calorie vegetable helps liver function. It also supplies necessary electrolytes and hydrates.
  • Parsley: renowned for its high antioxidant content, parsley supports liver and kidney detoxification as well as helps remove pollutants more effectively.

How to Make a Liver Detox Drink Not only is this straightforward meal easy to make, but it also promotes liver health. Here’s how to prepare your drink for liver detoxification:

Components:

  1. Three limes
  2. Five celery stalks
  3. A handful of parsley
  4. Six water liters

Steps in Preparation:

  • Rinse the parsley and celery well to get rid of any dirt.
  • To bring out the flavors and nutrients in the celery and parsley, chop them into smaller pieces.
  • Extract the juice by pressing the three lemons.
  • In a large pitcher or container, combine the lemon juice, diced celery, and parsley.
  • Pour six liters of water into the concoction.
  • To improve the detoxifying benefits and mix the tastes, thoroughly stir and refrigerate overnight.
  • Using Your Detox Drink Correctly Follow this easy three-day program for best results:
  • For three days, make sure to frequently consume this mixture throughout the day.
  • Try to drink two liters or more of the combination every day.
  • To aid in the detoxification process, drink more plain water as needed to stay hydrated.

In summary

This three-day liver cleanse is a fun and practical method to support liver detoxification and improve general health. The all-natural components support a healthy liver, which is crucial for overall wellbeing. They are mild but powerful. Savor the taste of refreshment and reap the health benefits of this easy detox treatment. Salutations and best wishes for your well-being!

Amazing Benefits of Lemongrass Tea

Amazing Benefits of Lemongrass Tea

Amazing Benefits of Lemongrass Tea

Are you looking for a tasty, refreshing drink that delivers a host of health advantages in addition to pleasing your palate? You only need to look at lemongrass tea! This lovely herbal infusion has several therapeutic characteristics that can help improve general wellbeing, and it’s quite easy to create. Let’s go into the realm of lemongrass tea and discover all the reasons to include this invigorating beverage in your everyday routine.

The leaves of the lemongrass plant, a tropical native prized for its zesty flavour and perfume, are used to make lemongrass tea. Here are some reasons to think about enjoying a cup of lemongrass tea on a regular basis:

Facilitate Your Digestion
Due to its well-known digestive properties, lemongrass tea is a great beverage to have after a meal. It can ease tummy pain, lessen gas and bloating, and support a healthy digestive system. It has been demonstrated that the natural substances in lemongrass promote the synthesis of digestive enzymes, which help in food breakdown and nutritional absorption.

Boost Your Immune System

Because lemongrass tea is so full of antioxidants, it can help bolster your defences against disease and infections. Vitamin C and potassium, two of the many vitamins and minerals found in lemongrass, combine to strengthen your immune system and maintain your year-round health and vitality.

Find Serenity and Relaxation

Lemongrass tea is a great beverage to sip on when you’re feeling stressed or anxious since it has a relaxing impact on both the body and the mind. The soothing scent of lemongrass helps ease stress and help you relax your muscles, which will enhance your feeling of calm and well-being.

Cleanse and Refresh

Lemongrass tea functions as a natural detoxifier, helping the body rid itself of pollutants and toxins. It helps your liver perform at its best and facilitates the removal of waste, which leaves you feeling invigorated and renewed from the inside out.

To prepare lemongrass tea, simply steep a handful of fresh or dried lemongrass leaves in hot water for approximately 5-10 minutes, then strain and relish. A squeeze of lemon or a drizzle of honey can also improve the flavour. Sip on this invigorating brew throughout the day to experience the full benefits of lemongrass tea and elevate your health and wellness to new heights!

20 Minute Air Fryer Chicken Fajitas

20 Minute Air Fryer Chicken Fajitas

Using an air fryer to make chicken fajitas is a quick, easy method that produces a tasty, nutritious meal.

INGREDIENTS

  1. One pound of skinless, boneless, thinly sliced chicken breasts
  2. One entire medium onion, sliced;
  3. one whole red bell pepper, sliced;
  4. one whole green bell pepper, sliced
  5. Two tablespoons of olive oil
  6. two tablespoons of lime juice
  7. One spoonful of spice for fajitas
  8. Half a teaspoon Add salt to taste.
  9. 1/4 tsp black pepper
  10. Corn tortillas or flour, for serving
  11. Extra toppings at your discretion: salsa, guacamole, shredded cheese, and sour cream

Guidelines

  • Cut one or two chicken breasts into thin strips to start.
  • For consistent cooking, cut one onion and a variety of red, green, and yellow bell peppers into strips of comparable size.
  • Combine the chicken and veggie strips in a large bowl.
  • Pour over some olive lime juice with oil. This helps the seasoning adhere to the foods while also adding taste.
  • Add the fajita spice, which usually consists of paprika, chili powder, cumin, and garlic powder. Until everything is coated evenly, toss everything.
  • Set your air fryer’s temperature to 400°F, or 200°C.
  • This step helps generate nice char on the chicken and veggies and guarantees that the cooking process begins right away.
  • Fill the air fryer basket with the seasoned chicken and vegetable mixture. Try not to pack the basket too full; if needed, cook in batches.
  • To ensure consistent cooking, air fried for to 10 minutes, shaking the basket or stirring occasionally.
  • Warm your flour or corn tortillas in the oven, on the stove, or even in the microwave while the chicken and veggies are cooking.
  • When rolling, warm tortillas are more flexible and won’t shatter.
  • It’s time to construct the fajitas once the chicken and veggies are cooked through and nicely charred.
  • Remove the chicken with spoon and southwestern mixture over the heated tortillas.
  • Top with your preferred fajita fixings, including salsa, guacamole, shredded cheese, sour cream, or fresh cilantro.
  • While everything is still warm, serve your chicken fajitas right away and enjoy!
  • With less oil and the same delicious flavor, this recipe for Air Fryer Chicken Fajitas is a quick, simple, and healthier way to enjoy this traditional dish.

air fryer homemade breakfast sandwiches

air fryer homemade breakfast sandwiches

Actually, this is a mash-up of recipes for baked eggs, bacon, and English muffins that were previously published. When you combine them, you get an AMAZING breakfast recipe that is a knockoff of McDonald’s Egg McMuffin. Moreover, you may make it in your very own air fryer! What a wonderful breakfast that was.

Variations:

  • On Air Fryer Day, nothing taste better than a classic breakfast sandwich. However, if you want to kick things up a level and create your own special flavors for the day, go ahead and add  epepper jack AND provolone cheese!
  • When it comes to effortlessly creating large quantities of these delicious delicacies at home with only one appliance—the air fryer—the options are virtually limitless!

Some excellent recommendations!

  • Any type of protein will do in this situation, including sausage patties, conventional bacon, turkey bacon, and even precooked bacon. Naturally, you could also use a meat substitute to make this sandwich vegetarian.
  • Add your preferred cheese, like sliced Swiss cheese, Monterey Jack, or Cheddar cheese.
  • Your morning sandwich game: How To Store Cooks simply became better by far. Become the talk of your colleagues by learning how to preserve them for later use. In addition to being delicious, breakfast sandwiches are also practical and substantial. Those are things that who wouldn’t want? Whether you’re packing all of your morning ingredients into a bagel, croissant, or English muffin, these simple storage and reheating instructions will help you enjoy them whenever you choose.
  • Store: any leftover ingredients in an airtight container after allowing them to come to room temperature. They’ll linger for two or three days.
  • Reheat: To reheat your breakfast sandwich, put it in the air fryer, cook it for four to five minutes at 340 degrees Fahrenheit.

Components

  1. One English muffin, split
  2. One big egg
  3. two fried chicken slices

Guidelines

  • Apply cooking spray on your ramekin to start.
  • Crack your egg inside of it after that.
  • Put the egg and English muffin into the air fryer. For three minutes, set the temperature to 330 degrees.
  • Remove the English muffin and add the chicken after three minutes. Cook the chicken and egg for an additional two minutes. After that, take the egg out. Increase the temperature to for three more minutes.
  • Put one half of the English muffin pieces on a cutting board, top with the chicken, flip the egg over, and then top with the other half of the English muffin.
  • Arrange, present, and savor!

air fryer sausage mcgriddle

air fryer sausage mcgriddle

Using an air fryer to make a replica of this mouthwatering sandwich at home is simple!

Changes:

  • Eggs: You can use fried or scrambled eggs for this breakfast sandwich. Over-easy eggs are a fantastic alternative as well.
  • Cheese: Place a slice of melted American or Cheddar cheese on top, then put it back in the air fryer or microwave.
  • Choose your preferred breakfast meat, such as sausage, bacon, or Canadian bacon, for breakfast.
  • Storing You can simply freeze or store them if you want to prepare a big amount of low-carb and keto bread ahead of time so you’ll be ready for the weekend or when the craving hits for your keto McGriddle.
  • After allowing the bread to come to room temperature, store it in the refrigerator in an airtight container. It’ll linger for two or three days. More than that, It is best to freeze it after wrapping it in parchment paper. It will keep for two to three months in the freezer with ease.

Components

  1. 8 ounces of mozzarella cheese for the dough
  2. Two ounces of cream cheese
  3. One cup of almond flour
  4. One huge McGriddle egg Filling: four big, cooked sausage patties
  5. Four large eggs, fried or scrambled
  6. Four tablespoons of butter or sugar-free maple syrup

Guidelines

  • In a medium bowl, combine the cream cheese and mozzarella and microwave.
  • After one minute of heating, mix, and then continue heating for an additional thirty seconds. Cheeses need to be thoroughly mixed.
  • Incorporate almond flour into the cheese blend.
  • In order to avoid cooking the egg, make sure the cheese mixture is still workable but not too hot before adding the egg.
  • Mix all of the ingredients together. Then mix in the ingredients, kneading if needed.
  • Using two sheets of parchment paper, press the dough into a flat rectangular shape.
  • For your McGriddle’s bread, cut out the circles using a cup or a biscuit cutter.
  • Cooking spray should be used before you air fry your “bread” for seven minutes at 400F, flip it, and then continue for an additional seven minutes. When the ‘bread’ is crispy and golden, it is done.
  • Next, drizzle the fake McGriddle’s bread with some sugar-free maple syrup.
  • Assemble your , cheese, egg, and sausage McGriddle-style.

Air Fryer Copycat McDonald’s Breakfast Burritos

Air Fryer Copycat McDonald’s Breakfast Burritos

Searching for a tasty and nutritious breakfast choice? The McDonald’s Breakfast Burrito, which has grown incredibly popular over time, is the only option. However, you can simply cook them at home using an air fryer, so why spend money on one? These imitations are every bit as good as the original, if not better!

Components

  1. One pound of sausage
  2. one-half cup chopped bell peppers
  3. 1/4 cup finely chopped onions
  4. One teaspoon of optional chilies
  5. Six or eight-inch flour tortillas and eight big eggs
  6. Two tablespoons of milk or cream
  7. One tsp salt
  8. half a teaspoon of pepper, black
  9. One cup of shredded cheddar cheese
  10. 1/4 cup finely chopped tomatoes
  11. Optional: 1/2 cup of refried beans

Guidelines

  • In a big skillet, crumble the sausage over medium-high heat. Cook for the entire prepared sausage. Don’t forget to split up the sausage with a spatula while it cooks. After draining, set the sausage aside.
  • Crack the eggs into a large bowl and whisk in the cream, black pepper, and salt. Mix them with a whisk. Cook the eggs over medium-low heat after adding the eggs, chiles, onions, and bell peppers to the skillet. Stirring occasionally, cook the eggs until they are thoroughly done.
  • Add approximately two tablespoons of sausage, two tablespoons of eggs, two tablespoons of shredded cheese, one tablespoon of diced tomatoes, and one tablespoon of optional beans. Burrito folded up.
  • Put some frying spray in the basket of your air fryer. After that, add your assembled breakfast burritos and give them a quick spritz of cooking spray or a brushing of melted butter to help them crisp up. After that, cook at 300 degrees Fahrenheit for 3–4 minutes, or until the cheese is melted.
  • Accompany with salsa!

air fryer breakfast empanadas

air fryer breakfast empanadas

Air fryer breakfast empanadas are a hit with chefs of all skill levels! These portable, savory pastries are ideal for a quick and simple on-the-go breakfast. They’re also a fantastic way to finish off any leftover meats or veggies in your refrigerator. For the recipe, scroll down!

Are air fryer empanadas freezer-friendly?

A tasty delicacy that can be prepared ahead of time and frozen for up to six months is empanadas. The empanada pies should be wrapped in plastic film before freezing and kept at room temperature in an airtight container or ziplock bag, where they will remain fresh for a very long time!

Components

  1. Two pie crusts, rolled and ready
  2. Four big eggs
  3. 1 cup of cheddar cheese and 1/4 cup of milk
  4. Half a pound of sausage for breakfast
  5. One can of diced potatoes
  6. One tsp salt
  7. half a teaspoon of pepper, black
  8. Four teaspoons of melted butter

Guidelines

  • Heat a skillet to a medium-high temperature.
  • Crumble and brown the morning sausage after adding it to the hot skillet. After draining, return the sausage to the skillet.
  • Gently crack the eggs. In a mixing dish, whisk together the eggs and milk. Pour over the heated skillet with the scrambled sausage.
  • Toss the drained diced potatoes with salt and pepper in a small mixing basin. Cook for five minutes after adding to the skillet.
  • When the cheese is melted, mix it in.
  • Pie crusts should be unrolled, then stacked on top of one another on a wooden cutting board.
  • Cut circles into the pie using a biscuit cutter or the lid of a mason jar.
  • On one edge of the pie circle, spoon 2 tablespoons of the egg filling. After folding in half, close the edges by crimping them with a fork.
  • Melt butter, then brush empanadas with it before finishing with a dash of pepper. Place in the air fryer and use the air fryer to cook for five minutes at 320 degrees Fahrenheit.serve warm and enjoy