Lemon cake that melts in your mouth

Lemon cake that melts in your mouth

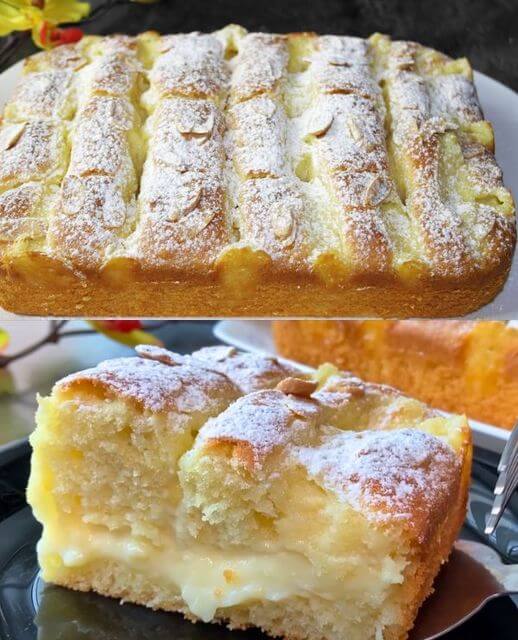
Lemon cake that melts in your mouth! Cake in 15 minutes!

Are you prepared to take a culinary trip yet? Let’s prepare a delicious lemon cake that will definitely wow your palate. A few basic ingredients and quick instructions can have you enjoying a delicious dessert in no time.

Ingredients:

Regarding the Cream:

  1. One egg
  2. 1.76 ounces of sugar (approximately 1/4 cup)
  3. Pinch of salt
  4. 0.71 ounces of corn starch (approximately 2 tablespoons)
  5. 0.85 cups of milk
  6. Lemon peel
  7. Juice of half a lemon
  8. 0.88 ounces of butter (approximately 2 tablespoons)

Regarding the Dough:

  1. 5.29 ounces (about 3/4 cup) of sugar and 3 eggs
  2. A dash of salt
  3. 0.35 ounces, or roughly 1 tablespoon, of vanilla sugar
    Vegetable oil in 0.63 cups
  4. 2.11 ounces, or roughly 1/4 cup, of sour cream
  5. 2.11 cups of flour
  6. Baking powder weighing 0.53 ounces, or roughly 2 teaspoons

Method for Baking Lemon Cake

Preparing the Cream
Step 1: Crack eggs into a saucepan, then stir in cornflour, sugar, and a dash of salt. After thoroughly mixing, stir in milk, half a lemon’s juice, and grated lemon zest. Reduce heat and cook until thickened.

Step 2: After cooking, toss in the butter, cover the mixture with foil, and set aside.

Making the Dough Step 3: In a bowl, beat the eggs, add sugar, salt, and vanilla sugar. Stir, then stir in sour cream and oil. Mixing continuously, add the sifted flour, baking powder, and lemon juice. When the dough is ready, thoroughly mix!

Step 4: Get an 18 x 26 cm mould ready, fill it with dough, and level it out.
Step 5: Pipe the cream onto the dough in a grid pattern using a decorating bag. Add a dusting of almond flakes.
Making the Cake
Step 6: Bake the cake for 40 minutes after preheating the oven to 180°C.

Applying the Last Touches

Step 7: For the ideal finishing touch, dust the cake with powdered sugar after it has baked.

Serving with Grace and Love
It’s time to appreciate your masterwork now! Present your loved ones to this delicious lemon cake with elegance and affection, and see as their faces burst with happiness.

In summary
You’ve made an excellent lemon cake in just fifteen minutes. It’s the ideal treat for any occasion with its crisp texture, creamy lemon filling, and nutty almond flakes. So go ahead, give in to your sweet tooth and relish each and every piece of this exquisite treat.


Onion Tea

Onion Tea

Onion Tea: A Natural Remedy for Your Health

Did you know that onion tea has been used for centuries as a natural remedy for various ailments? This humble beverage, packed with antioxidants, vitamins, and minerals, offers a multitude of health benefits. From boosting immunity to soothing sore throats, onion tea is a simple and effective way to support your well-being. Let’s explore how to prepare this comforting drink and reap its many rewards.


Easy Preparation

It’s simple to make onion tea with a few basic ingredients:

  1. Peel and coarsely chop one medium-sized onion first.
  2. In a saucepan, bring two cups of water to a boil.
  3. Simmer the chopped onion in the boiling water for ten to fifteen minutes.
  4. After taking the pot off of the hob, let the tea cool a little.
  5. Pour the tea into a mug after straining it to get rid of the onion chunks.
  6. If you would like, you can improve the flavour by adding a drizzle of honey or a squeeze of lemon juice.

Advantages for Health

There are several health advantages to drinking onion tea, including:

Immune Assist
Antioxidants like vitamin C and quercetin, which are abundant in onions, support a healthy immune system and stave off disease.

Breathing Aid
Onion tea’s steam can help clear blocked airways and lessen respiratory infection symptoms like coughs, colds, and bronchitis.

Digestive Aid: Onions provide substances that aid in digestion and may lessen bloating and indigestion symptoms.

Anti-Inflammatory Properties

Due to their anti-inflammatory qualities, onions can help lower bodily inflammation and ease the discomfort of arthritic disorders.

Heart Health:

Sulfur-containing chemicals found in onions may help lower cholesterol and lower the risk of heart disease.

In summary
A quick and easy approach to promote your health organically is to incorporate onion tea into your wellness routine. Onion tea can help with a variety of health issues, including immune system stimulation, sore throat relief, and improved digestion. So why not give it a shot and see for yourself the many advantages of this traditional medicine? To your good health and wellbeing, cheers!


Air Fryer Steak Bites with Potatoes

Air Fryer Steak Bites with Potatoes

This one-pot dish, Air Fryer Steak Bites with Potatoes, comes together in about 30 minutes. These juicy steak bites with crunchy potatoes may be made with any type of steak!

TIME FOR PREP: 5 minutes

Cooking time: sixteen minutes

A total of twenty-one minutes

Serving Ideas

  • Although the steak bite and potato combination is nearly complete meal on its own, you could choose to add the following extras:
  • SaladTo go with your steak, try light salad like this Cucumber Salad.
  • VegetablesMy personal favorites are Air Fryer Green Beans and Roasted Broccoli!
  • BeansWe really enjoy serving this dinner with some baked beans in the summertime. This recipe for Crockpot Baked Beans is incredibly simple!
  • CornAny type of steak goes incredibly great with buttery corn on the cob. This simple skillet-fried corn would be delicious served with potatoes and meat!
  • BreadHerb Drop Biscuits would be nice addition to complete this meal. My children want us to prepare these Cheesy Herb Crescent Rolls all the time.

How to Reheat and Store Leftovers Simple to prepare and store.

Here’s how to store any leftover steak pieces from your air fryer for later: To StoreAfter everything has cooled, keep your steak and potato cubes in the refrigerator for two to three days, sealed in an airtight container. To Reheat: You can reheat leftovers on the stovetop in pan until they are thoroughly warmed through. Personally, just throw them in the microwave for 30 to 45 seconds. Are Air Fryer Steak Bites Freezer Friendly? Indeed! This air fryer steak can keep for approximately month when frozen in an airtight container. To reheat, thaw in the refrigerator for the entire night and proceed as

Components

  1. One pound of quartered potatoes
  2. One teaspoon black pepper,
  3. one tsp salt,
  4. and two tablespoons of olive oil split
  5. 1 ½ pounds of sirloin, sliced into cubes of one inch
  6. 1 medium-sized, sliced sweet onion
  7. One tablespoon of spice for steak

Guidelines

  • Start the air fryer at 400°F.
  • Add the potatoes, 1 tablespoon olive oil, salt, and pepper to a medium-sized bowl, and mix to coat the potatoes.
  • Place potatoes in the air fryer basket and cook for 8 to 10 minutes at 400°F.
  • As potatoes are cooking Add the steak, onions, 1 tablespoon olive oil, and steak seasoning to the same bowl (rinse not necessary), and mix until the steak is covered.
  • Place the steak and onion directly on top of the potatoes in the air fryer basket. Cook for 4–6 minutes at 400°F.

Air Fryer Honey Garlic Salmon

Air Fryer Honey Garlic Salmon

This simple air fryer honey garlic salmon dish coats salmon fillets in a sweet and spicy marinade before they are air fried until they are wonderfully juicy and tender. This is a simple seafood dish that is bursting with flavor and ready in less than 15 minutes!

How to Reheat and Store Leftovers

If you keep your leftover honey garlic salmon in an airtight container, it will keep in the refrigerator for up to four days. To reheat, put the salmon in the air fryer skin side down and cook for about three minutes at 350°F, or until thoroughly heated.

This recipe for honey-glazed salmon may be frozen. 

Yes, this delicious soy and honey-glazed fish is freezer-friendly. Once the fish is fully cold, store it in the freezer for up to three months in an airtight container. Before reheating, place frozen fish in the refrigerator to thaw for a full day for optimal results.

Components

  1. Two salmon fillets (7 oz.)
  2. Half a cup of honey
  3. Two tablespoons of tamari or soy sauce
  4. one tablespoon finely chopped garlic
  5. one tsp Sriracha
  6. A tsp of finely ground red pepper
  7. One-half teaspoon of black pepper

Guidelines

  • Set the air fryer’s temperature to 400°F.
  • After rinsing, blot dry with a paper towel and set aside the salmon filets.
  • Combine the honey, soy sauce, garlic, crushed red pepper, and black pepper in a small bowl. Blend thoroughly with a whisk.
  • Use parchment paper to line the air fryer pan for simple cleanup. an air fryer lining. Place the filets on the parchment paper, skin side down.
  • Brush each filet with about half of the honey sauce; save the leftover sauce for another use.
  • Sear the fish for 8 minutes at 400°F. Add the remaining half of the honey sauce to each filet at the 4-minute mark, halfway through the cooking time. After 4 more minutes of cooking, the filets should be 145°F inside, according to an instant-read meat thermometer.
  • Serve right away.

Essential Tips for Keeping Vegetables Fresh Longer

Essential Tips for Keeping Vegetables Fresh Longer

Essential Tips for Keeping Vegetables Fresh Longer! In addition to preserving flavour and nutritional content, keeping your veggies fresher for longer also cuts down on waste and the number of times you need to visit the shop. Here are some useful storage suggestions to keep your veggies fresher longer and guarantee that you always have wholesome elements for your meals on hand.

1. Recognise Your Veggies
Different vegetables require different storage methods. Some thrive in cold environments, while others prefer room temperature:

  • Store root vegetables (beets, turnips, and carrots) in a cold, dry place. A cool drawer in your refrigerator or a basement would be perfect.
  • Leafy greens (kale, spinach, lettuce): Place these in the crisper drawer of your refrigerator after loosely wrapping them in a moist towel.
  • Tomatoes: To preserve flavour and texture, keep them at room temperature and out of direct sunlight.
  • Garlic and onions should be kept cold, dry, and well-ventilated. To prevent sprouting, they seek out darkness.

2. Preparation for Storage

The way vegetables are prepared before being stored can have a big impact on how long they last:

  • Avoid washing since moisture encourages deterioration. Just before using, give leafy greens and other vegetables a quick wash.
  • Trim leafy tops: To keep them from sucking moisture away from the roots, cut off any leafy tops from beets, carrots, or radishes before storage.

3. Use of Containers and Bags

The appropriate containers can have a significant impact:

  • Use airtight containers to preserve the freshness of chopped or peeled vegetables and prevent odours from transferring to other food items.
  • Perforated plastic bags: These are excellent for refrigerating produce like green beans and mushrooms because they let in air.

4. Optimal Humidity and Temperature

It’s critical to keep your refrigerator in the proper environment:

  • Drawers for crispers: They are made to retain moisture to keep your vegetables fresh. Change the humidity level to a higher level for leafy greens and a lower level for fruits that are more likely to spoil.
  • Keep fruits and vegetables apart: Fruits release natural gases that might speed up the rotting of vegetables that are close by.

5. Regular Checks

Develop the habit of routinely inspecting your vegetables:

  • Turn the stock by moving the older veggies to the front so they can be used first.
  • Examine the produce for rot and discard any that is damaged or ruined to stop the rot from spreading to the healthy produce.

You may maximise the flavour and nutritional value of fresh veggies by using these strategies to enjoy them for extended periods of time. This is economical and eco-friendly in addition to encouraging a balanced diet. So keep these easy tips in mind for the best vegetable storage the next time you restock!

Keep Your Kidneys Healthy

Keep Your Kidneys Healthy

How to Keep Your Kidneys Healthy with a Natural Home Drink

Are you seeking for an easy method to maintain the wellness of your kidneys? We have a cool drink recipe that can improve the function of your kidneys even further! Taking care of our kidneys becomes increasingly important as we age. Toxins and unhealthy lifestyles can put a strain on these vital organs, preventing them from functioning at their best. Water is therefore essential.

parsley:By staying properly hydrated, you can prevent kidney diseases, kidney stones, and toxic build-up in your body. And there’s one ingredient that can give your kidneys an extra boost – parsley!

Not only is parsley a familiar cooking herb, but it’s also a nutritional powerhouse with many advantages for kidney health. Iron, vitamin K, vitamin A, vitamin C, folate, and other important vitamins are abundant in it. Furthermore, parsley possesses an amazing array of qualities, including antimicrobial, antianemic, anticoagulant, antihyperlipidemic (lowers blood fat), antihepatotoxic (avoids liver toxicity), antihypertensive (lowers blood pressure), diuretic, hypoglycemic, hypouricemic, anti-oxidative, and estrogenic (assists in menstrual management).
In fact, parsley is suggested by conventional medicine as a way to assist treat kidney stones. Parsley tea helps flush your kidneys by boosting the flow and production of urine. This enhanced flow can relieve and prevent kidney stones by helping to “push” them out. Parsley tea is also supposed to prevent salt from being absorbed by renal tissue, which lowers the chance of kidney stones developing.

But the benefits don’t stop there! This tea can also help reduce anxiety and calm your nerves. While fresh herbs make for a more potent tea, you can easily replace them with a handful of dried parsley leaves.

Here’s How to Make This Kidney Cleansing Drink:

  1. One bundle of fresh leaves of parsley
  2. organic Eight glasses of water that has been filtered
  3. Two tbsp organic, raw honey
  4. Half a fresh lemon, squeezed into juice Preparation:

Directions:

  1. Leave the parsley leaves whole after washing and chopping.
  2. Heat the water to a boil using a medium heat setting.
  3. After adding the parsley leaves, turn down the heat.
  4. Give it ten minutes to simmer.
  5. Pour the tea through a strainer into a large pot, cover, and set aside to cool.
  6. Taste and adjust with honey and lemon juice.
  7. Have one or two cups of this cooling tea every day.
  8. Remaining tea can be kept in the refrigerator for up to a week in glass containers.

It’s imperative to speak with your doctor before ingesting parsley tea if you have renal disease, are already on prescription medication, or suffer from any other illnesses. It is crucial to remember that pregnant women should not drink parsley tea because it can cause an abortion or menstruation.

Kidney maintenance doesn’t have to be difficult. You may promote the health and general well-being of your kidneys by including this kidney-cleansing beverage in your daily regimen. Enjoy the many health advantages of parsley while staying hydrated!

Recall that your kidneys put forth great effort to maintain your health. So why not show them a bit more affection and attention?

The Timeless Secret of Banana Peels: Nature’s Answer to Radiant Skin

The Timeless Secret of Banana Peels: Nature’s Answer to Radiant Skin

In our rush to have a flawless complexion, we frequently miss the gems that are right in front of us. The common banana peel is one of these natural wonders with a long-kept secret that has been handed down through the generations. Imagine a century-old recipe derived from our ancestors’ wisdom, not from a flashy bottle or the newest beauty guru. Yes, we are discussing the application of banana peels to skin care, with a focus on maintaining a youthful and radiant appearance. Let’s explore this ageless beauty secret’s layers.

Banana Peel: The Organic Skin Soap

Banana peels are a food and antioxidant powerhouse rather than just a waste product. These peels, which are high in potassium, magnesium, and the vitamins B6 and B12, provide a natural way to support rejuvenate the skin. What would be trash is now a gem for your skincare routine thanks to this easy-to-use yet powerful treatment.

How to Apply the Miracle of Banana Peel

The method’s simplicity is where the magic is found. After eating a banana, take the peel off and give your face a gentle facial massage. Your skin feels soft and renewed when the peel’s ingredients moisturize and exfoliate it. A bright complexion can be gently and naturally supported by using a banana peel, especially for people who are concerned about the symptoms of aging on their skin.An Eco-Friendly Option for Beauty This approach, which uses plastic packaging and chemically packed products, saves waste and conserves natural resources. It’s a decision that helps the environment as well as your skin.

The Pleasure of Finding

It can be a fascinating trip to rediscover and incorporate this century-old recipe into your lifestyle. It serves as a reminder of the ease of use and potency of natural therapies. Although it might not be a panacea, the banana peel is a step in the direction of a more sustainable and thoughtful approach to beauty.

Accepting Natural Beauty

Using banana peels in your skincare regimen is a throwback to the good old days and a tribute to the wisdom of making do with what nature has to offer. It’s about appreciating the little things in life and welcoming the beauty of nature. Thus, The next time you indulge in a banana, keep in mind that the peel could be the key component your skin has been longing for. Peel back the layers of a banana peel to rediscover the thrill of natural beauty.

Dandelion: A Gift from Nature’s Garden

Dandelion: A Gift from Nature’s Garden

The dandelion, with its vivid yellow blossoms and fluffy white seeds that sway in the breeze, is a distinct spot in the natural tapestry. This little plant, which is often disregarded, has a wealth of health advantages. Here’s how to use dandelion in your daily routine and how it may be used as a natural cure.

An Abundance of Advantages

Beyond merely being a weed, dandelion also contains antioxidants, iron, calcium, magnesium, and potassium as well as vitamins A, C, K, and E. Together, these elements promote your health in a number of ways:

  • Detoxification: Dandelion roots and leaves support a healthy digestive system and aid in the elimination of toxins from the body by cleansing the liver and kidneys.
  • Joint Comfort: Dandelion’s anti-inflammatory qualities help reduce mild aches and pains, allowing you to enjoy your everyday activities more.
  • Heart Health: Dandelion promotes a robust and healthy heart by assisting in the regulation of blood pressure and cholesterol levels.
  • Blood Sugar Balance: Traditionally used as a boost to general energy and well-being, dandelion has been shown to help maintain balanced blood sugar levels.

Including Dandelion in Your Daily Diet

It’s surprisingly simple to embrace the health advantages of dandelion, and there are a number of entertaining ways to incorporate it into your routine:

  • Dandelion Tea: For a quick and purifying tea, steep the leaves or roots in boiling water. This might serve as a soothing morning or evening habit.
  • Young dandelion greens in salads are delicate and have a somewhat bitter flavor that gives salads a revitalizing kick.
  • Soups & Stews: To provide an extra nutritional boost to your favorite soups and stews, simmer the roots and leaves of dandelion.

A Kind Reminder

Even while dandelions are generally harmless, it’s a good idea to see a doctor before incorporating them into a regular routine, particularly if you’re taking medication or have any health issues.

Simple Pleasures of Nature

Dandelion serves as a reminder that the treasures of nature are all around us and can be used in easy, non-invasive ways to promote wellbeing. Dandelion is a great way to connect with nature and make a healthy lifestyle choice, whether it is added to meals or made into a calming cup of tea. Accept this happy plant.

The Natural Elixir for Radiant Skin: A Carrot, Bay Leaf, and Orange Zest Blend

The Natural Elixir for Radiant Skin: A Carrot, Bay Leaf, and Orange Zest Blend

Finding the fountain of youth in your kitchen may seem like something out of a storybook, but often the most charming fixes have their roots in simplicity and the natural world. A homemade mixture of carrot, olive oil, bay leaves, and orange zest may be the magic bullet you’ve been looking for if you want to give your skin a little more life and minimize the appearance of wrinkles. This delicious combination is more than just a recipe; it’s an ode to organic components that have long been prized for their cosmetic properties.

Why This Mix Is So Effective

Each component of this mixture has unique skin-beneficial qualities, particularly in terms of promoting the creation of collagen, which is essential to preserving the young appearance and flexibility of the skin.

  • Carrot: Packed with beta-carotene and vitamins A and C, carrots assist to prevent oxidative stress on the skin and promote the formation of collagen, which helps to smooth out wrinkles and give your skin a firm, youthful appearance.
  • Bay Leaves: Having anti-inflammatory and antioxidant qualities, bay leaves help to calm the skin, minimizing redness and puffiness while also promoting a more uniform skin tone.
  • Orange Zest: Packed with vitamin C, the zest of an orange is another collagen-boosting superpower that helps brighten complexion, heal skin, and fend against aging signs.
  • Olive Oil: Rich in vitamins E and K and important minerals, olive oil is a jewel of Mediterranean beauty regimens. It deeply hydrates skin, leaving it soft and supple.fats.

Making a DIY Skincare Remedy

You may easily make this skin-rejuvenating elixir at home. To make the oil, just gently simmer the carrot, bay leaves, and orange zest in it for a few hours over low heat. Then, filter the oil and keep it in a dark, cool area. Before going to bed, apply this golden liquid to your face, paying particular attention to wrinkles and fine lines. Overnight, the organic components profoundly feed your skin, promoting the development of collagen and amplifying its inherent radiance.

Accepting the Beauty Secrets of Nature

Including this natural elixir in your skincare routine is a great way to treat your skin with the love and care that it needs, rather than merely trying to improve its appearance. By deciding to trust in the calming force of Nature, you’re starting down the path to a more environmentally friendly and health-conscious beauty routine. Here’s to discovering the principles of natural beauty one tiny step at a time and to the amazing journey of self-care that maintains the brightness of your skin throughout your entire life.

The Delightful Twist: Banana Cloves Recipe

The Delightful Twist: Banana Cloves Recipe

Imagine coming across a recipe that combines the warming, fragrant cloves with the well-known sweetness of bananas to create something both fascinating and cozy. Although this combination may not immediately come to mind, you’ll find it to be really enthralling after trying it. This recipe for banana cloves is a voyage into a realm where flavors meld in the most wonderful ways, not merely a test of the senses. Let’s investigate this easy yet delicious meal that will add a little zing to your kitchen table.

A Harmony of Tastes

The inherent sweetness and creamy texture of bananas provide an ideal canvas for the zesty and spicy aromas of cloves. Add a depth of flavor with cloves, a spice noted for its potent scent and therapeutic qualities. to the surprisingly melodious bananas. This recipe is a feast for the senses as well as the palate, infusing your kitchen with a comforting and pleasant aroma.

Wholesomeness in Every Bite

In addition to its delicious flavors, this dish is very beneficial to your health. Rich in potassium, vitamin C, and fiber, bananas are a nutrient powerhouse that promotes heart health and gives you natural energy. Conversely, cloves have a long history of being used as an anti-inflammatory and are rich in antioxidants. When combined, they provide a cuisine that pleases the palette and is healthy for you.

Cooking’s Basic Pleasure

You only need a few ingredients and a little time to make this recipe.with a hint of originality. First, cut the bananas into slices and place them on a baking pan. Add a dusting of ground cloves, and if you’re feeling very daring, you can add a few more layers of flavor with a drizzle of honey or a sprinkle of cinnamon. Bake until the bananas have become caramel and the cloves are completely infused with flavor. The end product is a dish that is rich in flavor and scent but surprisingly easy to prepare.

Accepting the Odd Combination

The joy of combining different ingredients in the kitchen is demonstrated by this recipe for banana cloves. It asks you to enjoy the combination of flavors and to be open to the unexpected with your palate and thoughts. Whether you’re searching for an inventive breakfast recipe, a nutritious snack, or a sweetness, every bite of this recipe is sure to please.

Why not attempt it then? It’s a quick culinary experience that might result in a new favorite and serves as a reminder that often the simplest combinations are the most enjoyable.