Banana Peel for Ageless Beauty

Unlocking the Secret: Banana Peel for Ageless Beauty – A Centuries-Old Recipe!

For centuries, people have loved bananas for their mouthwatering flavor and healthful properties, but did you know that the peel, which you usually throw away, can reveal the secret to eternal beauty? Let’s explore the amazing world of banana peels and how they can reduce wrinkles. We’ll also share our favorite banana recipes for glowing skin. This century-old trick is going to completely alter your skincare regimen!

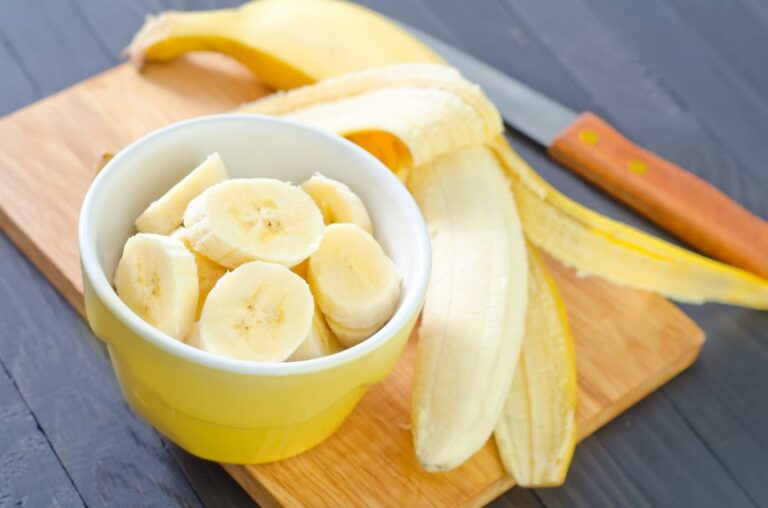
Peels from bananas: Magical

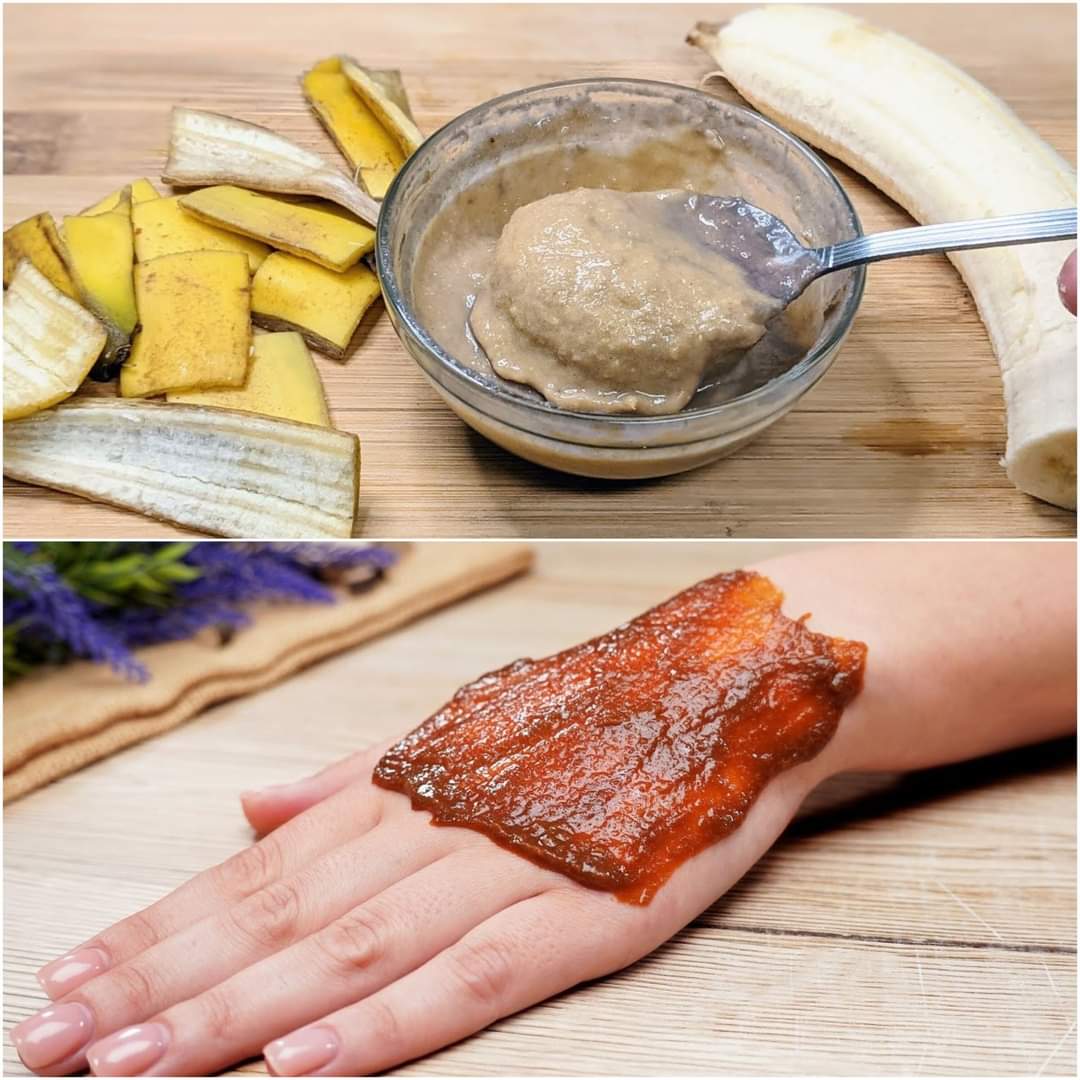
Peel of a banana for wrinkles: Antioxidants such as lutein, which shields the skin from oxidative damage and minimizes the appearance of fine lines and wrinkles, are abundant in the humble banana peel. All you have to do is apply a banana peel to your face, leave it on for twenty to thirty minutes, and then rinse it off with warm water. This easy, time-tested tip can encourage skin that is radiant and youthful.

Best Banana Recipes for Skincare

  • Oatmeal Scrub and Banana Peel: In a blender, combine the banana peel and ground oats to make a healthy scrub. Dead skin cells are removed from your skin with this mild exfoliating mixture, leaving your skin smooth and refreshed.
  • Banana Honey Face Mask: For a potent, hydrating face mask, mash a ripe banana and combine it with honey. For individuals who want to look dewy and young, this combination locks in moisture and deeply moisturizes the skin.
  • Banana Yogurt Soothe: To make a calming face mask for skin that is sensitive or inflamed, combine bananas with natural yogurt. This mixture gives the skin a natural, healthy appearance by calming it and reducing redness.
  • Banana Peel Acne Treatment: Banana peels’ antibacterial qualities can aid in the battle against acne. The ingredients in the peel help to fight blemishes and reduce inflammation when you gently rub it on the problematic areas and keep it there overnight.


Including banana peel in your skincare routine can provide you a natural, chemical-free way to keep your face looking young and glowing. These straightforward yet tasty recipes make use of every element of this wonderful fruit while also paying homage to the knowledge of earlier generations. With these best banana recipes, rediscover the delight of natural beauty and embrace the glow!

Fennel Soup A Delicious and Nutritious Elixir for Daily Well-Being

 Fennel Soup

A Delicious and Nutritious Elixir for Daily Well-BeingFennel Soup

First of all, Envision a dish that is not only incredibly tasty and soothing, but also bursting with health advantages that assist your liver, clear your bowels, and calm your stomach. This isn’t just any meal—it’s a steaming cup of fennel soup, which is widely regarded as a miraculous remedy for digestive issues. This is your go-to recipe for fennel soup if you’re looking for a natural solution to relieve fatty liver, stomach gas, and make sure your digestive system is functioning properly.

Body:

Why Fennel? For centuries, people have appreciated the digestive advantages of fennel, which gives it a distinct and fragrant flavor. It’s a vitamin, mineral, and antioxidant powerhouse in addition to being tasty. Fennel helps to calm the muscles and reduce inflammation. of the digestive tract, and it works wonders to relieve bloating and gas. It also supports your liver and aids in the detoxification processes.

The Fennel Soup’s Magic: The comforting qualities of homemade soup combined with the calming effects of fennel make a cup of souped fennel the ideal cure for anyone trying to support intestinal health. It’s quite satisfying to eat and promotes digestion, reduces gas, and helps with liver detoxification—it’s like a soothing hug for your insides.

How to Make Fennel Soup: This soup’s simplicity is what makes it so beautiful. What you’ll need to prepare your own gut-healing fennel soup is:

INGREDIENTS

  1. a freshly sliced fennel bulb
  2. One little onion, chopped
  3. minced garlic cloves to taste
  4. Chicken or vegetables soup for the foundation
  5. A tiny bit of olive oil for frying
  6. To taste, add salt and pepper.

INSTRUCTIONS

  • First, sauté the garlic and onion in olive oil until they become transparent. Cook the chopped fennel until it begins to soften. Add your preferred broth, bring to a simmer, and cook until the fennel is soft and the flavors have combined. You can puree the soup until it’s smooth for an added creamy touch, or you can leave it chunky for a more rustic appearance.
  • In summary, including fennel soup in your diet is beneficial for your digestive system in addition to being a tasty pleasure. Whether you’re trying to support your liver, have stomach gas, or are just in need of a intestinal cleanse, this soup made with fennel is a tasty approach to support your health. Try it out and see the impact it can have on your general health and intestinal health.

air fryer garlic parmesan fries

air fryer garlic parmesan fries

air fryer garlic parmesan fries


Air fryer-made, homemade garlic parmesan fries are delicious! Nothing compares to discovering how to make air fryer garlic fries! With easy directions for using an air fryer, this is one of the best french fry recipes! So continue reading if you want a delicious meal that requires less oil and turns out flawlessly every time!

Ingredients:

  1. One huge potato
  2. Half a teaspoon each of salt and black pepper
  3. One tablespoon of olive oil
  4. one tablespoon finely chopped garlic
  5. 1/2 tsp finely chopped parsley
  6. One cup of shredded Parmesan cheese


Guidelines:

  1. Cut and peel the potato to make fries of the required size. After washing, put the potatoes in a big basin of cold water. You’re going to have some crispy fries after this! Use paper towels to pat dry your potatoes.
  2. After putting the fries in a mixing dish, treat them with oil spray or olive oil. Mix in the salt and pepper and stir until the fries are well covered.
  3. Fries should be placed in an air fryer basket and cooked at 370 degrees Fahrenheit for 15 minutes.
    As the fries cook, give them periodic shakes.
    Take out the fries. Garnish with parmesan cheese and garlic, then serve with parsley on top.


Tips:

  1. Crispy Garlic Fries from an Air Fryer: Everyone enjoys crispy fries, but the secret is to coat each one with a thin film of olive oil. Just a tiny coating can help your French fries get crispier in the air fryer.
  2. Which Potatoes Are Best For French Fries Made in an Air Fryer? Russet potatoes are the ideal variety to use in the air fryer for French fries. Russet potatoes maintain their shape well, making them an excellent choice for Air Fryer French fries. Peeling or leaving the peel on is an option.
  3. Cleaning the Potatoes: Since they will crisp up so much better without water, make sure to wash and then dry them thoroughly.
  4. How Are French fries cut in an air fryer? A mandoline will cut the same size fries, so if you want to make the ideal French fry shape, get one. This is crucial because you want the fries to cook simultaneously on each side. It is made feasible by the mandoline because of its uniform cutting.


Just Why Soak Potatoes in French Fry Oil?

The majority of us had never used an air fryer to make deep-fried French fries. The debate about soaking versus not soaking is quite heated.

Although soaking the potatoes before making French fries aids in their crisping, I do not always have the time to do so. However, you must soak the potatoes for at least an hour in order to remove any excess starch. We all want our French fries to taste crispier, and it does just that.

In the event that you soak, please ensure the French fries are totally dry; otherwise, they will become quite moist.


How Are Air Fryer Fries Reheated?

Whether you want to reheat fast food or homemade French fries (I mean, who would throw them away?) is one of the most often topics I get asked.

Place them inside the air fryer basket, adjust the air fryer setting to 400 degrees F, and let them air fry for five to seven minutes.


Benefits of Banana for Hair and Skin

Benefits of Banana for Hair and Skin

Discover the Marvelous Benefits of Banana for Hair and Skin

Not only are bananas a tasty and healthy snack, but they may also be a hidden gem in your skin and hair care regimen! This little fruit has powerful vitamins and minerals that can do wonders for you. Here are ten incredible advantages of including bananas in your beauty routine.


For Your Magnificent Locks Natural Moisturiser:

  • When it comes to taking care of dry hair, bananas are wonderful. Their high potassium content gives your hair a healthy lustre by hydrating and reinvigorating dry strands.
  • Strength and Repair: Your hair’s strength and suppleness will improve as a result of the vitamin A in bananas, which helps replenish natural oils. Less breakages and broken ends result from this!
  • Scalp Soother: Do you have a scratchy scalp? Bananas’ anti-inflammatory qualities can reduce irritation and fight dandruff, which will make your scalp happier.
  • Encourages Hair Growth: Rich in vitamins and minerals, bananas nourish and energise the scalp, which in turn encourages the growth of hair.
  • Natural Hair Conditioner: You can use a banana hair mask to soften and manageable condition your hair. Bid adieu to harsh chemicals!
Basic Banana Hair Mask:
  1. Mash one ripe banana until it forms a smooth paste.
  2. You can add a tablespoon of honey or yoghurt for extra moisture and shine if desired.
  3. Apply the mixture to your hair, covering all strands from roots to tips.
  4. Leave it on for 20-30 minutes.
  5. Rinse thoroughly with shampoo and water.

For Your Bright Skin Anti-Aging Effects

  •  Antioxidants included in bananas can combat free radicals, preventing premature ageing and maintaining the youthful, vibrant appearance of your skin.
  • Moisture Boost: Bananas can help those with dry skin. Their high moisture content leaves the skin feeling supple and soft after deeply hydrating it.
  • Oil Control: Due to its potassium and vitamin A concentration, bananas can help manage sebum production if you struggle with oily skin, leaving your face feeling and looking more refreshed.
  • Bananas’ antibacterial qualities can aid in the treatment of acne. Banana peel applied to sensitive areas can help lessen breakouts and inflammation.
  • Gently exfoliate your skin to reveal a brighter complexion by removing dead skin cells. Natural enzymes found in bananas aid in this process.

Including bananas in your beauty regimen is easy and reasonably priced. Whether it’s mashing them into a hair mask or rubbing a peel on your skin, the natural benefits of bananas can help you maintain healthy hair and skin without relying on expensive products. So next time you enjoy a banana, remember it’s not just a snack but a beauty treatment too!

if you want how banana used for skin visit my Rediscover the Charm of a Century Old Skin Brightening Secret

Rediscover Youthful Radiance: The Banana Peel and Cornstarch Secret ‎‎


Garlic Parmesan Buffalo Wild Wings Recipe

Garlic Parmesan Buffalo Wild Wings Recipe

Tender, juicy chicken wings with a crispy exterior are combined with a delicious creamy garlic and parmesan sauce to create this recipe for Copycat Garlic Parmesan Buffalo Wild Wings.

Recipe Advice

  • Make sure your chicken reaches an internal temperature of 165°F before covering it with a flavorful sauce by using a meat thermometer.
  • Avoid packing the Air Fryer basket too full as this may restrict the air’s ability to circulate and cook your wings.
  • Watch your wings; you only want to fry them until they get golden brown, not until they dry out.
  • Before applying the creamy sauce coating, sprinkle on little more garlic powder for an extra tiny burst of flavo

INGREDIENTS

  1. Two pounds of chicken wings
  2. One half-teaspoon salt and one teaspoon peppercorns
  3. Half a cup of Parmesan-Garlic Sauce View notes

DIRECTIONS

  •  Give the chicken wings a quick salt and pepper seasoning.
  • Air fryer: Give it a five-minute preheat. After adding some chicken wings to the basket, cook them for 20 minutes, turning them over halfway through.
  • To bake in the oven, preheat it to 425 degrees. Arrange the chicken wings on a baking tray covered with parchment paper or aluminum foil. Bake the chicken wings for 20 minutes, then turn them over and continue baking for an additional 20 minutes.
  • After putting the crispy chicken wings in a bowl, cover them with 1/2 cup of parmesan sauce and toss to coat. Add more sauce on the side and serve. Increase the amount if you prefer

NOTES:

  • If you don’t want to make your own Buffalo Wild Wings garlic parmesan sauce, you may get it in bottles.
  • To crisp up the skin again, reheat leftovers in the air fryer or microwave.

Deep-frying

  • Heat up 375°F canola or peanut oil.
  • Pat wings to dry.
  • When the chicken is done, fry 8–10 wings at a time for 5–6 minutes on each side.
  • Transfer to a plate covered with paper towels to drain.
  • Serve after tossing with sauce and/or spice.


Sweet and Spicy Air Fryer Chicken Legs

Sweet and Spicy Air Fryer Chicken Legs

These sweet and spicy air-fried chicken legs have a crispy outside and juicy interior, made with basic ingredients and ready in under 30 minutes!

The chicken legs are swiftly cooked in the air fryer, resulting in crispy skin and juicy, soft meat. This recipe for tasty and simple air-fried chicken legs is ideal for hectic weeknights.

30 minutes or less to get crispy, juicy chicken legs from an air fryer! This simple recipe works well as a party snack or dinner on a weeknight.

INGREDIENTS

  1. Two tsp olive oil
  2. One-half teaspoon of garlic powder and
  3. one tablespoon of smoked paprika
  4. One and a half tsp onion powder
  5. One tsp of Italian spice
  6. One-third cup brown sugar
  7. Add half a teaspoon of cayenne pepper and taste.
  8. One tsp of kosher salt
  9. half a teaspoon of pepper, black freshly chopped parsley as a garnish

DIRECTIONS

  •  To make the seasoning mix, combine the olive oil, paprika, onion powder, garlic powder, cayenne, Italian seasoning, salt, and black pepper in a small bowl.
  • After using a paper towel to pat dry, put the chicken in a big basin. Apply the spice mixture on the chicken in an equal layer.
  • Allow the chicken to marinade in the refrigerator for up to 24 hours.
  • Set the air fryer’s temperature to 380°F. Coat the basket in cooking spray or apply a coat of oil.
  • Put the chicken in a single layer inside the air fryer basket, and cook it for 20 to 25 minutes, turning it over halfway through. Using a meat thermometer, check the internal temperature of your juicy chicken legs and adjust the cooking time until they reach 165°F.
  • Before serving, let the drumsticks rest for five minutes. If preferred, serve with a dipping sauce and garnish with finely chopped fresh parsley.

NOTES:

  • If you would rather, you can use chicken wings or thighs in place of the chicken.
  • Oven Baked: Preheat the oven to 425 degrees. Bake the chicken legs for 35 minutes. Then, turn them over and continue cooking for a further 10 to 15 minutes, or until the internal temperature reaches 165 degrees.

Air Fryer Copycat Taco Bell Quesadilla

Air Fryer Copycat Taco Bell Quesadilla

Everyone’s favorite Taco Bell menu item: I created this recipe for an Air Fryer Copycat Taco Bell Quesadilla today while preparing a quick lunch for my kids.

Different Recipes

With its crispy outside and creamy, spicy inside, the Taco Bell Quesadilla is a great foundation for many delectable variations. To keep your meals interesting and customized to your tastes, try these inventive takes on the traditional recipe:

Beef Quesadilla: To make a beefier take on the traditional quesadilla, replace the chicken with thinly sliced sirloin or seasoned ground beef. For an added taste boost, sprinkle the steak with taco spice.

Vegetarian Quesadilla: For a substantial meal, swap out the chicken for a mixture of black beans, corn, and diced tomatoes.Richness and creaminess are added by adding avocado slices or guacamole after cooking.

Spicy Shrimp Quesadilla: Use Cajun-seasoned shrimp as your protein to kick up the spice. The creamy jalapeño sauce complements the heat of the shrimp, creating a delectable seafood variation.

BBQ Chicken Quesadilla: Before adding the cooked chicken to the quesadilla, mix it with your preferred BBQ sauce. This rendition has a very American flavor profile thanks to the combination of the sour kick from the jalapeño sauce and the smokiness of BBQ.

Breakfast Quesadilla: Add scrambled eggs, bacon or sausage, and a sprinkling of cheese to make this quesadilla a breakfast feast. For the ideal start to the day, serve with a side of salsa.

Components

  1.  one-fourth teaspoon powdered garlic
  2. Two tspn of jalapeño juice
  3. two tsp chopped jalapenos
  4. one-third cup mayonnaise
  5. 1/2 teaspoon parpika and 1/8 teaspoon cayenne pepper
  6. 1/4 tsp salt
  7. Half a teaspoon of sugar
  8. half a teaspoon of cumin powder
  9. One pound of cooked, diced chicken
  10. Three pieces of American cheese
  11. Five eight-inch flour tortillas
  12. two mugs Monterey & Cheddar Jack cheese, shredded; divided

Guidelines

  • In a mixing bowl, combine the mayonnaise, jalapeño, jalapeño juice, and seasonings until the sauce is well blended.
  • Place a single tortilla open on a level surface. Lay a half-slice of cheese on one long side of the tortilla. Add half a cup of shredded cheese on the same side.
  • Put five or six chicken slices over the cheese.
  • Distribute 1 tablespoon of sauce over the tortilla’s opposing sides.
  • After folding the tortilla, cut it in half.
  • After giving the air fryer basket a quick oil spray, put the half-quesadilla inside. Drizzle a little oil on the quesadilla and cook for 3 minutes on 370 degrees, then flip and heat for an additional 2 minutes.
  • For each tortilla, repeat steps 2 through 5.

Air Fryer Taco Pockets

Air Fryer Taco Pockets

Tender, fluffy crescent roll dough is used to make Air Fryer Taco Pockets, which are then filled with seasoned ground beef, corn, salsa, onion, lettuce, tomato, and cheese.

INGREDIENTS

  1. One pound of ground beef
  2. one cup of chopped onions
  3. one tsp powdered garlic
  4. One tsp of chili powder
  5. One tsp of paprika
  6. Half a teaspoon of cumin
  7. One cup frozen or fresh corn
  8. One cup of drained black beans
  9. one cup salsa
  10. Refrigerated crescent sheet, 2-8 ounce tube
  11. Half a cup of cheese
  12. Nonstick cooking spray

DIRECTIONS

  1. Over medium heat, cook the meat in a pan. When the meat is fully cooked, add the onions and continue cooking.
  2. Stir in the cumin, garlic salt, and chili powder. Next, add the corn, beans, and salsa; stir until well blended. Allow this to get lukewarm.
  3. The crescent sheet should be unrolled; if using crescent rolls, make sure all seams are tightly sealed.
  4. Make four cuts on every sheet.
  5. Evenly distribute a few teaspoons in the middle of each piece. Top each slice with a small amount of cheese.
  6. Twist the edges and corners together after pulling them up.

Get the air fryer ready.

  • Apply nonstick frying spray on the basket. After inserting the pockets into the air fryer basket, close the air fryer. Give each pocket a little frying spray on top. This aids in their browning.
  • Preheat the air fryer to 300 degrees, then bake for 12 to 15 minutes.
  • The heated taco pockets can be taken out of the air fryer with a spatula.
  • Garnish with chopped cilantro, jalapeño slices, sour cream, salsa, and lettuce.

NOTES

  • Ground beef can be substituted with ground turkey or ground chicken. Instead of using the spices, you can use one package of store-bought or homemade taco seasoning.
  • When using crescent rolls, be sure to firmly pinch the seams.
  • To Bake: Bake for 12 to 15 minutes, or until golden brown, in an oven warmed to 350 degrees.
  • To freeze: fry them according to the recipe, allow them to cool fully, then wrap each pocket in plastic wrap before putting them in freezer-safe ziplock bag. After thawing in the fridge for the night, reheat.

AIR FRYER CHEESY TACO CRESCENTS

AIR FRYER CHEESY TACO CRESCENTS

Are you ready for an appetiser that is taco-inspired, cheesy, and crispy? Enjoy these Air Fryer Cheesy Taco Crescents and get ready to wow your loved ones at your next get-together! Prepare to savor this delicious snack by following this easy yet delicious recipe.

SELECT YOUR HEAT LEVEL IS THE FIRST KEY TO SUCCESS.

  • You can easily tailor these Air Fryer Cheesy Taco Crescents to your own level of spiciness and they are ready in matter of minutes.
  • To keep things really easy, grabbed taco spice packet from the grocery store.
  • If want everyone in my family to eat it, have to use modest seasonings. But feel free to add as much heat and spice as you like! F
  • Feel free to alter the flavors for your family by adding extra cumin or crushed red pepper flakes.

COMPOSITION

  1. Pillsbury chilled crescent rolls, one can
  2. Four sticks of Monterey Jack cheese
  3. 1/2 pound of browned ground beef
  4. Half a packet of taco seasoning

DIRECTIONS

  • Heat the air fryer to 400 degrees Fahrenheit.
  • Combine 1/2 envelope of taco seasoning and ground beef in a small microwave-safe bowl. Warm in the microwave for one to two minutes on high.
  • Make eight identical squares out of crescent sheets. Halve every cheese stick.
  • Place one or two teaspoons of the meat mixture and a half stick of cheese on top of each crescent square. (See the blog post’s photos.) To fasten, roll up each square and crimp the ends.
  • Place a square of foil inside the Air Fryer basket. Crème the foil, then arrange the crescents in a single layer on top.
  • Cook for five minutes. After cooking for a further two to three minutes, turn over and brown.

The Ultimate Veggie Delight for Blood Sugar Balance

The Ultimate Veggie Delight for Blood Sugar Balance


Finding a Tasty Path to Well-Being

Many people prioritise controlling their blood sugar levels in their search for health. Envision a cuisine that not only sounds delicious but also has advantages for your waistline and blood sugar levels. Red onions play a prominent role in this unusual recipe, transformed in a way you might not have imagined possible.

Red Onions’ Magic

Not only can red onions provide great flavour to salads and sandwiches, but they are also a nutrient-dense food that may help control blood sugar levels. This recipe proves that eating healthy doesn’t have to be boring by taking these common veggies and making them into something amazing.


The Recipe That Turns Everything Around
Components:

  1. Two crimson onions
  2. A 100–150 gramme bag of rye flour
  3. two eggs
  4. One hundred and fifty grammes of almond flour
  5. 70 grammes of cheese with Parmesan.
  6. One-tspn each of dehydrated basil, paprika, and ginger
  7. 5Fresh basil, garlic, tomatoes, and salt for the sauce


Directions:

  1. To prepare the onions, chop off the tops of each onion, leaving the roots in place. This aids in the onion’s ability to stay intact when sliced and cooked. Slicing the onion from the top will result in parts that open slightly but won’t cut all the way through.
  2. Soak: Let the onions sit in water for ten to fifteen minutes. This process helps to lessen their roughness and give them a modest softness.
  3. Coat: Combine the spices, rye flour, almond flour, and grated Parmesan cheese in a basin. Beat the eggs in a separate basin. Making sure the onion gets into the portions, dip each one in the egg and then the flour mixture.
  4. Bake: Set the oven temperature to 200°C (392°F). After coating, place the onions on a baking dish and bake for 30 minutes, or until they turn a gorgeous golden colour.
  5. The Sauce: Blend tomatoes with garlic, fresh basil, and salt to taste while the onions bake. This light sauce is the ideal foil for the deep, savoury taste of the baked onions.


Beyond the Dish

This recipe isn’t just about enjoying a delicious meal; it’s a step toward embracing a healthier lifestyle. The combination of ingredients works to provide a nutritious boost, potentially helping to manage blood sugar levels and aid in weight loss. Enjoying dishes like this can be a real treasure in your culinary arsenal, proving that healthful eating can be both simple and utterly satisfying.


Feed Your Mind, Body, and Spirit

Taste this creative recipe to see how much fun it can be to keep your weight and health in check. It’s evidence of the potency of putting nutrient-dense components together in novel and interesting ways. With every bite, take care of your health and well-being!