air fryer mac cheese flatbread pizza

air fryer mac cheese

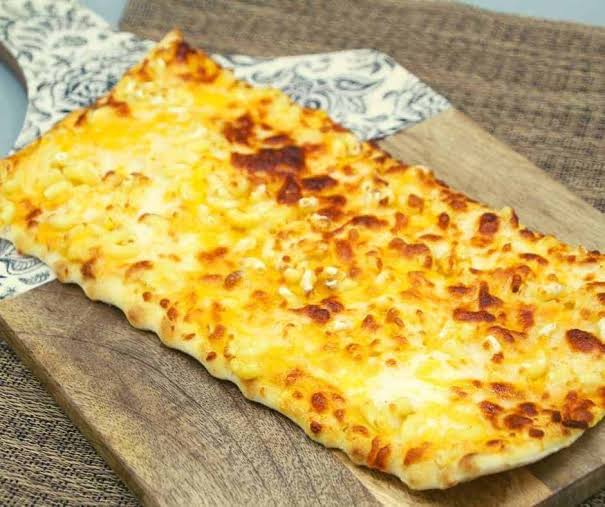
air fryer mac cheese flatbread pizza is amazing. My son’s two favorite foods combined into one. This is a fantastic air fryer pizza if you enjoy flatbread pizzas. We had some leftovers as my son adores mac & cheese, so I created a modern take on the traditional flatbread pizza. This makes a delicious and easy lunch or snack.

Components Required for Air Fryer Macaroni and Cheese

  • Flatbread Pizza Remainder Cheese and Macaroni (Cold)
  • Flatbread Crust
  • Colby, shredded Jack
  • Mozzarella Cheese Shreds


How to Make Pizza with Macaroni and Cheese in an Air Fryer

Lay out the flatbread first, smear it with olive oil, top it with the macaroni and cheese and shredded cheese, and place it in the air fryer basket. Cook for 8 to 10 minutes at 360 degrees Fahrenheit.

Ingredients:

  1. One cup of cold leftover mac and cheese
  2. One large crust for flatbread
  3. One cup of shredded mozzarella cheese
  4. One cup of shredded Colby Jack cheese
  5. One tablespoon of olive oil

Guidelines:

  1. Lay out the flatbread first, smear it with olive oil, top it with the macaroni and cheese and shredded cheese, and place it in the air fryer basket. Cook for 8 to 10 minutes at 360 degrees Fahrenheit.

Nutrition

Serving: 1 g Calories: 940 k cal Carbohydrates: 69 g Protein: 45 g Fat: 54 g Saturated Fat: 22 g Polyunsaturated Fat: 2 g Monounsaturated Fat: 15 g Cholesterol: 107 m g Sodium: 1763 m g Potassium: 383 m g Fiber:  0.4 g Sugar: 1 g Vitamin A: 1035 I U Calcium: 924 m g Iron: 4 mg

A Weekend Delight

A Weekend Delight: The Onion Recipe You’ll Cherish


Uncovering the Pleasure of Sautéing Onions

A recipe has a certain quality that makes you return to it again and again, particularly on the weekends. For many, it’s a recipe that elevates the common onion to a flavorful and joyful focal point. This specific onion recipe, which combines ease of preparation with a hint of culinary flair, has grown to be a beloved weekend ritual.

The Key to Its Enjoyment

Why is this dish of onions so delicious? It all comes down to treating the onion as the main attraction rather than only a supporting role. The onions’ inherent sweetness is brought out by roasting or caramelising them, producing a rich, complex flavour that improves everything it comes into contact with.

Components & Methodology

The essence of this recipe is in its simplicity and the transforming effect of slow cooking, while the exact recipe can be altered to suit individual tastes. Here’s a basic recipe for making your own onion treat over the weekend:

Ingredients:

  1. Big onions—the better the sweeter—
  2. Butter or olive oil
  3. A small amount of salt
  4. Herbs and spices (balsamic vinegar, thyme, and rosemary provide amazing depth) are optional.


Directions:

  1. Preheat & Prepare: If you’re roasting, start by heating your oven. After peeling, cut the onions into wedges or thick slices.
  2. Taste: Drizzle the onions with melted butter or toss them in olive oil. Add salt and any additional spices or herbs that you want.
  3. To cook, place the onions on a baking pan and roast them at a high temperature until they have a gorgeous caramelised colour. You can also cook them slowly in a pan until they’re tender and golden brown if you prefer stovetop caramelising.


Why I Love It on Weekends

For a few reasons, this dish for onions has become a weekend favourite. It’s adaptable, simple to make, and soothing. You may serve the onions as an accompaniment to practically any main meal, such as baked potatoes or grilled meats. The task of preparing is almost as satisfying as the meal itself since the long frying of the onions provides a period of peace and contemplation.

Accepting the Onion

This onion recipe is a great addition to your culinary repertoire, regardless of your level of experience in the kitchen. It’s not just a dish, but a beloved weekend ritual that adds richness and cosiness to the table and shows that sometimes the simplest ingredients can make the most delicious dinners. Try it this weekend; you never know, it might end up becoming your favourite recipe as well.


Revitalise Your Liver 3 Day Cleanse

Revitalise Your Liver 3 Day Cleanse

Revitalise Your Liver 3 Day Cleanse Grandma’s old recipe for liver cleansing is a testament to the enduring power of natural remedies. While modern life is filled with complex health solutions, sometimes the simplest ingredients can offer profound benefits.

If you’re looking for a natural way to support your liver and cleanse your body, this gentle yet effective detox might be the perfect start. Remember, maintaining a healthy lifestyle with a balanced diet and regular exercise is essential for overall health and well-being.


First of all, With this straightforward but effective recipe that has been handed down through the ages, rediscover the wisdom of the past. This traditional mixture of lemons, baking soda, garlic, and honey is meant to detoxify the body and cleanse the liver, leaving you feeling refreshed. This dish is worth trying out whether you’re looking to treat your liver or you’re just interested in natural detoxification techniques.


1. The Influence of Basic Components:

  • Lemons: Distinguished by their elevated vitamin C concentration, lemons are an abundant source of antioxidants that bolster hepatic function and facilitate elimination of bodily pollutants.
  • Baking soda: Baking soda is frequently commended for its capacity to maintain the pH balance of the body, which promotes improved health and detoxification.
  • Garlic: When it comes to cleansing, this unassuming component is a superfood. Allicin and selenium, two potent substances found in garlic, help cleanse the liver.
  • Honey: In addition to being incredibly tasty, honey has inherent antibacterial and antioxidant properties that promote general health and wellness.


2. Grandma’s Liver Cleanse Recipe: This is an easy recipe to follow, but it takes three days to complete. Here’s how to use and prepare this home remedy:

  • Two garlic bulbs should be peeled, chopped, and combined with the juice of two lemons.
  • A teaspoon of baking soda should be added to the blend.
  • Add 125 ml honey and stir until a smooth consistency is achieved.
  • Take one spoonful of this combination on an empty stomach every morning for three days.

3. What to Expect: Your body may react to this cleanse in a number of ways throughout the course of these three days, such as altered digestion or an increase in energy. These are not alarming signals; rather, they are indicators that your body is getting rid of pollutants. But it’s important to pay attention to your body; if you feel uncomfortable, think about reducing the dosage or seeing a doctor.

air fryer strawberry muffins

air fryer strawberry muffins


  1. Three cups of all-purpose flour
  2. two tsp powdered baking
  3. Half a teaspoon of salt
  4. One stick of room temperature, unsalted butter
  5. 1 cup of sugar, granulated
  6. Two big eggs
  7. One tsp vanilla essence
  8. One tsp almond extract
  9. half a cup of milk
  10. 2 1/2 cups chopped strawberries


Guidelines:

  1. In a large bowl, add the flour, baking powder, and salt, and mix well. In another bowl, add the butter and granulated sugar, and mix to combine, fold into eh almond extract and vanilla extract.
  2. Add the milk and eggs after that. Blend the batter until all the ingredients are well mixed. Grease your muffin pans with melted butter (not salted), or spray them with cooking spray.
  3. Strawberries should be included into the batter. Fill the muffin pans with roughly 3 teaspoons of strawberry batter. After inserting the muffin pan into the air fryer basket and adjusting the temperature to 320 degrees Fahrenheit, air fry the muffins for 12 to 15 minutes, or until they are set.


Expert Advice for the Greatest Strawberry Air Fryer Muffins

Look no further if you’re searching for an air fryer recipe that will wow your palate! These flavor-bursting strawberry muffins are really simple to prepare. To consistently prepare the best muffins, use our expert advice. Have fun!

  • Use either fresh or frozen strawberries for this recipe. Add frozen strawberries to the muffin batter if you wish to use them.
  • Thick: Although the batter is a little thick, it doesn’t matter because you will still have delicious handmade strawberry muffins.
  • Timing: It is crucial to monitor the cooking of your muffins because each air fryer varies significantly.


Storage:

Bring these delicious muffins with you everywhere! They make the ideal on-the-go breakfast or snack. They will last two to three days at room temperature if you put them in a plastic bag to preserve their freshness.

To freeze: Allow them to cool fully before tightly wrapping in plastic wrap or Saran wrap. Your muffins should then be placed in a freezer bag. You can store them in the freezer for up to three months.


Recipe Adapted From: Fork To Spoon

AIR FRYER CHEESY PULL-APART BREAD

AIR FRYER CHEESY PULL-APART BREAD

This easy appetizer, Air Fryer Cheesy Pull-Apart Bread, cooks in the air fryer in a matter of minutes. The combination of three types of cheese, butter, and garlic in this bread loaf is sure to please..

SELECT THE RIGHT BREAD LOAF IS THE FIRST KEY TO SUCCESS.

  • For this cheesy bread recipe, you want your bread loaf to be firmer and more rounder, similar to sourdough.
  • A very soft loaf will not hold up well with all the cheese on top, so avoid breeding it for this cheesy bread loaf.
  • Perfect bake-at-home bread boules could be found at my supermarket store.
  • Mine weighed nine ounces, and my air fryer could fit it nicely.
  • I could have probably squeezed a ten- or twelve-ounce loaf in there as well.
  • And while I recommend a round loaf, if your air fryer can accommodate an oblong loaf, by all means use it.

COMPOSITION

  1. One 9-ounce round loaf of bread
  2. 1/4 cup melted butter
  3. Two teaspoons of chives
  4. 1 teaspoon finely chopped garlic
  5. Half a cup of shredded cheddar cheese
  6. Half a cup of shredded mozzarella cheese
  7. Four ounces of brie cheese

DIRECTIONS

  • Set the air fryer’s temperature to 350°F.
  • Combine the melted butter, chives, and garlic in a small bowl.
  • Make grid-like incisions on the top of the bread loaf with a bread knife. Don’t cut through the bread completely.
  • Apply the butter mixture to every slit using a spoon or small brush, making sure to get as much butter as possible into the crevices.
  • Press the tiny slices of brie cheese into each indentation.
  • Top the bread with a layer of cheddar and mozzarella cheese, packing the shredded cheese into any empty spaces.
  • The bread loaf should be placed in the hot air fryer basket. Cook for 4–5 minutes at 350 degrees Fahrenheit, or until the bread is thoroughly warmed and the cheese has melted.

AIR FRYER SAUSAGE BALLS

AIR FRYER SAUSAGE BALLS

Sausage balls fried in the Air Fryer in a matter of minutes provide a quick and easy make-ahead breakfast option. They are incredibly easy to make and only take a few minutes to prepare. They are made with Jimmy Dean breakfast sausage, Velveeta, and Bisquick baking mix. Simply cook the sausage balls when you’re ready by preparing them in advance and freezing them.

ARE UNBAKED SAUSAGE BALLS FREEZABLE?

Yes, freezing these tasty sausage balls—perfect for appetizers, get-togethers with family, and holiday celebrations—will help you streamline your morning routine.

Just put the raw sausage balls on a baking sheet covered with parchment or wax paper that is safe to store in the freezer, and then give them one to two hours to solidify.

  • If your sheet pans won’t fit in the freezer, don’t panic; just use any flat, freezer-safe surface that is the appropriate size.
  • When the sausage balls are solid, move them to a freezer bag, vacuum seal bag, or ziploc bag to store them in the freezer for an extended period of time.
  • This sticking together won’t happen if you use the pre-freeze tray method.
  • There’s no need to thaw your frozen sausage bals before enjoying them

COMPOSITION

  1. One pound of Jimmy Dean sausage
  2. 1 pound of Velveeta cheese
  3. and 1 1/2 cups of Bisquick mix

DIRECTIONS

  • Heat the air fryer to 320 degrees Fahrenheit.
  • Place the sausage and Velveeta cheese in a food processor. (The mixture won’t be perfectly smooth.)
  • Blend in Bisquick and pulse a few times to mix everything together.
  • Form into walnut-sized balls and drop ten to twelve sausage balls at a time onto a shallow baking dish or Air Fryer basket.
  • Simmer for five minutes. After flipping the balls, bake for a further five minutes, or until the sausage balls turn golden brown.


Superfood Zucchini Recipe

Superfood Zucchini Recipe

Superfood Zucchini recipe First of all, Discovering meals that meet all the requirements for a balanced and healthful lifestyle—being tasty, nourishing, and conducive to weight loss—can occasionally feel like unearthing a hidden gem. You don’t need to search any more since we have discovered a recipe for zucchini that is both delicious and healthy, and it will quickly become a mainstay in your kitchen. Let’s explore how this straightforward vegetable may make your meals a source of happiness and well-being.

Body:

Zucchini: A Multipurpose Superfood Summer squash like zucchini is a nutritious powerhouse that is low in calories and high in vitamins, minerals, and dietary fiber. Because of this, it’s the perfect element for anyone trying to keep up a nutritious diet, control control your weight or just have a light, revitalizing lunch. It is a great addition to many different cuisines because of its mild flavor and adaptability.

The Recipe:

  • A Flavorful Treasure Trove: This beloved recipe for zucchini is created to bring out the best nutritional value and delicious flavors of this underappreciated vegetable. What you’ll need is
  • Cut medium zucchinis into spirals or rounds for a unique twist.
  • A dash of your preferred seasonings and herbs (garlic powder, basil, or oregano, for example)
  • A tiny bit of olive oil for frying
  • A few cherry tomatoes or a sprinkling of reduced-fat cheese are optional but add taste.
  • t’s a simple method: sauté the zucchini until it becomes tender, while adding a little olive oil and your preferred herbs. For an extra nutritional boost and color pop,As cooking comes to a finish, add some cherry tomatoes. If you’re in the mood for something decadent, a sprinkling of reduced-fat cheese can provide a richness without sacrificing the health advantages.
  • Why You Should Save This Recipe: This dish for zucchini is not only delicious but also promotes a healthy lifestyle in various ways. Its high fiber content makes you feel full and pleased, and its low calorie count makes it ideal for weight management. Zucchini is also high in antioxidants and hydration, which support general health and wellbeing.
  • In summary, this zucchini recipe is a celebration of eating healthfully and feeling fantastic, not just a dish. Whether your goal is to lose a few pounds, add more nutrient-dense meals to your diet, or just in Looking for a delicious new recipe? This one is likely to become your favorite. Accept zucchini as a treasure and allow it to guide you toward good health and happiness.

grandmas beetroot wonder

grandmas beetroot wonder

Recipes that have been handed down through the years have a unique quality. They are treasures on a platter, not just food. I’m thrilled to share with you today a recipe that my granny gave me that has been a family favourite for many years. She prepares this dish three times a week since she thinks beetroot has healing properties. You’ll see why after you give it a try. This dish for beetroot is a favourite of everyone trying to feed their body and soul because it is not only delicious but also full of health benefits.


Ingredients:

  1. 4 small beetroots, chopped and peeled
  2. Two tsp olive oil
  3. To taste, add salt and pepper.
  4. two minced garlic cloves
  5. For a tart twist, add one tablespoon of balsamic vinegar (optional).
  6. Fresh herbs for garnish, such dill or parsley


Guidelines:

preheat the oven: Set your oven’s temperature to 375°F (190°C) to start. The inherent flavours and nutrients of the beetroots are preserved thanks to this cooking technique.

To prepare the beetroots, coat them in a mixture of olive oil, salt, pepper, and minced garlic. Add some balsamic vinegar if you want to add even more flavour.
Roast till Perfect: Arrange the beetroot pieces on a baking sheet in a single layer. Roast, tossing periodically, in the preheated oven for about 45 minutes, or until soft and beginning to caramelise.

Garnish and Serve: After letting the roasted beetroots cool a little, move them to a platter. To add a burst of freshness, sprinkle with fresh herbs just before serving.


Why It’s Essential Every Week

This dish has several health advantages in addition to being a culinary delight. Beetroot is well-known for increasing vigour, reducing inflammation, and promoting mental wellness. It is evidence that appetising food can be exceptionally nourishing as well.

So, keep grandma’s beetroot recipe in mind the next time you’re looking for a quick, tasty, and healthful food. It’s a hearty and nourishing side dish that serves as a reminder that often the simplest recipes are the most satisfying.

The Ultimate Natural Immunity Boosting Elixir

The Ultimate Natural Immunity Boosting Elixir

Introduction: It is more crucial than ever to take action to strengthen our immunity and detoxify our systems because we live in a society where toxins are continuously attacking our bodies and our meals may not always be the healthiest. Fortunately, nature offers us an abundance of fruits and ingredients that can strengthen our resistance to bacteria and viruses, increase our blood count, and cleanse our liver, blood vessels, and intestines.

  1. The Power of Blueberries: Packed with health benefits, blueberries are small but mighty fruits. They boost your immunity in addition to increasing your blood count. Because they are high in antioxidants, blueberries support your body’s defences by scavenging free radicals.
  2. Lemon: The Citrus Shield: Lemons are well known for having a high vitamin C content, which makes them a great ally for serving as a potent antioxidant and preventing stress. During flu season, this citrus fruit is your best bet because it helps fight off infections and revitalise your body from the inside out.
  3. Ginger: The Revitalizer: This potent root does more than just add flavour to food; it also increases blood flow, boosts energy levels, and protects heart health by decreasing cholesterol and blood sugar. Its purifying qualities are also crucial for eliminating toxins from the body and leaving you feeling refreshed.
  4. Kiwi: The Superfruit High in Vitamin C: The kiwi is a fruit with enormous health benefits, so don’t let its small size deceive you. Kiwis are full of vitamin C, which protects your body from free radicals. They can also help lower high blood pressure, strengthen your immune system, ward off allergies and colds, and protect you from them.
  5. Apple: The All-Natural Curator It’s true that a daily apple keeps the doctor away. Apples are good for your blood vessels, liver, kidneys, and bile. They aid in bodily hydration and offer defence against ailments like angina pectoris and atherosclerosis. This fruit supports your body’s essential processes and is a true natural healer.

Conclusion: You can greatly improve your health and wellness by include these natural wonders in your regular diet. Blending some juice or smoothie is an easy and tasty method to reap these advantages. In addition to tasting amazing, this refreshing drink with blueberries, lemon juice, ginger, kiwi, and apple combined with a little water strengthens your immunity and detoxifies your body. By embracing these organic components, you can keep your health profile robust and bright and make sure you’re always prepared to take in life’s wonderful moments.

Moms Natural Remedy with Garlic

Moms Natural Remedy with Garlic

Moms Natural Remedy with Garlic: A Powerful Solution for Common Complaints There is a wealth of knowledge passed down through the centuries in every home. This wisdom frequently manifests itself in the form of effective homemade cures. One such gem is Mom’s homemade garlic natural medicine, which is a straightforward yet effective treatment for a range of common ailments and can offer calming respite.


Why Would You Eat Garlic?

Garlic is useful for more than just enhancing the flavour of your meals. It has several therapeutic benefits that have been utilised for ages. Garlic is an all-natural pain reliever that is well-known for its anti-inflammatory, antioxidant, and analgesic properties. Because it contains natural components like allicin, which have therapeutic properties of their own, it is a great option for treating illnesses naturally.

Formulating the Solution

The simplicity of Mom’s garlic cure is its beauty. You just need a few cloves of garlic and a carrier oil, like coconut or olive oil, to prepare it. To release the health benefits of the garlic cloves, start by crushing or coarsely cutting them. Next, combine the garlic with the carrier oil of your choice. This mixture can be applied externally to the affected areas, providing a comforting warmth that penetrates deep into the skin, easing pain and reducing inflammation.

Adaptable and Powerful

Mom’s garlic treatment can be customised to address particular problems:

  • Apply a little massage of the mixture to your legs to ease pain and promote circulation if you suffer from varicose veins or leg pain.
  • Use on arthritic and rheumatism-affected joints to help reduce stiffness and pain.
  • For headaches: Apply sparingly to the back of the neck or the temples to relieve tension headaches.
  • For joint pain: Garlic oil massages on a regular basis can help reduce persistent pain.


A Cautionary Note

Even while this natural therapy can offer substantial relief, it’s crucial to perform a patch test before using it widely, particularly if you have sensitive skin. The carrier oil helps to lessen the potency of the often strong garlic. Before applying it heavily, though, it’s wise to make sure your skin is comfortable with it.


Accepting Natural Healing

More than merely a custom, Mom’s homemade garlic cure is evidence of the therapeutic value of the natural world. Choosing to follow this straightforward yet efficient remedy will put you on a path to natural healing that has soothed generations of people. So let’s honour the counsel of our elders and discover solace and happiness in the restorative power of nature!