How to Soak Almonds Effectively

Unlock the Benefits: How to Soak Almonds Effectively

Almonds can be made more easily digestible and have more health benefits by just soaking them. This traditional method not only softens the nuts and improves their flavour, but it also releases enzymes that help the body absorb nutrients more effectively. Here’s how to soak almonds properly, whether your goal is to include them in your diet for improved digestion, heart health, or just as a healthy snack.

Why Are Almonds Soaked?

  • Nutrient-dense almonds are high in fiber, magnesium, and vitamin E. Phytic acid, an antinutrient that can prevent the absorption of minerals including iron and zinc, is also present in them. Soaking stimulates enzymes that facilitate the easier absorption of almond nutrients and lowers phytic acid levels.

A Comprehensive Guide for Soaking Almonds:

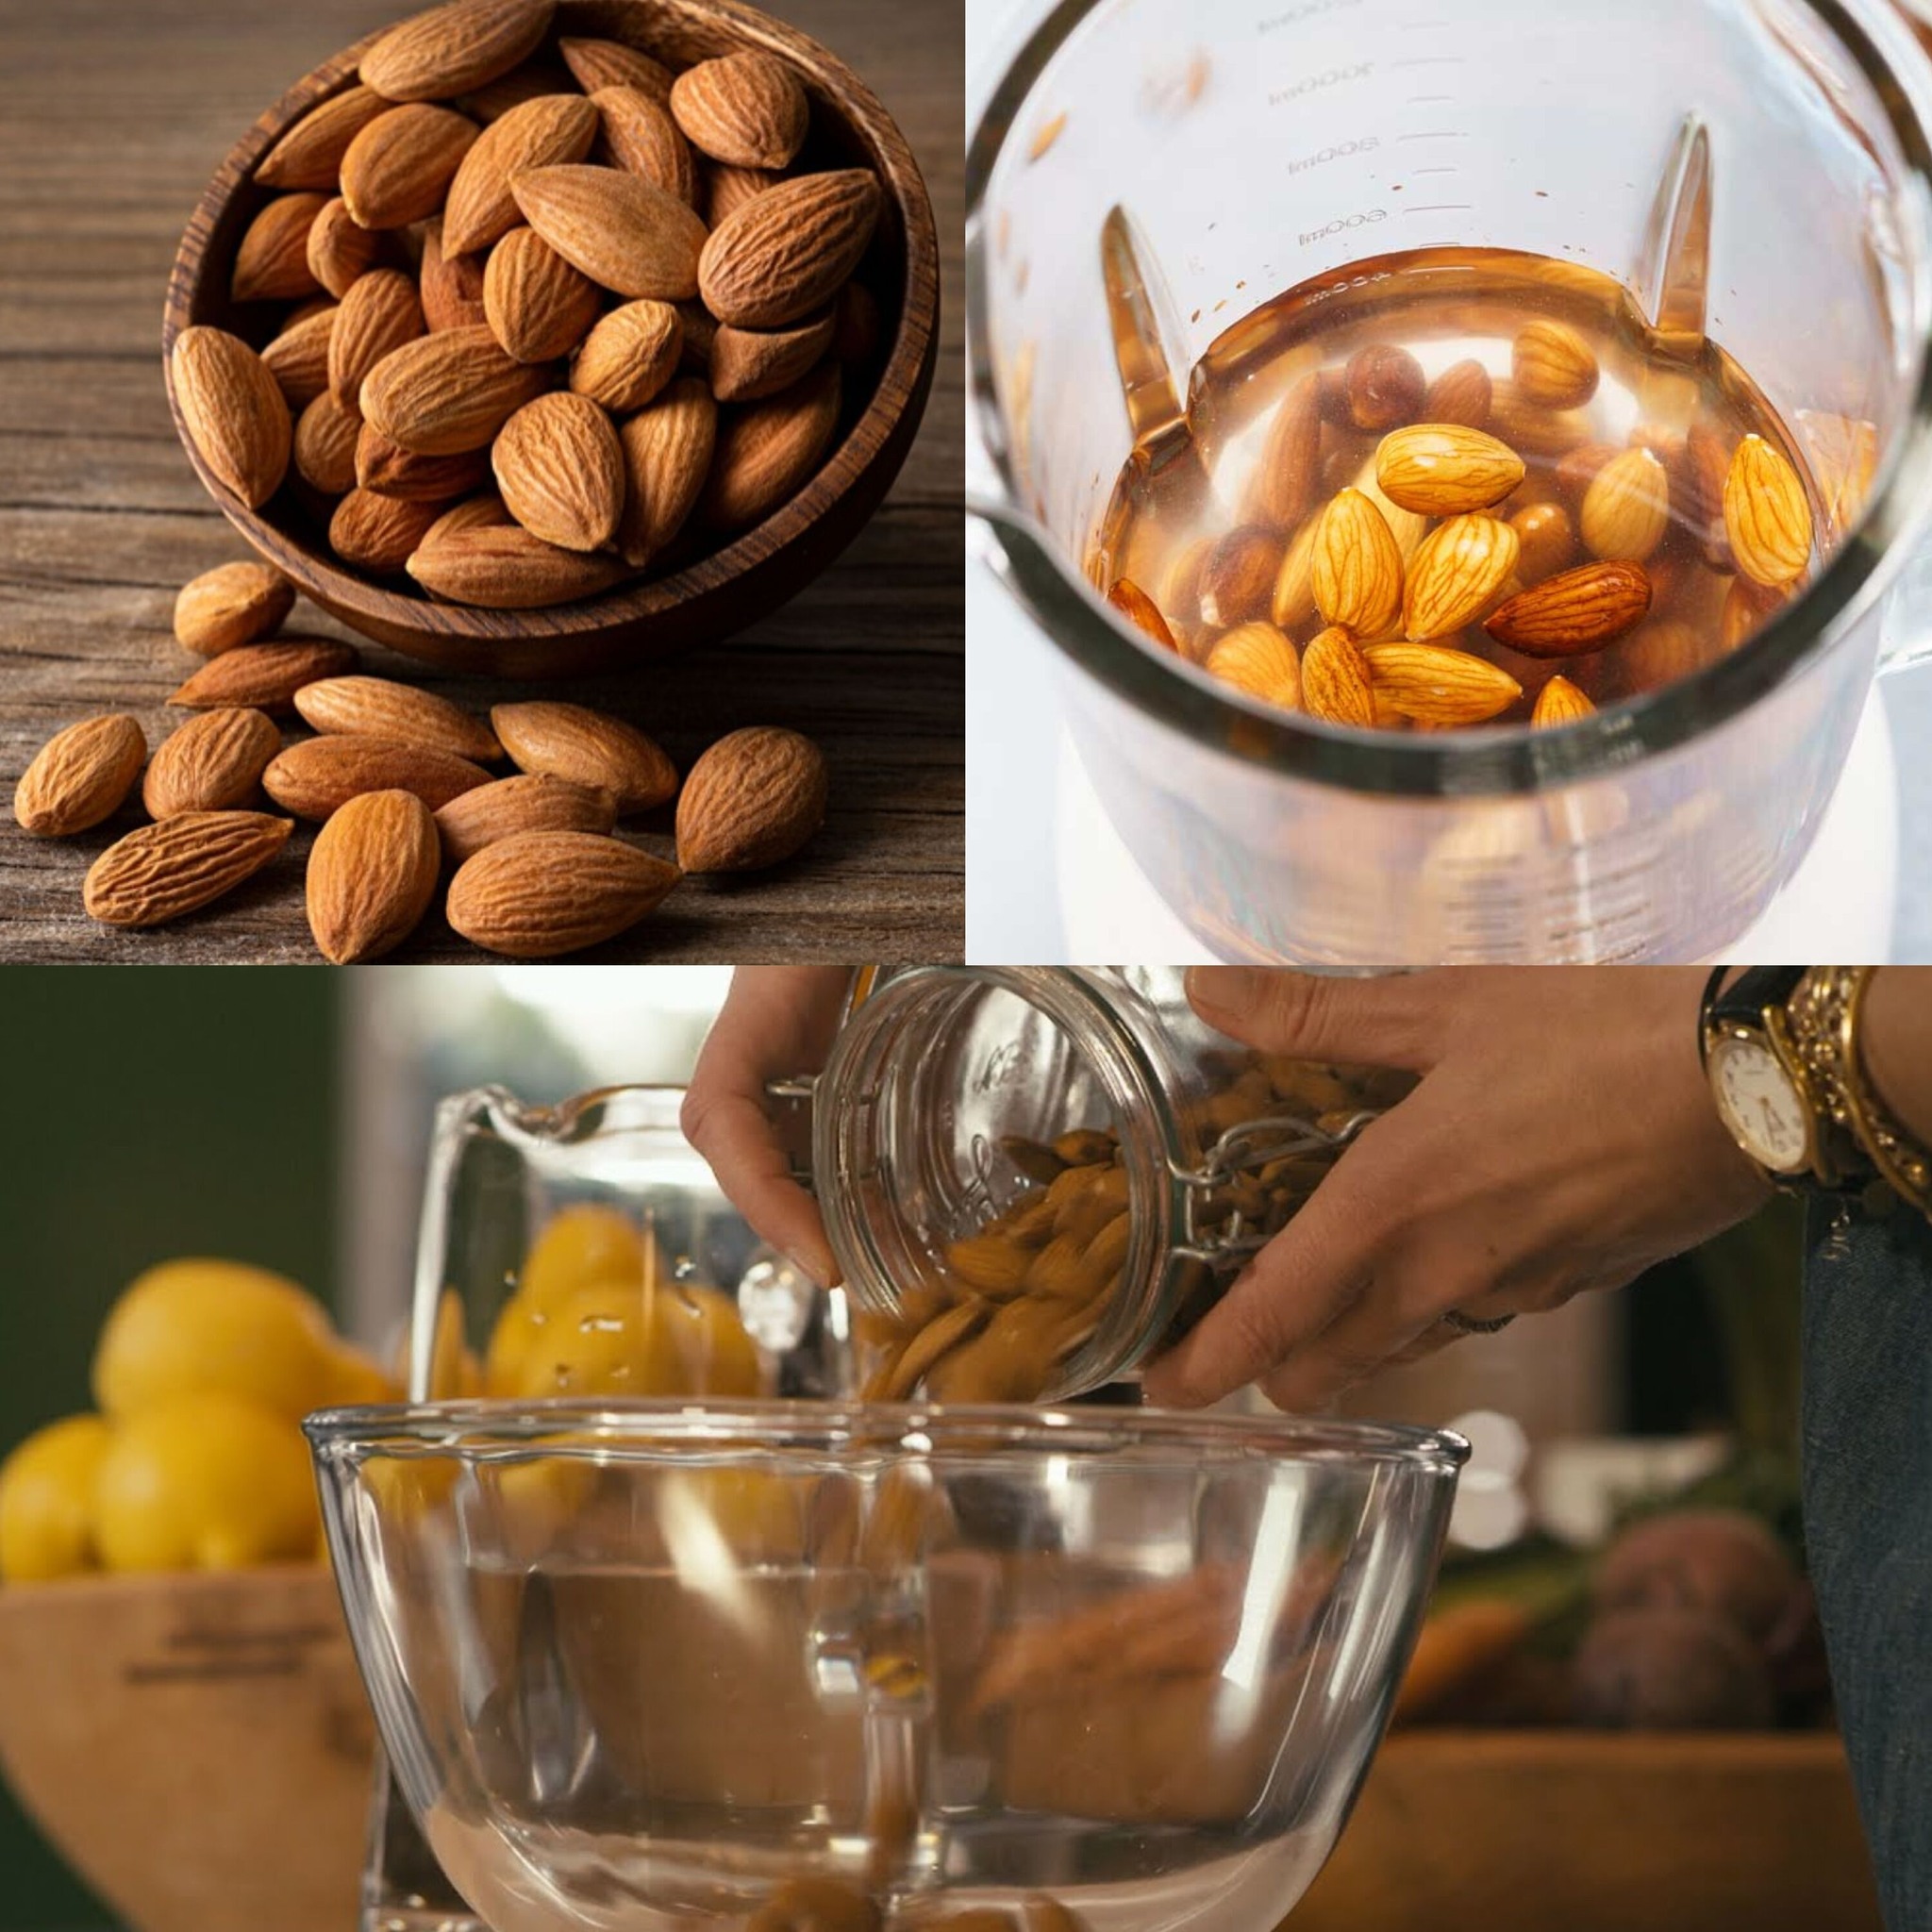
  • 1. Choose Raw Almonds: Begin with almonds that are raw and unsalted. They are perfect for soaking because they haven’t been heat-treated or processed and yet have all of their natural enzymes.
  • 2. Clean Them: To get rid of any residues and contaminants, rinse your almonds under cool running water.
  • 3. Soak in Water: Put the almonds in a basin and add twice as much water to cover them. Make sure there is adequate space in the bowl because they swell when they absorb water.
  • 4. Cover and Soak: Place a cloth over the bowl and leave it there for the almonds to soak for at least eight to twelve hours. This length of time gives the enzyme enough time to activate.
  • 5. Drain and Rinse: After the almonds have soaked, drain them and give them a good rinse under cold water. The almonds ought to be a little softer at this time.
  • 6. Use or Store: The almonds can be eaten right away or kept in the fridge. Almonds that have been soaked can be stored in the fridge for a few days. Make sure they are in a sanitised container with a lid on it.

Soaked Almonds’ Uses:

  • Snacking: Savor them as a soft, creamy snack.
  • Smoothies: Include them in smoothies to add extra nourishment and a nutty flavour.
  • Almond Milk: To produce your own homemade almond milk, soak your almonds.
  • Recipes: Add them to homemade granola, salads, and desserts.

in summary

Almonds gain maximum health advantages when soaked, which also happens to make them tastier and simpler to chew. These kinds of small changes can have a big impact on how your body uses the nutrients in almonds. You may discover that you love almonds even more after trying this method!

The Famous Cake That Drives You Crazy

The Famous Cake That Drives You Crazy! This Secret from My Grandmother

Let me describe the scene for you: It’s a leisurely Sunday afternoon, and you have a sweet tooth. However, it just feels too intimidating to spend hours in the kitchen making a cake. Do not be alarmed; I have the answer! In just fifteen minutes, you may have a delicious cake prepared using this recipe. You read correctly—fifteen minutes! Now, prepare to go on a culinary journey that will make your taste buds tingle with ecstasy by rolling up your sleeves.

Ingredients Let’s look at what you’ll need to make this amazing cake before getting into the specifics of the preparation process:

Regarding the Cream:

  1. One egg
  2. 50 grams, or 1.7 ounces, of caster sugar
  3. Ten grams, or 0.4 ounces, of vanilla sugar
  4. 15 grams or 0.4 ounces of maize starch
  5. 250 ml, or one cup, of milk

Regarding the Dough:

  • two eggs
  • 100 grams, or 3.5 ounces, of caster sugar
  • One dash of salt
  • 3.5 ounces (100 milliliters) of milk
  • 50 milliliters (1.7 fluid ounces) of sunflower vegetable oil
  • Six ounces (about 170 grams) flour
  • One-teaspoon baking powder
  • 50 grams, or 1.7 ounces, of ground almonds
  • 50 grams, or 1.7 ounces, of almond flakes
  • granulated sugar

Making Cream

Let’s begin by making the deliciously creamy frosting that will make our cake shine:

  • Crack the egg into a pot that fits. Add the milk, cornflour, vanilla, and caster sugars. To make the components uniform, mix them together.
  • After putting the pot on medium-high heat, keep stirring until the cream gets thicker. When it’s finished, transfer it into a glass container and place food film over it. Let it cool down fully.

Getting Ready for Dough

Let’s go on to the dough, which serves as our cake’s base:

  • Crack the eggs into a large bowl and season with salt and sugar. Beat the ingredients on high speed in a mixer until they froth and turn white. This could require three to four minutes.
  • Pour the milk and vegetable oil into the mixture in a thin stream and stir again.
  • Pour the baking powder and flour straight into the bowl and sift. Using a silicone spatula, mix in the ground almonds and mix the dough thoroughly. Everything should be thoroughly mixed to produce a lump-free, creamy dough.

Making the Cake

Now that the cream and dough are prepared, let’s make our cake:

  • Pour the dough onto a rectangle baking dish that has been lined with parchment paper, making sure to distribute it evenly. For an added crunch, top with almond flakes.
  • Pour the chilled cream into a pastry bag, then press your palm down to press a mesh of cream onto the dough’s surface.
  • Preheat the oven to 170°C. Bake the dessert for about 40 minutes, or until it is cooked through and golden brown.

Serving and Gratitude

  • Congratulations! You’ve just finished baking a scrumptious cake in a flash! The only thing left to accomplish is:
  • After taking the cake out of the oven, place it on a dish.
    For the last touch, dust the top with powdered sugar.
    Cut it into serving-sized portions and enjoy each taste immensely!

Grandma’s Delicious Chicken Roll-Up

Grandma’s Delicious Chicken Roll-Up

Components:

Regarding the Chicken:

  1. – Three chicken fillets, divided into halves
  2. – Season to taste with salt
  3. black pepper,
  4. Italian herb blend, and paprika.

Regarding the Sauce:

  • 200 milliliters of vegetable oil,
  • two teaspoons of vinegar,
  • four eggs,
  • one tablespoon of mustard,
  • and three garlic cloves
  •  Black pepper and salt, to taste

For the filling

  •  chop the parsley;
  • cut the garlic cloves;
  • and divide the 150 grams of cheese into two halves.

Regarding the Potatoes:

  • – Four potatoes, sliced into pieces
  • – Two tablespoons each of salt, paprika, and black pepper
  • – Two tablespoons of vegetable oil

Directions:

  • 1. Put the chicken fillets between two pieces of clingfilm and pound them lightly until they are very thin.
  • 2. Add paprika, salt, black pepper, and an Italian herb mixture to the chicken’s seasoning.
  • 3. Combine the eggs, mustard, vinegar, minced garlic, and vegetable oil in a bowl. Put some salt and black pepper over it. Using a mixer, beat.
  • 4. Turn the oven on to 180°C, or 350°F.

Apply a thick layer of sauce to each chicken fillet for the Chicken Roll-Ups: 1.

  • 2. Top with minced garlic and chopped parsley.
  • 3. Top each fillet with half of the cheese.
  • 4. Using toothpicks, secure the chicken fillets after rolling them up.

Regarding the Potatoes:

  • 1. Combine the vegetable oil, salt, paprika, and black pepper with the potato chunks.
  • 2. Spread some vegetable oil on a baking pan and arrange the potato chunks on it.

To Put Together:

  • 1. Top the potatoes with the chicken roll-ups.
  • 2. Drizzle the chicken roll-ups with more sauce.
  • 3. Bake at 180°C (350°F) for 40 minutes.
  • 4. After adding the remaining cheese, bake for a further five minutes, or until golden brown.

Irresistible Spaghetti Bolognese

Irresistible Spaghetti Bolognese

The ingredients are as follows:

  1. 300 grams of minced meat and vegetable oil for frying
  2. – One onion, cut very finely –
  3. Two cloves of garlic, minced –
  4. Four hundred milliliters of tomatoes, either canned or fresh, blended –
  5. One teaspoon of salt –
  6. Pepper to taste
  7. – Two teaspoons of paprika
  8. Oregano, one teaspoon amount
  9. – One-half cup of warm water
  10. – One teaspoon of salt
  11. – One tablespoon of olive oil –
  12. Two hundred pounds of spaghetti

Details to follow:

  • In a skillet, bring the vegetable oil to a simmer, then add the minced beef. Fry for five minutes for a browned appearance.
  • After adding the onion that has been finely diced, continue to sauté the meat for another three minutes.
  • 3. Add the garlic that has been minced and thoroughly combine.
  • The fourth step is to add the pureed tomatoes and then season them with oregano, salt, pepper, and paprika. For a few minutes, cook the food.
  • Stir the sauce while adding the warm water, then allow it to simmer for a while.
  • 6. Cook the spaghetti in a separate saucepan until it is cooked through, following the instructions on the package.
  • In order to avoid the spaghetti from sticking together, drain it and then toss it with olive oil.
  • It is recommended that the pasta be served with the delectable Bolognese sauce on top.

Incredible Cookies: A Delightful Journey into Linzer Biscuits

Incredible Cookies: A Delightful Journey into Linzer Biscuits

Greetings from the wonderful world of Linzer biscuits, where delicious fruitiness combines with buttery richness. We’re going to take a trip down memory lane as we learn how to make these amazing cookies, which will undoubtedly become your new favorite treat.

The Allure of Kraft Biscuits
Linzer biscuits are unique in the world of baked products because of their soft crumb and enticing sweetness. These cookies, which are originally from Austria, are known for their distinctive almond flavour and their recognisable “cut-out” appearance, which shows a mouthwatering glimpse of bright raspberry jam.

Components

You’ll need the following to make your own batch of Linzer biscuits:

  1. 150 g of soft butter (1/4 stick or 1/3 cup)
  2. Sugar powder: 75 g (2/3 cup)
  3. One yolk from an egg
  4. Two cups of plain flour, 250 grams
  5. 100 g (1/3 cup) of raspberry jam

Technique of Preparation

Let’s examine each step involved in creating these delicious treats:

Spreading the Dough

  • blend butter and powdered sugar together: In a mixing dish, blend soft butter and powdered sugar until smooth.
  • Add egg yolk: Gently whisk the egg yolk into the butter-sugar mixture until thoroughly blended.
  • Add plain flour: Stir the mixture until a smooth dough forms, then gradually add the sifted plain flour.
  • Cool the dough: Roll out the dough onto a sheet of baking paper that is about 3–4 mm thick, cover it with another sheet of baking paper, and repeat. To firm it up, put it in the freezer for fifteen minutes.

Baking to a Perfect Finish

  • Set the oven’s temperature to 180 degrees Celsius.
  • Cut out the cookies: From the chilled dough, cut out circles about 4–5 cm in diameter using a cookie cutter.
  • Then, arrange the circles on a baking sheet covered with parchment paper.
  • Bake: Bake the cookies for 12 to 15 minutes, or until they are golden brown, in a preheated oven.

Putting Together and Filling

  • Let the cookies cool: On a wire rack, let the baked cookies cool fully.
  • Stuff with raspberry jam: Evenly coat the bottom halves of the cookies with raspberry jam.
  • Place one jam-coated biscuit on top of the other to form a sandwich, and then gently press down to seal the two together.

Serving Ideas

  • Enjoy these delicious Linzer cookies as the ideal afternoon treat with a steaming cup of tea or coffee. When presented in a nice box with a ribbon bow, they also make thoughtful gifts for friends and family.

What Makes Linzer Biscuits Unique

There are multiple reasons why Linzer biscuits are unique.

  • Versatility: Feel free to use your preferred jams or preserves for the filling.
  • Visual Appeal: Any dessert spread gains a hint of refinement from the elaborate lattice arrangement.
  • Rich Flavour: The mellow flavour profile produced by the marriage of fruity jam and buttery cookie is absolutely enticing.

In summary
To sum up, Linzer biscuits are more than just cookies; they’re a gourmet experience that pleases the palate and makes you feel good. These amazing cookies will quickly become a beloved favourite in your repertoire of baked goods because to their buttery texture, fruity filling, and adorable appearance.

FRENCH TOAST BAKE Easy too Prepare

FRENCH TOAST BAKE  Easy too Prepare the night before and pop in the oven in the morning

Parts and pieces:

  1. 1/2 cup of butter that has been melted (one stick)
  2. 1 volume of brown sugar
  3. 1 loaf of bread that has been sliced deeply
  4. 4 eggs in total
  5. 3/4 of a cup of milk
  6. 1/4 milligram of vanilla
  7. Sugar in powder form for use in sprinkling
  8. Sprinkled cinnamon for flavoring

INSTRUCTIONS

  • 1. In a microwave-safe bowl, melt the butter and add the brown sugar. Stir until the ingredients are combined.
  • The second step is to distribute the butter and sugar mixture around the bottom of a 9 x 13 pan.
  • 3. Whisk together the eggs, milk, and vanilla.
  • 4. Arrange individual pieces of bread in the pan.
  • Fifth, place half of the egg mixture on the bread layer.
  • Sixth, sprinkle some cinnamon on top of the bread and eggs.
  • Seventh, add the second layer of sliced bread. Eighth, scoop the remaining egg mixture on top.
  • 9. Place the dish in the refrigerator and cover it.
  • 10. Bake for forty-five minutes at a temperature of three hundred and fifty degrees (covering the dish for the first thirty minutes).
  • 11. Sprinkle with cinnamon and powdered sugar before serving.
  • (12) Accompany the dish with warm maple syrup.

Bread Substitute with 3 Ingredients Prepared in Seconds

Bread Substitute with 3 Ingredients Prepared in Seconds

Fresh, handmade bread is one of the greatest culinary treats. Our bread substitute is superior than conventional bread for individuals who want a faster, easier option without sacrificing taste or texture. Three simple ingredients and a few minutes can make a versatile, delicious bread alternative that will become a kitchen staple. This recipe is ideal for hectic days, spontaneous events, or when you want fresh-baked bread without the bother.

Ingredients

  1. 450g flour (16oz)
  2. 30-ml vegetable oil 2 teaspoons
  3. 240 ml hot water (1 cup)
  4. Salt (to taste)

Instructions in detail

  • 1. Dough Preparation
  • Sift Flour: Sift 450 grams of flour into a large bowl. This step makes your flour light and lump-free, essential for a smooth, flexible dough.
  • Add Oil, Salt, and Water: Mix 2 tablespoons vegetable oil and a pinch of salt with the flour. Gradually add 240 ml of boiling water while swirling with a wooden spoon or hands. The hot water binds the components and makes the dough easy to deal with.
  • 2. Kneading and Resting Dough
    Knead the Dough: After mixing, place the dough on a lightly floured surface. Knead for 5-7 minutes to make smooth and elastic. Gluten, which gives bread structure and chewiness, is developed during kneading.
  • Form a Ball: Gather the kneaded dough into a ball and wrap it in plastic or a cereal bag. Let it rest 20 minutes. Resting the dough relaxes the gluten, making rolling simpler.
  • 3. Shape and Rest Dough Balls
    Divide the Dough: After resting, divide the dough into eight equal halves. Make tiny balls from each part.
  • Rest: Cover the dough balls with a breakfast bag or damp towel for 10 more minutes. A second rest makes the dough simple to roll out without springing back.
  • 4. Roll Dough in Thin Sheets Roll each dough ball thinly on a lightly floured surface. The diameter should be 6-8 inches, depending on how thick you like your bread alternative. Thinner dough makes crispier bread.
  • 5. Cooking Bread Substitute Heat a dry, non-stick pan over medium-high heat for roasting. Put one rolled-out dough sheet in the pan. Until golden brown, cook for 1-2 minutes per side. The dough will inflate up during cooking, making it light and fluffy.
  • Cool and Serve: Set the bread on a wire rack to cool after cooking. Repeat with remaining dough balls. For a tasty snack or supper, cut the bread sheets in half crosswise and fill them with your favorite fillings.

The Perfect Bread Substitute Tips

  • Use Hot Water: Hot water makes dough malleable and workable. It also makes bread puff up when cooked.
  • Avoid skipping rest periods. Resting relaxes gluten, making dough easier to roll and reducing shrinkage during cooking.
  • Thin Rolling: Roll dough thinly without ripping. Thinner dough makes bread replacement crisper.
  • Make sure your pan is hot before adding dough. This provides consistent cooking and avoids bread from drying out.

Flexible Serving Ideas

  • The bread alternative may hold your favorite sandwich fillings. Its light, airy texture complements meats, cheeses, and vegetables.
  • Wraps: Quick and healthy wraps with grilled chicken, fresh veggies, and sauce.
  • Serve bread wedges with hummus, tzatziki, or your favorite dip.
  • Breakfast: Scrambled eggs and avocado make a hearty breakfast.
  • Pizza Base: Quick pizza base with bread substitution. Add your favorite toppings and bake until cheese melts and bubbles.

Conclusion

Making a tasty bread alternative at home has never been easier. Fresh, homemade bread for any meal can be produced in minutes with three ingredients. This flexible recipe will become a kitchen favourite for sandwiches, wraps, or eating alone.

Bubble Donuts Recipe

Bubble Donuts Recipe

The ultimate soft and sweet snack! A tasty and entertaining treat, these bubble donuts are ideal for sating your sweet desire. Let’s get started on this simple dish.

Components of the Donuts

  1. Ten tablespoons and one cup of flour
  2. Two and a half tablespoons of sugar
  3. one-third teaspoon of salt
  4. One teaspoon of yeast
  5. One egg
  6. half a cup of milk
  7. 1/8 cup melted butter

Regarding the Glaze

  1. Half a cup of sugar powder
  2. One spoonful of hot water

Guidelines

  • First step: Combine the dry ingredients.
    Combine the flour, sugar, salt, and yeast in a sizable mixing basin. Combine all of the dry ingredients and stir until thoroughly mixed.
  • Add the wet ingredients in step two.
    Then combine the melted butter, egg, and milk with the dry ingredients. Stir until all of the dough is incorporated. Wrap the bowl in plastic wrap.
  • Let the Dough Rise in Step Three
    After putting the dough-filled bowl aside, let it sit at room temperature for approximately one hour. This facilitates the dough’s rising.
  • Step 4: Get the Frying Dough Ready
    Place the mixture into a piping bag after one hour.
  • Step 5: Bring the Oil to a Heat
    A large amount of cooking oil should be added to a saucepan and placed over medium heat. Roughly 350°F/175°C is the frying temperature that the oil should attain.
  • Step 6: Let the doughnuts fry
    Squeeze the batter into the heated oil using the piping bag, then cut the dough into little balls with a clean pair of scissors. Fry the donuts until they get crispy and golden. Take them out of the oil and pour off any extra on a dish covered with paper towels. Proceed with the leftover batter.
  • Create the Glaze in Step 7
    Mix the heated water and powdered sugar in a small bowl. Blend until a smooth glaze is formed.
  • Glaze the doughnuts in Step 8
    While the bubble donuts are still hot, spread the glaze over them. Before serving, let the glaze somewhat set.

Advice

  • To prevent greasy or undercooked donuts, make sure the oil is at the proper temperature.
  • You can add some more powdered sugar or coloured sprinkles to the glazed donuts as an added touch.

Nutritional Data (per serving)

  • 220 calories
  • 4g of protein
  • 30g of carbohydrates
  • 10g of fat

Reasons to Love This Recipe
The surface of these Bubble Donuts is perfectly crispy, while the center is perfectly soft. They are an appealing delicacy because the sweet glaze gives the perfect amount of sweetness. They are a lovely snack at any time of day and a great addition to any party because they are simple to make and enjoyable to eat.

Keep in Touch and Spread the Love!
Have you tried making this recipe? I would adore hearing your opinions! Please share your ideas by leaving a comment below. Please think about sharing this recipe on social media with your friends and family if you liked it. Your encouragement enables me to write more scrumptious recipes for you!

The Delightful German Apple Oatmeal Recipe

The Delightful German Apple Oatmeal Recipe: A Taste of Germany’s Finest

There’s no need to search any farther for a filling and delectable breakfast choice than the German Apple Muesli recipe. This delicious combination of muesli, fresh apples and a hint of vanilla essence is a taste of Germany’s culinary expertise and a wholesome way to start the day. This essay will walk you through the precise steps of making this delicious dish, which has been a family favorite in Germany for many years.

Components (For 8 Servings):

  1. One cup of muesli
  2. fifty grams of walnuts
  3. Two apples
  4. thirty milliliters of water
  5. One teaspoon vanilla extract, or more according to taste
  6. To taste, add agave syrup.

instructions

step 1: Get the muesli ready

  • First, use a blender to finely chop the muesli. Next, use a kitchen knife to finely chop the walnuts and chop one of the apples into smaller cubes.

Step 2: Puree the apples

  • In this stage, purée one of the apples in a blender with water until it becomes a smooth puree. Slice the second apple into smaller pieces. Combine the apple pieces, agave syrup, crushed muesli flakes, chopped walnuts and vanilla essence in a separate bowl.

Step 3: Blending the Elements

  • It’s time to combine every component at this point. After adding the applesauce, fully blend everything together. When the mixture is uniform and easily spread with a spoon onto a baking sheet covered with parchment paper, it is done.

Step Four: Cooking

  • Preheat the oven to 200°C (392°F). Bake the oat biscuits for about 30 minutes, or until they are crispy and golden brown.
  • The outcome is a delicious batch of oatmeal biscuits with a hint of vanilla essence and the flavors of fresh apples. This recipe for German apple muesli is a favorite with children and adults alike because it strikes the ideal balance between the earthy richness of muesli and the sweetness of apples and the crunch of walnuts.
  • So why not give the most popular breakfast meal in Germany a try for yourself and your loved ones? Make a batch of these oatmeal biscuits and enjoy the genuine flavors that have made them a national favorite.

In summary
Finally, the recipe for German Apple Muesli delivers the taste of Germany directly to your breakfast table, making for a lovely culinary experience. This recipe is sure to impress any crowd because it has the ideal balance of muesli, apples and a hint of vanilla essence. Try it and enjoy the healthy sweetness it adds to your mornings.

Healthy Lentil Bread Recipe

The Secret to My Grandmother’s Longevity: Healthy Lentil Bread Recipe

We frequently look to individuals who have accomplished the amazing feat of living for over a century for inspiration when it comes to leading long and healthy lives. One of the best examples of such longevity is my grandmother, who lived a long and happy life thanks to a simple handmade lentil bread that was sweetened just enough. We’ll explore my grandmother’s amazing life story and share the family recipe for her fabled lentil bread in this post. It has been passed down through the years.

The Extraordinary Heritage of My Grandmother
My grandmother was an amazing person who lived to reach almost one hundred years old. Everyone who knew her found great inspiration in her energy and enthusiasm for life. She credited a number of things for her long life, such as her upbeat attitude, her active lifestyle, and of course her unique lentil bread recipe.

Ingredients for the Lentil Bread Recipe:

  1. 1 250 grams, or 1/4 cup, of lentils
  2. 700 milliliters, or 2 7/8 cups, of water
  3. 100 milliliters, or 3.4 fluid ounces, of water
  4. Two tsp olive oil
  5. Two tsp of rice flour
  6. One teaspoon of turmeric
  7. One tablespoon of coriander powder
  8. One-teaspoon baking powder
  9. Twice as much psyllium husk
  10. Add salt to taste.
  11. One tsp lemon juice
  12. vegetable oil (used as lubricant)
  13. A couple of handfuls of sunflower seeds
  14. Several sesame seeds

Guidelines:

  • Start by soaking 250 grams of lentils for eight hours in 700 milliliters of water. This enables the lentils to absorb more water and swell.
  • Once the lentils have soaked, grind them in a blender with an extra 100ml of pure water until they are smooth.
  • Blend till 30ml of olive oil is added gradually.
  • Mix together 2 tablespoons rice flour, 1 teaspoon each of turmeric and ground coriander, 5 grams of baking powder, and 2 teaspoons of psyllium in a different bowl.
  • Thoroughly combine the dry ingredients.
  • Mix thoroughly after adding the dry ingredient mixture to the ground lentils. Add salt to taste to season.
  • Add 1 tablespoon of rice flour to the batter if it seems too runny, and stir until the right consistency is reached.
  • One tablespoon of lemon juice is stirred in to give the batter a light zest.
  • After using vegetable oil to grease a bread pan, pour the lentil batter into the pan.
  • For extra taste and texture, sprinkle some sesame and sunflower seeds over the batter.
  • Preheat the oven to 200°C and bake the lentil bread for 60 minutes.
  • After baking, allow the bread to cool while you make the dipping sauce.