I Can’t Stop Eating This Beetroot, Carrot, and Cabbage Salad: A Delicious New Salad Recipe

I Can’t Stop Eating This Beetroot, Carrot, and Cabbage Salad: A Delicious New Salad Recipe

Beet, carrot, and cabbage salad recipe that is both colorful and good for you

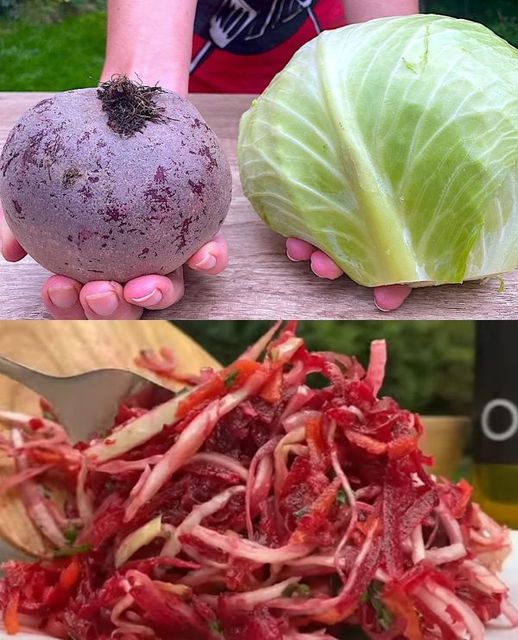
Enjoy the bright harvest from nature with a Beetroot, Carrot, and Cabbage Salad that is both colorful and healthy. The earthy sweetness of beets, the crispness of carrots, and the crunch of cabbage come together in this refreshing salad to make a symphony of tastes and textures that will delight the senses. This salad not only tastes great but also is good for you because it is full of vitamins, minerals, and enzymes. Let us look at the recipe to learn how to make this tasty meal.

WHAT’S IN THE BLEND:

  1. Peel and grate two medium-sized beets.
  2. Peel and grate two big carrots.
  3. 1/4 small head of cabbage, cut very thinly
  4. 1/2 cup chopped fresh parsley 1/4 cup toasted sunflower
  5. seeds or more if you want them crunchy
  6. 2. 5 cups of olive oil
  7. 1 tablespoon of vinegar from apple cider
  8. 1 teaspoon maple syrup or honey
  9. Add salt and pepper to taste.

HOW TO DO IT:

DIRECTIONS STEP BY STEP:

Step 1: Get the vegetables ready:

  • Peel the carrots and beets first, then grate them with a box grater or a food machine that has a grating attachment. Cut the cabbage into very thin pieces.
  • Second Step:
  • Mix the Ingredients: Put the grated beets, carrots, sliced cabbage, and chopped parsley in a big bowl. If you want, you can add toasted sunflower seeds to give it more crunch and nuttiness.
  • Make the dressing in the third step: Add the apple cider vinegar, honey or maple syrup, salt, and pepper to a small bowl. Use a whisk to mix the ingredients well. You can add more vinegar or sugar to taste to change the dressing.
  • Toss the salad in the fourth step. Pour the dressing over the beet, carrot, and cabbage in the big bowl. Toss the items with clean hands or salad tongs until they are all covered in the dressing. Make sure all the veggies are well mixed together and covered in the tasty dressing.
  • 5. Cover the salad bowl with plastic wrap or a lid and put it in the fridge for at least 30 minutes to let the flavors blend and the veggies get ready to be cooked.
  • Step 6: Serve and enjoy! Take the salad out of the fridge one last time after it has been chilled and give it one last toss. Move the cabbage, beet, and carrot salad to a serving plate or bowls for each person. If you want, you can add more chopped parsley or sunflower seeds as a garnish.
  • Step 7: Make it your own: You can make this salad your own by adding things like thinly sliced red onions, crumbled feta cheese, or extra lemon juice for flavor.

The Beetroot, Carrot, and Cabbage Salad is not only beautiful to look at because of its bright colors, but it’s also full of healthy, delicious tastes. This salad is sure to impress with how fresh and lively it is, whether it’s a side dish, a light lunch, or a gift to a potluck. This simple but satisfying recipe is good for you and tastes great. Let its bright flavors brighten your table and feed your body.

Air Fryer Donuts How to Make Them Fluffy and Delicious

Air Fryer Donuts How to Make Them Fluffy and Delicious

A great way to enjoy this classic treat with less oil and work is to make fluffy, tasty donuts in an air fryer. Let me show you how to make soft donuts in an air fryer that are crispy on the outside and impossible to resist:

How to Use an Air Fryer to Make Fluffy and Delicious Donuts

Donuts made in an air fryer are a better option than fried donuts, but they still taste great and have a fluffy texture. This recipe will show you how to use your air fryer to make donuts that are light, fluffy, and taste great.

Chapter 1: What You Need to Make the Donuts:

  1. 2 1 and a half teaspoons dry yeast that works
  2. 1/2 cup of warm milk (around 110°F)
  3. 1/4 cup of sugar, broken up
  4. 1/4 cup of melted unsalted butter
  5. 1 big egg
  6. Two and a half cups of wheat flour
  7. 1/2 teaspoon salt Oil mister or cooking spray

For the Glaze:

  1. 1 cup of sugar powder
  2. 2 to 3 tablespoons of water or milk
  3. Half a teaspoon of vanilla extract
  4. Sprinkles or food coloring (extra, for looks)

Chapter 2: Getting Ready

  • Get the yeast going: Mix the yeast and a little sugar with warm milk in a small bowl. Wait 5 to 10 minutes until it foams up.
  • The dough needs to be mixed. Put the activated yeast mixture, sugar, melted butter, egg, flour, and salt in a big bowl or the bowl of a stand mixer fitted with a dough hook.
  • Slow down the mixer and keep mixing until the dough comes together. If you have a stand mixer, knead the dough for 5 to 7 minutes on medium speed. To knead by hand, work the dough on a lightly floured surface for 8 to 10 minutes, or until it is smooth and pliable.
  • First Rise: Grease a bowl and put the dough in it. Turn the dough over once to coat it with oil.
  • Use a clean kitchen towel or plastic wrap to cover the bowl.
  • It will double in size after about an hour of rising in a warm place that doesn’t get drafty.

Chapter 3: Cutting and Fry in the Air

  • Get the air fryer ready by: For about 5 minutes, heat your air fryer up to 350°F (175°C).

How to Shape the Donuts:

  • After the dough has risen, punch it down and place it on a lightly floured surface.
  • The dough should be rolled out to about 1/2 inch thick.
    To make donuts and donut holes out of the dough, use a donut shape or two round cookie cutters of different sizes. Roll out any leftover dough again, and keep going until all the dough is gone.
  • Fry the donuts in the air: Spray or brush the air fryer basket with a little cooking spray or oil.
  • Put the donuts and donut holes in the air fryer basket so that they are all in one layer. Leave some room between them.
  • Spray cooking spray or oil on top of the donuts just a little.
    To cook, put the donuts in an air fryer set to 350°F (175°C) and flip them over once or twice during the five to six minutes, until they are golden brown and fully cooked.

Chapter 4: Making Panes

  • Get the glaze ready: Mix powdered sugar, milk or water, and vanilla extract in a small bowl with a whisk until the mixture is smooth. If you need to, add more milk or powdered sugar to change the consistency.
  • Pour the glaze over the donuts. Coat both sides of each warm donut evenly with the glaze. Let any extra glaze fall to the ground.
  • Decorate: You can add food coloring, sprinkles, or other toppings to the glazed donuts while the sauce is still wet if you want to.

Chapter 5: How to Serve and Do Well

  • Serve Warm: Serve the donuts straight away, while they are still warm and the sauce is still fresh.

How to Make Fluffy Donuts:

  • Make sure the yeast is properly active and that the dough rises in a warm place.
  • Do not pack the air fryer basket too full; this will allow air to flow around the donuts properly.
  • Depending on the type and size of your air fryer, you may need to change the cooking time.

Various forms: Try different glazes, like chocolate, maple, or lemon, or put jelly or cream inside the donuts to make them more interesting.

In conclusion
These donuts made in an air fryer are a great treat for breakfast, lunch, or any time you want something sweet. You can make donuts in your air fryer that are perfectly cooked, with a crispy outside and a soft, fluffy inside. You can also control the ingredients and make them healthier than regular fried donuts. Enjoy these tasty homemade treats with your family and friends.

Crispy & Healthy Air Fryer Chicken Breast

Crispy & Healthy Air Fryer Chicken Breast

Chicken breast cooked in an air fryer gets crispy and healthy, and you don’t have to use a lot of oil. Here’s a simple air fryer recipe for chicken that will be juicy and have a crunchy outside:

Crispy and healthy chicken breast cooked in an air fryer

Air-fried chicken breast is a healthy and tasty meal that has both tender chicken and a crunchy coating. It is cooked with very little oil. This recipe makes it easy to cook chicken breasts in an air fryer until they are perfectly done.

Part 1: What You Need

  1. 2 chicken breasts without bones or skin
  2. 1 tablespoon pan spray or olive oil
  3. 1/2 cup breadcrumbs (or panko breadcrumbs for extra crunch)
  4. 1/4 cup grated Parmesan cheese (not required but can add taste)
  5. 1 table spoon of garlic powder
  6. One teaspoon of pepper
  7. 1/2 teaspoon dried thyme
  8. Add salt and pepper to taste.
  9. Spray or mister for oil or cooking

Chapter 2: Getting Ready

  • Warm up the air fryer: For about 5 minutes, heat your air fryer up to 375°F (190°C).
  • Get the chicken breasts ready: Use paper towels to pat the chicken breasts dry to get rid of extra water.
  • Pound the chicken breasts until they are the same width, which should be about 1/2 to 3/4 inch.
  • Cover the chicken: Put the breadcrumbs, garlic powder, paprika, dried thyme, salt, and pepper in a small bowl or plate. If you want to use Parmesan cheese, grate it.
  • Spray or brush olive oil on both sides of the chicken breasts to make them even.
  • Cover in Breadcrumb Mixture: Coat each chicken breast with the breadcrumb mixture. Lightly press each breast into the mixture to make sure the covering sticks to all sides.

Chapter 3: Cooking with air

  • Air Cook the chicken breasts: Apply food spray or oil mister to the air fryer basket to make it a little more slippery.
    Put the chicken breasts that have been coated in the air fryer basket so that they are all in one layer.
  • How long it takes to cook: Between 18 and 22 minutes, flip the chicken breasts over and cook them at 375°F (190°C) until they are golden brown and hit 165°F (74°C) inside.
  • Make sure it’s done: Make sure the chicken breasts are fully cooked with a meat thermometer. The inside should be soft and juicy, and the outside should be crispy.

Chapter 4:

  • Serving Time: Take the chicken breasts out of the air fryer basket and let them rest for a few minutes. Then you can slice them or serve them.
  • Cut and Serve: Cut the chicken breasts in half and serve them hot with your favorite sides, like rice, salad, or steamed veggies.

Chapter 5: How to Do Well

  • How thick a chicken is: To make sure the chicken breasts cook evenly in the air fryer, make sure they are all the same thickness.
  • Stickiness of the Breading: Press the breadcrumb mixture firmly onto the chicken breasts to make sure it stays on well while air-frying.
  • Capacity of an air fryer: If you need to, work in batches to keep the air fryer basket from getting too crowded, which can make the chicken less crispy.
  • Various forms: You can change the flavors by adding your favorite herbs and spices to the dressing and breading.

In conclusion
Air-fried chicken breast is a healthy and flexible dish that gets crispy without deep-frying. With this easy recipe, you can make chicken breasts that are juicy and full of flavor. They’re great for a quick and filling meal. For a healthy and tasty dinner, pair these crispy chicken breasts with your favorite sides.

Air Fryer Roasted Potatoes and Bacon

Air Fryer Roasted Potatoes and Bacon

Potatoes roasted in an air fryer with bacon are a tasty and cozy meal. Here’s an easy way to make them:

ingredients

  1. One pound (450 grams) of baby potatoes, cut in half or quarters if they are big
  2. 4 pieces of bacon, cut up
  3. 2. 5 cups of olive oil
  4. 1 table spoon of garlic powder
  5. One teaspoon of pepper
  6. Add salt and pepper to taste.
  7. Freshly chopped parsley can be used as a topping.

How to Do It:

First Step: Get ready and season

  • Warm up the air fryer: For about 5 minutes, heat your air fryer up to 400°F (200°C).
    Get potatoes ready:
  • Toss the baby potatoes that have been cut in half with olive oil, garlic powder, paprika, salt, and pepper in a big bowl until they are well covered.
  • Throw in some bacon. Put the chopped bacon in the bowl with the seasoned potatoes and mix them together well.

Step 2: Fry in the air

  • Cook in Groups: Spread out the bacon and potatoes that have been seasoned in the air fryer basket. Depending on how big your air fryer is, you might have to cook in batches to keep it from getting too crowded.
  • To air fry, set the basket in the air fryer at 400°F (200°C) and shake it every 15 to 20 minutes. Keep shaking it until the potatoes are golden and crispy on the outside and the bacon is cooked all the way through and crispy.

Step 3:

  • Serve Make the potatoes and bacon look nice by putting them in a serving dish. If you want, you can add fresh chopped parsley as a garnish. Serve hot.

Hints and changes:

  • Changes: You can add your favorite herbs and spices, like smoked paprika, rosemary, or thyme, to make the flavor your own.
  • You can add chopped onions or bell peppers to make it taste better and change the color.
  • If you want the bacon to be extra crispy, you can cook it in the air fryer before adding it to the potatoes.
  • Roasted potatoes and bacon in an air fryer are a tasty and easy meal that can be used as a side dish or the main course. You don’t have to use a lot of oil when you use an air fryer to make potatoes and bacon crispy. You can eat this tasty and comforting dish by itself or with your favorite main food.
  • With this recipe, you can use your air fryer to make crispy, tasty potatoes and bacon with little work. Have fun making this tasty food and enjoying it!

Air Fryer Grilled chicken And Cheese Sandwiches

Air Fryer Grilled chicken And Cheese Sandwiches

You can make grilled ham and cheese sandwiches in the air fryer in no time. The outside gets crispy, and the cheese melts inside. In your air fryer, here’s how to make them just right.

ingredients

  1. 8 slices of sandwich bread (you can choose white or whole wheat)
  2. 8 pieces of cold chicken
  3. Eight slices of cheese, like cheddar, Swiss, American, or any other cheese that melts well.
  4. For spreading, you can use butter or mayonnaise.
  5. Olive oil spray or cooking spray

How to Do It:

Ready the sandwiches in the first step.

  • Put together sandwiches: Set out 4 pieces of bread. First put a slice of cheese on each slice. Then add two slices of chicken (bent to fit if needed) and another slice of cheese.
  • Add the last few slices of bread on top to make sandwiches.
  • You can choose to use butter or mayonnaise. Add a little butter or mayonnaise to the outside of each sandwich. This helps the outside get red and crispy when air-frying.

Step 2:

  • Get the air fryer hot Warm up: For about three to five minutes, heat up your air fryer to 360°F (182°C).

Step 3:

  • Spray the sandwiches with oil and cook them in an air fryer. To keep the basket from sticking, lightly spray it with cooking spray or brush it with olive oil.
  • Toast the bread: Lay the sandwiches out flat in the air fryer pan. Depending on how big your air fryer is, you might have to cook them one at a time.
  • For an air fry, set the temperature to 360°F (182°C) and cook for 4 to 5 minutes. Use tongs or a spatula to carefully flip the sandwiches over halfway through cooking to make sure they brown evenly.
  • If the outside of the sandwich is golden brown and crispy and the cheese is melted and gooey on the inside, it’s done.

Step 4:

  • Serve it cold or hot: Wait a minute or two before serving the sandwiches. Cut them in half across the middle and serve them hot.

How to Make the Best Grilled chicken and Cheese Sandwiches in an Air Fryer:

  • Pick Your Own Bread: For these sandwiches, use your best bread. To hold the fillings in place and keep the texture, thicker pieces work best.
  • Cheese Options: To get a range of tastes, try cheddar, Swiss, American, or a mix of these cheeses.
  • Extras: To make the sandwiches taste better, put cut tomatoes, spinach, or a mustard or mayonnaise spread inside them.
  • Make sure to put butter or mayonnaise evenly on the outside of the bread slices before air-frying them to get a crispy outside.
  • Reheating: To reheat remains, air fry them at 350°F (175°C) for two to three minutes, or until they are hot all the way through.
  • You can make these grilled chcken and cheese sandwiches in the air fryer for a quick lunch or dinner. Both kids and adults will love them! You can eat the fried, cheesy goodness right out of the air fryer.

Air fryer chicken and potatos


Air fryer chicken and potatos

This recipe makes a tasty and healthy meal with juicy, flavorful chicken and crispy, seasoned potatoes that can all be cooked in the air fryer.

ingredients

  1. 4 chicken legs with bones and skin still on
  2. 4 large potatoes, cut into wedges and peeled
  3. 2. 5 cups of olive oil
  4. 2 tablespoons of pepper
  5. 1 table spoon of garlic powder
  6. 1 teaspoon of onion powder
  7. 1 teaspoon of dried thyme
  8. Half a teaspoon of dried rosemary
  9. Add salt and pepper to taste.
  10. Chop some fresh parsley (optional, for decoration).

How to Do It:

First Step: Get the potatoes and chicken ready.

  • Warm up the air fryer: For about 5 minutes, heat your air fryer up to 375°F (190°C).
  • To make the potatoes, put the potato wedges in a big bowl and add 1 tablespoon of olive oil, paprika, garlic powder, onion powder, dried thyme, dried rosemary, salt, and pepper. Toss the wedges around until they are evenly covered.
  • To make the chicken, rub the chicken legs with the last tablespoon of olive oil and sprinkle them with salt and pepper.

Step 2: Fry the potatoes in the air fryer.

  • Make the potatoes: Put the seasoned potato wedges in the air fryer basket so that they are all of the same size. For 15 minutes, air fry the potatoes at 375°F (190°C), shaking the pan every so often, until the potatoes are golden brown and crispy. Take it out and set it aside.

Step 3: Cook the chicken in the air fryer

  • To cook the chicken, put the chicken legs in the air fryer basket with the skin side down. For 10 minutes, air fry at 375°F (190°C).
  • Flip Chicken: Turn the chicken thighs over and air fry for another 10 to 12 minutes, or until the chicken hits 165°F (74°C) inside and the skin is golden brown.

Step 4: Serve:

  • Put the chicken and potatoes from the air fryer on a plate and serve them hot. If you want, you can top them with chopped fresh parsley.

How to Get the Best Chicken and Potatoes in an Air Fryer:

  • Thighs of chicken: When you use bone-in, skin-on chicken legs, the chicken will be more juicy and flavorful. You can also use chicken breasts or drumsticks, but the cooking times will need to be changed.
  • For even cooking, cut the potatoes into pieces that are all the same size. You can leave the skin on to keep it healthy and add structure.
  • Seasoning: You can change the spices to your liking. To change things up, you can add smoked paprika, Italian spice, or even a little Parmesan cheese.
  • Make sure it’s done: Before you serve the chicken thighs, make sure they hit a safe internal temperature of 165°F (74°C) using a meat thermometer.
  • Various forms: Shred veggies like onions, bell peppers, or carrots and put them in the air fryer basket. This will make a full meal at once.
  • Storage: Any food that is left over can be kept in the fridge for up to three days in a sealed container. Put it back in the air fryer and heat it up for a few minutes more.
  • Any day of the week, you can make this simple and tasty chicken and potato recipe in the air fryer.

Apple Biscuits Without Sugar, Flour, and Eggs In the Oven or in the Pan

Apple Biscuits Without Sugar, Flour, and Eggs In the Oven or in the Pan

People are always looking for healthier snacks and sweets because they care about their health these days. Apple cookies are one of these treats that has become famous. On top of being tasty, these treats are unique in that they are made without sugar, flour, or eggs. These apple cookies are a great treat that won’t make you feel bad, whether you bake them in the oven or cook them in a pan. We will talk about the ingredients and steps needed to make these delicious apple biscuits in this piece.

ingredients

  1. One hundred grams of nuts (almonds, walnuts)
  2. 50 grams of dried apricots or cranberries and 50 grams of raisins
  3. 240 grams of apple peels
  4. 1 squeeze of lemon juice
  5. 2 tablespoons of olive oil
  6. Oatmeal (enough to fill a 250ml bottle)

Making apple cookies: how to do it:

  • Cut up the nuts.
    First, cut the nuts (almonds or walnuts) into small pieces that are easy to eat. This will give your apple cookies a great crunch.
  • Combine nuts, dried fruit, and oatmeal.
    Dried cranberries, raisins (or dried apricots), and oatmeal should all be mixed together in a bowl with chopped nuts. They will make a healthy base for your biscuits if you mix them well.
  • Cut up the apples.
    Put the apple peels in a different bowl and grate them. Add a teaspoon of lemon juice and mix well to keep the apples from turning brown. The lemon juice not only makes the apples taste better, but it also keeps their bright color.
  • Put in Olive Oil
    Now add two tablespoons of olive oil (or any other veggie oil you like) to the grated apples. This should be mixed into the apple mixture to make the biscuits taste and feel better.
  • Put the mixture in the fridge.
    Put the bowl with the apples, nuts, dried fruit, and oatmeal in the fridge for about thirty minutes to cool down. The ingredients can blend together during this resting time, making the final product taste better.
  • Make thin, small cookies.
    It’s time to shape your apple cookies after the dough has rested. Make thin rounds about the size of cookies out of small amounts of the dough. They will be crispier if you make them thinner.
  • Cook or bake
    You can now bake the cookies in the oven or cook them in a pan. They will be drier if you bake them in the oven, but they will be juicier and softer if you cook them in a pan. You get to choose!

Note: It’s important to know that cookies baked in the oven will be drier, which makes them great for people who like their snacks to be crunchy. If you cook biscuits in a pan, they will be juicier and more tender, which is a nice difference.

conclusion

If you want a healthy food that won’t make you feel bad, apple biscuits that don’t have any added sugar, flour, or eggs are a great option. These biscuits are not only tasty but also good for you because they have apples, nuts, and dried fruit in them. These treats will satisfy your sweet tooth while keeping you on the path to a better life. You can bake them in the oven for a crispier texture or cook them in a pan for a softer bite.

Just Chocolate and Milk An Incredible Dessert

Just Chocolate and Milk An Incredible Dessert

Need a treat that you can make quickly and easily that will taste great? You’ll get what you want with this two-ingredient chocolate treat! It’s the perfect treat for any event because you don’t have to bake it and there is no extra sugar. Come with me as I walk you through the easy steps to make this rich dessert.

Things you’ll need:

  1. 900ml of milk
  2. 1 tablespoon of gelatin agar
  3. 500g chocolate (200g dark chocolate and 300g chocolate with chopped hazelnuts)
  4. 3 teaspoons of oil

How to do it:

  • Putting Gelatin Agar in hot milk: Add the gelatin agar to the milk and heat it slowly over low heat. The gelatin agar needs to be stirred every so often until it is completely gone.
  • Putting in the chocolate and stirring it until it melts: Add the chocolate to the milk once it is warm. Keep stirring the chocolate into the milk until it is fully melted and mixed in.
  • When you’re ready to boil the mixture, bring it to a slow boil. Then, lower the heat and stir it constantly for three more minutes.
  • Putting it in a dish and putting it in the fridge: Put the chocolate mixture into a dish that won’t catch fire that is about 26x12x10 cm or something similar. After letting it cool down a bit, put the dish in the fridge for two hours or the freezer for one hour to set.
  • Melting Chocolate with Oil and Chopped Hazelnuts: Put the rest of the chocolate, oil, and chopped hazelnuts in a different bowl and melt them together. Mix everything together until it’s smooth.
  • Pouring the Chocolate Mixture Over the Cold Dessert and Putting It Back in the Fridge: Once the chocolate mix has cooled and thickened a bit, pour it over the cold dessert in the dish. Using a spatula, spread the chocolate topping out evenly. Then, put the dish back in the fridge for 15 minutes more to let it set.

Ideas for Serving

: Put the chilled treat on a platter and cut it into squares or rectangles. This very sweet treat goes well with either a hot coffee or a glass of cold milk.

in conclusion

You can make a rich dessert that will please your family and friends without spending hours in the kitchen by following a few easy steps. This creamy chocolate treat only needs two ingredients and will quickly become a favorite in your recipe collection.

Protein-Rich Lentil Patties A Delicious Vegan Alternative to Meat

Protein-Rich Lentil Patties A Delicious Vegan Alternative to Meat

Looking for a vegan meal that is high in protein and fills you up? These lentil patties are just what you need! For a tasty and healthy meal or snack that is also easy to make, these are a great choice.

ingredients

  1. One and a half cups of dried red lentils
  2. 1 big shallot, cut up
  3. 2 chopped garlic cloves
  4. Grate one small carrot. Chop up ¼ cup of fresh parsley.
  5. 1 tablespoon of tomato sauce
  6. 1 teaspoon of salt
  7. ½ teaspoon of black pepper
  8. Olive oil

What to do:

Step 1: Get the lentil mix ready.

  • Put the dried red lentils in a big bowl and add enough water to cover them. Soak them for about two hours.
  • After letting the lentils soak, use a fine mesh strainer to get rid of most of the water. Then, put the lentils in a food processor or blender.
  • Cut up the onions, mince the garlic, grate the carrots, and chop the parsley just before you put it in the food processor.
  • Add the black pepper, salt, and tomato puree.
    Add all the ingredients to a blender and blend until smooth and well mixed.

Step 2: Form the patties and fry them.

  • In a pan that doesn’t stick, heat the olive oil over medium to medium-high heat.
  • Take a scoop of the lentil mix and use your hands to form it into a ball.
  • Slowly put the patty into the hot oil.
  • Do it again, but this time make sure the pan isn’t too full.
  • Fry the patties until they are crispy, golden brown, and fully cooked on both sides.

Step 3: Serve and have fun!

  • Put the cooked lentil patties on a baking sheet lined with paper towels or parchment paper to drain off any extra oil.
  • Put the patties on a plate or dish and set your favorite dipping sauce next to them.
  • You can eat the tasty, high-protein lentil patties as a major dish, a snack, or an appetizer.

In conclusion
Not only do these lentil burgers taste great, they are also healthy and simple to make. They are full of energy from the red lentils and flavor from the aromatic vegetables and spices. You will love making them and adding them to your vegan recipe collection. These lentil patties will wowed anyone whether they are a main dish, a snack, or a starter.

The Ultimate Quick Fix Homemade Pita Bread

The Ultimate Quick Fix Homemade Pita Bread

Finding quick and tasty recipes is like finding secret treasures in today’s busy world. Our recipe for fresh pita bread is a hidden gem that will make your taste buds dance without taking hours to prepare. In just 6 minutes, you can make fresh, fluffy pita bread with just a few simple items and an easy recipe.

What’s in it

Get the following items ready to start this delicious cooking adventure:

  1. 1/4 teaspoon of sugar, broken up
  2. One teaspoon of salt
  3. 1 tablespoon of oil from plants
  4. 1 tablespoon of milk
  5. 6.8 ounces, which is about 3/4 cup, of milk
  6. 10.6 ounces of plain flour, which is about 2 1/4 cups
  7. 1 teaspoon of yeast

How the food is prepared

Let us get into the process of getting ready:

Putting the Ingredients Together: In a big bowl, mix the sugar, salt, and oil together first. Stir in the yogurt and warm milk until all of the sugar and salt are gone.
Adding Flour and Yeast: Next, add the dry yeast and flour to the mixture. Mix the items together until they are well mixed.
Kneading the Dough: Work the dough with your hands for four to five minutes, or until it is smooth and doesn’t stick to your hands anymore.
Letting the Dough Rise: Put a lid on top of the dough and let it rise for 20 minutes. It should double in size during this time.
How to Roll and Shape: Once the dough has risen, gently deflate it and place it on a floured surface. Make 12 equal pieces out of it and roll each one into a ball.
For baking, use a rolling pin to make a small circle out of each ball. Lay them out on a baking sheet that has been lined with parchment paper. Then, cover them with a tea towel. Set the oven to 250°C and bake for 6 minutes.
Serving: After baking, let the pita bread cool down a bit before cutting and serving. Enjoy the warm, fluffy goodness of pita bread you made yourself!

Shape and Rolling
A very important part of making the perfect pita bread is rolling and forming the dough. Spread out each piece of dough and roll it into a ball between your hands. Then, use a rolling pin to smooth each ball into a smaller circle, making sure that they are all the same thickness.

Making baked goods
There’s magic in the oven! Set your oven to 250°C and put the pita bread that you rolled out on a baking sheet. These doughy discs will turn into golden-brown pockets of deliciousness after only 6 minutes of baking.

Giving
When your fresh pita bread is done baking, try not to eat it right out of the oven (but don’t worry, we won’t judge!). Let them cool down for a while before you serve them. You can eat these tasty treats by themselves, with your favorite fillings inside, or with dips and spreads for a great snack or meal.

Pros of Making Your Own Pita

Quick and useful.
It’s easy and quick to make homemade pita bread that can be used in a lot of different ways. When you want a rich sandwich, a tasty wrap, or just a simple snack, pita bread is the best choice. Plus, you can change the ingredients to suit your tastes, so everyone at the table will enjoy it.

Value for Nutrition
If you make your own pita bread instead of buying one from the store, you can be sure that the ingredients are of higher quality. It’s a healthy way to fuel your body and fill your hunger because it’s full of nutrients like carbs, protein, and fiber.

In conclusion
When time is of the essence, homemade pita bread stands out as a bright example of how easy and tasty it can be. You can enjoy the pleasure of baking your own bread with just a few simple materials and a few minutes of your time. Why wait then? Start this cooking adventure and give yourself the deliciousness of fresh, home-made pita bread.