Spanish Tortilla Recipe

Spanish Tortilla Recipe

The Spanish Tortilla, also known as Tortilla Española or Tortilla de Patatas, is a quintessential dish in Spanish cuisine. This simple yet delicious omelet is made primarily with eggs, potatoes, and onions, although variations exist across different regions of Spain. It’s a versatile dish that can be served hot or cold, as a tapa, a main course, or even in a sandwich. With its rich history and cultural significance, the Spanish Tortilla embodies the essence of home-cooked Spanish food.

Ingredients:

  1. 6 large eggs
  2. 3 medium potatoes (Yukon Gold or similar), peeled and thinly sliced
  3. 1 medium onion, thinly sliced
  4. 1/2 cup olive oil
  5. Salt, to taste
  6. Optional: Chopped parsley, garlic, bell pepper

Instructions:

  1. Prepare the Potatoes and Onions:
    • Heat the olive oil in a large non-stick or cast-iron skillet over medium heat.
    • Add the sliced potatoes and onions to the skillet. Cook gently, stirring occasionally, until the potatoes are tender but not browned (about 20 minutes). You can add a pinch of salt at this stage.
  2. Drain and Cool:
    • Once the potatoes and onions are cooked, use a slotted spoon to transfer them to a bowl. Let them cool slightly. Reserve the oil in the skillet.
  3. Beat the Eggs:
    • In a large bowl, beat the eggs with a pinch of salt until well combined.
  4. Combine:
    • Add the cooled potatoes and onions to the eggs. Stir gently to combine, making sure everything is well coated.
  5. Cook the Tortilla:
    • Heat a few tablespoons of the reserved oil in the skillet over medium-high heat.
    • Pour the egg, potato, and onion mixture into the skillet. Spread it out evenly.
    • Reduce the heat to medium-low and cook until the edges are set and the center is starting to set, but still slightly runny (about 5-8 minutes).
  6. Flip the Tortilla:
    • Place a large plate or a flat lid over the skillet. Carefully invert the skillet to transfer the tortilla onto the plate.
    • Slide the tortilla back into the skillet to cook the other side. Cook until completely set and golden brown on both sides (about 5 minutes).
  7. Serve:
    • Let the tortilla cool slightly before cutting it into wedges. It can be served warm or at room temperature.

Tips:

  • For a more flavorful tortilla, you can add chopped parsley, garlic, or bell pepper to the potato and onion mixture before combining with the eggs.
  • Ensure even cooking by spreading the potatoes and onions evenly in the egg mixture.
  • The tortilla should be firm on the outside but still moist inside.

Enjoy your Spanish Tortilla!

30 Minute Rolls

30 Minute Rolls

Here’s a quick and easy introduction to making 30-minute rolls. These rolls are soft, fluffy, and perfect for any meal.

Ingredients:

  1. 1 cup plus 2 tablespoons warm water
  2. ⅓ cup oil
  3. 2 tablespoons active dry yeast
  4. ¼ cup sugar
  5. ½ teaspoon salt
  6. 1 egg
  7. 3½ cups flour (either bread flour or all-purpose will work)

Instructions:

  1. Activate the Yeast:
    • In a large bowl, combine the warm water, sugar, and yeast. Stir to dissolve and let it sit for about 5 minutes, until the mixture is foamy.
  2. Mix the Dough:
    • Add the salt, oil, and 2 cups of flour to the yeast mixture. Stir until well combined.
    • Gradually add the remaining flour, 1/2 cup at a time, until the dough pulls away from the sides of the bowl and is no longer sticky. You may need a bit more than 3 cups of flour.
  3. Knead the Dough:
    • Turn the dough onto a floured surface and knead for about 5 minutes, until smooth and elastic. Alternatively, you can knead the dough in a stand mixer with a dough hook attachment for 3-4 minutes.
  4. Shape the Rolls:
    • Divide the dough into 12 equal pieces and shape each piece into a ball. Place the balls on a greased or parchment-lined baking sheet.
  5. Let the Rolls Rise:
    • Cover the rolls with a clean kitchen towel and let them rise in a warm place for about 10 minutes.
  6. Preheat the Oven:
    • While the rolls are rising, preheat your oven to 400°F (200°C).
  7. Bake the Rolls:
    • Bake the rolls in the preheated oven for 10-12 minutes, until they are golden brown.
  8. Optional:
    • Brush the tops of the hot rolls with melted butter for an extra touch of flavor and softness.

Tips:

  • Make sure your water is not too hot, as it can kill the yeast. The ideal temperature is between 105°F and 115°F.
  • If you don’t have vegetable oil, you can substitute with melted butter or olive oil.
  • To make sure the rolls rise quickly, you can place the baking sheet in a warm oven (about 100°F/38°C) or use the proofing setting if your oven has one.

These rolls are perfect for dinner parties, holiday meals, or just as a quick homemade bread option. Enjoy!

Make This Cake Every Day A Simple Yet Delicious Recipe

Make This Cake Every Day A Simple Yet Delicious Recipe

Imagine biting into a fluffy, delicious cake that melts in your tongue with each bite. It sounds wonderful, doesn’t it? Prepare to taste just that with this amazing cake recipe. This cake, which is made using common cupboard ingredients, is not only very tasty but also quite simple to make. Let’s go into the specifics of making this cake, which will quickly become a favorite treat of yours.

Ingredients:

  1. 1 egg
  2. 200 milliliters of milk
  3. 200 grams of sugar
  4. Two heaping spoonfuls of honey
  5. 300 grams of wheat and one big scoop of oil
  6. One tiny tsp baking powder

Regarding the glazing:

  • To complete, add 250 g of butter
  • , 200 g of chocolate, little spoonfuls of milk,
  • and 250 g of coconut.

Creating the Dough

  1. Get the egg mixture ready by:
  • First, beat the egg until frothy, then add the sugar little by little until it melts and combines to produce a creamy mixture.
  • Add wet ingredients (such as: Mix everything thoroughly after adding the oil and honey to the egg mixture.
  • Add flour and milk. Pour the milk in gradually while continuing to stir. After adding all of the milk, gradually stir in the flour and baking powder mixture until a smooth batter resembling pancakes is achieved.

Setting Up the Glaze


This cake has an additional layer of pleasure thanks to the icing. This is how to achieve it: Chocolate should be melted by cutting it into small pieces and adding a few tablespoons of milk to a saucepan over the fire.

Add butter: After the chocolate begins Add the butter and whisk to melt, making sure everything is thoroughly blended.

Also see Baking the Cake: 5-Minute Cookies Recipe
It’s time to bake the cake now that the glaze and dough are prepared:

Warm up the oven: Aim for 160 degrees Celsius in your oven.
Prepare the cake: Transfer the ready dough onto a baking tray covered with parchment paper, making sure it is uniformly distributed. Bake for about 20 minutes, or until the cake is well cooked and golden brown.

Cake Decorating

It’s time to give your cake the final touches once it has baked:

  • Slice: After letting the cake cool down a little, cut it into smaller, rectangular pieces.
  • Cover in chocolate glaze: Every cake slice  should be dipped in the ready-made chocolate glaze until completely covered.
  • Coat with coconut: For a lovely touch, roll the chocolate-coated cake pieces in shredded coconut.
    Getting the Cake Served

Your cake is ready to be served once it has been exquisitely decorated:

To remove extra chocolate, place the adorned cake slices on a wire rack and let the excess drip off.
Have fun: Present your delectable cake pieces and savor each exquisite morsel!
Why This Particular Recipe?
Perhaps you’re wondering what makes this cake recipe unique. For the following reasons,

  • Simple ingredients: This cake may be made without any fancy ingredients. Simple pantry essentials alone.
  • Simple to create: This cake is so easy to prepare that even inexperienced bakers can master it with these clear directions.
  • tasty outcomes: This cake is really tasty and simple, yet it tastes bound to a maze everybody who tries it

1 Cup of Oatmeal and 1 Avocado Healthy and Delicious Breakfast in 10 Minutes

1 Cup of Oatmeal and 1 Avocado Healthy and Delicious Breakfast in 10 Minutes

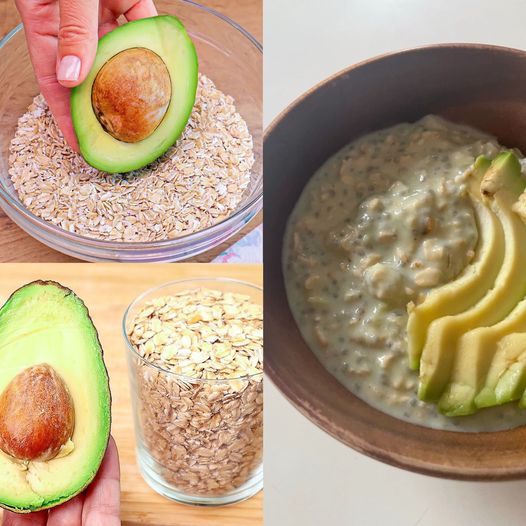
A tasty and nutritious meal doesn’t have to be difficult or time-consuming to prepare in the morning. An avocado and a cup of oats will suffice to prepare a wholesome dinner in ten minutes. With so many vitamins, fiber, and good fats in one mix, you’ll have all the energy you need to get through the day. Let’s get started with this delicious and simple breakfast meal.

**1. Nutrient-Rich: Oatmeal’s high fiber content promotes healthy digestion and helps you feel satisfied. Avocado is a nutritional powerhouse since it is full of vitamins, minerals, and healthy fats.

**2. Quick and Easy: This breakfast is ideal for hectic mornings since it requires few ingredients and little preparation time.

**3. Adaptable: This is customizable To make it tasty and engaging, customize the recipe using your preferred toppings and seasonings.

Components

  1. One cup of oatmeal (rolled or quick oats)
  2. One mature avocado
  3. Two glasses of water or plant-based or dairy milk
  4. Add salt to taste.
  5. Cherry tomatoes, fresh herbs, a squeeze of lemon juice, a drizzle of olive oil, or a scattering of seeds are optional toppings.

Directions for Cooking Oatmeal:

Boil two cups of water or milk in a small pot. Along with a dash of salt, add the oats. After lowering the heat to medium, boil the oatmeal for around five minutes, stirring now and again, until it becomes cooked and creamy.

Get the avocado ready:

  • Halve the avocado, remove the pit, and scoop out the flesh as the oatmeal cooks. into a basin. Using a fork, mash the avocado until it’s creamy and smooth. To taste, add a small teaspoon of salt.

Mix and Present:

  • When the oatmeal is prepared, transfer it to a bowl for serving. Add the mashed avocado on top and stir just a little. For a more eye-catching display, you may also pile the avocado on top if you’d like.

Add any desired toppings:

  • Add your favorite toppings to your breakfast to improve its flavor and nutritional value. A lovely touch may be added with cherry tomatoes, fresh herbs, olive oil, lemon juice, or a sprinkling of seeds.

Advantages of This Breakfast for Long-Term Energy: The fiber in the oatmeal and the healthy fats in the avocado provide you sustained energy to keep you satiated and full.

  • Heart Health: Heart-healthy meals that can decrease cholesterol and enhance cardiovascular health include avocado and oatmeal.
  • Fast and Convenient: This breakfast can be prepared in ten minutes, which makes it ideal for hectic mornings when you need a filling meal quickly.

Extra Advice

  • Taste Variations: Try a variety of tastes by sprinkling in some nutritional yeast for a savory touch or adding a splash of spicy sauce.
  • Make Ahead: Before starting, prepare the oats and put it in the refrigerator. For a quick breakfast in the morning, just reheat and toss in the avocado.

In summary
A delightful and nutritious way to start the day is with this oatmeal and avocado breakfast. It may be quickly prepared, is high in nutrients, and be readily altered to your preference. Try this simple dish for a satisfying breakfast that will satisfy your palate and nourish your body. Cheers to a delicious meal!

Homemade Fertilizers: Easy and Effective Ways to Nourish Your Plants

Homemade Fertilizers: Easy and Effective Ways to Nourish Your Plants

Would you like to provide your plants with more care without breaking the bank? There’s nowhere else to look! Making your own fertilizer at home using common household materials is a great method to provide your plants with nutrition. It is not only economical but also ecologically beneficial. Let’s look at two easy-to-use solutions that you can get started with right now!

1. Banana Peels: A Superfood of Potassium
What Makes Banana Peels? Although banana peels may seem like a waste, they are a great source of potassium, which is a vitamin that is vital for your plants. Potassium enhances general plant health, encourages blooming, and fortifies plant roots.

How to Apply:

  • Bury the Peels: Roughly chop banana peels, then bury them in the ground near your plants. When they break down, they will allow potassium and other nutrients to be released into the soil, providing the necessary boost for your plants.
  • For Liquid Fertilizer, Soak: Banana peels should be soaked in water for 24 to 48 hours. Water your plants with the liquid that is left behind. This technique gives your plants a nutrient-rich drink by swiftly delivering nutrients straight to the roots.

2. Coffee Grounds: Ideal for Plants That Love Acid
What Makes Coffee Grounds Unique? Do you enjoy having coffee in the morning? Your plants will also adore it! Coffee grounds are ideal for acid-loving plants such as roses, blueberries, and azaleas since they are high in nitrogen and have a moderate acidity.

How to Apply:

  • Direct Application: Cover the base of your acid-loving plants with a layer of used coffee grinds. By adding organic matter and enhancing soil structure, this technique will create Your plants grow well.
  • Coffee grinds may be added to your compost pile for composting. They add nitrogen, which enriches the compost and hastens the process of decomposition. Both the ecosystem and your plants will benefit from this!
  • Further Options for DIY Fertilizer
    Here are some other DIY fertilizer choices that can provide your plants with the nutrients they so desperately need if you’re feeling daring or want to try something different:
  • Eggshells: Break and scatter them all over plants to provide a calcium boost.
  • Epsom salts: Soak in water to release magnesium, which supports the process of photosynthesis.
  • Molasses: Dilute with water to nourish healthy soil microorganisms.
    Utilize aquarium water as a nutrient-rich irrigation solution.
  • Wood Ash: Dust with calcium and potassium.
  • Gelatin: Soak in water to release nitrogen, encouraging the development of leaves.
    Combine milk with water to get calcium. as well as protein.
  • Seaweed: Rinse and cut for an extra dose of minerals.
  • Vegetable Scraps: Boil and use the broth to make a fertilizer that is high in nutrients.
  • Weed Tea: To make a fertilizer that is rich in nutrients, steep weeds in water.

Try New Things and Eat Well

It’s time to get your hands dirty and try out your newfound assortment of DIY fertilizer alternatives! By blending several varieties and giving your plants a balanced nutritional profile, you may determine what works best for them. This will guarantee strong, healthy plant development, transforming your landscape into an impressive sight. Cheers to planting and feeding!

Stay Refreshed and Healthy with Watermelon Ginger Juice

Stay Refreshed and Healthy with Watermelon Ginger Juice

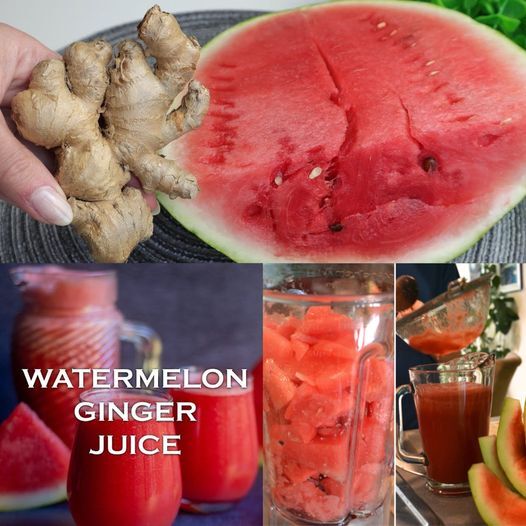
Are you looking for a delicious drink that will fulfill your palate and offer a host of health advantages? You only need to look at watermelon juice and ginger! In addition to being tasty, this wonderful combo has several health advantages that can improve your general wellbeing. Let’s learn how to prepare this cool beverage and uncover its incredible benefits.

Why Did You Select Ginger and Watermelon?
In addition to being hydrated, watermelon is a great source of vitamins A, B6, and C. Amino acids and antioxidants are also abundant in it. Watermelon is an excellent option for detoxification and hydration because of its high water content and low calorie load.

Conversely, ginger is a potent root that’s well-known for its antioxidant and anti-inflammatory qualities. It has been demonstrated to strengthen the immune system, lessen nausea, and help with digestion.

Ingredients Required

Collect the following items to make this invigorating juice:

  1. Four cups of watermelon cubes with removed seeds
  2. 1 inch of freshly grated ginger
  3. One spoonful of honey, if desired, to enhance sweetness
  4. One lime’s juice, optional for a tart twist
  5. Cubes of ice (optional; to garnish)

How to Make Ginger Watermelon Juice

  • Simply follow these instructions to make this tasty and nutritious juice:
  • Cut the watermelon into tiny pieces and remove any seeds before proceeding with the preparation of the fruit. Try to have around 4 cups of cubed watermelon.
  • Finely grate a 1-inch piece of fresh ginger after peeling it. grating the ginger will guarantee that it mixes with the liquid seamlessly.
  • Blend the Ingredients: Place the watermelon cubes, grated ginger, and any additional lime juice or honey in a blender.
  • Blend till Smooth: Use a high-speed blender to blend the ingredients until they are well-combined and smooth.
  • Strain (Optional): To get rid of any pulp and get a smoother texture, strain the juice using cheesecloth or a fine-mesh screen. This is a completely optional step that is based on your own preferences.
  • Present and Savor: Transfer the juice into glasses and garnish with ice cubes for an additional cool taste, if preferred. Serving the juice right away will ensure that its flavor and freshness are at their finest.
  • Watermelon Ginger Juice’s Power
    Drink this delightful mixture and take advantage of all the advantages it provides:
  • Hydration: This drink, which mostly consists of watermelon, is a great method to remain hydrated, particularly on hot days. Since watermelon is more than 90% water, it’s a refreshing option.
  • Digestive Health: This drink can help reduce nausea and increase digestion because it contains ginger. It is the ideal treatment for calming stomach discomfort.
  • Anti-Inflammatory: Watermelon and ginger both have anti-inflammatory qualities that can aid in lowering bodily inflammation and promoting general health.
  • Immune Boost: The immune-stimulating qualities of ginger along with the vitamins and antioxidants in watermelon make this drink an effective ally in preserving a robust immune system.
  • Low Calorie: This juice’s nutrient-rich makeup and low calorie count make it a great choice for people who want to have a delicious beverage and control their weight.

Extra Advice

  • Try Different Flavors: You may experiment with different taste profiles by adding additional fruits, such as strawberries or mint leaves, to the mixture.
  • Storage: Although it’s ideal to drink freshly prepared juice right away, you may keep it in the fridge for up to a day and enjoy it later.
  • Watermelon ginger juice is a delicious and pleasant beverage that you may include in your routine to boost your health. Try this simple recipe and witness the rejuvenating effects for yourself! To your well-being, cheers!

Why Choose Blueberries for Eye Health

Why Choose Blueberries for Eye Health?

It’s important to keep your eyes healthy, especially as we get older. Thankfully, blueberries provide a tasty and all-natural solution to preserve our vision. These little berries are nutrient-rich and can benefit our eyes greatly. This post will discuss the top reasons blueberries are for eye health and provide simple recipes to include them in our diet.

1. Packed with Antioxidants

Antioxidants such as vitamin C, vitamin E, and anthocyanins are abundant in blueberries. These potent substances protect our eyes from damaging free radicals and oxidative stress, which over time can injure them. We can provide the necessary defense for our eyes to remain healthy by frequently consuming blueberries.

2. Inflammatory-Reduction Capabilities

Chronic inflammation may be a factor in eye conditions including such as glaucoma and cataracts. Fortunately, blueberries have anti-inflammatory qualities that help protect our eyes and lessen inflammation. Blueberries are an effective way to reduce this risk and support long-term eye health by incorporating them into our diet.

3. Enhances Blood Flow

Essential elements included in blueberries help to increase blood flow to the eyes. Because of the increased circulation, our eyes are able to get the oxygen and nutrients they need to perform at their best. Blueberries are an excellent dietary addition for maintaining healthy eyes and keen eyesight.

4. Guards Against UV Harm

Frequent blueberry ingestion can help lower the risk of cataract development by shielding the body from damaging UV radiation. We can prevent potential sun damage to our eyes by indulging in these delectable fruit.

Among nutrients are blueberries. stronghold, providing a range of vital vitamins and minerals to promote eye health:

Vitamin C: Aids in preventing oxidative damage to the eyes.
Vitamin E: Protects eye cells from damage caused by free radicals.
Anthocyanins: Lessen eye strain and enhance night vision.
Zinc: Retinal health need zinc to function.
Blueberries are easy and fun to incorporate into your everyday routine. To get you going, consider these suggestions:

1. Boost Your Breakfast

Add some fresh or frozen blueberries to your oatmeal, yogurt, or cereal in the morning to kickstart a healthy day. Not only do blueberries improve the flavor, but they also provide you a nutritious start to the day.

2. Drinks in smoothie form

Add blueberries to your preferred smoothie recipes. Add them to other fruits, such as strawberries and bananas, and a drizzle of almond milk for a tasty and visually appealing beverage.

3. Foodstuffs

Blueberries may be consumed on their own as a quick snack or combined with nuts and seeds to make a wholesome trail mix. This is a snack that is not only delicious but also good for your eyes.

4. Greens

Toss in few blueberries to give your salads a sweet taste boost. Together with walnuts, feta cheese, and spinach, they make a tasty and visually stimulating dish.

5. Sweets

Use blueberries to satisfy your sweet taste in pies, parfaits, and muffins. To keep the nutritional advantages of blueberries intact, choose recipes that call for little or no sugar.

Here are a few more things to keep in mind with blueberries:

  • Fresh or Frozen: Blueberries can be found both ways. just as nourishing. To enjoy blueberries all year long, always have a bag of frozen ones on hand.
  • Daily Intake: To optimize blueberries’ advantages for eye health, try to incorporate at least half a cup of them into your diet each day.
  • Storage: To preserve their freshness and nutritional worth, keep fresh blueberries refrigerated and use them within a week.

For our eyes, blueberries are a real superfood. Blueberries are an essential food for anybody trying to protect their vision because of its high antioxidant content, anti-inflammatory qualities, and capacity to enhance circulation. We may take advantage of these berries’ many health advantages and enjoy their exquisite flavor by include them in our regular diet. Cheers to a better future and the health of your eyes!

Classic Southern Pea Salad

Classic Southern Pea Salad

Ingredients:

  1. 1 box (16 ounces) of thawed frozen sweet peas (canned peas also work well)
  2. Two hard-boiled and sliced eggs
  3. Four to six crisp and crumbled bacon pieces (or one cup of
  4. optionally cooked and diced chicken)
  5. Half a cup of finely chopped green onions (you may use ordinary onions instead if you’d like)
  6. One cup of finely shredded cheddar cheese (you can substitute any preferred cheese)
  7. One-fourth teaspoon black pepper
  8. half a teaspoon of salt
  9. One-fourth teaspoon of powdered garlic
  10. 1/2 cup chopped celery, or 1/2 teaspoon of celery seeds
  11. A dash of cayenne pepper for a little kick of spice
  12. One-half cup of mayonnaise
  13. One-half cup sour cream

Guidelines:

Mix the Salad:

  • Put the diced hard-boiled eggs, crumbled cheese, and frozen sweet peas in a large mixing basin. Shredded cheddar cheese, chopped green onions, and chicken , if using.
    The season
  • Add a touch of cayenne, black pepper, salt, garlic powder, and celery seeds (or minced celery). To make sure the seasonings are dispersed evenly, give it a good stir.
  • Accessorize It:
    Mix the sour cream and mayonnaise in a separate dish until a smooth consistency is achieved. Toss to coat all the ingredients. Pour this dressing over the pea mixture and toss lightly.
  • Cool and Present:
    Before serving, cover and chill the salad for at least one hour. This gives the tastes a good opportunity to meld together. Have fun:

Discover the Natural Wonders of Aloe Vera

Discover the Natural Wonders of Aloe Vera

Introduction: Nature’s Gift
With its luscious green leaves encasing a powerhouse of health benefits, aloe vera is more than simply another plant in the landscape. Aloe vera is well-known for its nutritional value and therapeutic abilities, making it a lovely addition to your daily regimen. Let’s investigate the ways in which this marvel of nature might lead to a more energetic, healthy existence.

Aloe Vera’s Health Benefits

  • Aloe vera is a superfood that is full of health-promoting substances including antioxidants, vitamins, and minerals.
  • Skin Care: Aloe vera gel is well known for its soothing properties on wounds, burns, and sunburns. Because of its moisturizing qualities, it’s also a great moisturizer for dry skin.
  • Digestive Health: Aloe vera juice use helps promote easy digestion. It is said to calm and aid in better digestion by clearing the digestive system.
  • Nutritional Boost: Juice from aloe vera plants is rich in nutrients. It is a rich source of minerals including calcium, copper, and magnesium as well as vitamins B, C, E, and folic acid. Amino acids and enzymes are also present.
  • Immune Support: Aloe vera’s antibacterial and anti-inflammatory qualities can strengthen the immune system and guard against germs.

Including Aloe Vera in Your Daily Routine
Aloe vera is easy to include into your daily routine and may be done in a number of fun ways.

  • Topical Application: To moisturize, calm, and treat a variety of skin ailments, apply aloe vera gel straight to the skin.
  • Aloe Vera Juice: Savor the nutritional and digestive properties of aloe vera juice by starting your day with a glass. Make sure it has been filtered and decolored for safe ingestion.
  • Cooking Ingredient: To give a cool edge to salads, salsas, and smoothies, add aloe vera.
  • Recipe Suggestion: Smoothie with Aloe Vera Try this easy aloe vera smoothie for a cool treat:

Components

  1. Fresh aloe vera gel in a cup
  2. One cup of sliced cucumbers
  3. One sliced green apple
  4. One lemon’s juice
  5. A few of mint leaves
  6. One cup of coconut water or water

Guidelines

  • Mix well. Components: In blender, combine all ingredients.
  • Blend until smooth by pulse-blending.
  • Have fun: For a cool and wholesome beverage, serve cold.

In conclusion

, Accept the Advantages Aloe vera is a multipurpose plant that promotes general wellbeing in addition to its aesthetic qualities. Applied topically or internally, aloe vera may be a great supplement.  to your fitness routine. Why not give this amazing plant a try and reap its advantages directly from the source?

Say Goodbye to Skin Tags with Garlic

Say Goodbye to Skin Tags with Garlic

Skin tags can be a bothersome cosmetic issue, but garlic has a surprising natural remedy! You can quickly and safely remove skin tags at home by using this culinary staple. This post will discuss the benefits of using garlic as a natural cure, as well as why it works so well.


Why Would You Eat Garlic? In addition to being excellent in food, garlic contains wonderful qualities that can aid in the eradication of skin tags.

1. antibacterial Properties: Garlic is a great option for removing skin tags because of its potent antibacterial qualities, which guard against infection and encourage healing.

2. Sulfur Compounds: Garlic contains sulfur compounds that can help dry up skin tags, causing them to get smaller and finally fall out.  away. It’s a safe and natural technique to get rid of those annoying tags.

3. Natural and Safe: Using garlic to remove skin tags is a natural and safe alternative to over-the-counter medications and medical procedures. Harsh chemicals or intrusive treatments are not a concern.

How to Remove Skin Tags Using Garlic
Now that you are aware of the many benefits of garlic, let’s explore how you may use it to remove skin tags at home with ease.

Components:

  1. One raw garlic clove
  2. Bandages using adhesive or medical tape
    Gauze or cotton balls

Guidelines:

  • Get the garlic ready: Begin by slicing a fresh clove of garlic thinly after peeling it. Using fresh garlic is essential since it has the highest concentration of substances that are active.
  • Put the Garlic in Place: Apply a tiny slice of garlic immediately to the skin tag, being careful not to get any skin irritation elsewhere on the skin.
  • Safeguard the Garlic: To hold the garlic slice in place, cover it with gauze or a cotton ball. To secure it, use medical tape or an adhesive bandage.
  • Go Away for the Night: Leave the garlic on the skin tag throughout the entire night for best effects. If you are uncomfortable, you can start with a shorter duration and work your way up to a longer one as your skin adjusts to the therapy.
  • Repetition Every Day: After taking out the garlic in the morning, give the area a quick wash with warm water and a gentle pat dry. Continue doing this each night until the skin tag comes off, generally in a week or two.

The Advantages of Garlic Use

There are several benefits of using garlic to get rid of skin tags:

  • Natural and Effective: Garlic works wonders as a natural skin tag remover without the need of harsh chemicals. Without having to worry about the negative effects of over-the-counter remedies, you may wave goodbye to those tags.
  • Simple to Use: You can probably already have the ingredients in your kitchen to complete this easy-to-follow approach at home. There’s no need to spend a fortune or make a trip to the store.
  • Cost-Effective: Compared to commercial treatments, using garlic is a less expensive option to eliminate skin tags. Put your money away for something more fun!

Extra Advice

Keep these pointers in mind to enhance the effectiveness of your garlic therapy.

keeping in mind:

Patch Test: To be sure you won’t experience a negative response, test a tiny area of your skin before applying garlic to a bigger one.

Protect Surrounding Skin: To shield the surrounding skin from any possible irritation brought on by the garlic, dab a little quantity of petroleum jelly around the skin tag.

Speak with a Doctor: It’s essential to get advice from a medical practitioner if you have any worries or if the skin tag exhibits symptoms of infection. They can guarantee your safety and offer direction.

Finally
Garlic makes it simple and efficient to remove skin tags at home. Skin tags can be safely and swiftly reduced by this natural therapy because to its antibacterial and sulfur-containing components. Send this home.