Pollo Asado

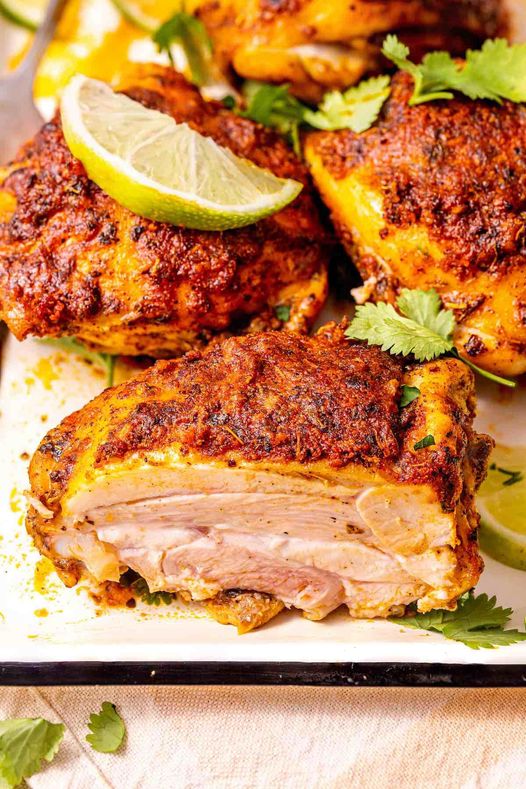
This flavorful, consistently juicy Mexican pollo asado is made with marinated grilled or baked chicken. Savour it by itself or add the chicken to tacos, bowls, and other dishes.

Recipe By: Arman Liew

Ingredients:

  1. Six skin-on, bone-in chicken thighs
  2. one small orange
  3. one tiny lime juiced
  4. One tablespoon vinegar
  5. two teaspoons of olive oil
  6. two tablespoons of achiote paste See notes for three
  7. smashed garlic cloves
  8. one teaspoon each of dried oregano
  9. cumin
  10. one teaspoon each of black pepper, onion powder, and salt.

Instructions:

  1. In a mixing basin, whisk together all the ingredients (excluding the chicken) until well incorporated.
  2. Put the bowl in the refrigerator for a minimum of half an hour and a maximum of four hours.
  3. As the oven heats up to 200°C/400°F, leave the chicken out to room temperature.
  4. Arrange the marinated chicken thighs on a large baking pan that has been lightly greased.
  5. Bake the chicken for 28 to 30 minutes, until the outside becomes crispy.

NOTES:

  1. For the grilled option, lightly oil and clean the grill grates before adding the chicken. Cook the chicken for 5 to 7 minutes on one side, then turn it over and cook for an additional 4 to 5 minutes. The chicken should be kept on the grill until its internal temperature reaches 165 degrees.
  2. TO STORE: Keep leftovers chilled in an airtight container or covered with foil. It can be refrigerated for up to four days if stored in this manner.
  3. TO FREEZE: You may freeze leftover cooled chicken for up to three months by placing it in an airtight container or freezer-safe bag.
  4. TO REHEAT: Spoon leftovers onto a parchment paper-lined baking sheet and bake for 10 to 12 minutes, or until thoroughly cooked, at 177C/350F. Do not remove the foil from the chicken and roast it that way.

Nutrition

Serving: 1 serving Calories: 306 k cal Carbohydrates: 5 g Protein: 19 g Fat: 24 g Sodium: 476 m g Pot assium: 296 m g Fiber: 1 g Vitamin A: 142 I U Vitamin C: 12 m g Calcium: 33 m g Iron: 1 m g NET CARBS: 4 g

Do You Have Rice and Canned Tuna at Home 3 Top Recipes So Simple, Delicious

Do You Have Rice and Canned Tuna at Home? 3 Top Recipes! So Simple, Delicious

You’re going to love this if your cupboard contains both rice and tuna in cans! These items may be used to create tasty, healthful meals that are quick and simple to make. These three delicious meals are sure to please you. Now let’s get started!

1. Ingredients for Tuna Fried Rice:

  1. two cups of boiled rice
  2. One can of drained tuna
  3. One little onion, finely sliced
  4. One cup of mixed veggies (corn, carrots, and peas)
  5. Two tsp soy sauce
  6. One tablespoon of olive oil
  7. two beaten eggs
  8. To taste, add salt and pepper.

Guidelines:

Get the ingredients ready:

  • In a big skillet over medium heat, warm up the olive oil. Sauté the chopped onion until it becomes transparent.
  • Add the tuna and vegetables.
  • Add the mixed veggies and stir until they become soft, about a few minutes. Pour in the drained tuna.
  • and thoroughly combine.
  • Add the eggs and rice:
  • Cooked rice should be added to the skillet and well combined with the tuna and veggies. Once the eggs are completely cooked, pour the beaten eggs over the rice and stir constantly.
  • After seasoning, serve:
  • Season with salt, pepper, and soy sauce. Enjoy while hot!

2. Ingredients for Tuna and Rice Salad:

  1. Two cups of chilled, cooked rice
  2. One can of drained tuna
  3. Half a cup of cherry tomatoes
  4. half a cucumber, chopped
  5. 1/4 cup of coarsely chopped red onion
  6. Two tsp olive oil
  7. One lemon’s juice
  8. To taste, add salt and pepper.
  9. As a garnish, use fresh parsley.

Guidelines:

Mix the ingredients together:

  • The cooled rice, cucumber, red onion, cherry tomatoes, and drained tuna should all be combined in a big dish.
  • Prepare the Dressing:
  • Whisk in a small basin.
  • lemon juice, olive oil, salt, and pepper combined.
  • Blend and Present:
  • After adding the dressing to the salad, stir to mix. Add fresh parsley as a garnish. Serve either room temperature or cold.

3. Ingredients for Tuna Rice Casserole:

  1. two cups of boiled rice
  2. One can of drained tuna
  3. One cup of shredded cheese, either mozzarella or cheddar
  4. half a cup of milk
  5. half a cup of frozen peas
  6. half a cup of breadcrumbs
  7. Two teaspoons of melted butter
  8. To taste, add salt and pepper.

Guidelines:

  • Warm up the oven:
  • Set the oven temperature to 350°F (175°C).

Combine Ingredients:

  • Cooked rice, drained tuna, shredded cheese, milk, and frozen peas should all be combined in a big mixing dish. Add pepper and salt for seasoning.

Get the casserole ready:

  • Spoon mixture into baking dish that has been buttered. Melt the butter and combine the breadcrumbs in a small dish, then sprinkle casserole.

Cook and Present:

  • Bake for 20 to 25 minutes, until the cheese is bubbling and the top is brown. Enjoy while hot!

In summary
You may make a number of quick, easy, and tasty dinners that are fulfilling when you use rice with canned tuna. These recipes may help you prepare anything from a simple salad to a hearty dish or even just a fast fried rice. Try them and experience the delicious and nourishing advantages they provide. Have fun in the kitchen!

APPLE CAKE: No sugar, no flour, just mix the ingredients and immediately put it to bake

APPLE CAKE: No sugar, no flour, just mix the ingredients and immediately put it to bake

Here’s a dish that showcases apples’ inherent sweetness and adaptability! This post will show you how to make a delicious apple-based recipe without adding any sugar or flour. Prepare to have your taste senses enticed and your body nourished by this nutritious delicacy.

Ingredients:

  1. 3 big apples, ideally the softer kinds
  2. Juice from one-half lemon
  3. 6.8 tablespoons, or 3.4 fluid ounces, of water
  4. A little over five tablespoons (2.8 ounces) of raisins
  5. 2.8 ounces, or around 5.3 tablespoons, of walnuts, chopped
  6. One dash of salt
  7. three eggs
  8. 6.8 tablespoons, or 3.4 fluid ounces, of vegetable oil
  9. Oat flakes, 7.8 ounces
  10. One baking powder bag
  11. Come on, let’s bake!

Comprehensive Guide

1. Getting the Apples Ready
Wash your apples thoroughly beforehand. If When necessary, peel them and thinly cut them into bite-sized pieces. To keep them from browning, squeeze the juice of half a lemon over them and thoroughly combine.

2. Incorporating the Treats
Add the raisins and, if preferred, soak them in rum or orange juice for added taste. Stir in the water after adding it. For that perfect crunch, add the chopped walnuts last.

3. Blending the Compound
Crack open the eggs and beat them softly in a different dish. Add them and the vegetable oil to the apple mixture. Stir everything thoroughly until it’s all well blended.

4. Making the Last Adjustments
It’s time to include our dry components now. After adding the baking powder, sprinkle in the oat flakes.

Gently stir the batter until it’s completely combined and smooth.

5. Perfect Baking
Grease your cake mold with butter to get it ready. Making sure the batter is distributed evenly, slowly pour the batter in. Place it in an oven warmed to 180 degrees Celsius and bake for 40 to 45 minutes, or until a toothpick inserted comes out clean and the cake is golden brown.

6. Presenting
Let your cake cool somewhat after baking before sprinkling it with powdered sugar. Cut it into pieces, present it, and observe how quickly it vanishes!

4. Raisins’ Advantages
Not only are raisins tasty, but they also provide a number of health advantages. They are thought to enhance lung function and respiratory health since they are high in natural sugars.

5. Walnuts’ Health Benefits
This has a pleasant crunch from the walnuts. dish while offering vital elements including vitamins, antioxidants, and omega-3 fatty acids.

6. The Value of Oat Crème
Oat flakes include fiber, protein, and a range of vitamins and minerals, making them a wholesome substitute for regular flour.

7. Apple Nutritional Value
Apples are a nutritious powerhouse, full of dietary fiber, vitamins, and minerals. They’re a great option for managing weight because they’re low in calories.

8. Baking Advice
For a consistent texture, make sure all the ingredients are thoroughly combined.
When taking the cake out of the oven, test for doneness with a toothpick.
For optimal flavor, let the cake cool slightly before cutting into pieces.
Check out our latest healthy dessert that requires no baking and no sugar! Sugar-Free Energy Candy Recipe

9. Suggestions for Serving
Savor the fruits of your labor, your apple creation. as a healthy snack or guilt-free dessert. For an extra treat, top it with a drizzle of honey or a dollop of Greek yogurt.

10. Final Thoughts
To sum up, this apple-based dish is proof of the fruit’s inherent sweetness and adaptability. It’s simple to make a tasty dessert that’s enjoyable and healthful with basic ingredients and preparation.

Cucumber Lemonade: A Refreshing Summer Drink

Cucumber Lemonade: A Refreshing Summer Drink

Cucumber lemonade is an ideal beverage to fight the heat if you’re seeking for something cold and refreshing. Cucumber crispness and lemon zest tartness mix in this refreshing drink to provide a lovely, hydrating, and tasty concoction. This is how to create a delicious cucumber lemonade at home.

Ingredients:

  1. one half  big cucumber,
  2. Eight lemons
  3. Half a litre of water
  4. A couple slices of peeled cucumber are optional.
  5. Cubes of ice

Method:

Get the cucumber ready:

  • Thoroughly wash and peel the cucumber.
    In medium-sized pieces, cut it.
  • Mix the Concoction:
  • Place the chunks of cucumber in a blender.
  • Add the eight lemons’ juice, squeezed, to the blender.
  • Blend the mixture until it’s smooth, adding just enough water to aid with the blending process. To ensure a smooth consistency, pour the blended mixture into a big jug using a strainer to get rid of any pulp or seeds.

Mix the ingredients together:

  • To the jug containing the strained mixture, add the remaining water.
  • Add some peeled cucumber slices if you want to improve the flavor and appearance.
  • To taste, sweeten
  • Adjust the honey to your personal taste. Use a few teaspoons at first and adjust as necessary.
  • Make sure the honey is completely dissolved by giving the mixture a good stir.

Present and Savor:
To cool the lemonade, fill the jug with a ton of ice cubes.
If preferred, serve in glasses with extra ice.
Take pleasure in the cool flavor of homemade cucumber lemonade!

How to Make the Best Lemonade with Cucumber

Modify Sweetness: You are welcome to change the quantity. sugar according to personal taste. If you’d like, you can alternatively use honey or a sugar substitute.
Enhance Flavor: For an additional refreshing twist, add a few mint leaves to the blender.
Chill Before Serving: Let the lemonade sit in the fridge for at least an hour before serving for the greatest flavor.

Finally
A delightfully easy drink that’s ideal for hot summer days or anytime you need something refreshing to drink is cucumber lemonade. It’s going to become a favorite because of its excellent flavor and simple preparation. Taste the fresh, zesty tastes of homemade cucumber lemonade by following this recipe!

The Best Cleaner for Pots, Pans, Stainless Steel, and Bathrooms

The Best Cleaner for Pots, Pans, Stainless Steel, and Bathrooms 🧽

It doesn’t have to be difficult to clean your house, especially if you know a few useful tips. You might be surprised to learn that dish soap and toothpaste work well together to make a surface cleanser. This easy-to-use yet effective mixture is great for stainless steel, bathrooms, and pots and pans. Let’s investigate how to utilize this multipurpose cleaner to give your house a shine.

Why Do You Need Toothpaste and Dish Wash?
**1. Gentle Abrasive Action: The moderate abrasives in toothpaste assist remove dirt without causing surface scratches. When combined with dishwashing liquid’s ability to dissolve grease, these two may easily remove stubborn stains.

**2. Versatile Cleaning: This blend functions as a handy all-in-one cleaner, safe and efficient on a variety of surfaces, including kitchenware and bathroom fixtures.

**3. Economical: Employing You may achieve great cleaning results at a lower cost by using materials you already own.

How to Prepare the Cleaning Ingredients and Use Them:

  1. Dish soap
  2. toothpaste (ideally not gel-based)
  3. Water
  4. A sponge or soft cloth

Guidelines:

  • Blend the Cleaner: Mix equal amounts dish soap and toothpaste in a small bowl. Blend well until a creamy, smooth consistency is achieved.
  • Pots and pans cleaning: Using a moist sponge or cloth, apply a tiny bit of the mixture. Scrub your pots and pans gently, paying special attention to any tough areas or burnt-on residue. Use warm water to completely rinse, then pat dry with a fresh towel.
  • Stainless Steel Polishing: Using a gentle cloth, apply the cleaning. After moving in, clean your stainless steel sinks, appliances, and cutlery.
  • the grain’s orientation. To get a shine that is free of streaks, buff with a dry cloth.
  • Bathroom Makeovers: Apply the cleanser on tiles, faucets, and sinks in bathrooms. Use a sponge or towel to gently scrub, and then rinse with warm water. Allow the mixture to remain for a few minutes before cleaning particularly stubborn spots.

Extra Advice

  1. Spot Test First: To make sure the cleaner doesn’t damage anything, always do a quick spot test on a discrete area.
  2. Rinse Well: To get rid of any cleaning residue, make sure to rinse surfaces well.
  3. Use Frequently: To maintain surfaces looking their best, incorporate this cleaning regimen on a frequent basis.

In summary
Dishwasher liquid and toothpaste combine to provide you with a strong, all-purpose cleaning. This mixture works well for removing stubborn stains. on bathroom surfaces, stainless steel, and pots and pans. It’s not only a practical solution, but it also saves money by utilizing things you probably already own. Today, give this easy concoction a try and enjoy a spotlessly clean home with little work!

Banana Lightening Anti-Stain Cream: A 200-Year-Old Anti-Aging Recipe

Banana Lightening Anti-Stain Cream: A 200-Year-Old Anti-Aging Recipe! 

In addition to being a tasty and healthy fruit, bananas have been used into beauty regimens for millennia due to their many advantages. This 200-year-old recipe for banana lightening anti-stain cream is proof of their continuing strength. This cream, which is simple to create and has anti-aging and skin-brightening qualities, can help you seem younger and more radiant. Here’s how to make this age-old cure.

Why Do Bananas Exist?
Vitamins A, B, and E are abundant in bananas and are vital for keeping skin healthy. In addition, they provide antioxidants and potassium, which support skin hydration, nourishment, and renewal. since of their inherent enzymes, bananas are a great ingredient for anti-stain creams since they may lighten dark stains and blemishes.


Components

  1. One ripe banana
  2. One tablespoon of lemon
  3. juice
  4. One spoonful of honey
  5. 1 tsp plain yogurt

Guidelines

  • Get the banana ready: Using a fork or blender, peel the banana and mash it into a smooth puree.
  • Mixing the ingredients: Put the yogurt, honey, lemon juice, and mashed banana in a bowl. Blend thoroughly until a creamy texture is achieved.
  • Apply the Cream: Give your face a good cleansing. Avoid getting any in your eyes when applying the banana mixture to your face. This cream may also be used to other parts of your body that have imperfections or dark patches.
  • Let It Sit: To enable the nutrients to permeate and do their magic, let the cream on your skin for a duration of fifteen to twenty minutes.
  • Rinse Off: Use lukewarm water to rinse your face, then pat dry. Observe as necessary, along with your usual moisturizer.

Advantages of Each Ingredient: Banana:

Offers vital vitamins and minerals, hydrates and nourishes the skin, and aids in the whitening of dark spots and imperfections.

Lemon Juice: Packed with vitamin C, lemon juice lightens hyperpigmentation and age spots on the skin. Its inherent astringent qualities aid in pore tightening.

Honey: Honey, a naturally occurring humectant, helps the skin stay hydrated. Additionally, it contains antimicrobial qualities that support clean, acne-free skin. Lactic acid, which is found in yogurt, gently exfoliates the skin to remove dead skin cells and encourage a more radiant complexion.

Why Make This Recipe Your Own?
Adding this banana lightening anti-stain lotion to your skincare regimen is an easy yet powerful method to improve it. The organic components are soft on the skin and offer a variety of advantages, including as anti-aging and hydration. By using this cream on a regular basis, you may brighten your complexion, minimize the look of dark spots, and have smooth, refreshed skin

In summary
Including this 200-year-old anti-stain treatment that lightens bananas into your skincare routine can provide amazing effects. With its blend of organic, skin-beneficial components, it’s a fun and efficient way to take care of your skin. Try this classic recipe and take pleasure in the glowing, young appearance it provides.

Boost Your Health and Well-being with Ginger and Cloves

Boost Your Health and Well-being with Ginger and Cloves

Searching for an effective natural cure to improve your overall health and wellbeing? There’s nowhere else to look! For you, a ginger-clove mixture may be the ideal remedy. There are several advantages to this combo, including improved immunity and relief from stomach problems. Let’s examine the remarkable benefits of this combo as well as how to make it.

Why cloves with ginger?
Cloves and ginger are well known for their therapeutic qualities. Together, they form a powerful concoction that can enhance a number of areas of your well-being. Ginger is widely recognized for its anti-inflammatory, anti-nausea, anti-inflammatory, and immune-boosting properties. Cloves are prized for their antibacterial qualities, as well as for helping with digestion, reducing inflammation, and relieving toothaches.

How to Prepare Cloves with Ginger Combination

Here’s a quick recipe to make this potent concoction:

Components:

  1. One big ginger root
  2. One tablespoon of whole cloves
  3. Four glasses of water
  4. Honey (to taste, optional)
  5. Lemon (to taste, optional)

Get the ginger ready

  •  After peeling, thinly slice the ginger root.
  • Boil the Water: Fill a saucepan with water and bring it to a boil.
  • Add the Ginger and Cloves: Add the entire cloves and the sliced ginger to the boiling water.
  • Simmer: For about 20 minutes, lower the heat and let the mixture to simmer.
  • Strain: To get rid of the cloves and ginger slices, strain the mixture.
  • Honey and Lemon Addition: Taste and add honey and lemon as needed.
    Advantages of the Clove and Ginger

Mixture By adding this straightforward yet effective ginger and By including clove combination into your daily routine, you can reap a number of health advantages:

Boosts Immunity: The immune-boosting qualities of cloves and ginger both aid in the body’s defense against diseases and infections.
Enhances Digestion: This concoction can assist in relieving indigestion, gas, and bloating, among other digestive problems.
Reduces Inflammation: The anti-inflammatory qualities of cloves and ginger can aid in pain relief and the reduction of inflammation.
Relieves Nausea: Ginger is frequently used to treat motion sickness and morning sickness since it is very good at reducing nausea.
Enhances Oral Health: Because of its antibacterial qualities, cloves have been used for ages to reduce toothaches and promote oral health.
How to Utilize the Blend
You may include this blend of ginger and cloves to your regular routine in a few different ways:

As a Tea: To reap the health advantages, have a cup of this ginger and clove tea every day.
In Cooking: To improve the flavor and nutritional content of soups and stews, you can also add this mixture to them.
You’ll soon be thanking me for introducing you to this straightforward yet effective natural treatment after trying this incredible recipe. To your health and wellbeing, cheers!

Smell of a Wealthy Home: Using Rice and Cloves

Smell of a Wealthy Home: Using Rice and Cloves

Have you ever entered a house and been drawn in by the opulent, welcoming scent right away? It is not as difficult as you may imagine to get that “wealthy home” aroma. You may produce a lovely and elegant smell for your house with simply rice and cloves. This is the procedure.

Why Cloves and Rice?
**1. Natural Fragrance: Cloves provide a comforting, elegant aroma that is warm and spicy. To provide a persistent scent, rice aids in the fragrance’s slow diffusion.

**2. Easy to Use and Safe: This approach is a safe substitute for chemical air fresheners because it just requires natural materials. It is ideal for homes with kids and pets.

**3. Cost-Effective: This is an affordable approach to refresh your food because rice and cloves are both affordable and widely accessible. House.

Components

  1. One cup of raw rice
  2. Two tsp full of cloves
  3. A little dish or bowl for decoration

Instructions:

  • Mix the rice with the cloves.
  • Place one cup of raw rice and two teaspoons of whole cloves in a small bowl or decorative plate. To guarantee that the cloves are dispersed equally throughout the rice, thoroughly mix. Position in Crucial Areas:
  • Put the dish or bowl in the living room, kitchen, or bathroom, or anywhere else you wish to enjoy the lovely aroma. Additionally, you may prepare many bowls to share across your house.

Refresh as necessary:

Stir the mixture every few days to release additional clove aroma and sustain the fragrance. Every several weeks or when the rice and cloves get Aroma starts to wane.

Extra Advice
Add Essential Oils: Feel free to add a few drops of your favorite essential oil, such as clove essential oil, for an added boost. This will lengthen the scent’s duration and enhance it.

beautiful Touch: Add a pleasing scent to your home decor by using beautiful bowls or plates.

Combine with Other Spices: For a more nuanced scent, try mixing with additional spices like star anise or cinnamon sticks.

Advantages of This Technique: Durable Aroma Cloves and rice work together to create a slow-releasing, persistent scent that keeps your house smelling good.

Natural and Non-Toxic: This technique is better for your house because it doesn’t utilize chemicals or artificial smells.

Simple and Reachable: Along with Using items you probably already have in your pantry, this approach is simple to set up and quick to execute.

In summary
It’s not necessary to spend a lot of money or hire an expert to create the aroma of a luxurious house. Your house may smell opulent and welcoming when you use basic, natural items like rice and cloves. With this simple and affordable technique, your house will smell lovely and new. Try it out and see how your living area transforms in a lovely way. Cheers to your scenting!

Morning Zest: Top 10 Benefits of Lemon Water

Morning Zest: Top 10 Benefits of Lemon Water

Drinking a glass of lemon water first thing in the morning is a straightforward yet effective practice that offers several health advantages. It’s simple to prepare this revitalizing beverage that might improve your general health. The top ten advantages of consuming lemon water each morning are listed below.

Increases Hydration
Staying Hydrated Is Essential: You can keep hydrated by starting your morning with a glass of lemon water. Sustaining body functions, energy levels, and general health depend on enough water.

2. Rich in Vitamin C for Immune Support: Vitamin C, a potent antioxidant that strengthens immunity and aids in the body’s defense against infections, is abundant in lemons.

3. Promotes Better Digestion: Drinking lemon water encourages the formation of digestive fluids, which helps to minimize bloating and reflux.

4. Encourages Loss of Weight
Natural Detox: By increasing metabolism, encouraging satiety, and aiding in the body’s detoxification, lemon water can aid in weight reduction.

5. Natural Mouth Freshener: Lemons’ citric acid aids in the natural mouth refreshing process by destroying oral germs.

6. Enhances Skin Conditions
Glowing Skin: Lemons’ vitamin C and antioxidants fight free radicals and lessen wrinkles and blemishes on the skin, leaving you with cleaner, more vibrant skin.

7. Improves Mood and Energy
Natural Energizer: Drinking lemon water gives you a boost in energy without the crash from coffee. Additionally, the smell of lemons may lift your spirits and ease tension.

8. Strengthens the Immune System
Greater Immunity: Drinking lemon water on a regular basis strengthens your immune system. keeping you healthy and preventing common ailments like the flu and colds.

9. Balances pH Levels Alkalizing impact: Although acidic at first, once digested, lemons have an alkalizing impact on the body that aids in restoring pH equilibrium.

10. Encourages Heart Health
Heart-friendly: Drinking lemon water has two benefits for your heart: it lowers blood pressure and supplies potassium.

Ingredients for Lemon Water Recipe:

  1. One lemon, fresh
  2. One warm water glass

Guidelines:

Cut the lemon in half, then squeeze the juice into a warmed glass of water.

Mix Thoroughly: Gently mix to blend.

Savor: For optimal effects, consume it first thing in the morning on an empty stomach.

In summary
Adding some lemon water to your daily ritual is an easy way tova practice with many positive health effects. This revitalizing beverage is a healthy approach to enhance your general well-being as it may strengthen your immune system, aid in weight reduction, and improve the condition of your skin. Savor the health benefits of lemon water and start your day with a zesty twist. To your well-being, cheers!

Bakery-Style Tea Cake: Original Recipe

Bakery-Style Tea Cake: Original Recipe

Savor the delicious tastes of this handmade tea cake, which is ideal for a tea party. We’ve also provided some helpful hints and techniques!

Ingredients:

  1. 100 grams of butter without salt
  2. thirty grams of light brown sugar
  3. two beaten eggs
  4. 200 grams of pancake mix
  5. Two papayas

Guidelines:

  • Set the oven’s temperature to the preferred baking setting, which is often 180°C or 350°F. Coat a cake tin with oil and flour, or line it with parchment paper.
  • 30 grams of light brown sugar and 100 grams of unsalted butter should be combined in a mixing dish. Beat the sugar and butter until the mixture is frothy and light.
  • Add two beaten eggs to the butter-sugar mixture gradually. Make sure every addition is well mixed in after making a batch.
  • Sort 200 grams of pancake batter. blend with the moist components. Just blend the pancake mix with the batter by folding it in. Avoid overmixing the cake as this might result in a harsh texture.
  • Two ripe bananas should be mashed and mixed into the cake batter. Your tea cake will taste delicious and be moist thanks to the mashed bananas.
  • Fill the cake tin with the prepared cake batter once it has been dusted and oiled.
  • When a toothpick put into the center comes out clean, bake in the preheated oven for the prescribed amount of time. The length of baking time varies based on your oven and the size of your cake pan, but it usually takes 30 to 40 minutes.
  • When finished, take the tea cake out of the oven and allow it to cool for a few minutes within the tin.
  • After that, move it to a wire rack to finish cooling.

Advice & Techniques:

  • To achieve a more rich and sweet banana taste in your cake, use ripe bananas.
  • For added texture and taste, feel free to stir in a handful of chocolate chips, almonds, or dried fruit before mixing the mixture.
  • For a beautiful appearance, sprinkle powdered sugar over the completed cake.

To Assist: Enjoy your bakery-style tea cake with a cup of your preferred tea or coffee after slicing it. It’s the ideal dessert for tea time or whenever you want a delicious piece of baked cake.