Potato Fritters

 Potato Fritters 

Introductions:

otato fritters are a delightful and versatile dish enjoyed in various cultures around the world. These golden, crispy treats are typically made by combining grated or mashed potatoes with a mixture of herbs, spices, and sometimes other vegetables or proteins, then frying them to perfection. The result is a flavorful and satisfying snack or side dish that can be served hot with a variety of dips or sauces.

Originating from different culinary traditions, potato fritters can be found in many forms, from the Indian “aloo pakora” to the British “bubble and squeak,” each with its unique twist and flavor profile. Whether you’re looking for a quick appetizer, a hearty breakfast option, or a tasty accompaniment to your main course, potato fritters are sure to impress with their deliciously crispy exterior and tender, flavorful interior. Perfect for any occasion, these fritters can be easily customized to suit your taste preferences, making them a favorite among home cooks and chefs alike.


Ingredients:

  1. 2 large potatoes (approx. 500g)
  2. Parsley
  3. Spring onions
  4. Salt, pepper, garlic powder
  5. 2 medium eggs
  6. 2 large tablespoons of cornstarch (around 40g)
  7. Sweet paprika
  8. 7g of coriander
  9. Vegetable oil for frying

For the sauce:

  1. 120g of plain yogurt
  2. Juice of half a lemon
  3. Lemon zest
  4. Parsley
  5. Half a cucumber
  6. Salt and pepper
  7. 1 clove of garlic
  8. Spicy sauce
  9. Olive oil

Instructions:

  1. Begin by grating the potatoes and then thoroughly squeezing them to remove excess moisture.
  2. In a bowl, combine the grated potatoes with parsley, spring onions, salt, pepper, garlic powder, eggs, cornstarch, paprika, and coriander.
  3. Shape the mixture into fritters and fry them in a pan with vegetable oil until golden brown.
  4. To make the sauce, mix together yogurt, lemon juice, lemon zest, parsley, cucumber, salt, pepper, garlic, spicy sauce, and olive oil.
  5. Serve the crispy, golden potato fritters with a generous dollop of this refreshing sauce.
  6. Enjoy!

Oatmeal and Zucchini Bake Better than Pizza

Oatmeal and Zucchini Bake Better than Pizza

Give your everyday meals a healthier makeover with this oatmeal and zucchini bake! A flavorful treat with cheese, eggs, and chives on top that will make your family look forward to dinner every day.

Components:

  1. One zucchini
  2. Salt, to taste
  3. 3–4 tablespoons of oatmeal
  4. 100g of grated cheese
  5. 2 eggs
  6. Add pepper to taste and cut the chives.

Guidelines:

Get the zucchini ready.

– Finely chop the zucchini and season with salt. Let it sit for ten minutes in order to extract extra moisture.

2. Establish the Foundation:

– Squeeze off any extra water from the shredded zucchini. Combine the grated cheese, eggs, chopped chives, oats, and pepper with the zucchini.

3. Baking:

– Set oven temperature to 180°C, or 360°F.
– For twenty minutes, bake the mixture in a dish.

4. The Finished Touch

– Remove the cover and replace it.

the oven for a further ten minutes, until the edges are crisp and the top is brown.

5. Present:

Cut into slices and warm up. Savor the healthy goodness of your zucchini and oatmeal bake!

Better for you than pizza, and always a hit! When you duplicate this delicious bake, let us know and don’t forget to tag us.

Say Goodbye to Sugar: Enjoy Healthy Cookies Without Flour and Sugar

Say Goodbye to Sugar: Enjoy Healthy Cookies Without Flour and Sugar!

Do you have a sweet tooth, yet you wish to avoid refined sugar? There’s nowhere else to look! This post will introduce you to a delicious recipe for high-energy cookies that don’t contain any flour or sugar. These guilt-free sweets satisfy your cravings without sacrificing your health objectives because they’re tasty and simple to prepare.

Why Choose Desserts Without Sugar?
While sugar is certainly tasty, it also raises a number of health risks, including the potential for weight gain and a higher chance of chronic illnesses like diabetes and heart disease. You can indulge your sweet craving without suffering any bad effects by selecting sugar-free alternatives. In addition, you should notice a decrease in cravings and a more consistent level of energy throughout the day.

Checklist of Ingredients

  1. 120 grams (4 ounces)
  2. Fifty grams (1.8 oz) of dried cranberries.
  3. 30 grams (1 ounce) 60 grams (2 ounces) of oatmeal nuts
  4. thirty grams (1 ounce) 20 grams (0.7 ounces) of peanuts seeds of pumpkins
  5. 15 grams, or 0.5 ounces 15 ml (0.5 fl oz) of sesame hone
  6. 130 grams, or 4.6 oz. sugar-free dark chocolate
  7. 20 ml, or 0.7 fl oz extra virgin olive oil

Getting the Base Mix

  • To begin, soak your dried fruits in cold water for fifteen minutes to give them a refreshing bath. This process eliminates preservatives while also bringing forth their healthy attributes.
  • After soaking, remove the water and process the dates, oats, and dried cranberries until a sticky consistency is achieved. In a frying pan, cook the peanuts and almonds separately until golden brown. For a more homogeneous texture, then finely chop them or combine them.
  • Add these deliciously nutty treats to your base mixture and well stir.
  • Using Honey for Natural Sweetening
    We’ll use a little honey to naturally sweeten our cookies instead of grabbing for processed sugar. Make sure the honey is equally dispersed in the mixture after adding 15 ml of it. Honey has many health advantages, such as antioxidants and antimicrobial qualities, in addition to providing sweetness.
  • Making the Cookie Balls
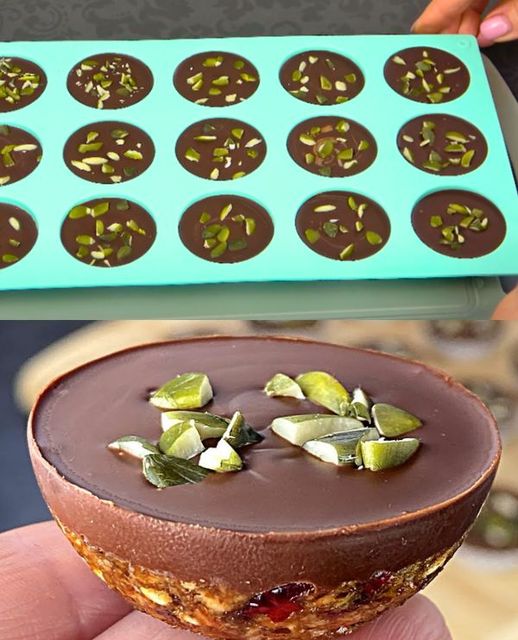
    The exciting part is about to begin: sculpting our cookie dough! Place the mixture on a silicone mold after rolling it into little spheres. Each ball should be gently flattened. to the thickness you want. This stage lays the groundwork for our mouthwatering cookies.
  • Alluring Chocolate Glaze
    Let’s dip our cookies in dark chocolate to turn them into gourmet treats. In a water bath, melt 130 grams of unsweetened dark chocolate. Stir in 20 milliliters of olive oil for a glossy finish. After the chocolate has melted, carefully dip each cookie into the mixture, making sure to coat them well.
  • Using pumpkin seeds for decoration
    Before the chocolate-coated cookies harden, sprinkle some pumpkin seeds on top for a last-minute decoration. Pumpkin seeds offer more than just visual appeal; they also give food a wonderful crunch and an added nutritional boost (think magnesium and zinc).
  • Perfect Texture with Chilling
    Place your cookies in the fridge for thirty to forty minutes toLet the flavors to combine and the chocolate covering to solidify. Your nutritious treat is now ready to be enjoyed after it has cooled!

Inconclusion , relish your well-being indulgence.

In summary, choosing sugar-free confections does not imply compromising taste or satisfaction. Sweet treats that satisfy your palate and invigorate your body can be made with healthy ingredients and inventive preparation methods. So why not bake some of these healthful cookies for a guilt-free treat

Lose Weight by Cleansing Your Colon in 7 Days

Lose Weight by Cleansing Your Colon? in 7 Days

Taking good care of your colon is crucial to maintaining good health and controlling your weight, particularly as we become older. Even though our digestive systems are meant to function well, they occasionally have trouble breaking down and getting rid of everything we eat. Inconvenience, bloating, weight gain, and the buildup of waste in our bodies can result from this.

Recognizing the Value of a Healthy Colon
Ignoring the health of our colons can have a number of detrimental impacts on our general wellbeing, particularly for those of us between the ages of 45 and 65. Toxins that remain in the colon have the potential to enter the bloodstream and seriously harm our health. Constipation, delayed digestion, mood changes, bloating, and weight fluctuations are all indicators of a sick colon. These circumstances have a significant effect on our quality of life and can to further health concerns like reduced immunity, skin conditions, and even long-term illnesses.

Accepting Colon Cleansing as a Way to Improve Health
It’s never too late to start implementing regular colon cleansing procedures; they can greatly enhance your overall health. Enhanced digestive efficiency, improved vitamin absorption, and a general sense of lightness are among the advantages. A healthy weight is very vital at this point in your life, and sustaining it also depends heavily on having a clean gut.

For Colon Health, Try a Week-Long Juice Cleanse
Try this healthy juice cleanse to kickstart your path to a healthier colon and possibly aid in weight loss. You can perform this simple system cleaning for a week

23 Things You Should Know About Okra

23 Things You Should Know About Okra

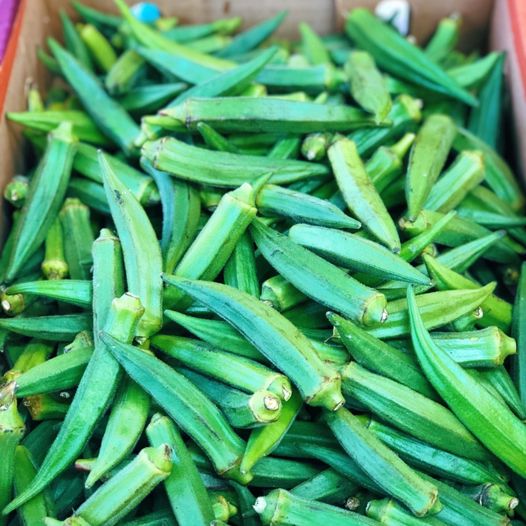
Okra, sometimes referred to as “gumbo” or “lady’s finger,” is a popular and adaptable vegetable eaten all across the world. These are 23 amazing okra facts that you should be aware of, regardless of your level of experience with this green vegetable.

Benefits to Nutrition

  • Rich in Nutrients: Okra is a great source of B vitamins, as well as vitamins A, C, and K.
  • High in Fiber: It has a fair quantity of dietary fiber, which improves gut health and aids in digestion.
  • Low in Calories: Okra is an excellent addition to a balanced diet because it is low in calories.
  • Antioxidants: Helps combat oxidative stress by containing antioxidants like quercetin and catechins.
  • Provides a sufficient supply of calcium, which promotes the health of bones.

Advantages for Health

  • Blood Sugar Regulation: Okra could assist in maintaining blood because of its fiber content, sugar levels.
  • Heart Health: The fiber and antioxidants in it support heart health.
  • Anti-Inflammatory Properties: Assists in lowering bodily inflammation.Okra’s vitamin C helps to strengthen the immune system.
  • Hydration: Okra helps with hydration because it contains over 90% water.Okra is a versatile ingredient in cooking that can be pickled, fried, grilled, or boiled.
  • Thickening Agent: Because of its inherent thickening qualities, it is frequently used in stews and soups, such as gumbo.
  • Global Cuisine: Popular throughout the Middle East, Africa, and the South of the United States.
  • Pairing: Goes nicely with garlic, onions, and tomatoes.
  • Warm Climate Okra Growing: This plant does well in warm weather and is rather simple to cultivate.
  • Quic:k-Growing Within 50–60 days of sowing, harvesting is possible. Requires a soil that is rich and well-drained.
  • Watering: Needs regular irrigation, particularly in arid periods.

Interesting Facts

  • Historical Use: During the American Civil War, okra seeds were used in place of coffee.
  • Botanical Family: Cotton and hibiscus are members of the mallow family, which this plant belongs to.
  • Mucilage: Mucilage is the slimy material found in okra that has a number of culinary and therapeutic applications.
  • Pollination: Bees and other pollinators can be drawn to okra blossoms, which self-pollinate.
  • Cultural Significance: Okra is seen as a sign of health and prosperity in several civilizations.

In summary, okra is an amazing vegetable that has a wide range of health advantages, a variety of culinary applications, and intriguing historical and cultural importance. Okra is a wholesome and adaptable complement to any dish, whether it is consumed raw or added to a robust gumbo. Having gained additional knowledge regarding okra, you can recognize its various benefits and even come up with fresh ways to include it in your diet. Cheers to cooking and gardening!

Delicious and Sugar-Free Pineapple, Lemon, and Ginger Juice for Weight Loss

Delicious and Sugar-Free Pineapple, Lemon, and Ginger Juice for Weight Loss

Are you trying to lose weight and looking for a delicious and healthful dish to help you? There’s nowhere else to look! Try this delicious and simple-to-make Fat-Burning Juice of pineapple, lemon, and ginger.

Components:

  1. Two extremely ripe pineapple slices (around 100g)
  2. one lime’s juice
  3. A one-centimeter chunk of ginger root
  4. hundred milliliters of water

Getting ready:

  • Put the ginger root, lime juice, and pineapple slices in a blender. Mix well until smooth.
  • When the mixture is well combined, add the water and blend again.
  • Once the fat-burning juice is produced, pour it into a glass and enjoy its cool flavor.
  • This refreshing beverage boosts your body’s ability to burn fat and helps jump-start your metabolism in addition to being a delicious treat for your taste buds. Include this drink in your daily regimen for a healthy living. and relish the advantages it provides.
  • Recall that reaching your weight reduction objectives is a journey, and that every little step matters. Accept this delicious drink as a part of your endeavors to have a longer, happier life. To your well-being, cheers!

Baked Fish with Cherry Tomatoes and Olives

Baked Fish with Cherry Tomatoes and Olives

A tasty and healthful dinner that is simple to make and full of Mediterranean flavours is baked fish with cherry tomatoes and olives. Tender fish fillets cooked with luscious cherry tomatoes, salty olives, and fragrant herbs make up this meal. Now let’s get into the specifics of making this delicious dish!

Ingredients

  1. White fish fillets: 4 (such as cod, haddock, or sea bass)
  2. Cherry tomatoes: 2 cups, halved
  3. Kalamata olives: 1 cup, pitted and halved
  4. Garlic: 4 cloves, minced
  5. Red onion: 1 small, thinly sliced
  6. Olive oil: 1/4 cup (60ml)
  7. Lemon juice: 2 tablespoons
  8. Dried oregano: 1 teaspoon
  9. Dried thyme: 1 teaspoon
  10. Salt and black pepper: To taste
  11. Fresh parsley: 2 tablespoons, chopped (for garnish)
  12. Lemon wedges: For serving

Method:

Combine the ingredients:

  • Pitted Kalamata olives, minced garlic, sliced red onion, and split cherry tomatoes should all be combined in a mixing dish.
  • Include the seasonings: Pour in some lemon juice and olive oil. Add salt, black pepper, dried thyme, and dried oregano. Mix everything until well incorporated.

Step 2: Get the Fish Ready

  • Preheat the oven: Set oven temperature to 400°F, or 200°C.
  • Adjust the fish’s seasoning: Using paper towels, pat dry the salmon fillets. Add black pepper and salt on both sides.

Step 3 Put Together and Bake

  • Arrange the baking dish in layers: In a baking dish, spread half of the tomato and olive mixture on the bottom.
  • Add the fish: Place the seasoned fish fillets on top of the tomato and olive mixture.
  • Spread remaining mixture on top: Cover the fish fillets with the remaining tomato and olive mixture.
  • Bake: Bake the fish for 20 to 25 minutes in a preheated oven, or until it is cooked through and flakes readily with a fork.

Step 4: Present

  • After baking, take out the baking dish and garnish it. Serve with lemon wedges on the side and garnish with freshly cut parsley.
  • Serve hot: Present the baked fish hot, accompanied with cherry tomatoes and olives, along with your preferred side dishes, such quinoa, steaming rice, or a crisp salad.

TIPS for the Ideal Baked Fish

  • Make use of fresh fish: For this dish, fresh fish fillets work best since they will be soft and tasty.
  • Avoid over baking: Watch the fish closely in the oven to avoid overcooking it. When the fish is done, it should be opaque and flake readily with a fork.
  • Personalise the herbs: For extra taste, feel free to add fresh herbs like dill, basil, or rosemary.

Conclusion

A tasty, nutritious, and easy dish to make for any meal is baked fish with cherry tomatoes and olives. This dish calls for luscious tomatoes, salty olives, and fragrant herbs to complement the fish’s flavour and tenderness. Enjoy preparing and eating this delicious supper with a Mediterranean flair with your loved ones!


Drinking 1 Glass of THIS Fixes Fatty Liver in 2 WEEKS

Drinking 1 Glass of THIS Fixes Fatty Liver in 2 WEEKS!

Did you know that in just two weeks, a straightforward drink made with carrot and lemon can help treat a fatty liver? Packed with vitamins and antioxidants that support liver health and general well-being, this hydrating and nourishing drink is a great choice. Let’s explore the ingredients and methods for creating this delightful beverage at home.

Why carrots with lemons?
**1. Detoxifying Properties: The detoxifying properties of lemons are widely recognized. They support improved liver function by aiding in the liver’s cleansing and toxic removal.

**2. Packed with Antioxidants: Beta-carotene and vitamin A, two potent antioxidants that shield the liver from oxidative damage and promote liver cell regeneration, are abundant in carrots.

**3. Anti-Inflammatory: The anti-inflammatory qualities of carrots and lemons might lessen liver inflammation and enhance liver wellness.

**4. Hydration: This beverage contains plenty of water, which is good for your liver and general health.

Ingredients:

  1. 1 big chopped and peeled carrot
  2. One lemon’s juice
  3. one cup of water
  4. One teaspoon honey (to taste) is optional.
  5. a few ice cubes (not required)

Guidelines

Get the carrot ready:

Peel and cut the carrot into small pieces first. It blends more easily as a result.

Mix the ingredients together:

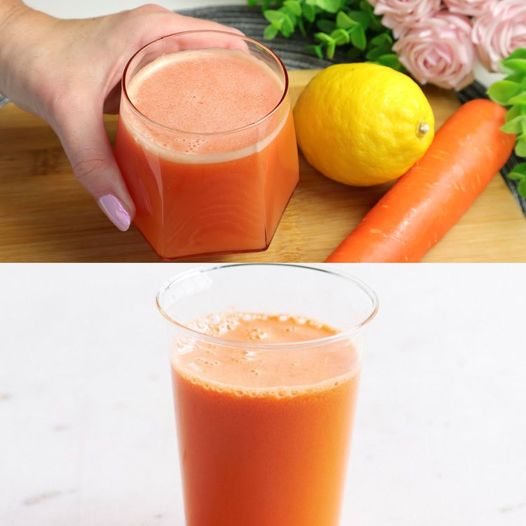
Add the water, lemon juice, and diced carrot to a blender. Process till smooth. You can strain the mixture through cheesecloth or a fine-mesh sieve if you’d like a smoother texture.

Enhance the Drink’s Taste:

If you would prefer your drink a little sweeter, stir in one teaspoon of honey. Mix thoroughly to blend.

Serve:

Transfer the blend into a glass.

If you want it cold, pour it over a few ice cubes. Savor this cool beverage right away.

Extra Advice

  • Fresh Ingredients: For optimal results and highest nutrient content, use fresh, organic carrots and lemons.
  • Consistency: To notice a noticeable improvement in liver function, drink one glass of this lemon-carrot juice every day for at least two weeks.
  • Balanced Diet: To enhance general liver health, pair this beverage with a diet high in fruits, vegetables, lean meats, and whole grains.

Benefits of Lemon and Carrot Juice Liver Detox: Aids in liver cleansing by encouraging improved liver function and eliminating toxins.

Nutrient Boost: Supplies vital vitamins and antioxidants that promote general well-being and liver health.

Anti-Inflammatory: Helps prevent and treat fatty liver by reducing inflammation in the liver. illness.

In summary
You can treat fatty liver in two weeks by adding a glass of carrot and lemon juice to your daily routine. It’s a simple yet efficient method. This delightful, simple-to-make beverage is loaded with minerals that promote liver detoxification and general health. Try it out and reap the rewards of a happy and healthier liver. Salutations to your well-being

Lose 2 Kilos in 5 Days and Cleanse Your Intestines: The Power of Chia Seeds and Lemon

Lose 2 Kilos in 5 Days and Cleanse Your Intestines: The Power of Chia Seeds and Lemon

Are you trying to find a healthy and efficient technique to get rid of constipation and reduce weight? Maybe a simple drink of lemon and chia seeds will do the trick. This potent mixture can help you clear your intestines in three days and shed up to two kg in just five. Here’s how to make it and how it functions.

Why Lemon and Chia Seeds?
**1. High in Fiber: Chia seeds are a great source of fiber, which promotes healthy digestion and prolongs feelings of fullness. This can encourage weight loss by lowering total calorie intake.

**2. Hydration and Detox: Lemon is an organic detoxifier that also aids in bodily hydration. Its high vitamin C concentration helps with digestion and strengthens your immune system.

**3. Mild Cleaning: Chia seeds and lemon work together to gently and naturally cleanse your intestines, which can help reduce constipation and promote better gut health.

How to Prepare the Lemon and Chia Seed Drink:

  1. One spoonful of chia seeds
  2. One glass (about 250 ml) of water
  3. One lemon’s juice
  4. Honey (to taste, optional)

Guidelines:

Let the Chia Seeds Soak:

Put a tablespoon of chia seeds in a glass of water. To keep the seeds from clumping together, give them a good stir. Soak them for a minimum of half an hour, or until a gel-like consistency forms.

Incorporate Lemon Juice:

Pour one lemon’s juice into the glass. Mix thoroughly to blend. You can add a teaspoon of honey if you’d like a little sweetness.

Raise a glass:

Sip this concoction on an empty stomach first thing in the morning. Use it every day for at least five days to get the optimum effects.

Advantages and Advice

  • Weight Loss: Chia seeds’ fiber makes you feel fuller, which lowers your consumption of calories overall and aids in weight loss.
  • Digestive Health: Chia seeds and lemon work together to promote a healthy gut, ease constipation, and improve digestion.
  • Hydration: This beverage aids in maintaining proper hydration, which is crucial for both weight loss and general wellness.

Extra Advice

Stay Active: To optimize weight loss and general well-being, pair this drink with frequent exercise.

A healthy diet should consist of a variety of fruits, vegetables, lean meats, and entire grains.

Keep Yourself Hydrated: Throughout the day, sip on lots of water to aid in digestion and general well-being.

In summary
You may naturally cleanse your intestines, alleviate constipation, and reduce weight by making a simple drink with chia seeds and lemon every day. This simple beverage is a great way to support digestive health and help you reach your weight loss objectives. Give it a try for five days and see the amazing results for yourself!

Refreshing Spiced Pineapple Skin Juice Recipe

Refreshing Spiced Pineapple Skin Juice Recipe

Searching for a novel and invigorating application for pineapple skins? This juice made from spiced pineapple skin is both tasty and environmentally responsible! Make a tasty and healthful drink out of the pineapple skins instead of discarding them. This delicious juice with a hint of spiciness can be made as follows.

Why Pineapple Skin Juice?

**1. Zero Waste: Utilizing the pineapple skins maximizes the use of the whole fruit while reducing waste.

**2. Nutrient-Rich: Pineapple peels are rich in antioxidants, vitamins, and minerals that are good for your health.

**3. Flavorful and Refreshing: A combination of spices infuses this juice, giving your standard fruit drink a distinctive and revitalizing touch.

Ingredients:

  1. 1 medium pineapple, carefully cleaned
  2. a 1-inch-long segment of new ginger,
  3. cut up
  4. One cinnamon stick
  5. Four to five cloves
  6. one juiced lime
  7. Four glasses of water
  8. Taste-tested agave syrup or honey (optional)
  9. Cubes of ice (optional)

Guidelines for Preparing the Pineapple Skins:

Peel the pineapple and chop the peels into smaller pieces after giving it a thorough wash. Make sure the skins are free of any debris or residue.

Heat up the Skins:

Place the pineapple skins, sliced ginger, cloves, and cinnamon stick in a big pot. Add the four glasses of water.

Reduce:

  • After bringing the mixture to a boil, lower the heat, and simmer it for 20 to 30 minutes. This permits the nutrients to be extracted from the pineapple peels and the tastes to permeate.
  • Pour the Juice Through a Strainer:
  • Once simmering, take the saucepan off of the burner and let it to cool.
  • somewhat. Pour the mixture into a pitcher after straining it through cheesecloth or a fine-mesh screen, throwing away the solids.

Include Lime Juice:

Add the fresh lime juice and stir for an additional citrus flavor boost. For a sweeter beverage, taste the juice and add honey or agave syrup.

Serve:

If desired, pour the spiced pineapple skin juice into glasses with ice cubes. You can consume this cool beverage right now or save it in the fridge for later.

Extra Storage Advice: You can keep any leftover juice in the fridge for up to three days.

Flavor Variations: For a bubbly twist, add a few fresh mint leaves or a dash of sparkling water.

Health Benefits: This drink has anti-inflammatory and digestive qualities from the ginger in addition to reducing waste. spices.

The Eco-Friendly Advantages of Spiced Pineapple Skin Juice One of the best ways to maximize the use of your produce and cut down on food waste is to create juice from pineapple skins.

Hydration: On hot days in particular, this cool beverage is ideal for maintaining proper hydration.

Digestive Aid: The spices and ginger can ease indigestion and promote a healthy digestive system.

In summary
An excellent technique to transform what would normally be kitchen waste into a tasty and nutritious beverage is to make spiced pineapple skin juice. It’s nutrient-rich, refreshing, and simple to prepare. Try this inventive recipe to enjoy a tasty, environmentally friendly beverage that is also excellent for you. To your wellbeing and longevity, cheers!