THE BEST BANANA PUDDING Recipe

THE BEST BANANA PUDDING RECIPE

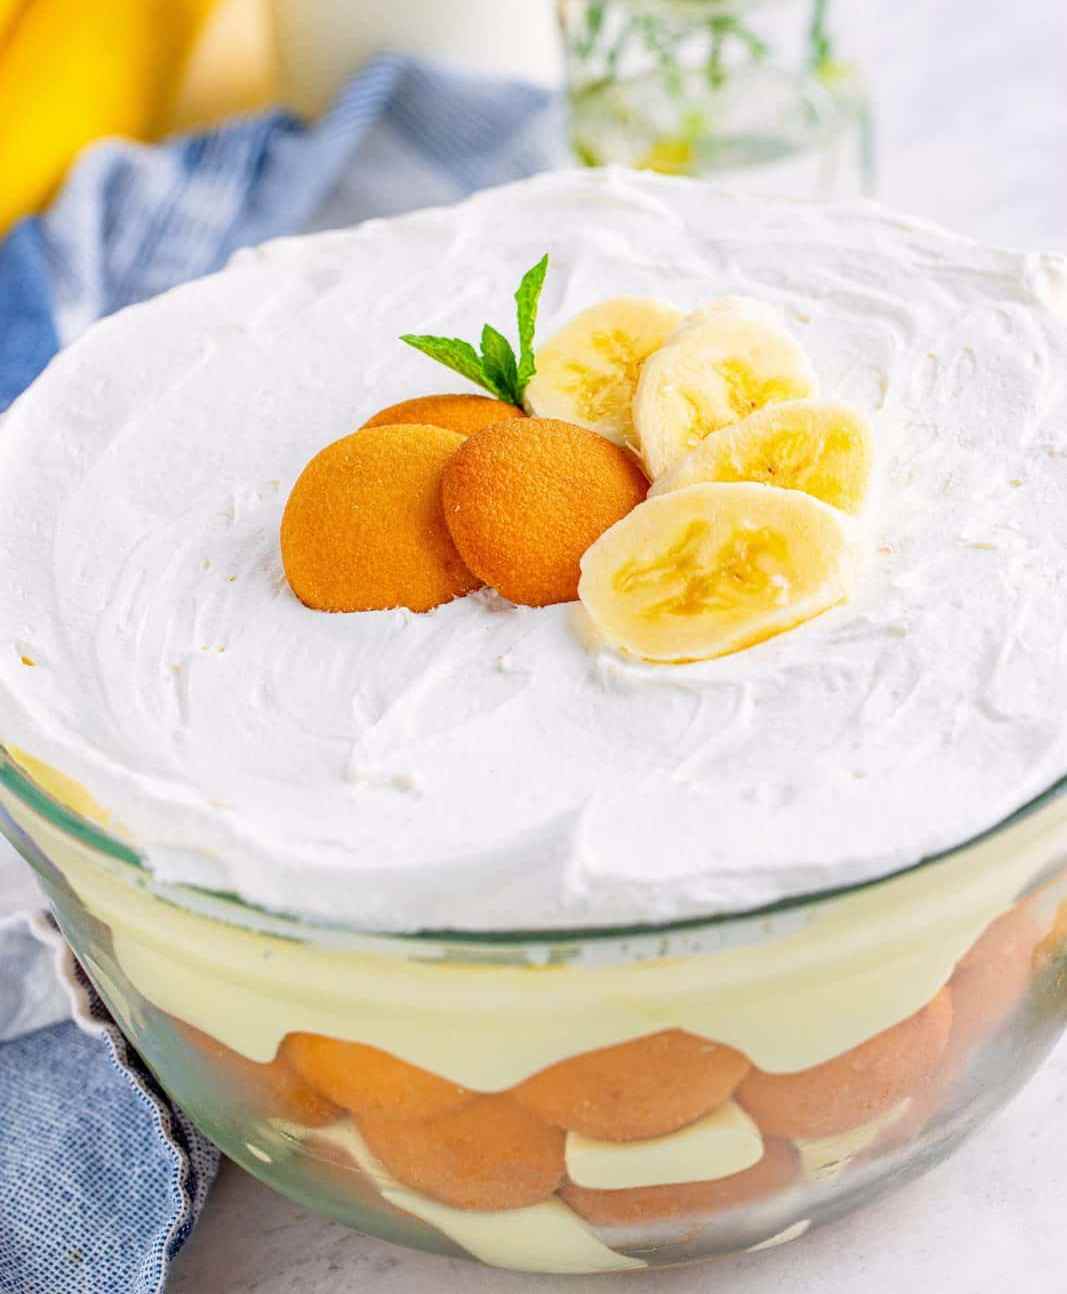
THE BEST BANANA PUDDING RECIPE Made with custard, cream cheese, sweetened condensed milk, fresh bananas and Nilla wafers, this recipe for the best banana custard can be prepared without cooking!

A traditional Southern dish that has been enjoyed for generations is banana custard. Layers of vanilla custard, sliced bananas and Nilla wafers are combined to create this rich and delectable dessert, which is finished with whipped cream. Whether it’s served during a summer BBQ or a family get-together, it makes the ideal dessert. Take a spoon, then, and let’s go!

How does this pudding vary from a cooked banana pudding?

I’ve already posted a recipe for cooked southern banana custard on the website. The bananas’ propensity to brown quickly is the sole drawback to baked custard. You want to bring nice, non-brown bananas if you are bringing this to a potluck or picnic. Because the no-cook version travels well and serves up effortlessly, it’s perfect for potlucks and picnics where bananas keep fresher for longer.

Setup Time: twenty-five minutes
Twenty-five minutes in total
12 servings

Recipe By: Brandie Skibinski

INGREDIENTS FOR THE BEST BANANA PUDDING RECIPE:
  • 8 ounces of room temperature cream cheese
  • 14 ounces of condensed milk with added sweetness
  • 5 ounces of instant vanilla custard mix (bigger box)
  • Three cups of milk (2% or more)
  • Two tsp vanilla essence; an eight-ounce tub of
  • Thawed COOL WHIP whipped topping (separate use)
  • An 11-oz package of Nilla wafers (split use)
  • 5–7 bananas, cut into slices and peeled for separate usage.
INSTRUCTIONS FOR THE BEST BANANA PUDDING RECIPE:
  • Cream cheese should be beaten with an electric mixer on medium speed in a large bowl until it is creamy and fluffy.
  • Pour in the milk, vanilla custard mix, sweetened condensed milk and vanilla essence. Stir until thoroughly blended.
  • Incorporate half of the whipped topping lastly.
  • To layer: line the bottom of a big bowl, trifle dish or 9 x 13-inch baking dish with one-third of the Nilla wafers.
  • Arrange the banana slices in a single layer.
  • After that, cover all of the bananas with a third of the custard mixture.
  • Add two more layers after that.
  • Place the leftover whipped topping over top.
  • To allow the mixture to thicken and the wafers to soften, cover with plastic wrap and chill in the refrigerator for at least one to two hours before serving.

Remarks:

  • Please be mindful of the custard you are purchasing. It cannot be “cook and serve,” but rather INSTANT. On store shelves, they are next to each other. Cook and Serve WON’T SUCCEED.
  • Additionally, confirm that the can of condensed milk you are collecting is sweetened and not evaporated milk. This dish won’t firm up and won’t have as much sweetness.
  • You can use vanilla custard flavour instead of banana cream custard flavour. As an alternative, vanilla extract can be replaced with banana extract.
  • Ensuring that the cream cheese is room temperature is crucial. If not, lumps will form and you won’t be able to get it extremely smooth.
  • Given that bananas naturally come in a variety of sizes, I would estimate 5-7 bananas, depending on the size of the bananas you buy. Although you should follow your own preferences, I like my banana custard to have a lot of fresh banana in it.

What is the shelf life of banana custard?

  • If kept in an airtight container, banana custard can be kept in the refrigerator for up to three days. After preparing it, make sure to chill it right away. Note: The bananas will start to turn brown once you start eating the banana custard, so keep that in mind. Freezing is not something I advise.

Nutritional values: 458 kcal, 72 g of carbohydrates, 10 g of protein, 14 g of fat, 408 mg of sodium, 1 g of fibre, and 54 g of sugar.


Gluten Free Zucchini Muffins

Gluten Free Zucchini Muffins

Gluten Free Zucchini Muffins are prepared with common grocery ingredients. These are ideal for summer get-togethers, lunchboxes, breakfast, and on-the-go snacks. Before you need them, prepare them and freeze!
Ideal for vegetarian and gluten-free diets.

Ten minutes for prep

Cooking: Thirty minutes
Time in total: 40 minutes
Course: Brunch, Breakfast, and Snack

Diet: vegetarian and gluten-free

12 servings

215 calories

Recipe By: Bintu Hardy

Ingredients For Gluten Free Zucchini Muffins:

  1. Pear nectar (⅓ cup; 75ml)
  2. Vegetable oil (⅓ cup; 75ml)
  3. Dark brown sugar (⅔ cup; 225g).
  4. Four large free-range eggs
  5. One-half teaspoon vanilla
  6. Two and a half cups (350g) shredded zucchini
  7. Two and a half cups (300g) gluten-free flour
  8. Two teaspoons gluten-free baking powder
  9. One and a half teaspoons crushed cinnamon
  10. One-Quarter teaspoon nutmeg
  11. One pinch of salt

Instructions For Gluten Free Zucchini Muffins:

  • Turn on the oven to 350 degrees Fahrenheit, 160 degrees Celsius with a fan, 180 degrees Celsius or gas 4.
    Put the muffin liners inside your muffin tins.
  • In a sizable bowl, combine the pear nectar, vegetable oil, sugar, eggs, and vanilla; stir to blend.
  • Add the grated zucchini and stir.
  • Mix just till mixed after adding the flour, baking powder, nutmeg, cinnamon, and pinch of salt. Don’t overmix the batter, please
  • Pour the batter into the muffin tins and bake for 25 to 30 minutes, or until the muffins are cooked through, as measured by the toothpick or wooden skewer coming out clean.
  • Before serving, let the muffins to cool slightly on a wire rack.

Remarks Gluten Free Zucchini Muffins:

  • To keep moisture in the courgette, choose fresh ones and grate right before using.
  • After shredding, remove any extra moisture from the zucchini using a towel or your hands to avoid muffins that are too moist.
  • To avoid tough muffins, do not overmix the batter when combining the wet and dry components.
  • Muffin tin liners make cleanup easier and help keep food from sticking.
  • Lower the spice content at first and then gradually add more for kid-friendly muffins.
  • After baking and cooling, place the muffins in an airtight container and store it at room temperature for two to three days, or store it in the refrigerator for up to one week.
  • One dish consists of seven WW Blue Plan Smart Points.

Why Prepare This Dish Every Day?

  • Ingredients: There’s no need to look far or wide for unusual or fancy ingredients. This recipe is simple to prepare because it only calls for ordinary cupboard items.
  • Healthier Option: You may incorporate zucchini into your diet and enjoy a cake that is lighter and has less sugar. Both your health and taste buds will benefit from it.
  • Freezer-friendly These muffins are great made in large quantities and frozen. It works well for last-minute tea time treats, brunches, and hectic mornings. Your future self will be appreciative.
  • Vorteile von Zucchini: In addition to being delicious, courgette have a high water content and few calories. In addition, they offer vital nutrients such dietary fibre, potassium, vitamin C, and vitamin A.

Nourishment Facts Recipe:
12 muffins; 215 kcal; 33 g of carbohydrates; 5 g of protein; 8 g of fat; 1 g of saturated fat; 4 g of polyunsaturated fat; 2 g of monounsaturated fat; 0.05 g of trans fat; 55 mg of cholesterol; 31 mg of sodium; 180 mg of potassium; 3 g of fibre; 15 g of sugar; 137 IU of vitamin A; 5 mg of vitamin C; 71 mg of calcium; 1 mg of iron


10 Minute Pudding

10 Minute Pudding

10 Minute Pudding Recipe Finding a dish that blends speed and flavour is a genuine culinary discovery in a world where time is often limited. For dessert enthusiasts who want to sate their sweet tooth in the shortest amount of time, the 10-Minute Pudding seems like a real gem. Prepare to set out on an adventure where excitement and pragmatism collide.

Ingredients For 10 Minute Pudding Recipe:

  1. One condensed milk can
  2. Two milk cans (as a measure, use the condensed milk can)
  3. Three eggs
  4. One tsp vanilla extract
  5. One cup of sugar (to make the syrup)

Instructions For 10 Minute Pudding Recipe:

  • Making the syrup: Melt one cup of sugar in a custard mould until it turns golden caramel. Hold back.
  • Making Pudding: Condensed milk, milk, eggs, and vanilla essence should all be added to the blender. Until you have a homogenous mixture, beat for around five minutes.
  • Assembly: Fill the caramelised mould with the mixture.
  • Speedy Cooking: cook in the microwave on high for 8 to 10 minutes. The custard should have a somewhat creamy centre with firm edges.
  • Cooling: Give it at least two hours to cool before putting it in the refrigerator.
Relevance to Recipe:

Ten Minutes Pudding is more than just a quick dessert; it’s a call to pragmatism without sacrificing the pleasure of indulging in something delectably sweet. A choice that is well suited to the hectic pace of daily existence.

Advice for Recipe:

For a zesty twist, try adding some lemon zest to the mixture.
For a fragrant touch, lightly sprinkle some cinnamon over top before serving.

In summary:

One example of how to make sweet moments without spending hours in the kitchen is the 10-Minute Pudding. Talk about your experiences making this simple dish and see how taste and usefulness may go hand in hand. Post a comment to encourage others to savour the pleasure of life as it is happening!


Oven Crispy Parmesan Potatoes

Oven Crispy Parmesan Potatoes

Oven Crispy Parmesan Potatoes These tiny ones are far too addicting! Even when I double the recipe, we devour the entire tray!

These golden beauties pair perfectly with a slow-cooked, perfectly cooked tenderloin of beef or a succulent roast chicken. However, don’t let customs limit you. They look just as good served with a crisp green salad or as the centrepiece of a warm meal with eggs.

Recipe By: Rgahb

Ingredients For Oven Crispy Parmesan Potatoes:

  1. 4 large russet potatoes, peeled and chopped into rounds about 1/4 inch in diameter
  2. One-third cup extra virgin olive oil
  3. One tablespoon fresh thyme leaves or one teaspoon dried thyme
  4. One teaspoon garlic powder
  5. Half a cup shredded Parmesan cheese
  6. Salt and freshly ground black pepper, to taste
  7. Optional garnish of fresh parsley sprigs

Instructions For Oven Crispy Parmesan Potatoes:

  1. Set the oven temperature to 400 degrees Fahrenheit. To guarantee that we have that perfect crispiness, you want it to be really hot.
  2. Coat the potato rounds thoroughly by tossing them in olive oil. Give them some room as you arrange them in a single layer on a baking sheet covered with parchment paper. You don’t want any steaming at this point, do you?
  3. In a separate bowl, mix together the Parmesan cheese, thyme, garlic powder, salt, and pepper. Stir them thoroughly.
  4. Evenly sprinkle each potato circle with this mixture. You’re looking for a nice even coating, so every bite has that mouthwatering flavor.
  5. Transfer the baking sheet to the oven and bake for twenty to twenty-five minutes, or until crisp and brown. Watch them closely and flip them halfway through to make sure they are evenly crispy and browned.
  6. Take the potatoes out of the oven and allow them to cool slightly after they are golden like the fields in late September. Then, for a flash of colour, you may move them to a serving tray and sprinkle some of that fresh parsley on top.
Variations & Advice:
  •  For a unique touch, mix your own combination of herbs, such as oregano or rosemary, with the thyme. Wish to make a crust that is cheesy
  • During the last few minutes of baking, turn those potato rounds over, top with a little extra Parmesan, and broil for a short while. But watch out
  • There’s a thin line between crispy from, well, overdone.
  • Remaining potatoes? They are a delicious addition to hash in the morning or served with a sandwich at lunch.

My love, this recipe’s beauty isn’t just in the flavor—it’s also in the memories it evokes and brings back. It’s about the love that’s passed down, one crispy potato at a time, from one generation to the next, much like the well-worn pages of our family cookbooks. Enjoy now and give me credit later.


Orange English Cake

Orange English Cake

Orange English Cake  One of the many recipes that populate our kitchens is this one, which is a real confectionery gem. Its endearing simplicity and the zesty orange flavour combine to produce a singular experience that goes beyond culinary restrictions. We welcome you to discover the mysteries of this timeless item and introduce a little of English culture into your house by using our guide.

Recipe By: m.alicar

Ingredients For Orange English Cake:

  • Three cups of wheat flour
  • One cup of sugar
  • One cup of butter
  • Four eggs
  • One cup of orange juice
  • The zest of two oranges
  • 1 tablespoon baking powder
  • Half a teaspoon of salt

Instructions For Make Orange English Cake

  • Dough: Beat the butter and sugar together in a bowl until a creamy consistency is achieved.
  • Egg Addition: Beat thoroughly after each addition of egg, then add the eggs one at a time.
  • Adding Secos: Sieve the baking powder, salt, and wheat flour into the batter. Gently stir.
  • Introducing Citrus Flavour: Incorporate the orange juice and zest into the dough, blending until a uniform texture is achieved.
  • Baking: Place the dough in a pan that has been buttered, and bake it for 45 to 50 minutes at 180°C, or until a toothpick inserted in the centre comes out clean.

Relevance:

  • Orange English Cake is a culinary adventure that embodies the grace and heritage of English cooking, not just a recipe. Its subtle, astringent flavour elevates any cake to a new level, making it a must-have ingredient for homemade cakes.

Advice:

  • For an additional taste and appearance boost, consider adding an orange icing topping.
  • For a taste of Britain, serve thin slices with tea.

In summary:

Together, we delve into the skill of crafting an English Orange Cake—a recipe that cuts across boundaries and provides a taste of English heritage. Please let us know about your experiences attempting this recipe in the comments below. We value your feedback and ideas as we work to further expand our culinary universe. I hope every piece of this cake serves as a gateway to a flavorful adventure that you won’t soon forget!

Chicken Lasagna Roll Ups

Chicken Lasagna Roll Ups

Cooking Chicken Lasagna Roll Ups is a comforting evening dish. Lasagna noodles are folded up with tender chicken, broccoli, and cheese, then baked in a handmade cream sauce.

This recipe, which serves as a full supper, is a family favourite!

Rather than arranging the components in a pan, a lasagna roll up is produced by wrapping all of the classic lasagna ingredients in pasta.

Preparation Time: 25 minutes
Cooking Time: One hour Five minutes
Cooling period of fifteen minutes
Time Spent: One hour, forty-five minutes
Six servings

Recipe By: Holly Nilsson

Ingredients For chicken lasagna roll-ups:

  • 12 cooked and cooled lasagna noodles
  • 4 cups cooked chicken
  • 3 cups cooked and cooled broccoli
  • 2 ½ cups shredded mozzarella cheese mixture
  • 2 cups cottage cheese or ricotta
  • 1 cup shredded mozzarella cheese
  • ¼ cup shredded parmesan cheese
  • 2 eggs
  • 2 tablespoons chopped parsley

Sauce for Recipe:

  • ¼ cup butter
  • One diced onion
  • Two minced garlic cloves
  • One-and-a-half cups flour,
  • Two cups chicken broth, one and a half cups milk,
  • Four ounces cream cheese
  • One cup shredded mozzarella
  • One and a half cups Parmesan
  • One teaspoon dried basil
  • One and a half teaspoons chopped oregano

Instructions For chicken lasagna roll-ups:

  • Turn the oven on to 350°F.
  • Mix the ingredients for the cheese mixture and reserve.

Sauce:

  • Heat the butter in a medium saucepan and sauté the onion and garlic for about 3 minutes, or until soft. Cook for one to two minutes after adding flour.
  • Gradually add the milk and broth, whisking after each addition. It will start out thick but thin out. After adding all of the liquid, whisk in the melted cream cheese. Simmer for one minute.
  • Take off the heat and mix in the dried basil, oregano, mozzarella, and Parmesan cheeses.

Putting together:

  • Fill a 9×13 pan with one cup of the sauce mixture.
    Arrange the noodles.
  • Spoon chicken, broccoli, and cheese mixture over noodles. Top each with 2 tablespoons mozzarella cheese.
  • Roll noodles and place seam down in the pan. Top with the remaining sauce.
  • Cover with foil and bake for 30 minutes. Remove foil, sprinkle with remaining cheese, and bake for another 15 minutes.
  • Remove from the oven and let cool 15 minutes before serving.

Notes If you’d like, you can use ricotta instead of cottage cheese.
You can add broccoli or any other steamed vegetable, such as carrots or asparagus, in place of it.

Although we like the taste of the homemade sauce, you can use one or two jars of Alfredo sauce to speed up preparation.

Information on Nutrition:
serving size: two roll-ups; 931 calories; 60g of carbohydrates; 72g of protein; 44g of fat; 24g of saturated fat; 1g of trans fat; 235 mg of cholesterol; 1456 mg of sodium; 892 mg of potassium; 4g of fibre; 10g of sugar; 1798 IU of vitamin A; 50 mg of vitamin C; 747 mg of calcium; 3 mg of iron
The estimated nutritional information is subject to change depending on the brands of components and cooking techniques employed.

Creamy Vanilla Happiness Recipe

Creamy happiness

Creamy Vanilla Happiness Recipe A Tasty Adventure into Dessert Paradise Recipe

Savour the silky smoothness of our happy dessert with creamy vanilla! Your taste buds will be dancing after tasting this delicious confection, which is the ideal balance of smooth textures and rich flavours. This dish is going to become a staple in your repertoire, regardless of whether you’re a dessert connoisseur or just trying to sate your sweet taste.

Ingredients for Creamy Vanilla Happiness Recipe

  1. Two cups of heavy cream
  2. One cup of whole milk
  3. Two tsp vanilla essence or one vanilla bean
  4. 1/2 cup of sugar, granulated
  5. Four huge yolks from eggs

Instructions for Creamy Vanilla Happiness Recipe

  • Put the whole milk and heavy cream in a saucepan. Split the vanilla bean apart and scrape the seeds into the mixture if you’re using one. The mixture should be heated to a simmer over medium heat. Take off the heat.
    Beat the egg yolks and sugar together thoroughly in a another basin.
  • Pour the heated cream mixture into the egg yolk mixture gradually while continuing to whisk to prevent curdling.
  • Transfer the blended mixture back to the pot and stir constantly over low heat until it thickens to the point where a spoon can easily slide through it. Keep it from boiling.
  • Take off the heat source and pass the custard through a fine-mesh sieve to eliminate any remaining particles.
  • At this stage, mix the vanilla essence into the custard if using it.
  • The custard should be allowed to come down to room temperature before being chilled for four or more hours or overnight.
  • As directed by the manufacturer, churn the custard in an ice cream maker after it has cooled.
  • When the ice cream has thickened, transfer it to a container with a lid and freeze it for a further two to four hours.

Advice and Hints for the Recipe:

  • Before serving, add with chocolate shavings or crushed vanilla wafers for a special touch.
  • Try varying the extracts you use, such as hazelnut or almond, to create interesting flavour combinations.
  • For an extra treat, swirl in some caramel sauce or fruit compote.

Direction for the Recipe:

Serve your creamy vanilla bliss in repurposed ice cream bowls and top with fresh mint leaves straight from your garden to give it a uniquely personal touch. The presentation has the power to improve the whole eating experience.

In summary:

Take a trip through delicious flavours with our custard, which is creamy vanilla happiness. This dish, with its smooth texture and pure vanilla fragrance, is a celebration of life’s sweet moments. Give every bite of happiness to you and your loved ones.

Cashew Chicken

Cashew Chicken

This cashew chicken has a takeout-like flavor thanks to the soft stir-fried chicken and roasted cashews in garlic sauce.

Ingredients:

  1. ½ cup cashews, unsalted and roasted
  2. Half a cup of water and two tsp cornstarch
  3. Four tablespoons of the highest-quality hoisin sauce, like Kikkoman or Lee Kum Kee
  4. One spoonful of soy sauce
  5. 1/2 pound of skinless, boneless chicken tenderloins or breasts, sliced into 1/2-inch pieces
  6. Half a teaspoon each of salt and freshly ground black pepper
  7. two tsp of vegetable oil
  8. Eight scallions (one bunch), white and green sections separated, each cut into 1-inch pieces; six medium garlic cloves, minced
  9. two tsp of rice vinegar
  10. One-half tsp Asian sesame oil

DIRECTIONS

  • Set oven temperature to 350°F.
  • Arrange the cashews in a single layer on a baking sheet. Toast for about five minutes in the oven, or until aromatic. Remove from the heat; they will firm up as they cool.
  • As you wait, make the sauce by combining the water, cornstarch, hoisin sauce, and soy sauce in a small bowl. Put aside.
  • The chicken parts should be put in a big bowl. After adding the salt and pepper, mix to ensure even coating.
  • Heat one tablespoon of the vegetable oil in a big, nonstick skillet over high heat until it’s extremely hot. After adding half of the chicken to the skillet, stir-fry it for three minutes, or until it is lightly browned but not cooked through. Move to a platter
  • Next add the remaining chicken, garlic, and white sections of the scallions to the skillet along with the remaining tablespoon of vegetable oil. Stir-fry for about 3 minutes, or until the chicken is lightly browned but not cooked through. Put the chicken back in the pan from the first batch.
  • Reduce the heat to medium and stir in the rice vinegar; cook for about 30 seconds, or until it evaporates.
  • After adding the sauce mixture to the chicken, heat it for approximately a minute, tossing occasionally, until the chicken is cooked through and the sauce has thickened well. Take off the heat source. Add the sesame oil, cashews, and scallion greens and stir. Serve right away

Spinach and Cheese Enchiladas recipe

Spinach and Cheese Enchiladas recipe

Spectacular Spinach and Cheese Enchiladas recipe, share this recipe with anyone! It’s very simple to make and far too delicious! Often, we prefer to correct it.

Enjoy the combination of creamy cheese and nutrient-dense spinach, encased in tender tortillas, in this simple recipe for Spinach and Cheese Enchiladas. These enchiladas, a nod to the many culinary traditions of Mexico, are a great option for cheese lovers and vegetarians alike because they present a plant-based version of a traditional dish. Because of its variety and regional variances, enchiladas have long held a valued place in Mexican culinary culture. With its emphasis on the delectable combination of spinach and cheese, this recipe in particular promises a feast full of flavour and enjoyment.

Recipe By: RGAHB

Ingredients For Spinach and Cheese Enchiladas recipe:

  1. Cream cheese, eight ounces
  2. One-half cup sour cream
  3. One yellow onion, chopped finely
  4. Three minced garlic cloves
  5. Eleven cups of fresh spinach
  6. Juice of half a lime
  7. One 4.5-ounce can of chopped green chillies
  8. A ½ teaspoon of crushed chilli powder and cayenne pepper each
  9. One teaspoon of cumin powder
  10. One can of green enchilada sauce (28 ounces)
  11. Eight huge wheat tortillas
  12. Four cups of Mexican blend cheese, shredded and divided
  13. To taste, add salt and pepper.
  14. Two tsp oil
  15. ¼ cup finely chopped fresh cilantro

Instructions For Spinach and Cheese Enchiladas recipe:

  • Warm up and get ready: Set your oven’s temperature to 375°F (190°C) to start.
  • Cook Onion and Garlic: Saute onion and garlic in oil in a skillet until they are transparent.
  • Cook the spinach in the skillet until it wilts by adding it and sprinkling it with salt and pepper.
  • Mixing Flavours: In a different bowl, use a smooth blender to combine the cream cheese, sour cream, lime juice, green chiles, and spices. Add the spinach mixture and stir.
  • To assemble the enchiladas, coat a baking dish with a thin layer of enchilada sauce. Spoon each tortilla with a portion of the spinach and cheese mixture, top with a little cheese, roll up, and put seam-side down in the dish.
  • Add Sauce and Cheese: Drizzle the remaining sauce over the enchiladas and top with the remaining cheese.
  • Bake: Bake the dish for 20 minutes with the foil covering it. Take off the cover and bake for a further five to ten minutes, or until the cheese is bubbling and golden brown.
  • After your enchiladas have cooled down a bit, top them with fresh cilantro and serve. This recipe for spinach and cheese enchiladas, which transforms basic ingredients into a sensory extravaganza, is sure to become a treasured addition to your cooking arsenal.

Walking Taco Casserole

Walking Taco Casserole

Have you ever tried walking tacos or Frito pie? My Texan friend asked me if I wanted to try a pop-up in Brooklyn, where we both resided, a few summers ago. I had never tried or heard of Frito pie growing up in the Northeast.

INGREDIENTS

  1. Two tsp neutral oil (like canola oil)
  2. One sliced white onion
  3. 4 garlic cloves, finely chopped
  4. One pound of ground beef, 80/20
  5. Three tablespoons of taco seasoning (store-bought or homemade)
  6. One thinly diced scallion
  7. One fifteen-oz can of pinto beans
  8. One 10-oz can RO*TEL Original Green Chilies and Diced Tomatoes
  9. One cup of chunky, thick salsa
  10. To taste, add salt and black pepper to 1 1/2 cups of cheddar cheese, or more if necessary.
  11. One nine-ounce bag Corn chips from Fritos

In order to serve (optional)

  1. sour cream
  2. Jalapenos in pickles
  3. chopped scallions
  4. shredded green leafy vegetables

INSTRUCTIONS

Add the aromatics and sauté.

  • Heat the oil in a large 12-inch skillet over medium heat. Sauté the onion and garlic for 6 to 8 minutes, or until they are transparent and tender.

Cook the meat.

  • Using a wooden spoon, add the beef and break it up into bite-sized pieces. Saute until beautifully browned, 6 to 8 minutes.

Note:

  • Season the meat with a healthy pinch of salt if your taco seasoning does not include additional salt.
  • Set the oven temperature to 350°F while the meat is cooking.

Reduce the heat in the casserole:

  • After lowering the heat to medium-low, mix in the pinto beans, onions, and taco seasoning. Saute until thoroughly combined, one to two minutes.
  • After adding the salsa and Rotel, simmer the mixture for 8 to 10 minutes, or until the meat is properly seasoned and the flavors have blended. Add more salt and pepper to taste, if necessary.

Top with toppings:

  • Quickly move mixture to a 9 x 13-inch casserole dish, spreading evenly. Add two cups of Fritos chips and cheddar cheese on top, or more if you’d like.
  • Bake until the cheese is nicely melted, about 10 minutes.

Assist

  • Add optional dollops of sour cream, pickled jalapenos, scallions, and shredded lettuce to the top of the casserole dish. Distribute among serving dishes and savor!