Quick Wild Fruit Jam Recipe

Quick Wild Fruit Jam Recipe

Quick Wild Fruit Jam Recipe!

Whip Up a Delicious and Healthy Breakfast with This Quick Wild Fruit Jam Recipe!

Introduction: Hello, everyone who enjoys breakfast! This recipe for wild fruit jam is a simple and quick way to have a tasty and healthy start to the day. This jam, which is made without any added sugar, is a great addition to your daily routine. Prepare to have your taste buds teased and your day boosted by a rush of delicious fruit!

The Recipe: What is so unique about this recipe for wild fruit jam? It’s easy: simply some lemon juice, a handful of frozen or fresh wild berries, plus a hint of natural sweetness from ripe apples or bananas. And that’s it! No need for added sugar or artificial sweeteners – just pure, wholesome ingredients bursting with flavor.

Instructions:

  1. Gather your ingredients first: ripe bananas or apples, lemon juice, and your choice of wild berries (strawberries, blueberries, raspberries, or blackberries).
  2. Put the wild berries and a spritz of lemon juice in a saucepan. Over medium heat, bring the mixture to a moderate simmer, stirring from time to time.
  3. Add the chopped apples or mashed bananas when the berries start to soften and release their juices. These all-natural sweeteners will improve the fruity flavour and thicken the jam.
  4. Simmer the mixture for a further 10 to 15 minutes, or until the consistency you desire is achieved. Use an immersion blender or potato masher to break up any larger chunks of fruit if you want a smoother jam.
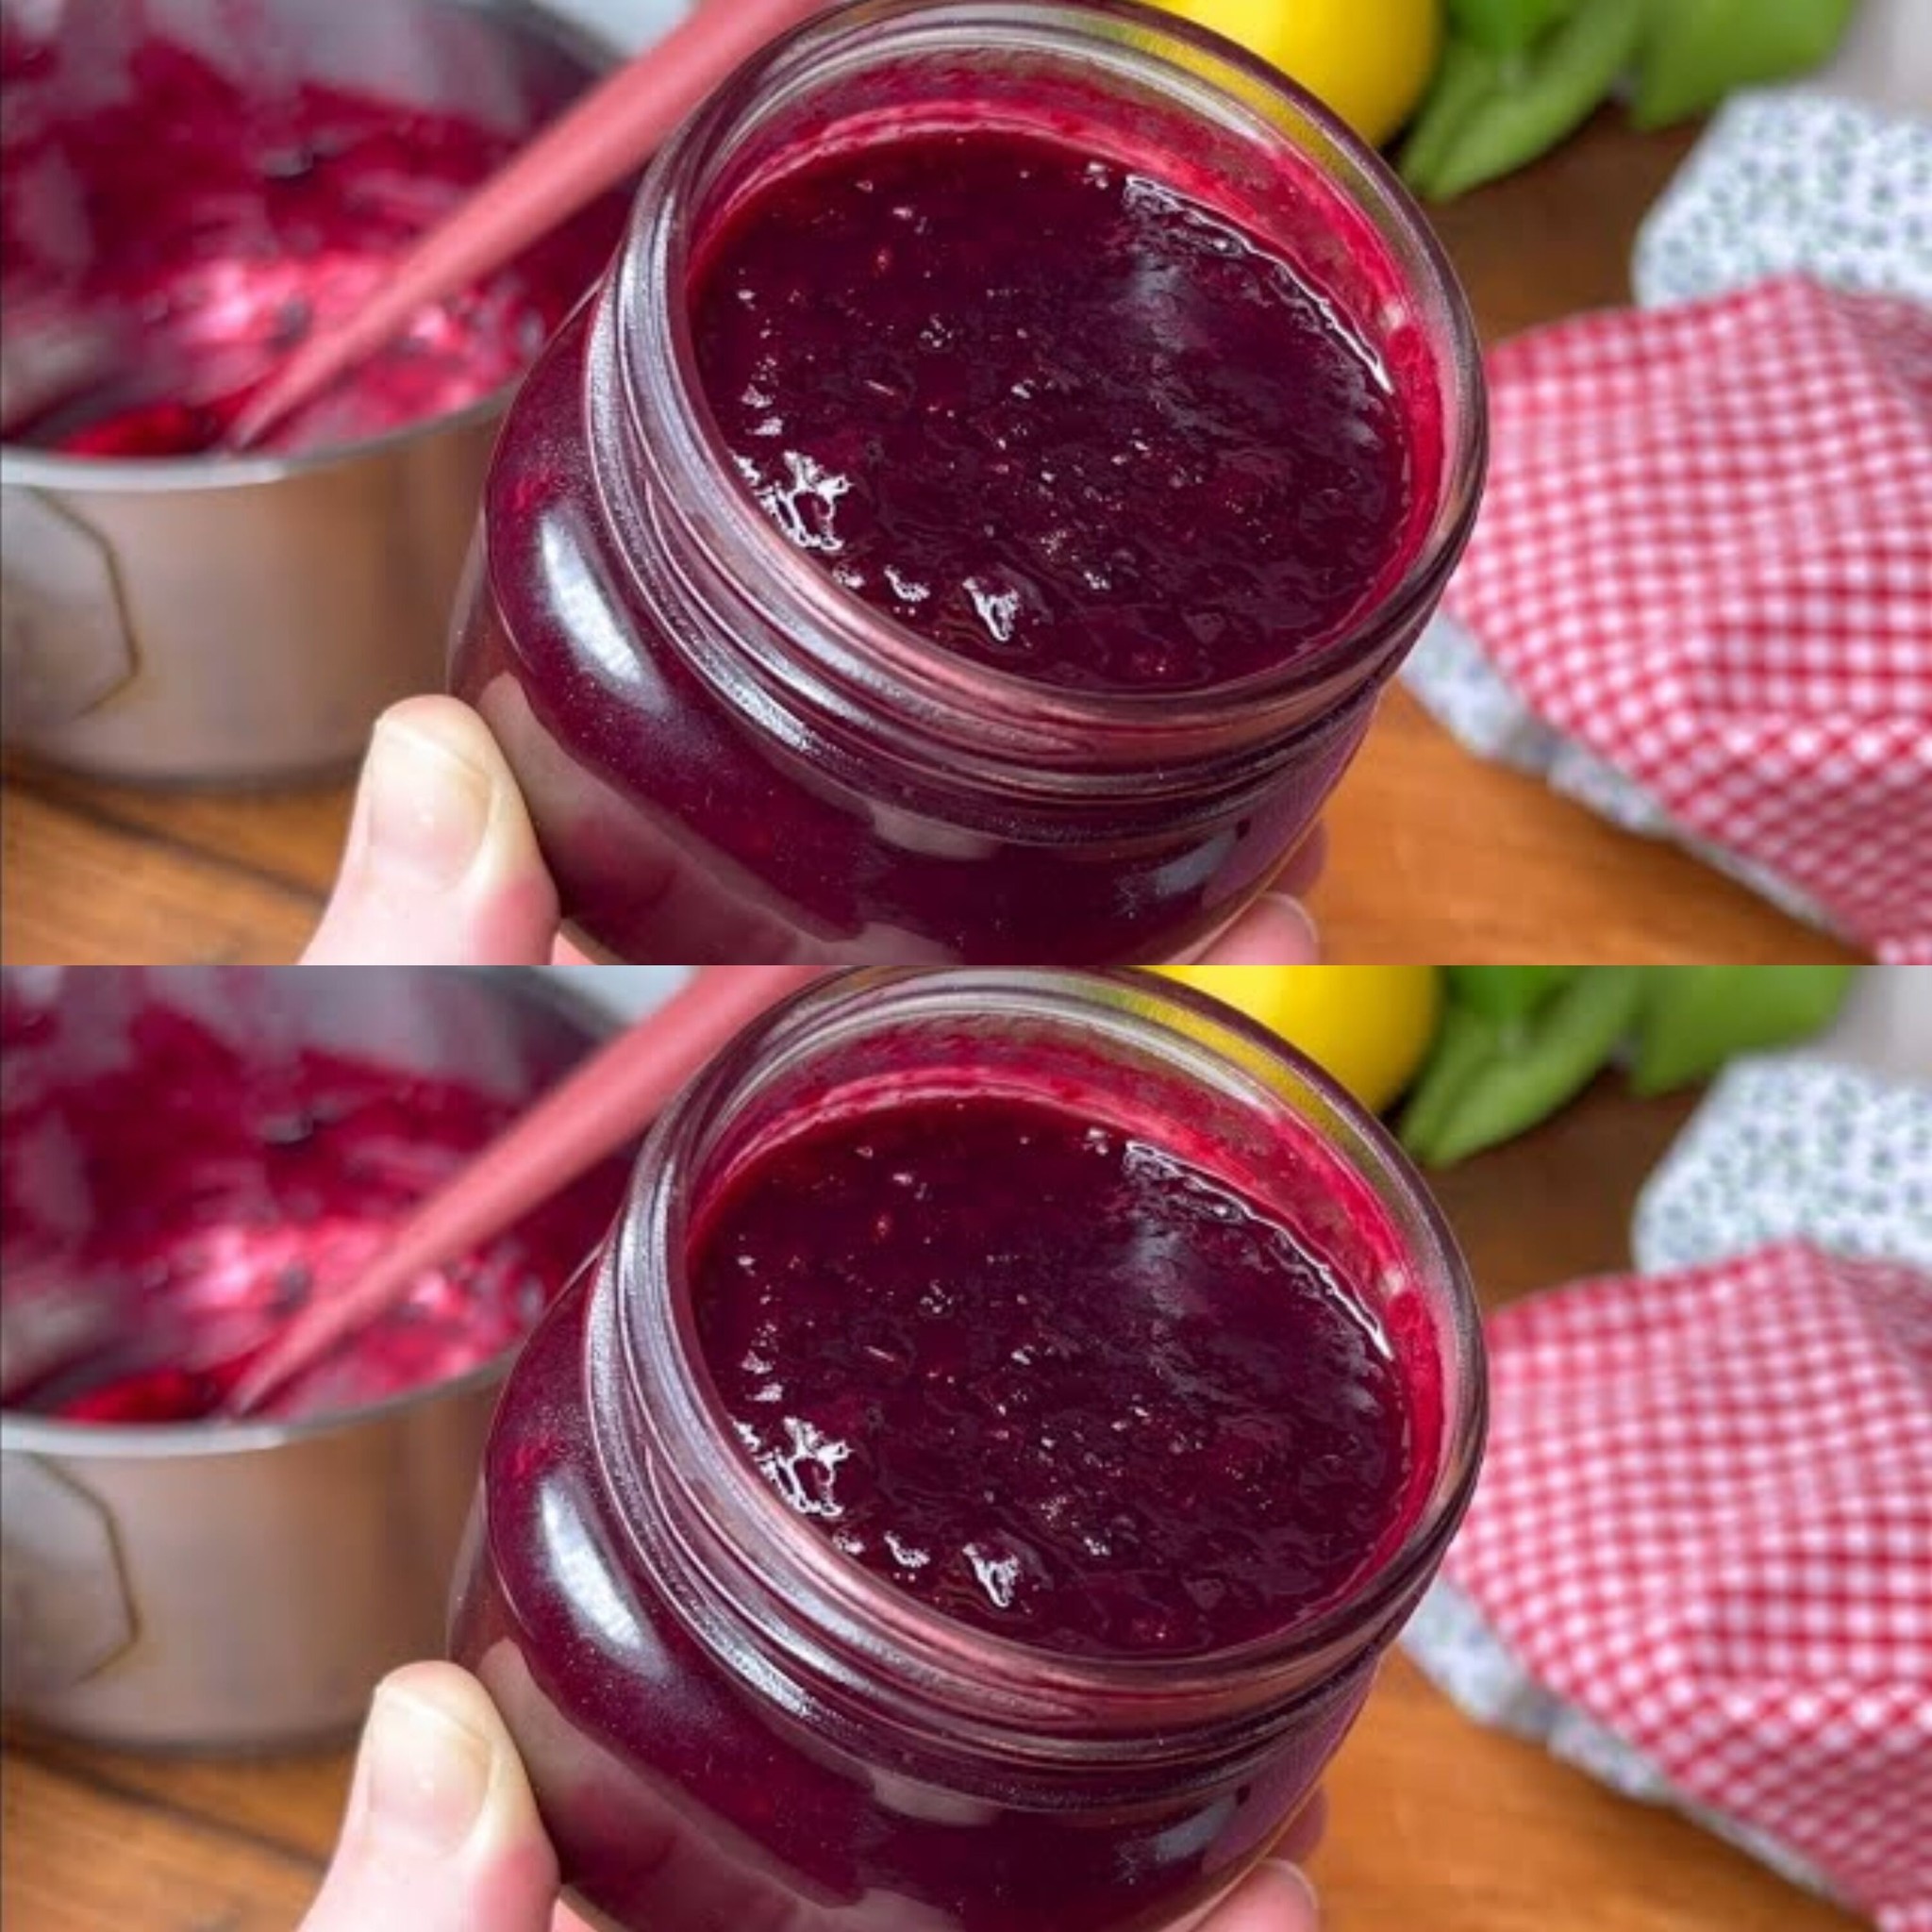
  5. Once the jam has thickened to your liking, remove it from the heat and let it cool slightly before transferring it to a clean jar or container.
  6. Store your homemade wild fruit jam in the refrigerator for up to two weeks, and enjoy it spread on toast, stirred into yogurt, or drizzled over oatmeal for a delicious and nutritious breakfast treat!

The Benefits: This recipe for wild fruit jam is very healthful in addition to being delicious. You may get the flavour of classic jam without any additional sugar or artificial additives by using ripe bananas or apples as natural sweeteners instead of sugar. Plus, wild berries are packed with vitamins, antioxidants, and fiber, making this jam the perfect choice for a wholesome and satisfying breakfast.


In conclusion, you can improve the quality of your breakfast by making a quick batch of this wild fruit jam with just a few basic ingredients and little preparation time. Say goodbye to store-bought jams loaded with sugar and hello to a healthier, tastier alternative that you can feel good about enjoying every day!

Best Air Fryer Salmon

Best Air Fryer Salmon

Best Air Fryer Salmon

Nothing, absolutely nothing, comes close to air-fried fish! I enjoy salmon cooked in a variety of ways, but the air fryer technique is my personal favourite.
The surface has a wonderfully flavoured coating that is crunchy and crispy, while the inside is really soft, juicy, and flaky. I’ve never tasted salmon like this one before!
Have you used the air fryer to prepare fish yet? Are you in love with it? Share your experience with us in the comments section below.

The gorgeous dark pink to crimson colour of wild salmon meat is caused by the antioxidant antihistamine found in it. Its natural diet is to blame!
Even though wild salmon is usually more expensive than farmed salmon, it is well worth the extra money!

Recipe By: Rachel Maser

Ingredients:

  1. Four five-ounce wild salmon fillets, about one and a quarter inches thick
  2. Two tsp olive or avocado oil
  3. One tablespoon smoky paprika
  4. One tablespoon of powdered garlic
  5. One tablespoon powdered onion
  6. One tablespoon of dried oregano,
  7. sea salt, freshly ground black pepper, and chopped parsley or cilantro for garnish, along with fresh lemon or lime wedges

Guidelines:

  1. If using frozen salmon fillets, thaw them out in the refrigerator entirely before making this recipe.
  2. Half an hour before cooking time, take your salmon fillets out of the refrigerator. If they are not cold right out of the refrigerator, they will cook more evenly, staying juicy and moist without becoming overdone.
    Use a paper towel to gently blot your salmon to remove any extra moisture.
  3. Transfer them to a shallow dish and equally coat with oil and all of the seasonings. Make sure to thoroughly coat your fish by rubbing both sides of them.
  4. Set the temperature of your air fryer to 390°F. Your salmon should be air-fried for 8 to 10 minutes, or until it’s golden and flaky all over.
  5. Serve with wedges of lime or lemon and season with fresh herbs.
  6. Serve with wedges of lime or lemon and season with fresh herbs.


How to Prevent a Heart Attack in Just 60 Seconds Using Cayenne Pepper

How to Prevent a Heart Attack in Just 60 Seconds Using Cayenne Pepper

How to Prevent a Heart Attack in Just 60 Seconds Using Cayenne Pepper !Did you know that you can stop a heart attack in under a minute with a straightforward and effective chemical found in your kitchen? It’s accurate! Herbalist John Christopher claims to know a recipe that may halt a heart attack in under 60 seconds. What is the element that’s kept a secret? Cayenne spice!

You may be asking yourself how a basic cooking spice can have such a significant impact on heart health. It is well known that cayenne pepper speeds up heart rate and enhances blood flow throughout the body. Additionally, it has a hemostatic action, which helps the body recover after a heart attack and rapidly halt bleeding.

Using cayenne pepper is easy. If you or someone you know is experiencing a heart attack, simply mix a teaspoon of cayenne pepper in a glass of water and have the person drink it. Make sure they are conscious for this to work effectively. If the person is unconscious, you can use cayenne pepper extract and put a few drops under their tongue.

Dr. Schulz’s Cayenne Tincture Recipe

Enjoying Beetroots

Enjoying Beetroots

Enjoying Beetroots: Easy and Delicious Ways

Beetroots are a vibrant addition to any dish because of their rich magenta colour and earthy, sweet taste. However, they are also a great source of vitamins, minerals, and antioxidants that can improve your health. Here are a few quick and tasty ways to add more beets to your meals so you can enjoy their beautiful flavours as well as their health advantages.

Why Would You Eat Beets?
Beetroots are an excellent source of iron, manganese, potassium, fibre, folate (vitamin B9), and vitamin C. They may increase blood flow, decrease blood pressure, and improve sports performance. They can also give a range of recipes a colourful touch and an increase in flavour.

Simple and Tasty Ways to Prepare Beetroots

  1. Roasted BeetrootsHow to Get Ready: Cut the beetroots into bits after peeling them. After tossing them with a little olive oil, salt, and pepper, roast them in the oven for 30 to 40 minutes at 400°F (200°C) or until they are soft. For added flavour, you can also add herbs like thyme or rosemary.

    Why It’s Great: Beets are a great side dish or salad topping because roasting brings out their inherent sweetness.


  2. Beetroot JuiceHow to Get Ready: For a refreshing juice, blend raw beetroots with some apples, carrots, or citrus, such as lemon or orange. If you want a smoother texture, strain.

    Why It’s Outstanding: To quickly absorb all of the vitamins and minerals from the veggie, drink beetroot juice. It is especially well-liked by those

  3. Beetroot SaladHow to Get Ready: Sliced and cooked beetroots should be combined with spinach or rocket, feta cheese and almonds. For a tasty salad, toss with olive oil and balsamic vinegar.

    Why It’s Great: This salad is a nutritional powerhouse, offering a good mix of fiber, protein, and healthy fats.

In summary
Beetroots are not only nutritious but also incredibly versatile in the kitchen. Whether roasted, juiced, or tossed into a salad, they provide significant health benefits and elevate the flavor of your meals. Experimenting with beetroots can be a delightful culinary adventure—enjoy discovering your favorite way to prepare them!

The Hidden Treasure of the Mimosa Plant

The Hidden Treasure of the Mimosa Plant

The Hidden Treasure of the Mimosa Plant

Unbeknown st to many, the mimosa plant—which is prized for its delicate beauty and touch sensitivity—has uses beyond aesthetics. Discovering the secret of this humble plant is akin to discovering a gold mine right in your own backyard. Remarkably, there’s actual richness to be found in just two leaves of this amazing plant—it’s not just about the beauty or novelty of its leaves folding upon touch.

The Mimosa, commonly referred to as the “touch-me-not,” is a natural wonder that has captivated both botanists and biologists. As a survival strategy to fend off predators, its leaves lock up and droop when touched or shaken, only to unfold again minutes later. But beyond this intriguing behaviour are many advantages that, to those who know how to take advantage of them, are worth as much as gold.

First of all, the medical benefits of the mimosa plant have been acknowledged. Mimosa leaves are used in traditional medicine systems all over the world because of their therapeutic properties. These leaves are a natural treatment for wounds, bruises, and other conditions since it is thought that they have anti-inflammatory and wound-healing qualities. The plant’s extracts have been used as a relaxing agent for anxiety and tension, as well as to treat minor pain and skin ailments.

Furthermore, the plant’s potential extends beyond its ability to treat illnesses. Studies are investigating the Mimosa’s potential for air and soil purification, which makes it an important ally in environmental preservation campaigns. Its rapid growth and resilience make it a natural choice for reforestation projects and for reclaiming lands degraded by pollution or overuse.

But because they are so rare in offering these advantages in a form that is so convenient and little, mimosa leaves are like gold mines. The plant’s medicinal qualities can be obtained from just two leaves, making it an affordable and sustainable answer to a variety of problems.

To sum up, the mimosa plant is a gem that goes unnoticed in the world of plants. Its delicate look and touch-sensitive nature indicate a plant with a lot of promise and worth, not simply for show. The Mimosa is undoubtedly a plant worth more than gold, whether for its therapeutic qualities, advantages for the environment, or the simple delight of witnessing its leaves dance at the least touch. Thus, keep in mind that you are witnessing a veritable treasure trove of natural resources the next time you come across this modest yet remarkable plant.


Banana Peel Magic Say Goodbye to Pimples with a DIY Banana Face Mask

Banana Peel Magic: Say Goodbye to Pimples with a DIY Banana Face Mask

Banana Peel Magic Say Goodbye to Pimples with a DIY Banana Face Mask Are you sick and weary of fighting stubborn zits that just won’t go away? It’s time to use the common banana peel, nature’s medicine. That’s right, you can say goodbye to those pesky spots and welcome cleaner, healthier skin just by wiping a banana peel over your face. Let’s explore the benefits of using a banana face mask and how it might improve your skin.

The Power of Banana Peels:


Banish Pimples Naturally:

Because they have anti-inflammatory and antibacterial qualities, banana peels are especially useful in the fight against acne and pimples. With daily usage, the peel helps fight off acne-causing germs, relieve irritation, and reduce inflammation on the skin, resulting in smoother, cleaner skin.

How to Make a Banana Face Mask:

All it takes to make your own banana face mask is a few simple steps. This is how you do it:

  1. Choosing a Ripe Banana: Look for a banana that is ripe and has yellow skin with brown specks on it. These bananas are particularly beneficial for skincare because they have higher antioxidant content.
  2. Gently peel the banana, then eat the fruit, reserving the peel for a face mask.
  3. Rub the Peel on Your skin: Gently massage your clean skin, paying particular attention to the regions that are prone to acne and pimples, with the inner side of the banana peel. For five to ten minutes, massage the peel in circular strokes to let the skin absorb the healthy nutrients.
  4. Let it Sit: Allow the residue left on your skin from the banana peel massage to do its job for a further ten to fifteen minutes.
  5. Rinse Off: To get rid of any remaining banana peel residue, thoroughly rinse your face with lukewarm water. Then, pat dry with a fresh towel.

 Feel the Effects:

Prepare to be amazed by the results! With regular use, the banana face mask can help reduce the appearance of pimples, improve skin texture, and leave your complexion looking radiant and refreshed.

In Conclusion:

Who knew that the secret to brighter, healthier skin could be found in something as uncomplicated as a banana peel? The banana face mask is a must-try for anyone hoping to get rid of zits and have a glowing complexion naturally because of its mild efficiency and natural healing qualities. Try it and welcome to skin that is smoother and free of imperfections!

A Delightful Vegetable Salad for a Healthier You

A Delightful Vegetable Salad for a Healthier You

A Delightful Vegetable Salad for a Healthier You

Hi there, cherished companions! I’d like to share a fun dish with you today that is healthy and delicious. This salad is a veritable vitamin bomb for your body and soul because it is loaded with almonds, carrots, and beetroots.

Ingredients:

  1. 3 beetroots
  2. Two carrots
  3. One olive oil red onion
  4. 1 tsp Ginger Powder
  5. 1 tsp Garlic Powder
  6. 1 tsp Dried Parsley
  7. A handful of Walnuts
  8. Salt, to taste
  9. Black Pepper, to taste
  10. Some Water

Let’s Get Cooking!

  1. This salad’s inherent deliciousness and simplicity are what make it so magical. Begin by giving your carrots and beetroots a thorough wash. In addition to their stunning deep crimson hue, beetroots are well-known for their health advantages and are a nutrient-dense food.
  2. Finely chop the carrots and beetroots, and finely slice the red onion. In addition to adding a pop of colour, the red onion’s subtle sweetness and earthiness go well with the beets and carrots’ earthiness.
  3. Drizzle some olive oil—a healthier substitute for conventional cooking oils—into a pan. Because of its heart-healthy lipids, olive oil is a staple in healthful cuisine. Gently add your chopped veggies to the pan. Now, it’s time to spice things up! Sprinkle in the ginger powder, garlic powder, and dried parsley. These spices not only add a burst of flavor but also come with their own set of health benefits. Ginger, for instance, is great for digestion while garlic is celebrated for its  immune-boosting properties.
  4. Toss in some walnuts for a delicious crunch. In addition to offering a unique texture, walnuts are a superfood that is high in heart-healthy Omega-3 fatty acids. To aid in the cooking process, add a small amount of water and season with salt and black pepper to taste.
  5. Now, give it a good fifteen minutes on low heat to work its magic. This low-heat cooking technique guarantees that the vegetables keep their flavours and nutrients.

Serving Up Goodness

Depending on your pleasure, serve this vibrant medley warm or cold after it’s finished. Each bite of this salad is an adventure through a world of flavours as well as a step towards a healthier you.

Recall that eating healthily is a sign of respect for oneself. This salad is the ideal travel companion for your quest for health. It’s simple, wholesome, and incredibly tasty. So go ahead and give it a shot and reap the benefits of excellent health!

The Unexpected Magic of Milk-Soaked Onions

The Unexpected Magic of Milk-Soaked Onions

The Unexpected Magic of Milk-Soaked Onions: A Traditional Remedy Revisited

The Unexpected Magic of Milk-Soaked Onions: A Traditional Remedy Revisited

There are some combinations in the treasure trove of home remedies that, although they may not appear very common at first, actually hold the keys to astounding and unexpected health advantages. The act of just pouring milk over an onion is one of these fascinating combinations. This traditional cure, which has been handed down through the ages, is evidence of the natural therapeutic qualities of commonplace substances. Let’s investigate the healing properties of milk-soaked onions and how this unusual combination can treat a range of illnesses.

Why Milk and Onion?

The Surprising Benefits

The capacity of the milk-and-onion treatment to relieve colds, coughs, and other respiratory ailments is especially well-praised. Here are some reasons to think about this combo:
  • Calming Sore Throats: The calming effect of the milk and onion combination can aid in the relief of sore throat pain. The onion reduces inflammation and fights infection, while the warm milk soothes the lining of the throat.
  • Reducing Congestion: Certain molecules in onions aid in the breakdown of mucus, facilitating its expulsion. By acting as a carrier, the warm milk facilitates the more effective distribution of these advantageous substances via the respiratory system.
  • Increasing Immunity: Milk and onions are rich in nutrients that help the immune system function. By regularly consuming this mixture, you can strengthen your resistance to infections and ordinary colds.

How to Get Ready for It

Making this cure is easy:

  1. Dice an onion into tiny bits.
  2. Pour a cup of milk over the chopped onion in a pot.
  3. Gently heat the mixture until the milk is warm, not boiling.
  4. Strain the mixture to remove the onion pieces.
  5. Consume the warm milk.

While it may seem unconventional, many have sworn by the effectiveness of milk-soaked onions for generations. This remedy is a perfect example of how combining simple ingredients can lead to surprisingly beneficial results. Whether you’re battling a stubborn cough or simply seeking to strengthen your immune system,  this traditional concoction might just be worth a try. Embrace the wisdom of natural remedies and discover the unexpected magic of milk-soaked onions for yourself.

Boost Your Immune System with Homemade Juice

Boost Your Immune System with Homemade Juice

Boost Your Immune System with Homemade Juice

Are you looking for a tasty, all-natural way to strengthen your immune system? This homemade immune-boosting beverage is the only thing you need! This colourful mixture, which is full of vitamins, antioxidants, and anti-inflammatory qualities, will keep you feeling well and energised all day. Let’s get started on making the ideal pineapple, carrot, turmeric, and lemon juice at your own home!

1. Pineapple Power

First, choose a ripe pineapple and chop it into large pieces. In addition to being sweet and delectable, pineapples are also a great source of antioxidants, including vitamin C and bromelain, which strengthen the immune system and advance general health. Similar to a tropical delicacy, it boosts your immunity!

2. Turmeric Touch

To your pineapple pieces, add a teaspoon of ground turmeric. Turmeric’s key ingredient, curcumin, is well known for having anti-inflammatory and antioxidant qualities. Turmeric gives your juice an additional immune-stimulating punch in addition to a warm, earthy flavour. To many years of wonderful health!

3. Carrot Craze

Add a few peeled carrots after that to get your fill of beta-carotene, vitamin A, and other vital elements. In addition to giving the juice a naturally pleasant taste, carrots strengthen the immune system and support good skin and vision. It’s time to go orange for your immune system!

4. Lively Lemon

Add one fresh lemon’s juice to the mixture to give it a tangy taste and an extra dose of vitamin C. Lemon juice not only makes the juice taste better, but it also supports detoxification and helps the body become more alkaline. Get ready for a tangy twist and a vibrant immune boost!

5. Blend and Enjoy

Place the pineapple, carrot, turmeric, and lemon in a blender. To aid in the blending process, add a small amount of water or coconut water. In order to achieve the appropriate consistency, add extra liquid as necessary and blend until smooth and fully blended. You’re creating a masterpiece here!

6. Strain (Optional)

To get a smoother juice, you can remove any pulp or fibres by straining the mixture through cheesecloth or a fine-mesh screen. As an alternative, you can drink the juice straight for more texture and fibre. The choice is yours!

7. Serve and Sip

Transfer your prepared immune-boosting juice into a glass, top with a sprig of fresh mint or a slice of lemon, and serve with ice cubes if preferred. Enjoy the mouthwatering flavours while you nurture your body from the inside out. It’s similar to a revitalising trip for your palate!

In summary
The most natural way to promote your health and vitality is with homemade pineapple, turmeric, carrot, and lemon juice, which has potent immune-boosting effects, refreshing flavour, and brilliant colours. Include this delectable drink in your regular routine to maintain a robust immune system and satiated taste senses! It’s time to toast to excellent health!

No-Bake Lemon Poppy Seed Fridge Bites

No-Bake Lemon Poppy Seed Fridge Bites

No-Bake Lemon Poppy Seed Fridge Bites

This week is predicted to be 90 degrees. It’s officially the BEST time of year for food  fitness (catching sunrise on an outdoor run), clothing (or lack thereof), and mood. It’s amazing how much happiness is directly correlated with the sun on my skin. I feel more thankful for everything in my life, more creative, and more productive. I’m grateful, sunshine. I’m grateful for summer!

SUNSHINE
MEANS CITRUS

Facts about flavour: Tacos and sweets alike can benefit greatly from the addition of a squeeze of citrus. These no-bake lemon poppy seed fridge nibbles come together in a matter of minutes and are perfect for summertime eating. After mixing the ingredients, just press the “dough” onto a tiny dish and refrigerate it for one or two hours before cutting.

Moreover, they are vegan! These lemon poppy seed bites were made healthier by adding a plant-based vanilla protein powder to the mix. Adding a little sweetness and a tonne of satisfying protein was a wise choice.

It kind of reminds me of marzipan in terms of texture! Made with sugar and almond flour, marzipan is a rich paste. These lemon poppy seed snacks are also free of gluten because they are made with a generous mix of almond flour and coconut flour.

But despite being grain-free, vegan, high-protein, and free of gluten, they taste like the ideal pick-me-up. Here, there’s no deprivation—just a tonne of flavour that will make your teeth sink.

Ingredients:

  1. One cup of almond flour
  2. One-fourth cup coconut flour
    Two scoops of protein powder (recipes in notes), preferably vanilla or unflavored.
  3. One-third cup of melted coconut oil
  4. One-fourth cup maple syrup
  5. Juice from half a lemon plus the zest
  6. Full tablespoon of poppy seeds
  7. Add 2 tsp coffee creamer
  8. 3 tablespoons confectioners sugar as optional glazing components.

Directions:

  1. In a mixing dish, combine protein powder, poppy seeds, almond flour, coconut flour, and lemon zest.
  2. In a another basin with plenty of room, melt the coconut oil and mix in the maple syrup.
  3. Using a spatula and then your hands, fold the wet ingredients into the dry ingredients. It should solidify into the consistency of cookie dough. Add a little extra almond flour if the mixture seems too moist.
  4. Press the dough mixture firmly into a bread loaf pan or meal prep container (I used a glass one that measured about 6 by 4 inches) after lining it with wax paper.
  5. Before slicing and glazing, place in the refrigerator for a minimum of two hours.

To create the glaze, mix coffee creamer and powdered sugar together until a glaze forms. For the glaze to solidify, uniformly spread it and freeze for about 20 minutes. Glazing is not required, but it looks really lovely! I think the bites are already quite sweet.

Meal prep tips: Lemon poppy seed bites can be stored in the fridge or the freezer. They will have a chewier texture if kept in the fridge. Keep bites in an airtight container and they can be enjoyed for up to 5 days in the fridge or up to 1 month frozen.


Selecting Protein Powder: Feel free to utilise your favourite VANILLA or UNFLAVORED protein powder (collagen would work too). If using a powder without flavour, then use one more tablespoon of maple syrup.

The Bobs Red Mill with Nutritional Booster plant-based powder is my personal favourite. It is a vanilla flavour that has been naturally sweetened. Chia seeds are added to give you an additional fibre and omega-3 boost!