Natural and Effective Insect Repellent with Lemon and Lime

Natural and Effective Insect Repellent with Lemon and Lime

Natural and Effective Insect Repellent with Lemon and Lime Have you had enough of battling bothersome insects breaking into your house? There’s nowhere else to look! We have an easy, green remedy for you that combines cloves with lemon and lime. This approach is not only efficient, but it also leaves your surrounds with a lovely scent thanks to its invigorating citrus scent.

Why mix cloves with lemon and lime?

The mosquito is one of the most bothersome creatures we come across. Luckily, the potent combination of citrus and cloves strongly irritates these little buzzers. The pungent aroma of cloves combined with the zesty scents of lemon and lime forms a strong barrier that deters mosquitoes.

Creating Your Own Insect Repellent

It’s easy to make your own mosquito repellent by combining cloves with lemon and lime. What you’ll need is as follows:

Ingredients:

  1. One lemon
  2. One lime
  3. Several cloves

Guidelines:

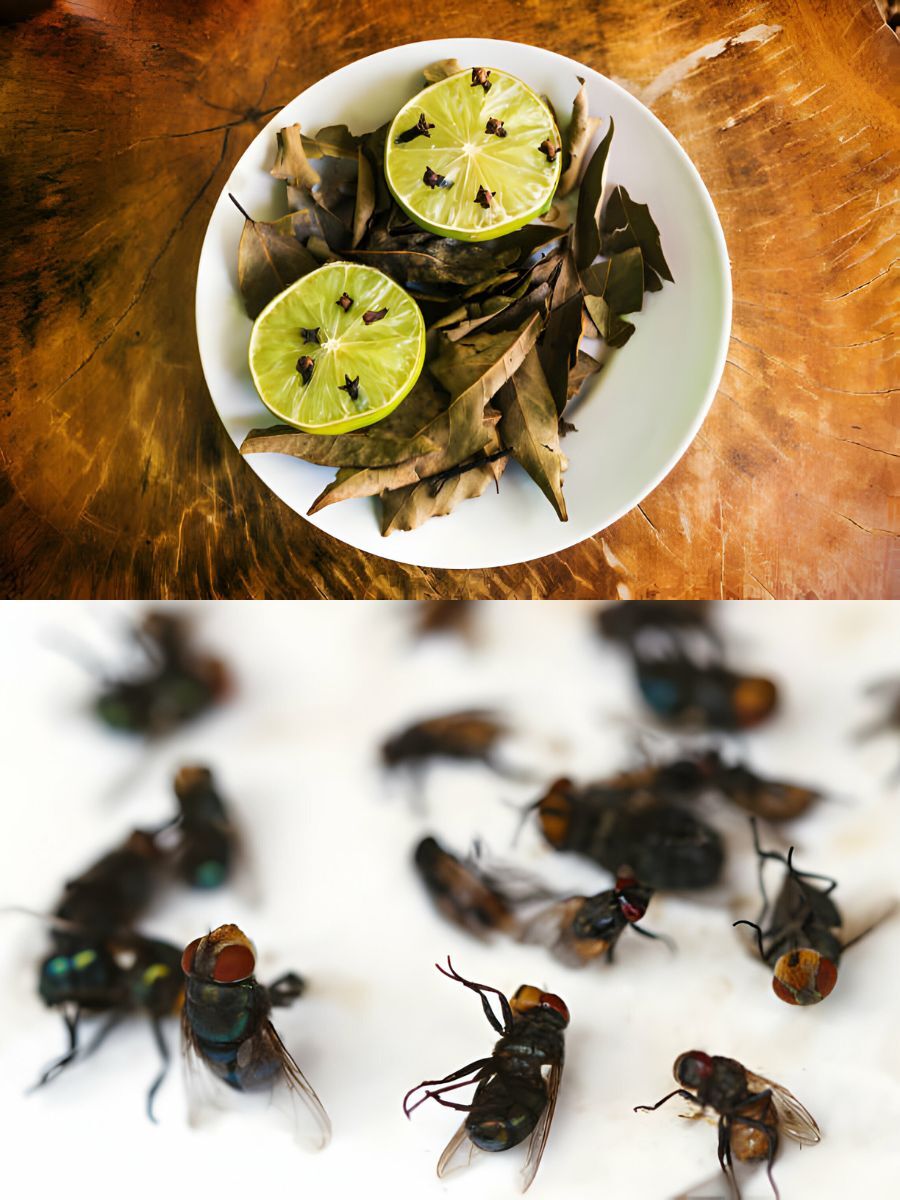
  1. Cut up the lime and lemon: Cut the lime and lemon in half or into thick slices first. Their fragrant oils will be released as a result.
  2. Put the Cloves in: Take the cloves and press them into the lemon and lime’s flesh. For best effect, arrange them closely together.
  3. Disperse: Arrange the lemon and lime slices with cloves in a deliberate manner throughout your house, especially in places where insects frequently congregate. Patios, outdoor lounging areas, and windowsills can all be examples of this.
  4. Take Pleasure in an Insect-Free Environment: Unwind while letting the lemon and lime with clove insect repellent do its thing. Not only will it effectively repel insects, but it will also add a fresh and invigorating scent to your surroundings.

In summary
Say goodbye to chemical-laden insect repellents and embrace this natural alternative. With just a few simple steps, you can create your own lemon and lime with cloves insect repellent. Not only will you keep insects at bay, but you’ll also enjoy a fragrant and bug-free environment. Give it a try and experience the power of nature!


Bell Wontons Taco In Air Fryer

Bell Wontons Taco In Air Fryer

Bell Wontons Taco In Air Fryer Do you want for the robust tastes of Taco Bell with a crunchy accent? Taste the delicious combination of Asian and Mexican flavours with my Air Fryer Taco Bell Wontons recipe!

These crispy wonton shells loaded with all of your favourite Taco Bell fixings are going to up your snack game. Encased in a crispy wonton wrapper are perfectly seasoned meat, melting cheese, and zesty salsa, making for an incredibly delicious appetiser or snack that is sure to please.

  • Crispy Texture
  • Adaptable Fillings
  • Quick and Simple
  • Crowd-Pleasing Appetiser

Spend 20 minutes preparing.   

Cooking Time: Twelve minutes

Duration: thirty-two minutes

24 servings are provided.


Ingredients For Bell Wontons Taco In Air Fryer:

  • One cup cooked and seasoned taco meat
  • 24 wonton wrappers
  • 1 cup of shredded Mexican cheese
  • Half a cup of dipping sauce


Ingredients For Bell Wontons Taco In Air Fryer:

  • For five minutes, preheat the air fryer to 375 degrees Fahrenheit (190 degrees Celsius).
  • Spoon one teaspoon of taco meat and one teaspoon of cheese into each wonton wrapper, one at a time.
  • Using your finger, moisten the edge of the wonton wrapper with water.
  • Seal the closure by folding the wrapper over the filling. Continue until all of the wontons are stuffed.
  • Batch-process the taco wontons in the air fryer basket.
  • Apply frying spray that is nonstick to the wontons.
  • For seven minutes, air fried (also known as air crisp) at 375 degrees Fahrenheit (190 degrees Celsius).
  • After the taco wontons are cooked, take them out of the basket and continue cooking the remaining ones.
  • Present the crunchy taco wontons beside salsa and sour cream for drizzling.


Expert Advice:

  • Here are some expert cooking suggestions for delicious Air Fryer Taco Bell Wontons:
  • Don’t Overfill: The taco meat and cheese mixture should not be stuffed into the wonton wrappers to the brim. Overfilling may result in a messy cooking process as the filling explodes.
  • Make Sure to Seal Tightly: When air-frying wonton wrappers, make sure to seal the edges tightly to stop contents from escaping. Moisten the edges with a tiny bit of water, then press firmly to seal.
  • Prevent Sticking: You might want to use a silicone mat or parchment paper to keep the wontons from sticking to the air fryer basket. Cleanup will also be simpler as a result.
  • Space Out the Wontons: To ensure adequate air circulation around each wonton, try not to pack the air fryer basket too full. If necessary, fry them in batches to make sure they cook through and are crispy.
  • Keep an eye on the wontons while they cook because the temperature of an air fryer varies. To get the right amount of crispiness, adjust the cooking time as necessary. Flip them halfway through to ensure even browning.
  • Serve Right Away: For the best texture and flavour, savour the taco wontons hot and crispy right out of the skillet. If left out too long, they can easily become soggy again.
  • Get Innovating with Fillings: Try a variety of fillings to personalise your Taco Bell wontons. To accommodate varying tastes and preferences, try alternatives such as diced veggies, black beans, corn or shredded chicken.


Nourishment Facts about the Recipe:

One serving is provided.73 kcal of calories 7g of carbohydrates 3g of protein 3g of fatTwo grams of saturated fat 0.1g of polyunsaturated fat 1g of monounsaturated fat Trans Fat: 0.1 g12 mg of cholesterol 139 mg of sodium 49 milligrams of potassium 0.2g of fibre 2g of sugar 45 IU of vitamin AVitamin C: 0.04%38 milligrams of calcium Iron: 0.5 mg

The Magic Trick to Turning Milk into Whipped Cream

The Magic Trick to Turning Milk into Whipped Cream

The Magic Trick to Turning Milk into Whipped Cream Have you ever been in a tight spot and wanted the decadent flavour of whipped cream but all you had in your refrigerator was a glass of milk? Do not be alarmed! In only ten minutes or less, you can turn a plain glass of milk into a fluffy, delectable whipped cream with this clever DIY recipe. Whether you want to add a dash of happiness to your favourite dessert or add a hint of decadence to your afternoon coffee, this easy tip can save the day.

Ingredients:

  1. One glass of milk, ideally chilled
  2. One to two tablespoons (or to taste) of powdered sugar
  3. Half a teaspoon of vanilla essence (for the flavour of traditional whipped cream)
  4. A small amount of cornflour (optional; to help stabilise and thicken)

The Enchanted Conversion:

  1. Chill Your Tools: To get the best results, first chill your mixer’s bowl and beaters in the refrigerator for ten to fifteen minutes. This small trick helps the milk whip up properly and makes a significant impact.
  2. Mixing the Ingredients: Add the glass of milk to the chilled bowl. Stir in the cornflour (if using), vanilla extract, and powdered sugar. Your cream is sweetened by the sugar, flavoured by the vanilla, and stabilised by the cornflour.
  3. Whip It Up: Beat the ingredients using the mixer set to the highest speed. It will begin to take on more volume and thicken. Patience is essential because this process could take a little longer than making regular whipped cream. Continue beating until the mixture has a creamy, soft texture that retains its shape.
  4. Savour Instantaneously: This handcrafted whipped cream tastes best when consumed right away. It makes a delicious and light garnish for pies, cakes, fruits, or even your morning cup of coffee.

Why You’ll Love This Recipe:

This is not just a creative kitchen tip for generating whipped cream from milk; it’s also a better option than store-bought varieties as you can regulate the sugar content and keep additives out. In addition, it’s a cheap and practical fix if you run out of heavy cream in the refrigerator.

This dairy-based whipped cream is a show-stopper whether you’re serving it to guests or just indulging yourself to a little extra sweetness. It’s evidence that regular ingredients may feel a little more exceptional with a little imagination. So feel free to try it out and revel in the miracle of turning milk into whipped cream!

Choosing the Right Variety

Choosing the Right Variety

Choosing the Right Variety

Can’t wait to experience the incredible flavour of just-picked bell peppers from your own garden? You don’t need to search any farther because this post contains all the knowledge you need to cultivate the tastiest bell peppers in your backyard. We can assist you regardless of your level of gardening knowledge.

There are a number of sweet bell pepper cultivars available, each with a distinct flavour, colour, and size. Here are a few typical selections:

  • Green bell peppers: have a crisp, slightly bitter flavour because they are picked before they reach full ripeness.
    Red bell peppers: When allowed to fully ripen on the vine, these peppers develop into sweet, flavorful gems.
  • Bell peppers in the yellow and orange kinds are colourful and tasty additions to any garden.

It’s crucial to take your local climate into account when choosing a bell pepper cultivar. Although they grow well in tropical areas, several cultivars are bred to flourish in colder locations.

These planting suggestions can help you achieve a plentiful yield and successful growth:

  • Start with High-Quality Seeds or Seedlings: If you’re starting from scratch, go for premium, disease-resistant seeds. As an alternative, choose robust seedlings from a reliable nursery.
  • Time Is Everything: A crop for the warm season is bell peppers. Start seeds indoors 8-10 weeks before the last expected frost date. Transplant the seedlings outdoors once the soil has warmed and all danger of frost has passed.
  • Give Them Plenty of Sunlight: Bell peppers love sunlight! Make sure to plant them in a location that receives at least 6-8 hours of direct sunlight daily.
  • Use Well-Draining Soil: Bell peppers grow best in soil that drains well and has a pH of 6.0 to 6.8. Adding organic matter to the soil will increase its fertility.
  • Give Adequate Spacing: To promote healthy air circulation and stop the spread of illness, bell pepper seedlings should be planted 18 to 24 inches apart.
    Applying a layer of mulch around plants can help conserve moisture, control soil temperature, and discourage weed growth.

Here are some care and maintenance pointers to guarantee robust growth and an abundant harvest:

Watering:

For your bell pepper plants to remain healthy, you must water them properly. Water them thoroughly and frequently enough to keep the soil damp but not soggy. Steer clear of overwatering as this might cause root rot. In order to allow your bell peppers enough time to dry before the chilly evening temps, it’s also advisable to water them early in the day.

Fertilizing:

As directed by the manufacturer, fertilise your bell peppers using a balanced organic fertiliser to encourage healthy growth. Take care not to fertilise too much as this can cause more foliage to grow than fruit.

Staking or Support:

Your bell pepper plants may require assistance as they become taller in order to keep from falling over. To provide the plants support and make sure they remain upright, think about utilising cages or stakes.

Pest and Disease Control:

Common pests that might harm your bell pepper plants are tomato hornworms and aphids. Examine your plants on a regular basis and take appropriate action, such as employing natural pest control techniques or applying organic insecticides. Additionally, it’s critical to watch out for any disease-related symptoms, such as powdery mildew or bacterial spots. If afflicted, apply the proper organic therapies to the plants as soon as possible.

By following these tips and providing the right care, you can enjoy a bountiful harvest of crispy and flavorful bell peppers straight from your own garden. Happy growing!

Avocado and Tomato Snack

Avocado and Tomato Snack

Avocado and Tomato Snack The Hidden Delight

One underappreciated snack that is worth highlighting in the realm of snacks is the mild avocado and tomato snack. In just one minute, this easy-to-make yet incredibly delicious combo will disappear from the table, leaving everyone hankering after more. Discover the secret to this recipe’s success and how it may turn into a go-to snack for any occasion.

Discovering the Magic

Easier said than done: This snack’s simplicity is what makes it so delicious. You can make a tasty and nutrient-dense snack with just a few fresh ingredients.

Perfect Harmony of Flavours: Ripe tomatoes’ luscious sweetness and avocado’s creamy texture combine to create a flavourful combination that will definitely please your palate.

Tomatoes and avocados are both nutrient-dense superfoods that are loaded with vitamins, minerals, and antioxidants. This snack gives you a burst of vital nutrients in addition to satisfying your cravings.

The Formula
It’s easy to make this delicious avocado and tomato snack. This is how you do it:

  1. ripe avocados
  2. ripe tomatoes
  3. Juice from lemons
  4. sea salt
  5. Toppers are optional and can include your preferred herbs and spices, red onion, cilantro, and balsamic glaze.

Guidelines:

  1. Get the ingredients ready: Cut ripe avocados and tomatoes into small pieces using a knife.
  2. Toss in the avocado and tomato slices and season to perfection. To keep the avocado from browning and to give a cool zing, drizzle it with lemon juice. To bring out the flavours, add a pinch of sea salt.
  3. Mix & Match: Use your imagination while choosing toppings! Add some thinly sliced red onion for a little crunch, some chopped cilantro for a blast of freshness, or a drizzle of balsamic glaze for a bit of sweetness.
  4. Present and Savour: Gently toss the avocado and tomato combination to ensure that the seasonings and toppings are uniformly coated. Transfer to a serving plate and observe how quickly this delicious snack disappears from the table.

Conclusion:

A hidden gem just waiting to be found, the mild avocado and tomato snack is a delicious blend of flavours and healthful benefits. This easy-to-make yet delicious meal is sure to please both palates and hearts. It may be eaten as an appetiser at parties or as a fast and nutritious snack. Now go grab some ripe avocados and tomatoes and enjoy this irresistible snack that will go quickly!

Edamame Salad

Edamame Salad

Edamame Salad

This recipe for edamame salad is bursting with zesty, fresh flavour! Combine it with cucumber, feta cheese, corn and a vinaigrette made of red wine.

Recipe By: Sonja & Alex

Ingredients:

  1. 12 ounces of frozen and thawed shelled edamame
  2. One teaspoon of kosher salt
  3. three tablespoons of olive oil split
  4. two chopped cloves of garlic
  5. One tablespoon of vinegar made from red wine
  6. One-half teaspoon of spicy sauce
  7. One-half teaspoon of cumin
  8. 15-oz drained maize can
  9. Half an English cucumber, chopped
  10. 1/4 chopped red onion
  11. ½ cup crumbled feta cheese
  12. One handful of coarsely chopped cilantro

Guidelines:

  1. After rinsing the frozen edamame in a sieve with warm water, shake off any extra moisture.
  2. Fill a big skillet with 1 tablespoon olive oil and place it over medium-high heat. Once the edamame is bright green but has warmed through, add ½ teaspoon of kosher salt and simmer for 2 minutes.
  3. Take the mixture off the stove and add the grated garlic, stirring until it is well combined and no longer chunky.
  4. Combine two tablespoons of olive oil, red wine vinegar, spicy sauce, and cumin in a big bowl. Add the edamame, corn, diced cucumber, minced red onion, feta cheese, ½ teaspoon salt kosher salt and the chopped cilantro.
  5. Mix everything together. Serve right away. Leftovers last up to 3 days refrigerated (if necessary, refresh the flavors with a pinch of salt or drizzle of olive oil).


Details about storage:

Edamame salad keeps well in storage. It can be kept chilled for up to three days in a sealed container. It’s normal for salads to naturally lose some of their saltiness when refrigerated, so feel free to add a dash of salt or olive oil to revive the flavours over time.

Cooking the edamame

Cooking the edamame is the only step in this recipe, regardless of technique! To prepare it for the salad, you’ll need to both thaw it and cook it little. It arrives frozen. Don’t go overboard, though, as it will lose its appealing colour and turn greenish brown! Here are some pointers for preparing edamame:

  • First, rinse it: Put the frozen edamame in a sieve with warm water, then shake off any extra moisture. This aids in defrosting the frozen veggie so that less heat is used.
  • Cook for two minutes, but not for too long: Fill a big skillet with olive oil and place it over medium-high heat. Add the edamame and salt and cook for 2 minutes until warmed through but still bright green. Don’t overcook it, or the edamame will turn greenish-brown.
  • The finest part is about to happen: take it off the fire and mix in the grated garlic. Stir thoroughly until thoroughly combined, since grated garlic tends to group together.
  • All you have to do is combine the cooked edamame with the veggies and vinaigrette. Completed!

Natural Herbs That May Help Eliminate Parasites

Natural Herbs That May Help Eliminate Parasites

Natural Herbs That May Help Eliminate Parasites Overview It’s important to keep an eye out for any parasites that can compromise our health. Fortunately, there are a number of plants found in nature that are said to have anti-parasitic qualities. When it comes to health issues, you should always seek medical attention first. However, adding certain herbs to your diet may help your body’s built-in defences against parasites. Here are five plants that are said to be beneficial in this regard.

1. Garlic Not only can garlic enhance the flavour of your favourite recipes, but it also has potent anti-parasitic properties. Garlic’s main ingredient, allicin, is believed to have antimicrobial properties. Including fresh garlic in your food may help fight off parasites and strengthen your immune system.

2. The Wormwood Wormwood has long been used to treat digestive disorders; it is especially well-known for its ability to combat worm infections. It can be consumed as a supplement or tea. Because of its strength, though, it is essential to take the recommended dosages in order to prevent any negative consequences.

3. Dark Walnut Hulls of black walnuts have long been used as an all-natural treatment for intestinal parasites. Juglone, a substance thought to have anti-parasitic properties, is present in them. Black walnut is frequently sold as an extract or as capsules.

4. Clove Clove is a potent herb that has been used to kill parasite eggs and larvae because of its high eugenol content. Because of its antibacterial qualities, the body’s ability to harbour parasitic infections is inhibited. Cloves can be ground and used in cooking or diluted to make an oil.

5. Mint There’s more to oregano than just Italian seasoning. The oil of oregano, which can be diluted and taken in capsule form, is known for its antiviral, antibacterial, and anti-parasitic properties. It works particularly well to fight bacteria in the digestive system.

In summary

Although some herbs have been shown to have anti-parasitic properties, caution must be exercised when using them. Before beginning any new treatment, always get advice from a healthcare professional, particularly if you have pre-existing medical conditions or are currently taking other medications. Recall that while these herbs can enhance general health when used in conjunction with a balanced lifestyle, they are not a replacement for expert medical care.


Air Fryer Spatchcock Chicken.

Air Fryer Spatchcock Chicken.

Winner, winner, chicken dinner! These days, there’s a new addition to Spatchcock Chicken’s chicken selection whenever you stroll into a grocery shop. They were originally visible to me at Trader Joes, but they were also suddenly visible at my neighborhood grocery shop.

Advice & Techniques

  • To ensure that the skin becomes crispier, blot the chicken dry with a paper towel before adding spice.
  • For best results, make sure the chicken is free of extra fat before air-frying.
  • The same procedures can be used to create spatchcock chicken in the oven if you don’t have an air fryer.
  • Increase the cooking time for a complete spatchcock chicken and make the necessary adjustments.
  • Season the spatchcock chicken, then brush with melted butter for additional crispy skin.
  • Always make sure by checking Using a meat thermometer, check the doneness of your chicken. A minimum internal temperature of 165°F/75°C is required.
  • One hour of rest is all you need before slicing and serving your spatchcock chicken. This will assist in retaining all of the fluids.
  • Before serving, pour some fresh lemon juice over your spatchcock chicken for added taste.
  • You can create your own flavor inventions in place of Italian seasoning. Use kosher salt, black pepper, garlic powder, onion powder, lemon pepper, and other seasonings

Components

  1. Four to six tablespoons of olive oil
  2. One tablespoon of lemon juice
  3. four tablespoons of minced garlic
  4. Four tsp Seasoning from Italy
  5. three to four pounds

Directions for Making Spatchcock Chicken

  • Combine the olive oil, lemon juice, minced garlic, and Italian seasoning in a small mixing bowl. Blend thoroughly.
  • Apply a layer of pastry brush on the chicken.
  • Preheat the air fryer to 375 degrees Fahrenheit and set a timer for 15 minutes.
  • Next, turn on the air fryer, spray the chicken with extra spice blend, and cook it for a further 20 to 30 minutes at 375 degrees Fahrenheit.
  • The thickest section of the bird should register 165 degrees Fahrenheit when the internal temperature is checked.
  • Give it a good ten minutes to rest before serving.

Air Fryer Trader Joe’s Shawarma Chicken Thighs

Air Fryer Trader Joe’s Shawarma Chicken Thighs

Trader Joe’s Shawarma Chicken Thighs in an air fryer Love for good shawarma is universal. particularly when it’s prepared using an air fryer! These air fryer chicken thighs are properly cooked after being spice-rubbed. These are so wonderful you can eat them straight or serve them with tahini sauce on warm pita.

Trader Joe’s Shawarma Chicken Thighs are a must-try if you enjoy Middle Eastern food. The flavor of these succulent chicken thighs is enhanced with a marinade made of a combination of spices. They work well when baked or grilled, and they also taste fantastic when sliced and added to shawarma sandwiches. Trader Joe’s chicken thighs are a great and simple way to add flavor to your next dinner. Make sure to give them a try. You’re going to love it!

Temperature and Cooking Time

For how long are Trader Joe’s Shawarma Chicken Thighs supposed to cook in an air fryer? Shawarma chicken should be air-fried for 15 to 20 minutes at 390 degrees.

Keep in mind that because every air fryer is a little bit different, you should cook the chicken until the internal temperature reaches 165 degrees F. To do this, insert your meat thermometer into the thickest section of the bird.

Remaining

Prepared Once cooked, Trader Joe’s chicken shawarma keeps well in the refrigerator for three to four days. Place each portion back on high for two minutes, or until thoroughly heated!

Trader Joe’s Shawarma Chicken Thighs should not be frozen after cooking because doing so will change the flavor when it thaws.

COMPONENTS

  1. One package of chilled Trader Joe’s Chicken Shawarma Thighs

Guidelines

  • Take the chicken out of the packaging and throw away the marinade.
  • Once the air fryer is adjusted to 390 degrees Fahrenheit, place the chicken shawarma inside the basket and cook for 15 to 20 minutes, or until the internal temperature reaches 165 degrees Fahrenheit.
  • Arrange, present, and savor!

A Simple and Delightful Carrot Milk Recipe

A Simple and Delightful Carrot Milk Recipe

A Simple and Delightful Carrot Milk Recipe Overview This recipe for carrot milk is ideal if you’re searching for a warm, soothing beverage that’s nutrient-rich and simple to prepare. It’s a delicious way to savour the sweetness of carrots in their natural state when combined with smooth milk. Let’s get started with this easy meal that takes only five minutes to prepare.

Ingredients:

  1. Two big carrots, finely shredded after peeling
  2. Four cups of milk (for creaminess, whole milk is ideal)
  3. Two teaspoons of honey or sugar (optional; taste and adjust accordingly)
  4. A pinch of ground cardamom or cinnamon for extra flavour (optional)

Directions:

  1. Peel and finely grate the carrots as the first step in preparing them. They will cook more quickly and mix in with the milk more easily as a result.
  2. Boil the Milk: Heat the milk to a gentle boil in a medium-sized pot. As the milk heats up, watch it closely to make sure it doesn’t boil over.
  3. When the milk reaches a boiling point, stir in the grated carrots. After lowering the heat to medium-low, simmer the mixture for three to four minutes. Stir occasionally to make sure the milk and carrots are thoroughly combined.
  4. Taste Your Drink: This is the time to add sugar or honey if you like a little sweetness. A dash of cardamom or cinnamon can also wonderfully intensify the flavour. Stir.
  5. Serve Warm: Your carrot milk is ready to be savoured once the carrots have softened and the milk has taken on a beautiful orange hue. Transfer into your preferred cup and savour it warm.

Advantages for Health This carrot milk recipe isn’t just tasty; it’s also a healthy choice. Carrots are rich in beta-carotene, which is excellent for vision. Milk, on the other hand, provides calcium and vitamin D, essential for maintaining strong bones. Together, they make a nutritious combination that’s both satisfying and beneficial.

In summary This recipe for carrot milk is a great example of how basic ingredients can be turned into a delectable beverage. Whether you’re settling down with a book or need something warm before bed, this carrot milk is a fantastic choice. Enjoy the creamy richness of this simple and quick dessert by giving it a try today.