Banishing Parasites Naturally

Banishing Parasites Naturally

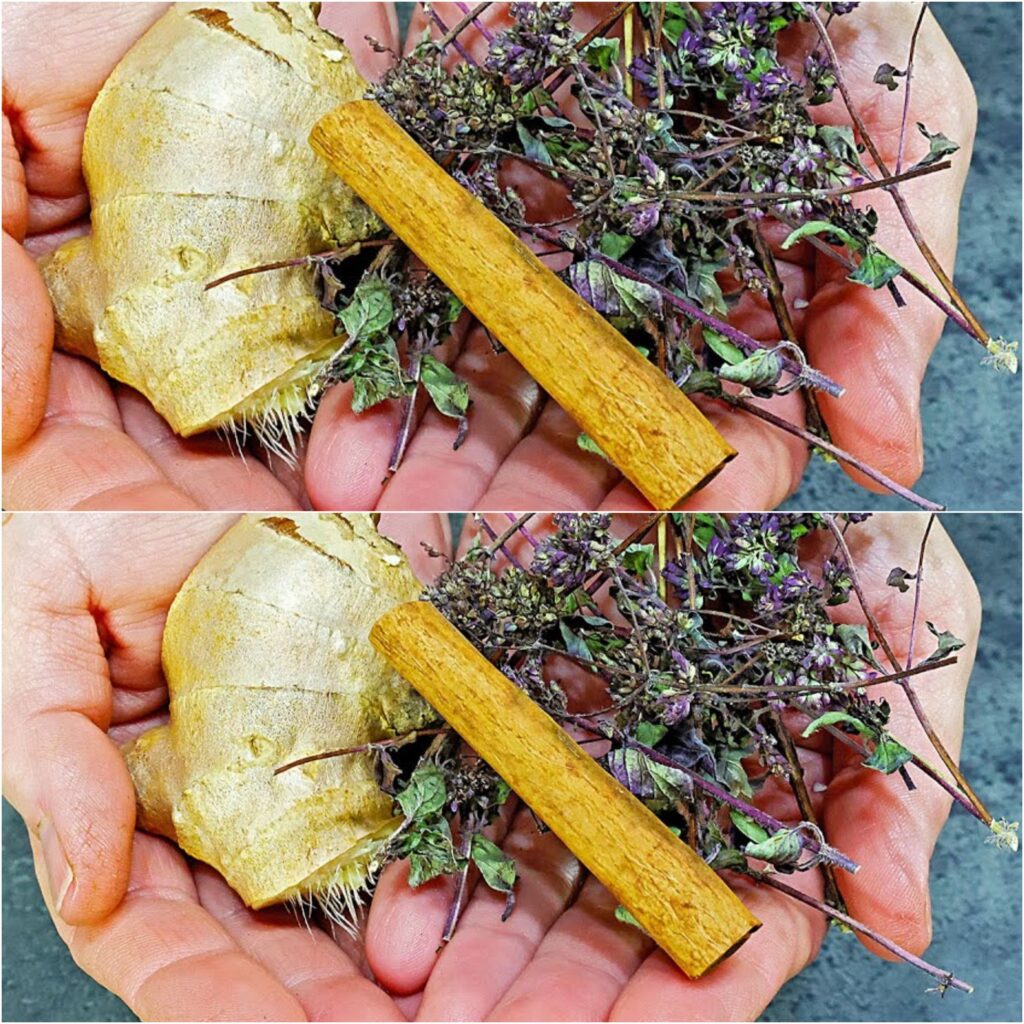
Banishing Parasites Naturally: The Power of Anti-Parasite Remedy with Cinnamon Stick, Cloves, Ginger, and Oregan

A powerful natural cure that uses the power of herbs and spices will help you bid farewell to unwanted guests in your intestines. Cinnamon stick, cloves, ginger, and oregano work together to provide a potent anti-parasite remedy that helps flush out parasites while also supporting intestinal health. Let’s examine this powerful remedy’s specifics and see how it can help you.

1. Understanding Parasites and Their Impact:

Unwanted creatures called parasites can live in the intestines and lead to a variety of health problems, such as weariness, vitamin shortages, and discomfort during digestion. Luckily, nature has given us strong weapons to fend off these invaders and bring our digestive systems back into equilibrium.

2. The Ingredients and Their Benefits:

Every component of this anti-parasite treatment has special advantages of its own:

  • Cinnamon Stick: Well-known for its antibacterial and anti-inflammatory qualities, cinnamon stick aids in the fight against parasites and reduces inflammation in the digestive system.
  • Cloves: Rich in compounds such as eugenol, cloves possess strong antiparasitic and antifungal properties, making them effective at eliminating intestinal invaders.
  • Ginger: With its potent anti-inflammatory and digestive-stimulating properties, ginger aids in expelling parasites and soothing gastrointestinal discomfort.
  • Oregano: Oregano: Rich in antibacterial and antioxidant properties, this plant is a great ally in the battle against parasites and promotes general gut health.

How to Get Ready for and Apply the Cure:

  1. Making this anti-parasite medication is easy and clear-cut:
  2. Ingredients: Collect oregano, ginger, cloves, and cinnamon stick.
  3. To prepare, put all the ingredients in a saucepan of water and bring it to a simmer. Simmer for ten to fifteen minutes to extract the beneficial ingredients from the combination.
  4. Use: To get the advantages of these potent anti-parasitic substances, strain the liquid and drink it as a tea or add it to your favourite foods.

Conclusion:

You have a natural anti-parasite cure that not only helps remove parasites from the intestines but also supports general digestive health when you combine the powers of cinnamon stick, cloves, ginger, and oregano. You may eradicate parasites and cleanse your gut with this powerful medicine, which will help you stay at your best and be as healthy as possible. Bid farewell to parasites and welcome to a more contented and robust you!

Trader Joe’s Santa Maria Tri-Tip Roast Air Fryer

Trader Joe’s Santa Maria Tri-Tip Roast Air Fryer

The Santa Maria Tri-Tip Roast Air Fryer from Trader Joe’s is fantastic! The air fryer is ideal if you’ve been searching for the finest way to prepare this delectable dish.

The Santa Maria Tri-Tip Roast Air Fryer from Trader Joe’s is fantastic! Much easier and better than roasting in the oven!

Expert Advice on How to Cook Santa Maria Tri-Tip in an Air Fryer

  • To assist you achieve the greatest results when cooking Santa Maria Style Tri-Tip in an air fryer, consider the following expert advice:
  • Marinate the meat for at least 4 hours, or overnight if you can, to achieve the maximum flavor and softness.
  • Allow meat to reach room temperature. Before cooking, remove the tri-tip from the refrigerator and allow it to come to room temperature for around half an hour. This promotes uniform cooking.
  • Use a thermometer for meat. The most reliable method of determining doneness is to take the tri-tip’s internal temperature. To achieve medium-rare or medium-doneness, the internal temperature of the tri-tip should be cooked to 130–135°F or 140–145°F.

Components

  1. 1. Santa Maria Tri-Tip Roast from Trader Joe’s
  2. Two teaspoons of Santa Maria olive oil Rub: (Selective)
  3. two minced garlic cloves
  4. Two tsp kosher salt
  5. One tsp black pepper
  6. One tsp of dehydrated rosemary
  7. A single tsp of dried thyme
  8. One tsp of smoky paprika
  9. Half a teaspoon of optional cayenne pepper

Guidelines

  • Set your air fryer at 400 degrees Fahrenheit for three to five minutes. Take the roast out of the bag made of plastic. Transfer roast to a chopping board. Combine the ingredients for the spice rub in a small basin. Apply a layer of olive oil to the tri-tip and then generously season the roast.
  • Depending on the size of the air fryer, you might need to chop the roast after placing the tri-tip within the basket and making sure it doesn’t contact the sides.
  • cut into tiny fragments.
  • Cook the tri-tip in the air fryer for 20 to 25 minutes at 400 degrees Fahrenheit, rotating it halfway through, to achieve a medium-rare to medium-done texture.
  • Using a meat thermometer, determine the tri-tip’s internal temperature. For medium-rare, the temperature should be between 130 and 135°F, and for medium doneness, between 140 and 145°F.
  • After the tri-tip reaches the doneness you choose, take it out of the air fryer and allow it to rest for five to ten minutes before slicing and serving.

6 Plants to Clean Your Lungs and Fight Asthma

6 Plants to Clean Your Lungs and Fight Asthma

6 Plants to Clean Your Lungs and Fight Asthma

Within the field of natural medicine, some plants are highly acclaimed for their potent capacity to promote respiratory health, providing relief from ailments like asthma, dyspnea, and a variety of infections. By include these plants in your health regimen, you can manage respiratory conditions holistically, in addition to using standard therapies.

1. Ginger

Ginger, which has strong anti-inflammatory and muscle-relaxing qualities, is helpful in lowering respiratory tract inflammation and relieving the tense muscles that come with asthma. A mixture of ginger, honey, and lemon can significantly reduce breathlessness spells. Frequent infusion of ginger may also be used as a prophylactic against respiratory illnesses.

2. Borage

Because of its cooling properties, boreage helps relieve dry, irritated lungs. Steep one tablespoon of borage blooming tops in a cup of hot water for around ten minutes to reap its benefits. This herbal medicine can help relieve discomfort by giving the lungs much-needed moisture.

4. Thyme

Thyme produces antiseptic essential oils that function as natural antibiotics and antifungals, making it a potent ally against chest congestion. In addition to its benefits for the skin, thyme infusion effectively treats respiratory infections and bacterial pneumonia because of its ability to fight against bacteria and viruses.

5. Licorice (Glycyrrhiza Glabra, G. Uralensis)

As a softening and anti-inflammatory, licorice works wonders. Utilize finely cut or powdered dry root to prepare an infusion, but be mindful of the quantity—a little goes a long way. Licorice not only soothes the mucous membranes but also acts as a stimulating expectorant due to its saponin content.

6. Hyssop

When it comes to clearing up respiratory congestion, hyssop is unmatched. To benefit from its medicinal qualities, steep a teaspoon of its flowering tips in a cup of hot water for 10 minutes.

By include these herbs in your medical regimen, you can improve your body’s inherent healing abilities and provide supportive care for respiratory disorders. Before beginning any new herbal remedy regimen, you should, however, speak with a healthcare provider. This is especially important if you have a medical history or are currently taking other prescriptions.

One pot Mexican rice casserole

One pot Mexican rice casserole

One pot Mexican rice casserole

This recipe for One Pot Mexican Rice Casserole with ground beef is incredibly tasty, quick, and simple! This delicious dish with lots of taco flavour with beef, rice and corn will be a hit with the whole family!

This casserole has the exact same flavour as everyone’s preferred Mexican rice from a restaurant. All of that can be transformed into a substantial, all-you-you-eat supper in just 30 minutes! We all agree on this rice casserole, which is why it has always been a mainstay in my home. In the past, I would assemble it and bake it in the oven. That is, until I realised I could just turn this into a one-pan, stovetop meal. The rice simmers in the pan right along with the cooked ground beef and onion, corn, salsa, tomato sauce, and seasonings for amazing flavor! After your rice is tender you can stir in your favorite shredded cheese, and top with green onions if you’d like. We also really enjoy this with an

Ingredients:

  1. One pound of minced meat
  2. one chopped small onion
  3. salt & pepper to taste
  4. 1 1/2 cups beef broth
  5. 1 15-ounce can of drained corn
  6. 2 teaspoons taco seasoning
  7. 1 teaspoon garlic powder
  8. 1 cup long grain white rice
  9. 1 1/2 cups sauce
  10. 1 cup grated cheese

How to make:

  1. Cook the ground beef and onion in a big skillet over medium-high heat until the beef is no longer pink. Season with salt and pepper to taste. Remove grease if necessary.
  2. Putting the skillet back on the burner and coating the steak with taco seasoning and garlic powder.
    Add the tomato sauce, tomato sauce, rice, corn and broth.
  3. Heat the mixture until it boils. Shut off the heat, cover, and simmer for 18 to 20 minutes.
  4. Put the cheese cover back on and let it melt for two to three minutes.
  5. Have fun!


Honey and Cinnamon – A Blend that Cures 15 Diseases

Honey and Cinnamon – A Blend that Cures 15 Diseases

Health Benefits of Honey and Cinnamon

  • Immune System Boost: The antioxidant and antibacterial qualities of honey and cinnamon, when consumed regularly, enhance the immune system and may help prevent or treat infections and colds.
  • Blood Sugar Control: According to preliminary study, cinnamon may help type 2 diabetics better regulate their blood sugar levels. This concoction is thought to work well for controlling blood sugar levels when combined with honey.
  • Anti-Inflammatory Effects: Honey and cinnamon have anti-inflammatory qualities that may help lessen bodily inflammation and the symptoms associated with inflammatory illnesses.
  • Benefits of Antioxidants: These components are abundant in antioxidants that shield cells from harm caused by free radicals.
  • Skin Care: Honey and cinnamon have been used to treat acne, irritations, and other skin problems in natural skincare products including masks and lotions.
  • Dental Health: Manuka honey, in particular, may help treat conditions like gingivitis and periodontitis.
  • Arthritis Relief: Applying a paste made from honey and cinnamon to affected areas can help alleviate joint pain and stiffness. Drinking tea with these ingredients can also provide relief.
  • Weight Management: A daily drink of honey, cinnamon, and boiled water may aid in weight reduction.
  • Digestive Comfort: This mixture helps relieve heartburn and bloating while also clearing the digestive tract.
  • Toothache Remedies: For pain relief, apply a mixture of honey and cinnamon to your aching teeth.

Recipe for a Honey and Cinnamon Drink:

  1. 200–300 ml (one cup) water
  2. Ceylon cinnamon
  3. Honey

Getting ready:

  1. Heat the water to a boil.
  2. Add a teaspoon of cinnamon to the water that is boiling.
  3. After 15 minutes of infusion, let the mixture cool.
  4. Stir in two tsp honey and well combine.
  5. Take one-half cup before breakfast, and one more half an hour before bed.

This honey and cinnamon concoction is not just a remedy but a testament to the healing power of natural ingredients. Whether you’re dealing with minor health irritations or seeking a general health boost, this simple recipe might be just what you need.


Oven Crispy Parmesan Potatoes

Oven Crispy Parmesan Potatoes

Oven Crispy Parmesan Potatoes

This recipe for Oven Crispy Parmesan Potatoes turns the humble potato—a mainstay of Midwest cuisine—into a crispy, cheesy pleasure. With a hint of thyme and a blast of Parmesan cheese, this dish elevates the humble spud and is a great way to enjoy it with any meal. It’s a monument to the power of simple ingredients. Perfect as an accompaniment to a tender roast chicken or as the focal point of a warm brunch, these golden rounds of happiness are guaranteed to make an impression and disappear swiftly from the table.

Ingredients:

  1. 4 large russet potatoes, peeled and cut into rounds of 1/4 inch
  2. one-third cup extra virgin olive oil
  3. 1/2 cup grated Parmesan cheese
  4. 1 tablespoon fresh thyme leaves, or 1 teaspoon dried thyme
  5. one tsp powdered garlic
  6. Salt and freshly ground black pepper, to taste
  7. Fresh parsley sprigs for garnish (optional)

Directions:

  1. Preheat your oven to 400°F. A hot oven is crucial for achieving that desired crispiness.
  2. Coat the potato rounds in olive oil, ensuring each piece is well-covered. Arrange them in a single layer on a parchment-lined baking sheet, spaced slightly apart to prevent steaming.
  3. Mix the Parmesan, thyme, garlic powder, salt, and pepper in a bowl. Sprinkle this blend over the potato rounds, aiming for an even coating to enrich every bite with flavor.
  4. Bake for 20-25 minutes, or until golden and crispy. Remember to turn the potatoes halfway hrough the baking time for uniform crispness.
  5. Before serving, sprinkle some fresh parsley on top of the roasted potatoes to give them a pop of colour and freshness.

Changes & Advice:

  1. Try Different Herbs: To give the Parmesan mixture a unique flavour character, feel free to add oregano or rosemary.
  2. Option for Cheesy Crust: To add even more cheese, turn the potatoes halfway through baking, sprinkle with more Parmesan, and broil for a brief period of time. Watch closely to avoid over-browning.
  3. Repurpose Leftovers: If you have any leftovers, incorporate them into your breakfast hash or as a tasty side for lunch.

air fryer tri-tip steak recipe

air fryer tri-tip steak recipe

One of the greatest and tastiest ways to cook a fantastic roast in the air fryer is with this Air Fryer Tri-Tip Steak Recipe!

This is the ideal approach for you if you have never produced a roast in the air fryer. The meat has an incredible flavor and turns out to be juicy and soft. So go ahead and use the air fryer instead of the oven.

I served my roast with a basic chimichurri sauce today. This roast goes well with any gravy or sauce you want; it’s so juicy that you don’t need much!

Components

  1. Half a pound of beef loin (tri-tip) Tri-Tips

Rub:

  1. Six cloves of garlic
  2. Two tsp olive oil
  3. Half a teaspoon of salt
  4. One tsp pepper
  5. One-fourth teaspoon of garlic powder

Guidelines

  • Before cooking, I always let my meat rest for at least thirty minutes at room temperature. I made a garlic rub for this recipe, so I skipped the typical pre-salting step.
  • Dice your garlic into small pieces first.
  • Next, combine the minced garlic with the olive oil.
  • Make around ten pricks on each side of the roast with your fork to allow the oil and garlic to permeate it.
  • Massage the blend into the flesh.
  • After rubbing the mixture into the meat on both sides, place it in the refrigerator for about an hour.

air fryer sausage foil packets

air fryer sausage foil packets

These Air Fryer Sausage Foil Packets are perfect for busy nights when you don’t want to spend hours cooking or doing dishes. They’re full of protein and vegetables for a well-rounded meal, and they cook in just a few minutes because everything is cooked in one foil packet.

Pro Tip:

  • You can use any Air Fryer, basket, or oven to make this dish. In the Ninja Foodi, Instant Pot Vortex, Instant Pot Crisp Lid, and Mealthy Lid, I have also prepared delicious foil packet dinners. The cooking time will change, but the recipe will stay the same.
  • Use heavy-duty aluminum foil for the greatest results. It will hold up better throughout cooking and dishing because it is heavier than standard foil.
  • Cut the ingredients into pieces that are comparable in size. In this manner, they all cook simultaneously.
  • Because you don’t want to overcrowd the air fryer basket, you might need to cook these Air Fryer Sausage Foil Packets in batches. They won’t cook through adequately otherwise.
  • Refer to the manufacturer’s instructions wherever possible before using foil in your air fryer, given that each one varies somewhat.

The ingredients include:

  1. 4 Italian sausage;
  2. 1 pound Yukon gold potatoes;
  3. 3 large carrots;
  4. 1 large zucchini;
  5. 1 large yellow onion;
  6. 4 cloves garlic;
  7. 2 tablespoons butter, diced into cubes;
  8. and sauce made with ¼ cup olive oil,
  9. 1 tablespoon Italian seasoning,
  10. 1 teaspoon paprika,
  11. and ½ teaspoon garlic salt.

Guidelines

  • Tear out four 12-inch aluminum foil sheets. Put aside. Spoon evenly between each foil sheet all the ingredients except the butter and sauce.
  • Drizzle the sauce and a little butter on top of each packet.
  • Once the long edges are folded in, crimp firmly. To ensure that all corners are secured, fold in the short edges and crimp firmly.
  • After adding the Air Fryer Sausage Foil Packets to the Air Fryer Basket, air fry them for 15 to 20 minutes at 350 degrees Fahrenheit, or until they are fork-tender.
  • Arrange, present, and savor!

Air Fryer Half Chicken

Air Fryer Half Chicken

Searching for a quick and wholesome chicken recipe? See how to cook half a chicken in an air fryer! This recipe yields a tasty, crispy chicken dish that is easy to follow. Ideal for a dinner on a weeknight!

Chicken is favorite food of all Americans and is loved by all. Because chicken absorbs the flavor of whatever you season it with, made simple rub for it tonight and drizzled it with olive oil, and had delicious and speedy meal for the whole family! Everyone’s favorite supper was that one! I’m grateful for my air fryer!

Expert Advice:

  • Room Temperature Half Chicken: It’s critical to allow the meat to come to room temperature for 30 minutes prior to roasting. This will guarantee more even cooking and better-tasting food for you!
  • How to Spice a Half Chicken: You may use anything; just season liberally and adjust the spices to taste! Herb blends, garlic and lemon, or simply a basic chicken rub are all excellent choices!
  • Chicken’s internal temperature: Before serving, make sure the chicken is thoroughly cooked. Given that each air fryer cooks at a different rate, this is crucial! Use a meat thermometer just for peace of mind. Make sure your chicken is cooked through to an internal temperature of 165 degrees Fahrenheit before removing it from the air fryer.

Components

  1. One and half pounds of chicken
  2. Two tsp chicken rub, or more seasonings
  3. Two tablespoons of olive oil, or any other hot oil

Guidelines

  • Apply some olive oil to the chicken first. When seasoning the chicken, add these. Put the chicken into either the air fryer tray or the basket.
  • Put in the air fryer and cook for 10 minutes at 370 degrees Fahrenheit.
  • When the chicken’s internal temperature reaches 165 degrees F, after 10 minutes, turn it over and continue air-frying it for further 10 to 15 minutes (use meat thermometer to confirm).
  • Put on plate, offer service, and

Unlocking the Beauty Benefits of Boiling Onion Peels

Unlocking the Beauty Benefits of Boiling Onion Peels

Overview Get ready to uncover a beauty secret found in your kitchen that has been hiding for ages: boiling onion peels. Even though you probably cook with onions frequently, you might be surprised to learn that the common onion peel has a wealth of collagen-boosting qualities that can completely change the appearance of your skin. Come discover the surprisingly beneficial effects of boiling onion peels and how this easy habit may give you skin that is vibrant and luminous.

The Wonders of Simmering Onion Slices The purpose of boiling onion peels is to maximize the collagen-boosting potential of these frequently disregarded kitchen trash, not merely to make delectable broths:

  • Rich in Antioxidants: Flavonoids and quercetin, two antioxidants found in abundance in onion peels, help shield the skin from oxidative damage and encourage the creation of collagen.
  • Collagen augmentation: Collagen is the protein that keeps the skin firm and supple. Compounds that increase collagen are released when onion peels are boiled; these properties can help smooth out wrinkles, improve the texture of the skin, and make the skin look younger.
  • Anti-Inflammatory Properties: The anti-inflammatory chemicals in onion peels can help calm irritated skin, lessen redness, and improve the general health of the skin.


  • Boiling Onion Peels: A Guide Use these easy methods to boil onion peels until they’re perfectly cooked and reveal their beauty benefits:
  • Get Your Peels: Gather the onion peels from the onions you have either stored or utilized in recipes. To get rid of any dirt or debris, be sure to give them a good rinse.
  • Boiling: Put the onion peels in a pot with water on top of them. Once the water reaches a boiling point, lower the heat and simmer the peels for 20 to 30 minutes, or until the water turns a deep golden color.
  • Cooling and Straining: Take the saucepan off the burner when the peels have reached a boiling point and allow the liquid to reach room temperature. Remove the onion skins using a strainer, preserving the flavorful broth.
  • Application: Soak the cooled onion peel broth in your skincare routine or use it as a face toner.Using a cotton pad, gently massage your face and neck. After letting the soup dry, apply your preferred moisturizer.

In summary

Boiling onion peels can help you obtain vibrant, youthful-looking skin because of its high collagen-boosting capabilities and antioxidant-rich composition. You may uncover the true radiance in your skin and enjoy the many cosmetic benefits of onion peels by including this easy habit into your nightly regimen. Why then wait? Tonight, start boiling those onion peels, and get ready to be astounded by the outcome!