Old Wisdom An Orange Peel and Clove

Old Wisdom An Orange Peel and Clove

Old Wisdom: An Orange Peel and Clove Among the many traditional health remedies that have been passed down through the ages, the art of boiling orange peels with cloves stands out as a testament to the knowledge and inventiveness of our ancestors. This age-old technique, handed down through the generations of women, creates a potent treatment by combining the therapeutic qualities of two everyday household objects.

  • Orange peels are rich in nutrients and have a pleasant fragrance. They contribute to the prevention of the disease because of their high vitamin C content. These foods are high in flavonoids and antioxidants, which shield cells from oxidative stress. This prevents ageing and reduces the risk of many chronic disorders.
  • Contrarily, cloves are tiny but potent spices that are rich in antioxidants, essential oils, and minerals. Because of their well-established antibacterial, anti-inflammatory, and digestive-enhancing properties, they are essential for enhancing overall health.
  • These two ingredients combined provide a warm, aromatic infusion that is both calming and nutritious. The result is a cool beverage with a perfectly balanced sweetness and spice that embodies all-natural wellness.

Tips By: Homeremedies


How to Make Orange Peel Soda with Cloves:
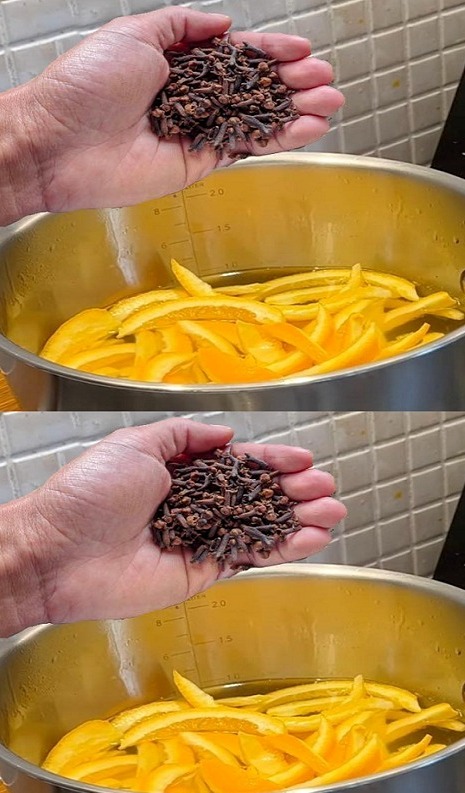
  • Two rinds of orange
  • Five cloves total
  • One cup of water, or roughly 250 millilitres


Technique:

  • First, thoroughly wash the orange peels to remove any dirt or pesticides. Gently pat them dry.
  • Put the water in a small saucepan and bring it to a boil.
  • Gently add the peeled oranges and cloves to the boiling water, then lower the heat so that it simmers.
  • To fully unleash all of the flavours and benefits, gently infuse the ingredients over low heat for around fifteen minutes.
  • Once the infusion reaches the desired strength, discard the cloves and peels and transfer the mixture into a cup.


An Abundance of Benefits:
This infusion provides numerous health advantages in addition to being delicious, such as:

  • Orange peels’ rich vitamin C content strengthens the immune system.
  • Orange peels and cloves offer protection against oxidative stress and cellular damage because of their strong antioxidant content.
  • It is a great option for treating infections and lowering inflammation because of its inherent antibacterial and anti-inflammatory qualities.
  • Cloves can help with indigestion and speed up digestion, among other digestive health benefits.
  • Customised Infusion for Oneself


The basic formula has several benefits, but there is also room to customise it to fit individual preferences and health requirements:

  • Add some fresh ginger slices or a cinnamon stick for an extra dose of warmth.
  • Try adding a few rounds of lemon or a slice of apple to add even more delectable complexity.
  • To naturally sweeten the coffee, add a tablespoon of honey or maple syrup; if you’re limiting your calorie intake, use a sugar substitute.
  • This ancient concoction not only reconnects us with the wisdom of our ancestors, but it also offers a simple, effective way to improve our natural health on a daily basis.


Tasty Air Fryer Empanadas

Tasty Air Fryer Empanadas Using prepared pie crusts for the dough and heating them in an air fryer makes making empanadas simple! Tender veggies and savoury ground beef fill it to the brim, making it impossible to resist having another.

Since I’m all about convenience, air-frying them is the best option. The only difference between these rich and perfectly cooked golden-brown empanadas cooked in an air fryer and those that require oil frying is that they cook in just ten minutes!

In case you still need more convincing, the dough for this recipe is created with prefabricated pie crust. Put another way, even less preparation! You won’t be able to get enough of the flavorful blend of veggies and spiced ground meat that fills it up.
Recipe By: Alyssa Rivers

TIME FOR PREP: 30 minutes
Cooking time is ten minutes.
A total of forty minutes
SERVINGS: Ten enchiladas


Ingredients For Tasty Air Fryer Empanadas:

  • 4 ounces of diced potato
  • 1/2 pound of lean ground beef
  • ⅓ cup of minced yellow onion
  • Finely chopped red bell pepper
  • 1/2 cup frozen peas
  • Minced garlic cloves
  • 1 teaspoon each of salt, pepper, and cumin
  • 1 teaspoon each of oregano and chilli powder
  • One-Forth cup beef broth
  • One-Tablespoon tomato paste
  • Two ready made pie crusts
  • Two egg whites
  • Two teaspoons of water


Once the potatoes are fork-tender, boil the diced potatoes. After draining, set away.
Add the ground beef and onion to a large frying pan and sauté until the beef is evenly browned. Add the peas and bell pepper to the pan. After 5 to 7 minutes of sautéing, the veggies should be soft.
Add the cooked potatoes, tomato paste, beef broth, garlic, salt, pepper, paprika, cumin, oregano, and chilli powder. After thoroughly mixing in the liquids and spices, sauté the mixture until the liquid has decreased. Take the filling off of the hob.

Roll out the pie dough and cut into circles about 4 inches in diameter using a cookie cutter or a large enough rimmed cup. To get at least ten, you’ll need to gather the leftovers, roll them out, and cut more circles.
In a separate bowl, mix together the egg whites and water to make the egg wash.

Lay out one of the dough circles on a work surface, fill the centre with about 2 tablespoons of filling, and lightly egg wash the edge of one side of the dough.

To form a half circle, fold the dough in half over the filling. Crimp the edges together using a fork. Proceed with the remaining dough and filling.
After brushing each empanada with egg wash, air fry it for 8 to 10 minutes at 350 degrees Fahrenheit, rotating it halfway through. Make the empanadas in batches, leaving space between them.


Nutrition Guide:

47 kcal of nutrition calories
3g of carbohydrates

6g of protein
Fat: 1 gramme
One gramme of saturated fat
0.1g of polyunsaturated fat
1g of monounsaturated fat
Trans Fat: 0.1 g
14 mg of cholesterol
297 milligrammes of sodium
158 milligrammes of potassium
1g of fibre
1g of sugar
412 IU of vitamin A
11 mg of vitamin C
14 mg of calcium
Iron: 1 mg
Since nutrition data is computed automatically, it should only be used as a rough guide.

Bread and Butter Pudding

Bread and Butter Pudding

Discover how to prepare bread pudding using a few basic components. The ingredients for this recipe are buttered bread slices drenched in creamy custard and topped and below with raisins. It’s roasted until the bottom is tender and flavorful and the top is crispy and golden brown.

INGREDIENTS

  1. 8 or so pieces of stale white bread, 14 ounces cup softened unsalted butter
  2. cup raisins
  3. 3 large eggs
  4. 1 ½ cups milk
  5. ½ cup heavy cream
  6. ⅓ cup divided sugar
  7. ¼ teaspoons of pure vanilla extract, cinnamon, and nutmeg

Guidelines

  • Spread butter in a 10 x 7 x 2 inch (26 x 18 x 5 cm) casserole dish and place it aside. Another option is to use a 9-inch (23cm) pie dish, brownie pan, or any other around the same size and 2-inch (5cm) height item you may have. Whether the baking dish is circular, oval, or square makes no difference.
  • Spread butter on both sides of the bread pieces and place them in the pan, stacking them on top of one another. In order to prevent them from burning while baking, lightly push the raisins into the bread and sprinkle them on top and in between the layers. Put aside.
  • Whisk together the eggs, milk, whipping cream, ¼ cup (50g) sugar, vanilla, cinnamon, and nutmeg in a large mixing basin. Evenly distribute the mixture over the bread. The baking dish should be covered and refrigerated for one hour.One hour.
  • Set the oven’s temperature to 175°C/350°F. Drizzle the remaining butter over the top and then sprinkle 2 tablespoons (25g) of sugar on top.
  • Bake for 35 to 45 minutes, or until the top becomes crispy and golden brown. The bottom layer of bread must absorb all of the milk. If necessary, cover loosely with aluminum foil after 20 minutes to avoid excessive browning. Before serving, take out of the oven and allow it cool for around ten minutes. Serve right away with your preferred toppings. Leftovers can be frozen for up to two months or kept covered in the refrigerator for up to two days.

Notes:

  • Stale white bread is used in this recipe. I have tried this recipe with challah and brioche, and it turned out great. Remaining donuts are also a great fit for it. If you use donuts, I advise against buttering them. Use your preferred gluten-free soft white bread to make this dish gluten-free.
  • You can use soaked or unsoaked raisins in this bread pudding, depending on your preference and the people you are serving it to. Should you choose to utilize soaked raisins, let them steep in ½ cup (120ml) of brandy, cognac, dark rum, or bourbon the day before you intend to prepare this dish. After draining the raisins, you can choose to incorporate 1 tablespoon (15ml) of liquor into the milk mixture. Should you dislike raisins, you may You could omit them entirely or replace them 1:1 with chocolate chips, peanut butter chips, or almonds.
  •  Slice the bread or cut it into cubes that are 2 inches (5 cm) in size. If you’d like, skip the buttering step and just move the bread to the baking dish. Next, evenly distribute the raisins between and on top of the bread cubes by sprinkling them on. Follow the recipe’s instructions exactly.

Air Fryer Vanilla Berry Pavlova

Air Fryer Vanilla Berry Pavlova

Have you ever used your air fryer to prepare a dessert? Try this simple keto Pavlova inspired by the holidays!

INGREDIENTS

  1. big egg whites
  2. One teaspoon apple cider vinegar or 1/4 teaspoon cream of tartar
  3. 1/4 cup (40 g/1.4 oz) powdered cellulose
  4. One cup (240 ml/eight fluid ounces) of heavy whipped cream
  5. 1 tsp vanilla essence without sugar
  6. Two tablespoons of powdered cellulose or your preferred low-carb sweetener (20 g/0.7 oz)
  7. One cup (140 g/5 oz) of fresh berries of your choice, such as blueberries, blackberries, raspberries, or strawberries

Guidelines

  • Break open the eggs and take out the whites and yolks. Transfer the egg whites to a mixer or a sizable, spotless basin.
  • Beat the egg whites at a medium-low speed to begin. After about two minutes, stop until the whites start to bubble. Next, incorporate the apple cider vinegar or cream of tartar.
  • One tablespoon of sweetener at a time, add. Continue pounding until they become glossy and stiff-peaked.
  • Put some parchment paper (round cake parchment works well) into your air fryer. Make a round meringue by spooning the mixture on top, being sure to leave at least 2.5 cm (1 inch) of space on the sides.
  • Make a nest in the center with a spoon or spatula, building up the sides of the meringue to accommodate the baked berries and whipped cream.
  • Preheat the air fryer to 120°C/250°F. Cook for 40 minutes, checking every 20 minutes or so.
  • After it’s done, take it out of the air fryer and allow it to cool completely before taking it out again and adding the topping.
  • Whip the cream while adding two tablespoons of cellulose and vanilla extract.
  • To assemble, place fresh berries and whipped cream on top of the chilled meringue. Add some fresh mint as well.
  • Cut into pieces for instant serving or keep chilled for a maximum of one day. It’s usually preferable to assemble the Pavlova just before serving. The baked meringue will keep for up to three days in the refrigerator when stored in an airtight container.

Air fryer chicken rissoles

Air fryer chicken rissoles

Here’s an additional simple air fryer chicken recipe to add to your repertoire. These mini rissoles, which are made with mince, panko breadcrumbs, and zucchini, go well with a salad for supper. The following day, you can quickly have them for lunch by putting them inside a bread roll along with your preferred toppings.

Recipe by: Tracy Rutherford

INGREDIENTS

  1. 500g Coles Chicken Mince with RSPCA Approval
  2. 25g, or half a cup, of panko crumbs
  3. Finely grate 40g (1/2 cup) parmesan cheese.
  4. Three green shallots, cut thinly
  5. two smashed garlic cloves
  6. 1 egg, whisked just enough
  7. One zucchini, finely chopped, with honey mustard dressing
  8. Two tablespoons of olive oil
  9. One tablespoon of lemon juice
  10. One tablespoon Dijon mustard
  11. One tablespoon of honey

INSTRUCTIONS

  • Step 1: In a large bowl, combine mince, breadcrumbs, parmesan, shallot, garlic, and egg. Add the zucchini to the bowl after squeezing out any extra juice. Once mixed, whisk in the seasoning.
  • Step 2: Roll the mixture into ten balls using 1/4 cupfuls. Transfer to a lightly oiled tray, then carefully press into rounds that measure 7 cm. To cool, cover and refrigerate for half an hour.
  • Step 3: Lightly mist the air fryer basket and rissoles with oil. Cook for 10 minutes at 180°C, or until cooked through and golden (see note).
  • Step 4: To make the dressing, thoroughly mix the oil, juice, mustard, and honey in a small basin.
  • Step 5: Drizzle the rissoles with dressing before serving.

Discovering the Candle That Never Goes Out

Discovering the Candle That Never Goes Out


Candles hold a special place in the world of home decor and ambience because they emit a warm  that turns any space into a peaceful haven. However, consider a candle that could accomplish all of this without ever using up its final wick—a candle that burns continuously. Let’s take a lovely journey to examine the idea of an eternal candle, even though it might sound like something out of a fairy tale.


The Magic of the Never-Ending Candle

The concept of an ever burning candle combines the allure of conventional candles with a dash of contemporary wonder. While the actual physics of a really eternal flame is still lagging behind our imaginations, creative methods exist that effectively convey the essence of this alluring concept. For instance, candles that flicker and shine just like the genuine thing without ever melting away are now possible thanks to LED technology and a little creative design.

A Durable Warm Glow

These long-lasting candles are a great complement to any environment because they have so many benefits. First of all, they offer the romantic atmosphere of a room lit by candles without the risk of a fire. This implies that you can go to sleep or wake up to the reassuring light of your candle while it’s still burning. In addition, they save you trips to the market for replacements because they are long-lasting and reasonably priced.

How to Use Everlasting Candles in Your House

There are many different designs of eternal candles, ranging from sleek and futuristic to ones that evoke the natural beauty of beeswax. They can be used in your bathroom to create a spa-like atmosphere for when you rest, or you can arrange them on your dining table for an endlessly romantic dinner ambiance. You can even nestle them in a bookcase to offer a soft glow to your reading corner.

The Allure of Eternal Light

Even if we might not now own a candle that burns perpetually, the idea of an eternal candle infuses our lives with a sense of wonder and boundless warmth. It represents light that never goes out, warmth that never goes cold, and a comfortable atmosphere that is always accessible. Why not allow this eternal light to enter your house and take advantage of the limitless attractiveness it offers? It serves as a source of unending solace and is more than just a candle.

Unlocking the Delicious Secrets of Leeks

Unlocking the Delicious Secrets of Leeks

Unlocking the Delicious Secrets of Leeks: A Recipe You Must Try

You’re in for a treat if you’ve ever looked at leeks and wondered what culinary wonders these long, green bunches hold. Leeks are much too frequently overlooked in favor of their onion cousins, but today we’re bringing them front and center with a dish that will transform your perception of this adaptable vegetable. Prepare your palate for a delectable and surprisingly easy-to-make leek meal that will tantalize your Unlocking the Delicious Secrets of Leeks buds.

A Symphony of Flavors

With their subtle sweetness, leeks make a great foundation for a variety of recipes, especially soups, stews, and pies. But the recipe we’re going to present makes leeks the star of the show instead of just a supporting actor. This recipe creates a symphony of tastes that will have you hankering after seconds. It blends the naturally sweet leeks with a hint of garlic and the creamy richness of a light sauce.


Creamy Braised Leeks: A Recipe You Must Try

What you will require:


  1. 4 large leeks, washed, and divided lengthwise into halves
  2. Two tsp olive oil
  3. one minced garlic clove
  4. One cup of broth made of vegetables
  5. ½ cup cream (you can use dairy-free alternative or half-and-half for a lighter version).
  6. To taste, add salt and pepper.
  7. As a garnish, a sprinkling of fresh parsley or thyme

Directions

  1. Heat the olive oil in a big skillet over medium heat. Add the leeks, cut-side down, and simmer for 5 to 7 minutes, or until they begin to brown.
  2. When the leeks are aromatic, add the minced garlic and simmer for an additional minute.
  3. After adding the vegetable broth, boil the mixture. Once the leeks are soft, cover and let them gently braise for about 10 minutes.
  4. Take off the top and add the cream. Reduce the sauce slightly and turn the leeks once to coat them with the delicious creamy sauce. To taste, add salt and pepper for seasoning.
  5. Serve warm, topped with a sprinkling of parsley or fresh thyme.


More than just a recipe, this creamy braised leek meal is a celebration of tastes, textures, and the delight of preparing food using basic, healthful ingredients. These leeks are going to become a new favorite, whether you’re cooking a romantic dinner for two or hoping to wow visitors. Thus, why not allow leeks to take center stage on your table? Salutations!

What transpires ten mins

What transpires ten minutes after Burn Bay departs from home is shocking


Because of their unique flavor, bay leaves are a staple in culinary applications. But there are benefits to burning as well. Let’s resolve this together.

 It’strue that they are a secret, little-known component used in Mediterranean cooking.

Laurel Plant: Fascinating Details and Features


This multibranched plant reaches heights of one to three meters in shrub form. The glossy, leathery leaves are flexible and shiny, resembling pointed spears. It contains tiny black fruits that are spherical in shape. It grows best in hot, semi-arid, desert, and temperate climates that are between 10 and 2900 meters above sea level.


Bay laurel is widely used in cleaning and cosmetic products and has unexpectedly positive health effects on people. The most popular application for it is as an infusion to ease stomach pain.


Still, there are a lot of other benefits associated with bay leaves. This plant has an abundance of vitamins and minerals, some of which include iron, calcium, magnesium, zinc, potassium, phosphorus, vitamin A, riboflavin, niacin, eugenol, and cineole. It is also recognized for its calming and anti-inflammatory properties. Not only can it be added to soups, stews, and drinks, but the dried leaves can also be burned to produce pain-relieving vapors. Even while it appears strange, it might end up doing more good than harm. We can now ascertain the reasons why you can benefit from this remedy.


How Your Home Burner Can Benefit from Bay Leaves


Diffuse the aroma of burning bay leaves around you if you’re having problems breathing. This plant’s leaves can be burned to create expectorant vapors that have the potential to improve cognitive performance, clear airborne germs, and soothe congested noses. The vapors produced by burning leaves should be released into the atmosphere rather than consumed. The anti-inflammatory properties of this plant help people with headaches and also lessen the pain associated with being in a bad mood. Actually, numerous scientific studies have demonstrated the effectiveness of this herb in alleviating headaches.


This is because the leaves contain a variety of compounds that have both sedative and anxiolytic properties. Regular use of this herb can help reduce upsetting emotional states and promote peaceful relaxation. Recent studies by the American Association of Nurse Anesthetists highlight the presence of linalool. When taken in large enough doses, this substance can significantly reduce anxiety and begin to act as soon as ten minutes after inhalation.


In fact, bronchitis and other respiratory conditions are frequently treated using the leaves. They clear the respiratory tract, which reduces the pain brought on by sputum and mucus. However, in this case, you should soak them in water or extract oil from them and use it as a humidifier instead of burning them.


Air Fryer Fried Green Tomatoes

Air Fryer Fried Green Tomatoes

A traditional Southern side dish gets a healthy makeover with air fryer fried green tomatoes! With each bite, they get progressively better in texture and flavor.

INGREDIENTS:

  1. Four unripe, medium-green tomatoes
  2. Half a teaspoon of salt

Breading

  1. Half a cup of all-purpose flour
  2. two big, beaten eggs
  3. half a cup of buttermilk
  4. One cup of cornmeal
  5. 1 cup breadcrumbs from Panko
  6. one tsp powdered garlic
  7. One tsp of paprika
  8. One tsp salt
  9. half a teaspoon of black pepper, cracked
  10. spritz with olive oil

DIRECTIONS

  • Dice the tomatoes into slices that are 1/4 inch thick. After using paper towels to pat them dry, sprinkle them with 1/2 teaspoon salt and set them aside.
  • Assemble the breading station using three bowls. In one, place the flour; in the other, whisk the eggs and buttermilk. In the third, combine the breadcrumbs, cornmeal, paprika, garlic powder, and a teaspoon each of salt and pepper.
  • Set the temperature of the air fryer to 400°F, or 200°C.
  • Using paper towels, pat the tomato slices dry before dipping each one in the flour one at a time. Coat thoroughly on both sides, then dunk in the egg mixture, and lastly, the combination of cornmeal and breadcrumbs. Cover both sides thoroughly.
  • Drizzle a little olive oil into the air fryer basket, place the tomatoes in a single layer, then drizzle some olive oil over the tops. Cook for 8 minutes, turning once during such time. To avoid packing the basket too full, work in batches.
  • When all of the fried tomatoes are done, remove them from the basket and keep warm on a pan in a low oven. Enjoy with a dipping sauce (tartar or remoulade, for example).

NOTES

  • For little kick of heat, add one or two tablespoons of hot sauce to the egg mixture. Replace the spices in the breading mixture with one or two tablespoons of seasoning that is Cajun or Creole
  •  For delicious, cheesy finish, add grated Parmesan cheese to the breading mixture.

Air Fryer Mozzarella Sticks (Homemade Recipe)

Air Fryer Mozzarella Sticks (Homemade Recipe)

These mozzarella sticks from the air fryer are far superior to those from the store! A few basic ingredients will make this snack creamy and crispy.

COMPOSITION

  1. Eight sticks of string cheese or mozzarella cheese
  2. Half a cup of all-purpose flour
  3. two big, beaten eggs
  4. 1 cup breadcrumbs from Panko
  5. Grated Parmesan cheese, half a cup
  6. one tsp powdered garlic
  7. One tsp of Italian spice
  8. One teaspoon of optional paprika
  9. To taste, add salt and pepper.
  10. Nonstick cooking spray

DIRECTIONS

  • The cheese sticks should be unwrapped and put on a baking pan covered with parchment. Freeze them until solid, about 1 hour. In order to prevent the cheese from melting too soon during cooking, this step is essential.
  • Arrange three small bowls. Put the all-purpose flour in the first bowl. Beat the eggs in the second. Add the Panko, grated Parmesan cheese, Italian seasoning, garlic powder, paprika (if using), and a dash of salt and pepper to the third.
  • After dredging a frozen mozzarella stick in flour, shake off any extra.
  • Next, submerge it into the whisked eggs, letting any surplus run off.
  • In the end, coat it with the breadcrumb mixture, pressing it firmly to stick. Back on the baking sheet, place the covered stick. With the remaining sticks, repeat.
  • After coating all of the mozzarella sticks, place them back in the freezer for a minimum of 10 and a maximum of 30 minutes. This procedure aids in the coating’s retention throughout cooking.
  • For around five minutes, preheat the air fryer to 400 degrees Fahrenheit (200 degrees Celsius).
  • Spray the air fryer basket with non-stick cooking spray. Place the mozzarella sticks in the basket in a single layer, ensuring they’re not touching. You may need to work in batches depending on the size of your air fryer. Spray the tops of the sticks lightly with cooking spray.
  • Cook them for 6-8 minutes, flipping halfway through to ensure even cooking. The mozzarella sticks should be golden brown and crispy.
  • Serve hot with your favorite dipping sauce. Enjoy!
  • Apply a little layer of nonstick cooking spray to the air fryer basket. Make sure the mozzarella sticks are not touching when you arrange them in the basket in a single layer. Depending on how big your air fryer is, you might have to work in batches. Apply a thin layer of cooking spray to the tops of the sticks.
  • To achieve consistent cooking, turn them halfway through the 6 to 8 minutes of cooking. The mozzarella sticks have to be crispy and golden brown.
  • Warm up and pair with your preferred dipping sauce. Have fun!