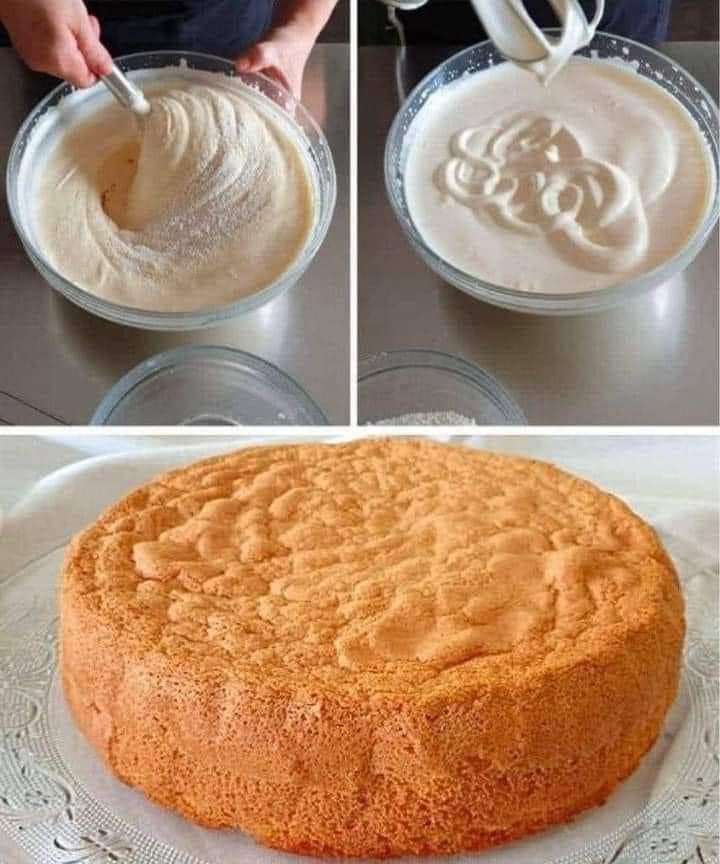
3-INGREDIENT SPONGE CAKE
This European sponge cake is made in the most classic way! Using only three ingredients, you will get the most moist, leveled cake that pairs perfectly with any of your favorite creams.
What is a Sponge Cake?
Now, don’t try cleaning your dishes with this cake! You’ll be sorely disappointed. Okay, no more mom jokes, I promise. Below I will describe what makes sponge cake different than other types.
Sponge cakes are primarily made with eggs and a bit of sugar and flour. This makes this cake both light and airy and sturdy and absorbent. Therefore, sponge cakes are perfect for spreading on filling or topping with heavy fruits.
Tips for The Best Sponge Cake
- Keep the eggs at room temperature before you make the cake. Room temperature eggs beat better!
- Beat the eggs with sugar for at least 10 minutes, on medium-high speed in a stand mixer. The texture should be airy, yet stiff, and you should get thick ribbons. If using a hand mixer, you may need to beat for twice as long.
- First, sift the flour. Eliminating any flour lumps or clumps will provide a homogeneous texture.
When adding flour to the egg mixture, do it gradually in thirds. Use a rubber spatula to gently stir in the flour rather than a whisk to avoid over-mixing and compromising the fluff of your beaten eggs. - A 9-inch baking pan or bigger is what you need. When baking, this cake is prone to overflowing.
A abrupt shift in temperature during the early baking process can cause the cake to collapse, therefore avoid opening the oven door during that time. - Prick the cake with a toothpick to see if it’s done baking. Don’t test until almost done baking.
🌟 INGREDIENTS:
- – 4 eggs
- 1 cup (200g) granulated sugar
- 1 cup (120g) all-purpose flour
🌟 INSTRUCTIONS:
1. Preheat your oven to 350°F (175°C). Grease and line the bottom of a round cake pan with parchment paper.
2. In a large mixing bowl, crack the eggs and add the sugar.
3. Using an electric mixer, beat the eggs and sugar together on medium-high speed for about 8-10 minutes until the mixture is thick, pale, and has tripled in volume.
4. Sift the flour into the egg mixture in small batches. Gently fold the flour into the batter using a spatula, making sure not to overmix. Be careful to fold in the flour thoroughly but gently to maintain the airiness of the batter.
5. Once the flour is fully incorporated, pour the batter into the prepared cake pan.
6. Bake in the preheated oven for approximately 25-30 minutes or until the top is golden brown and a toothpick inserted into the center comes out clean.
7. Remove the cake from the oven and let it cool in the pan for 5 minutes. Then transfer it to a wire rack to cool completely.
8. Once cooled, you can serve the sponge cake as is or frost it with whipped cream, fresh fruit, or your favorite frosting.
Enjoy your homemade three-ingredient sponge cake! It’s a simple and versatile dessert that can be enjoyed on its own or with various toppings.
I love you all ❤️💕🥰