Chicken Lasagna Roll Ups

Chicken Lasagna Roll Ups

Cooking Chicken Lasagna Roll Ups is a comforting evening dish. Lasagna noodles are folded up with tender chicken, broccoli, and cheese, then baked in a handmade cream sauce.

This recipe, which serves as a full supper, is a family favourite!

Rather than arranging the components in a pan, a lasagna roll up is produced by wrapping all of the classic lasagna ingredients in pasta.

Preparation Time: 25 minutes
Cooking Time: One hour Five minutes
Cooling period of fifteen minutes
Time Spent: One hour, forty-five minutes
Six servings

Recipe By: Holly Nilsson

Ingredients For chicken lasagna roll-ups:

  • 12 cooked and cooled lasagna noodles
  • 4 cups cooked chicken
  • 3 cups cooked and cooled broccoli
  • 2 ½ cups shredded mozzarella cheese mixture
  • 2 cups cottage cheese or ricotta
  • 1 cup shredded mozzarella cheese
  • ¼ cup shredded parmesan cheese
  • 2 eggs
  • 2 tablespoons chopped parsley

Sauce for Recipe:

  • ¼ cup butter
  • One diced onion
  • Two minced garlic cloves
  • One-and-a-half cups flour,
  • Two cups chicken broth, one and a half cups milk,
  • Four ounces cream cheese
  • One cup shredded mozzarella
  • One and a half cups Parmesan
  • One teaspoon dried basil
  • One and a half teaspoons chopped oregano

Instructions For chicken lasagna roll-ups:

  • Turn the oven on to 350°F.
  • Mix the ingredients for the cheese mixture and reserve.

Sauce:

  • Heat the butter in a medium saucepan and sauté the onion and garlic for about 3 minutes, or until soft. Cook for one to two minutes after adding flour.
  • Gradually add the milk and broth, whisking after each addition. It will start out thick but thin out. After adding all of the liquid, whisk in the melted cream cheese. Simmer for one minute.
  • Take off the heat and mix in the dried basil, oregano, mozzarella, and Parmesan cheeses.

Putting together:

  • Fill a 9×13 pan with one cup of the sauce mixture.
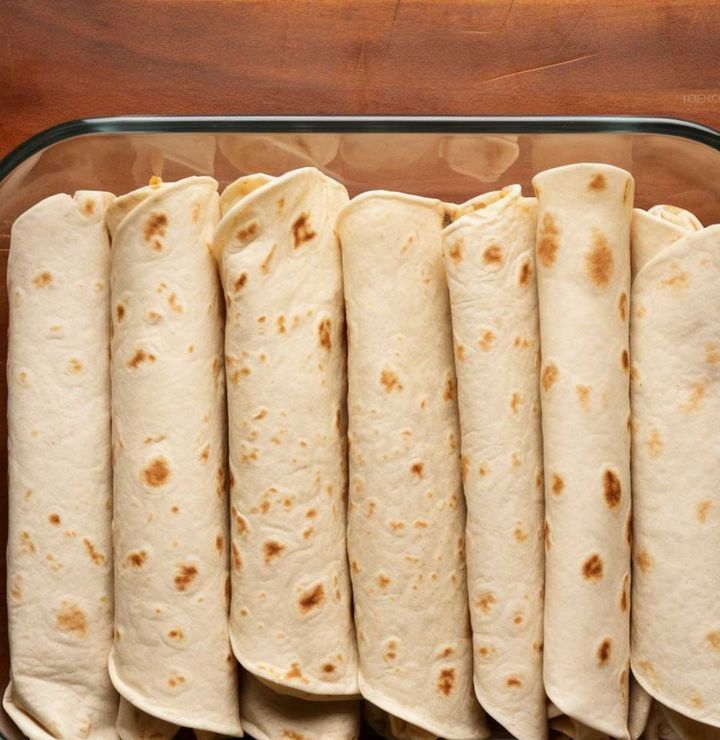
    Arrange the noodles.
  • Spoon chicken, broccoli, and cheese mixture over noodles. Top each with 2 tablespoons mozzarella cheese.
  • Roll noodles and place seam down in the pan. Top with the remaining sauce.
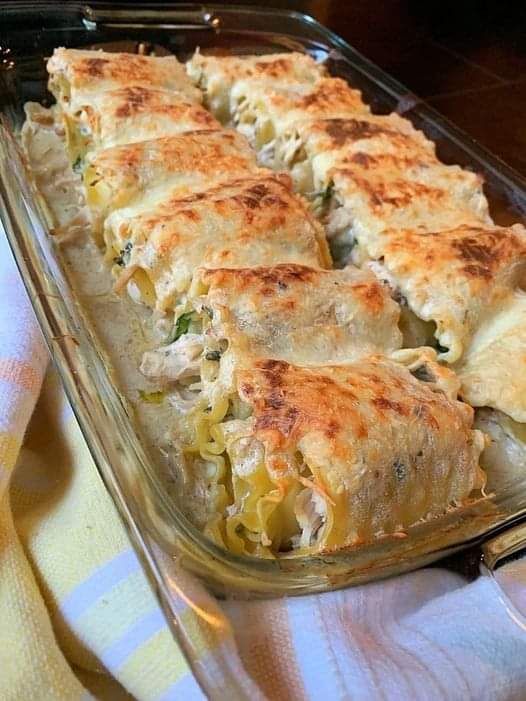
  • Cover with foil and bake for 30 minutes. Remove foil, sprinkle with remaining cheese, and bake for another 15 minutes.
  • Remove from the oven and let cool 15 minutes before serving.

Notes If you’d like, you can use ricotta instead of cottage cheese.
You can add broccoli or any other steamed vegetable, such as carrots or asparagus, in place of it.

Although we like the taste of the homemade sauce, you can use one or two jars of Alfredo sauce to speed up preparation.

Information on Nutrition:
serving size: two roll-ups; 931 calories; 60g of carbohydrates; 72g of protein; 44g of fat; 24g of saturated fat; 1g of trans fat; 235 mg of cholesterol; 1456 mg of sodium; 892 mg of potassium; 4g of fibre; 10g of sugar; 1798 IU of vitamin A; 50 mg of vitamin C; 747 mg of calcium; 3 mg of iron
The estimated nutritional information is subject to change depending on the brands of components and cooking techniques employed.

Hasselback Potatoes Recipe

Hasselback Potatoes Recipe

Thinly sliced potatoes are roasted until they are the perfect golden brown, and then cheese, sour cream, and green onions are added on top. These potatoes are known as hasselback potatoes. A simple but stunning side dish that goes great with steak and chicken!

Ingredients

  1. Six russet potatoes, o
  2. ne-quarter cup olive oil,
  3. one-fourth cup melted butter,
  4. salt, and pepper to taste, ei
  5. ght thin-cut cheddar cheese slices, cut into one-inch squares,
  6.  one-third cup sour cream,
  7. two teaspoons green onions,
  8. and cooking spray

DIRECTIONS

  • Start the oven at 450 degrees Fahrenheit. After lining a sheet pan with foil, spray cooking spray on the foil.
  • On a chopping board, sandwich a potato between two chopsticks. Cut the potato into thin, ⅛–¼ inch-thick slices. The chopsticks will stop you from having to from slicing through completely.
  • Proceed with the remaining potatoes in the same manner. Arrange the potatoes onto the baking sheet.
  • Mix the butter, olive oil, salt, and pepper in a small bowl.
  • Make sure to get some of the olive oil mixture between the potato slices as you brush the entire surface.
  • Bake potatoes for 50–60 minutes, or until they are soft and golden.
  • After taking the potatoes out of the oven, give them five minutes to cool.
  • Place a slice of cheddar cheese between each potato cut.
  • Put the potatoes back in the oven and continue to bake for another three to five minutes, or until the cheese has melted.
  • Place a dollop of sour cream on top of each potato, and then scatter the green onions  on top. Serve right away.

NUTRITIONAL INFORMATION

402 kcal of calories,

39 g of carbohydrates,

7 g of protein

18 g of fat,

10 g of saturated fat,

37 mg of cholesterol,

186 mg of sodium,

935 mg of potassium,

3 g of fiber,

2 g of sugar,

336 IU of vitamin A,

13 mg of vitamin C,

44 mg of calcium, and 2 mg of iron.

CREAMY WHITE CHICKEN ENCHILADAS

CREAMY WHITE CHICKEN ENCHILADAS

Creamy White Chicken Enchiladas are prepared with cheese, shredded chicken, green chiles, flour tortillas, and a delectable creamy white sauce!

Set Up Time: fifteen minutes

Cooking Time: 25 minutes

Time Spent: forty minutes Five servings

A TASTY RECIPE FOR CHICKEN ENCHILADA

Chiladas are among my favourite Mexican dishes, aside from chimichangas. This is one of those dishes that even finicky eaters enjoy! It has a delicious creamy sauce that truly brings everything together, and it’s not spicy at all. This is an easy evening dinner that comes together quite quickly!

Ingredients:

  1. One cup of shredded Monterey Jack cheese (or mozzarella) \two cups of cooked, shredded chicken (you can also use a store-bought rotisserie chicken) with Adobo
  2. seasoning and salt
  3. pepper to taste
  4. Ten taco-sized flour tortillas
  5. three tablespoons of butter
  6. three tablespoons of all-purpose flour
  7. two cups of chicken broth,
  8. one cup of sour cream
  9. four ounces of diced green chilies (do not drain)
  10. one cup of shredded Cheese from Monterey Jack

Instructions  for White Chicken Enchiladas:

  1. Set the oven’s temperature to 350F.
  2. Apply nonstick cooking spray to a 9 x 13-inch baking dish.
  3. One cup of shredded cheese should be added. Add some Adobo seasoning, salt, and pepper for flavour.
  4. Put a little of the chicken mixture into each wheat tortilla.
  5. After rolling each one, put it on the baking dish. Just cram them all inside.
  6. Melt butter in a saucepan of moderate size. Stir in flour; simmer and thicken for 1 minute, being careful not to burn.
  7. Whisk in chicken broth until it’s smooth.
  8. Add chilies and sour cream and stir. Make sure the mixture doesn’t boil.
  9. Remove the sauce from the stove and serve the enchiladas with it. Add the remaining cheese shreds on top.
  10. Bake for twenty to thirty minutes. You can broil these for one or two minutes on high, if you’d like, until the cheese is bubbling and gently browned. Warm up and enjoy with your preferred sides.

SUGGESTIONS FOR CHICKEN COOKING AND SHREDDING:

  • There are two methods you can use to prepare chicken. A few chicken breasts can be roasted in the oven. Toss them with a little olive oil, season with salt and pepper, and bake for 35 to 45 minutes.
  • Alternatively, boil your chicken until it’s done. Alternatively, you may use rotisserie chicken from the grocery. It just comes down to how much time you have available and what kind of chicken you want. The chicken that is roasted or rotisserie will have the most flavour.
  • After the chicken is cooked, shred it with two forks. Alternatively, place your chicken in the mixing bowl and use the paddle attachment on your stand mixer. After you turn on the mixer, the chicken will be properly shredded in just one minute.
  • I’ve prepared this set for five dishes, figuring that each individual will eat two enchiladas.

Course: Principal Course

Creamy Vanilla Happiness Recipe

Creamy happiness

Creamy Vanilla Happiness Recipe A Tasty Adventure into Dessert Paradise Recipe

Savour the silky smoothness of our happy dessert with creamy vanilla! Your taste buds will be dancing after tasting this delicious confection, which is the ideal balance of smooth textures and rich flavours. This dish is going to become a staple in your repertoire, regardless of whether you’re a dessert connoisseur or just trying to sate your sweet taste.

Ingredients for Creamy Vanilla Happiness Recipe

  1. Two cups of heavy cream
  2. One cup of whole milk
  3. Two tsp vanilla essence or one vanilla bean
  4. 1/2 cup of sugar, granulated
  5. Four huge yolks from eggs

Instructions for Creamy Vanilla Happiness Recipe

  • Put the whole milk and heavy cream in a saucepan. Split the vanilla bean apart and scrape the seeds into the mixture if you’re using one. The mixture should be heated to a simmer over medium heat. Take off the heat.
    Beat the egg yolks and sugar together thoroughly in a another basin.
  • Pour the heated cream mixture into the egg yolk mixture gradually while continuing to whisk to prevent curdling.
  • Transfer the blended mixture back to the pot and stir constantly over low heat until it thickens to the point where a spoon can easily slide through it. Keep it from boiling.
  • Take off the heat source and pass the custard through a fine-mesh sieve to eliminate any remaining particles.
  • At this stage, mix the vanilla essence into the custard if using it.
  • The custard should be allowed to come down to room temperature before being chilled for four or more hours or overnight.
  • As directed by the manufacturer, churn the custard in an ice cream maker after it has cooled.
  • When the ice cream has thickened, transfer it to a container with a lid and freeze it for a further two to four hours.

Advice and Hints for the Recipe:

  • Before serving, add with chocolate shavings or crushed vanilla wafers for a special touch.
  • Try varying the extracts you use, such as hazelnut or almond, to create interesting flavour combinations.
  • For an extra treat, swirl in some caramel sauce or fruit compote.

Direction for the Recipe:

Serve your creamy vanilla bliss in repurposed ice cream bowls and top with fresh mint leaves straight from your garden to give it a uniquely personal touch. The presentation has the power to improve the whole eating experience.

In summary:

Take a trip through delicious flavours with our custard, which is creamy vanilla happiness. This dish, with its smooth texture and pure vanilla fragrance, is a celebration of life’s sweet moments. Give every bite of happiness to you and your loved ones.

Consume this mixture every evening for 4 days: It burns all the belly fat quickly, healthily, and without leaving any traces

Consume this mixture every evening for 4 days: It burns all the belly fat quickly, healthily, and without leaving any traces

Fighting belly fat is about improving your general health, not just your aesthetic goals. In the middle of the abundance of quick fixes promising weight loss, adopting lifestyle changes is where real success is made. This is a comprehensive strategy for losing belly fat that emphasises natural treatments and significant lifestyle changes.

Essential Lifestyle Changes for Improved Health:

Frequent Exercise: To increase metabolism and burn fat, include a variety of physical activities in your routine.

Healthy Diet: To ensure a range of nutrients, including a variety of fruits and vegetables in your meals.
Hydration: To maintain body functioning and help with weight management, try to drink at least two litres of water each day.
Moderation is key to minimising calorie surplus and unhealthful weight gain. Cut back on alcohol, sugary indulgences, unhealthy fats, and excessive carbs.

A Natural Solution to Reduce Belly Fat: Use this natural concoction in conjunction with your healthy lifestyle to help target belly fat in as little as four days. This mixture is also supposed to strengthen the immune system, energise the body, and improve brain function.

ingredients:

  1. 125 gram mes of radishes .
  2. Three luscious lemons
  3. Four tsp honey
  4. Two tsp finely ground cinnamon
  5. One ginger slice

How to Prepare and Use It:

  • Blend: Peel the ginger and radishes first. Mix these until they are smooth.
  • Mix: Include the ground cinnamon, honey, and peeled lemons in the mixture. Stir until a homogeneous consistency is reached.
  • Consume: Take one tablespoon each day, preferably before breakfast and supper, of this mixture.

Expected Outcomes and Length:

Many have reported feeling rejuvenated and noticing a visible reduction in belly fat after just four days. For sustained benefits, it’s recommended to continue this regimen for three weeks.

Crucial Points to Remember:

Even while this treatment can provide you an extra push in the direction of a smaller waist, you must see it as a component of a larger lifestyle adjustment. Before adding anything new to your health regimen, always get medical advice, especially if you have any dietary restrictions or pre-existing diseases.

You’re not just aiming to lose belly fat by incorporating these natural remedies and lifestyle changes into your routine; you’re also opening the door to a healthier, more energetic version of yourself. It’s important to remember that every action you do brings you one step closer to your wellness objectives.

Tips by: Our Recipes


Cashew Chicken

Cashew Chicken

This cashew chicken has a takeout-like flavor thanks to the soft stir-fried chicken and roasted cashews in garlic sauce.

Ingredients:

  1. ½ cup cashews, unsalted and roasted
  2. Half a cup of water and two tsp cornstarch
  3. Four tablespoons of the highest-quality hoisin sauce, like Kikkoman or Lee Kum Kee
  4. One spoonful of soy sauce
  5. 1/2 pound of skinless, boneless chicken tenderloins or breasts, sliced into 1/2-inch pieces
  6. Half a teaspoon each of salt and freshly ground black pepper
  7. two tsp of vegetable oil
  8. Eight scallions (one bunch), white and green sections separated, each cut into 1-inch pieces; six medium garlic cloves, minced
  9. two tsp of rice vinegar
  10. One-half tsp Asian sesame oil

DIRECTIONS

  • Set oven temperature to 350°F.
  • Arrange the cashews in a single layer on a baking sheet. Toast for about five minutes in the oven, or until aromatic. Remove from the heat; they will firm up as they cool.
  • As you wait, make the sauce by combining the water, cornstarch, hoisin sauce, and soy sauce in a small bowl. Put aside.
  • The chicken parts should be put in a big bowl. After adding the salt and pepper, mix to ensure even coating.
  • Heat one tablespoon of the vegetable oil in a big, nonstick skillet over high heat until it’s extremely hot. After adding half of the chicken to the skillet, stir-fry it for three minutes, or until it is lightly browned but not cooked through. Move to a platter
  • Next add the remaining chicken, garlic, and white sections of the scallions to the skillet along with the remaining tablespoon of vegetable oil. Stir-fry for about 3 minutes, or until the chicken is lightly browned but not cooked through. Put the chicken back in the pan from the first batch.
  • Reduce the heat to medium and stir in the rice vinegar; cook for about 30 seconds, or until it evaporates.
  • After adding the sauce mixture to the chicken, heat it for approximately a minute, tossing occasionally, until the chicken is cooked through and the sauce has thickened well. Take off the heat source. Add the sesame oil, cashews, and scallion greens and stir. Serve right away

Spinach and Cheese Enchiladas recipe

Spinach and Cheese Enchiladas recipe

Spectacular Spinach and Cheese Enchiladas recipe, share this recipe with anyone! It’s very simple to make and far too delicious! Often, we prefer to correct it.

Enjoy the combination of creamy cheese and nutrient-dense spinach, encased in tender tortillas, in this simple recipe for Spinach and Cheese Enchiladas. These enchiladas, a nod to the many culinary traditions of Mexico, are a great option for cheese lovers and vegetarians alike because they present a plant-based version of a traditional dish. Because of its variety and regional variances, enchiladas have long held a valued place in Mexican culinary culture. With its emphasis on the delectable combination of spinach and cheese, this recipe in particular promises a feast full of flavour and enjoyment.

Recipe By: RGAHB

Ingredients For Spinach and Cheese Enchiladas recipe:

  1. Cream cheese, eight ounces
  2. One-half cup sour cream
  3. One yellow onion, chopped finely
  4. Three minced garlic cloves
  5. Eleven cups of fresh spinach
  6. Juice of half a lime
  7. One 4.5-ounce can of chopped green chillies
  8. A ½ teaspoon of crushed chilli powder and cayenne pepper each
  9. One teaspoon of cumin powder
  10. One can of green enchilada sauce (28 ounces)
  11. Eight huge wheat tortillas
  12. Four cups of Mexican blend cheese, shredded and divided
  13. To taste, add salt and pepper.
  14. Two tsp oil
  15. ¼ cup finely chopped fresh cilantro

Instructions For Spinach and Cheese Enchiladas recipe:

  • Warm up and get ready: Set your oven’s temperature to 375°F (190°C) to start.
  • Cook Onion and Garlic: Saute onion and garlic in oil in a skillet until they are transparent.
  • Cook the spinach in the skillet until it wilts by adding it and sprinkling it with salt and pepper.
  • Mixing Flavours: In a different bowl, use a smooth blender to combine the cream cheese, sour cream, lime juice, green chiles, and spices. Add the spinach mixture and stir.
  • To assemble the enchiladas, coat a baking dish with a thin layer of enchilada sauce. Spoon each tortilla with a portion of the spinach and cheese mixture, top with a little cheese, roll up, and put seam-side down in the dish.
  • Add Sauce and Cheese: Drizzle the remaining sauce over the enchiladas and top with the remaining cheese.
  • Bake: Bake the dish for 20 minutes with the foil covering it. Take off the cover and bake for a further five to ten minutes, or until the cheese is bubbling and golden brown.
  • After your enchiladas have cooled down a bit, top them with fresh cilantro and serve. This recipe for spinach and cheese enchiladas, which transforms basic ingredients into a sensory extravaganza, is sure to become a treasured addition to your cooking arsenal.

Keto Blueberry Ice Cream

Keto Blueberry Ice Cream

Your taste buds will think you cheated when you try this delectable frozen keto delight, which is made with keto blueberries ice cream.

This low-carb blueberry ice cream’s richness and smoothness will make keto a breeze—especially in the sweltering summer months.

This is an eggless keto ice cream that is loaded with healthful blueberries.

This homemade keto blueberry ice cream is simple to make because no egg yolks are needed. Another reason to make when the temperature rises is that there is no need to turn on the burner.

INGREDIENTS

  1. one-fourth cup lemon juice
  2. 3/4 cup of sugar replacement, granulated
  3. 2. Half a cup of thick cream for whipping
  4. one cup of water
  5. One-eighth teaspoon of salt
  6. One pint (16 ounces) of frozen or fresh blueberries, divided

GUIDELINES

  • In a small bowl, mix the sugar substitute and lemon juice together. Keep in mind that the sweetener won’t dissolve entirely. After that, transfer this mixture to the blender. Then, fill the blender with the heavy cream, water, and salt. Blend for about 30 seconds.
  • After adding half of the blueberries to the blender, pulse for a further 20 to 30 seconds, or until the mixture is well combined.
  • Subsequently, include the leftover blueberries into the ice cream blend.
  • If you’re using an ice cream maker, fill it with the blueberry mixture and process it in line with the directions provided by the manufacturer. My machine processed it in twenty to twenty-five minutes.
  • Any leftovers should be kept in an airtight jar with a tight lid. The ice cream must melt on the kitchen surface before it can be scooped again.

Instructions for No-Churn Ice Cream

  • When the ice cream is ready, transfer the mixture into one or more metal pans, depending on availability. After that, freeze the ice cream for around one hour.
  • Take the ice cream out of the freezer and give it a spoonful of stir-power after an hour. After that, put it back in the freezer. This phase will be repeated twice more, giving you three hours in total. Now you may scoop and savor the no-churn ice cream.
  • You’ll need to let the ice cream melt on the kitchen counter until it’s scoopable again if you have any leftovers.

Notes

  •  This recipe’s proportions are for a 2-quart ice cream maker. You may easily double the recipe if your ice cream maker is larger.
  • A serving is about two and a third cups.

Walking Taco Casserole

Walking Taco Casserole

Have you ever tried walking tacos or Frito pie? My Texan friend asked me if I wanted to try a pop-up in Brooklyn, where we both resided, a few summers ago. I had never tried or heard of Frito pie growing up in the Northeast.

INGREDIENTS

  1. Two tsp neutral oil (like canola oil)
  2. One sliced white onion
  3. 4 garlic cloves, finely chopped
  4. One pound of ground beef, 80/20
  5. Three tablespoons of taco seasoning (store-bought or homemade)
  6. One thinly diced scallion
  7. One fifteen-oz can of pinto beans
  8. One 10-oz can RO*TEL Original Green Chilies and Diced Tomatoes
  9. One cup of chunky, thick salsa
  10. To taste, add salt and black pepper to 1 1/2 cups of cheddar cheese, or more if necessary.
  11. One nine-ounce bag Corn chips from Fritos

In order to serve (optional)

  1. sour cream
  2. Jalapenos in pickles
  3. chopped scallions
  4. shredded green leafy vegetables

INSTRUCTIONS

Add the aromatics and sauté.

  • Heat the oil in a large 12-inch skillet over medium heat. Sauté the onion and garlic for 6 to 8 minutes, or until they are transparent and tender.

Cook the meat.

  • Using a wooden spoon, add the beef and break it up into bite-sized pieces. Saute until beautifully browned, 6 to 8 minutes.

Note:

  • Season the meat with a healthy pinch of salt if your taco seasoning does not include additional salt.
  • Set the oven temperature to 350°F while the meat is cooking.

Reduce the heat in the casserole:

  • After lowering the heat to medium-low, mix in the pinto beans, onions, and taco seasoning. Saute until thoroughly combined, one to two minutes.
  • After adding the salsa and Rotel, simmer the mixture for 8 to 10 minutes, or until the meat is properly seasoned and the flavors have blended. Add more salt and pepper to taste, if necessary.

Top with toppings:

  • Quickly move mixture to a 9 x 13-inch casserole dish, spreading evenly. Add two cups of Fritos chips and cheddar cheese on top, or more if you’d like.
  • Bake until the cheese is nicely melted, about 10 minutes.

Assist

  • Add optional dollops of sour cream, pickled jalapenos, scallions, and shredded lettuce to the top of the casserole dish. Distribute among serving dishes and savor!

KFC ORIGINAL SECRET CHICKEN RECIPE

KFC ORIGINAL SECRET CHICKEN RECIPE

A significant portion of my youth was spent eating KFC Original Recipe Chicken. When I was a child, my aunt used to take me home from school, stopping at the KFC that was located about half a street away. We used to share a strawberry parfait and chicken that they used to sell. I can still eat this meal memory whenever I choose, unlike the Pioneer Chicken my mom used to buy.

INGREDIENTS

  1. whole chicken, cut into pieces
  2. 3 beaten eggs
  3. 4 tablespoons oil

For the coating

  1. 2 cups flour
  2. 4 teaspoons paprika
  3. 1 teaspoons salt
  4. 1 teaspoon pepper
  5. 1 teaspoon poultry seasoning (or chicken stock powder)
  6. 1 teaspoon oregano
  7. 1 teaspoon tarragon
  8. 1 teaspoon parsley
  9. 1/2 teaspoon thyme
  10. 1 teaspoon chives
  11. 1/2 teaspoon garlic powder
  12. 1/2 teaspoon onion powder
  13. 1/2 teaspoon celery salt
  14. Half a teaspoon of powdered onion
  15. One-half tsp celery salt

GUIDELINES

  •  After sifting the flour, combine all of the coating ingredients, then use a mortar and pestle to ground them all finely before placing them in a fresh plastic bag. Coat every piece of chicken with the flour mixture in the bag after coating it with the beaten egg. Make sure all of the flour is covering each piece.
  • Warm up the skillet’s oil. Gradually brown the chicken, uncovered, in the oil. After the chicken is browned, cover the skillet and continue to sauté it over very low heat until it is cooked through. Lay out on paper towels to remove any surplus.