I CAN’T Stop Making It NO FRYING OR FUSSING. Tastier than MEAT

I CAN’T Stop Making It NO FRYING OR FUSSING. Tastier than MEAT

Are you prepared to transform your everyday culinary routine? A better, more delicious substitute is here to replace the fussy, unhealthy frying! For anybody who wants to make something wonderful without spending hours in the kitchen, this recipe is a game-changer.

Ingredients:

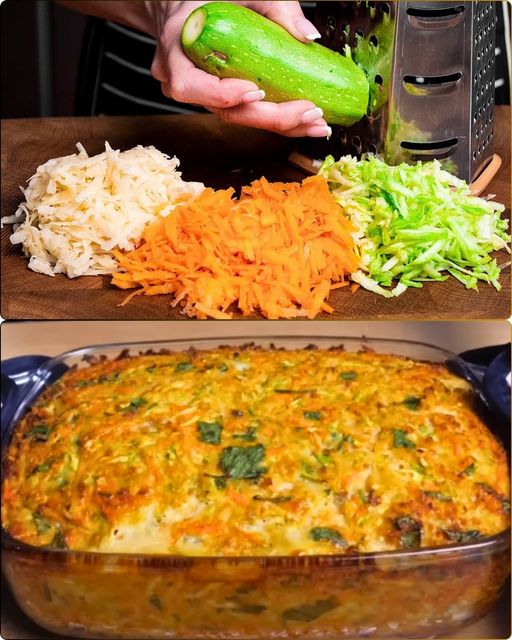
  1. 12 ounces (0.8 pounds) each of zucchini
  2. , potatoes,
  3. and carrots
  4. A 5.5-oz bag of onions
  5. three eggs
  6. two to three garlic cloves
  7. Two teaspoons of vegetable oil
  8. One tsp salt
  9. Taste of pepper
  10. Raw herbs, such as parsley
  11. Two slices of bran bread
  12. or three teaspoons of premade breadcrumbs

Getting Ready

  • Clean and Slice: All veggies (excluding garlic) should be cleaned, peeled, and then grated using a coarse grater.
  • Warm up the oven: Assign 200 degrees Celsius to your oven.
  • Grease Baking Dish: Grease the interior of a baking dish. walls and the bottom covered with oil.

Breading
When bread is used for breading:

To make the bread crumbs, pulse two bran slices into crumbs.
To bake crumbs, spread them out on a baking sheet and bake at 200 degrees Celsius for approximately 5 minutes.
Changing things up

  • Ingredients: In a bowl, combine shredded veggies, breadcrumbs (or premade breadcrumbs), minced fresh herbs, and pressed garlic.
  • Beat Eggs: Beat three eggs in a different bowl and add oil, salt, and pepper to taste.
  • Blend Well: Smoothly blend the vegetable mixture with the egg mixture.
  • Baking the Dish Assembly: Evenly distribute the vegetable mixture into the baking dish that has been prepared, pressing it down a little and smoothing the top.
  • Bake: For 50 minutes, place the dish in a preheated oven set to 180 degrees Celsius or until the color turns golden brown.

Serving Ideas
This meal can be served hot or cold, as a main course or a side dish, once it has been baked. It goes really well with crusty bread or a crisp salad. Try experimenting with different sauces and toppings to further improve the flavor!

Benefits to Nutrition
This meal is not only very yummy but also quite nutrient-dense. Eggs supply protein, while vegetables like potatoes, zucchini, and carrots are high in vitamins and minerals. Plus, you’ll cut down on extra fat and calories because there isn’t any frying involved.

Changes
You are welcome to alter this recipe to your own tastes. For an added blast of flavor, you can add other items like cheese or sliced ham instead of substituting your preferred veggies taste. There are countless options!

Advice and Techniques

  • Use Fresh foods: For the greatest taste, go for locally produced, fresh foods.
  • Try New Seasoning Combinations: Don’t be scared to use unconventional seasoning combinations. To alter the flavor, experiment with adding other herbs and spices.
  • Increase the Recipe by Two: Since this meal freezes nicely, why not double the amount and store some for later? Just reheat in the oven to make a simple and quick dinner.

In summary
To sum up, this recipe is revolutionary for anyone trying to streamline their cooking process without compromising taste. You may make a tasty and healthful supper with basic materials and minimal preparation time. Why then wait? Try it out now and make up your own mind!

Chicken Thighs and Potatoes  A Delightful Dish

Chicken Thighs and Potatoes  A Delightful Dish

It may be satisfying to cook every day, especially when you have a recipe like this one. A delicious sauce, potatoes, and carrots combined with chicken thighs make for a filling and substantial dinner. This is a simple dish that will make dinner tonight really wonderful!

Ingredients:

  1. 5 thighs of chicken
  2. Five potatoes
  3. two carrots
  4. three garlic cloves
  5. One onion, three half a spoonful of butter
  6. One bundle of parsley
  7. Add salt (to taste).
  8. Add pepper (to taste).
  9. one-third cup honey
  10. one-third cup sweet chili sauce
  11. One-fourth cup soy sauce
  12. One tablespoon of mustard

Guidelines

  • Put some seasoning to the chicken.
  • On both sides, sprinkle the chicken thighs with salt and pepper.
  • Melt the butter in a skillet over medium heat before frying the chicken.
  • Cook until both sides of the chicken thighs are golden brown. After removing it from the pan, set the chicken aside.
  • Cut the potatoes into pieces to start preparing the vegetables.
  • Cut the carrots into rounds that are thicker.
  • Chop the garlic and dice the onion.
  • Chop the parsley finely.
  • Cook the Vegetables: Fry the onion in the same skillet as the chicken until it turns transparent.
  • Add the carrots and potatoes and sauté for a few minutes, or until the vegetables begin to soften.
  • Sauté the parsley and garlic together for one further minute.
  • To make the sauce, put the mustard, soy sauce, honey, and sweet chili sauce in a different pan.
  • Once the ingredients are well mixed and dissolved, stir over low heat.
  • Put the Plate Together:
    The fried veggies should be transferred to a baking tray.
    After that, arrange the chicken thighs over the veggies.
    Over the chicken and veggies, distribute the sauce equally.
  • Cook the Food:
    Set the oven temperature to 350°F (180°C).
    Bake for about 40 minutes, or until the veggies are soft and the chicken is cooked through. As they come out of the oven, savor your succulent chicken thighs and potatoes!

Nutrition Facts (per Serving)

  • 450 calories
  • Total Fat: 25 grams
  • Ten grams of saturated fat
  • 100 mg of cholesterol
  • 800 mg of sodium
  • 35g of total carbohydrates
  • 4g of dietary fiber
  • 20g of sugars
  • 20g of protein

Talk to Us!

We really hope you like this dish as much as we do in our kitchen! Give it a try and, in the comments section below, let us know how it goes. Please feel free to distribute this recipe to your friends and family if you liked it. Your assistance helps us produce and distribute even more delicious recipes. Have fun in the kitchen!

Homemade Bread Recipe You’ll Never Buy Bread Again

Homemade Bread Recipe You’ll Never Buy Bread Again

You won’t want to purchase bread from the store again once you try this simple and tasty homemade bread recipe. Make fresh, handmade bread with a beautiful crust and soft interior by following these easy instructions.

Components

  1. Four tsp olive oil
  2. One tsp dry yeast
  3. One tsp salt
  4. One-third cup heated water
  5. 4.5 oz of regular flour

Getting Ready

Get the dough ready and mix the ingredients:

  • Fill a large mixing basin with flour. Add the salt, dried yeast, olive oil, and warm water.
  • Combine and Knead: Combine all ingredients and stir until well combined. Next, use your hands to knead the dough until it gets elastic and smooth.

Allow the Dough to Rise

  • First Getting Up: Place a fresh towel or plastic wrap over the dish and allow the Dough should rise for approximately an hour, or until doubled in size, in a warm location.
  • Form the Dough into a Cylinder: After the dough has risen, place it on a surface that has been lightly dusted with flour. Roll it into a cylindrical shape.
  • Separate and Shape Loaves: Cut the cylinder in half lengthwise. Form each component into a loaf.
  • Get ready to bake: After lining a baking sheet with baking paper, place the loaves on it. Score each loaf in a few small places on top and dust with flour.
    Prepare the Bread
  • Warm up the oven: Set the oven temperature to 200°C (392°F).
  • Bake: Bake the bread for about 30 minutes, or until it is golden, after placing the baking sheet containing the loaves in the oven. brown and produces a hollow sound when the bottom is tapped.

Chill and Present

  • Cool: Take the bread out of the oven and place it on a cooling rack to cool.
  • Serve: Cut your handmade bread into slices and top with your preferred toppings.

Nutritional Information

Not only is this handmade bread incredibly tasty, but it also makes a nutritious supplement to your meals. Based on 12 servings, the following is an approximation of the nutritional breakdown per serving:

  • 150 kcal of calories
  • 4g of protein and 3g of fat
  • 0.5g of Saturated Fat
  • 28g of carbohydrates
  • 1g of fiber
  • 1g of sugars
  • 200 milligrams of sodium
  • Vitamin A: 0% DV
  • Vitamin C: 0% DV
  • Calcium: 1% DV
  • Iron: 8% DV

In summary

You can have fresh bread right out of the oven with this simple and tasty homemade bread recipe. It’s ideal and easy to create. for every situation. You won’t want to purchase bread from the supermarket again once you try this recipe. Take pleasure in preparing and serving your loved ones with this handmade treat!

Apple Pie with Soufflé Cream Recipe

Apple Pie with Soufflé Cream Recipe

Ingredients:

  1. 20 cm diameter dough made with:
  2. 1 teaspoon baking powder and 250 grams of flour
  3. 90 grams of butter, plus a dash of salt
  4. Two yolks from eggs
  5. 40 grammes Sugar

for the Layer of Apples:

  1. Three apples, weighing around 500 grams each
  2. 40 grams of sugar
  3. 4–5 tablespoons lemon juice

For the Cream Soufflé:

  1. Two beaten eggs
  2. 40 grams of sugar,
  3. 1 teaspoon of vanilla sugar,
  4. and 400 grams of sour cream or natural yogurt
  5. thirty grams of corn starch

Baking Guidelines:

Getting the Dough Ready:

Combine flour, sugar, egg yolks, butter, baking powder, and salt in a bowl and stir until a dough forms. Refrigerate it for half an hour after wrapping it in plastic wrap.
Getting the Apple Layer Ready:

  • Slice the apples thinly after peeling and cored.
  • Combine the apple slices, sugar, and lemon juice in a bowl. Put aside.

A recipe for Soufflé Cream:

  • Beat the egg whites with the sugar and vanilla extract in a sanitized bowl until firm peaks form.
  • Smoothly combine yogurt (or sour cream) and corn starch in a separate basin. The beaten egg whites should be gently folded into the yogurt mixture.

Put Together and Bake:

  • Set the oven temperature to 170°C (338°F).
  • Roll out the dough and use it to line a pie dish with a 20 cm diameter.
  • The prepared apple slices should be arranged on the dough.
  • Over the apple layer, equally distribute the soufflé cream.
  • Bake for 40 to 45 minutes, or until the apples are soft and the top is golden brown, in a preheated oven.

Chilling and Presenting:

  • Allow the apple pie to cool completely after baking before slicing.
  • Cut into wedges and serve this delicious apple pie with Savoring the delicious tastes and smooth texture of soufflé cream!

Homemade Cheese Delight: 1 kg of Cheese from 2 Liters of Milk Without Vinegar or Citric Acid

Homemade Cheese Delight: 1 kg of Cheese from 2 Liters of Milk Without Vinegar or Citric Acid

It may seem intimidating to make cheese at home, but it’s actually quite easy! You can make 1 kg of wonderful handmade cheese from 2 liters of milk and only a few simple ingredients—neither vinegar nor citric acid are needed. Here’s how to enjoy fresh, healthful cheese straight from your kitchen, step-by-step instructions included.

1. Components and Tools

To begin, you will require:

  1. Two liters of fresh whole milk that hasn’t been too processed
  2. One cup of live-cultured plain yogurt
  3. 1/4 tsp liquid rennet (found online or at health food stores)
  4. One tsp salt
  5. Cheesecloth
  6. A big pot
  7. A liar

2. Getting the Milk Ready

Warm up the milk: Transfer the milk into a big saucepan and warm it gradually over a medium flame. Stir. sporadically to avoid burning or it sticking to the bottom. The milk should be heated to 32°C (90°F).

3. Including the Rennet and Yogurt

  • Add Yogurt: Ensure that the plain yogurt is well mixed in. The taste and texture of the cheese are derived via fermentation, which is aided by the living microorganisms present in the yogurt.
  • Add the rennet and dilute it with a little bit of cold, non-chlorinated water.
  • To ensure that the diluted rennet is distributed uniformly, add it to the milk mixture and stir gently for approximately 30 seconds.

4. Milk Curdling

  • Let It Rest: After covering the pot, leave it alone for approximately an hour. The milk will curdle and start to separate into liquid whey and solid curds during this period.

5. Taking the Curds and Cutting Them Up

  • Cut the Curds: Using a long knife, cut the curds into tiny cubes after they have formed. This facilitates the whey’s release. Prepare the Curds: Stirring carefully, cook the curds slowly to 38°C (100°F). For about half an hour, keep this temperature maintained. The curds will solidify and contract.

6. Pressing the Cheese and Draining

  • Drain the Whey: Carefully transfer the curds and whey into a colander that has been lined with cheesecloth. Allow the whey to run out, periodically using a spoon to squeeze the curds to assist
  • get rid of extra liquid. Salt and Press: Lightly stir the curds after sprinkling them with salt. Squeeze off as much whey as you can from the curds by gathering the cheesecloth around them and forming a ball. Wrapped curds should be placed beneath a weight. (such as a heavy saucepan) for many hours in order to condense and press the cheese more.

7. Consuming All of Your Cheese

  • Once you’ve pressed, remove the cheese’s wrapping and place it in a sanitized container. You may eat it right away or store it in the fridge for a few days to allow the taste to develop.

In summary
Producing delectable, fresh cheese at home without the use of vinegar or citric acid is a satisfying procedure. A simple, tasty cheese that can be eaten on its own or in a variety of meals may be made with only milk, yogurt, and rennet. Try this procedure and enjoy the satisfying taste of handmade cheese!

Discover the Delight of Purslane: A Tasty Turkish Recipe

Discover the Delight of Purslane: A Tasty Turkish Recipe

Have you ever used purslane in a recipe? This much-ignored plant, which is sometimes seen as a weed, is a nutritious powerhouse and may taste surprisingly good. I was first exposed to this adaptable item by my Turkish neighbors, who also showed me how to use it to make a meal that tastes better than meat. Here’s how to savor this tasty and nutritious plant at home.

1. Why did Purslane do this?
Omega-3 fatty acids, as well as minerals like calcium, potassium, and magnesium, as well as vitamins A, C, and E, are abundant in purslane. It adds a pleasant flavor and crisp texture to a variety of foods. It tastes somewhat acidic and lemony. It’s also very simple to grow and frequently available in markets and gardens.

2. Components of an Easy Purslane Recipe

To make a tasty dish with Turkish influences Purslane dish, you will require:

  1. Two cups of young purslane leaves with delicate stalks
  2. One big onion, diced finely
  3. two minced garlic cloves
  4. two medium-sized sliced tomatoes
  5. One-third cup olive oil
  6. One tsp of paprika
  7. To taste, add salt and pepper.
  8. Juice from lemons (optional)

3. Directions for Cooking

  • Get the purse ready: To get rid of any grit or grime, give the purslane a good rinse. Preserve the fragile leaves and stems and trim any tough ones.
  • Sauté the Garlic and Onion: Heat the olive oil in a big pan over medium heat. Add the chopped garlic and onion and sauté until aromatic and tender.
  • Add the Tomatoes: Cook the diced tomatoes for five to seven minutes, or until they begin to break down and produce a sauce.
  • When cooking purslane, add the purslane to the pan and thoroughly combine it with the combination of tomatoes. Add the pepper, salt, and paprika. Cook until the purslane is soft but still somewhat crunchy, approximately 5 minutes.
  • Finish with Lemon Juice: Right before serving, drizzle a little lemon juice over the dish to add even more flavor.
  • 4. Suggestions for Serving
    This is such a versatile meal made with purslane. It is delicious cold as a component of a cool salad or heated as a side dish. It tastes great on its own with a slice of crusty bread or as an accompaniment to fish or grilled meats.

In summary
Purslane is a tasty and healthy complement to any dish, with a distinct flavor that can compete with even the best
succulent meats. This easy yet tasty meal, with Turkish influences, is a great way to incorporate this amazing plant into your diet. Try it and savor the delicious tastes and health advantages of purslane!

Homemade Buttered Leavened Peels

Homemade Buttered Leavened Peels

Savor these mouthwatering homemade buttered leavened peels—they go well with any meal or occasion. You may stuff these easy-to-make, tender, buttery buns with whatever fillings you choose. To make a delicious treat for your family and friends, simply follow these simple instructions.

Ingredients:

  1. 1 tablespoon for brushing
  2. and ¾ cup warm milk
  3. One tsp sugar
  4. One tablespoon of dried yeast or 1.4 ounces of fresh yeast
  5. One cup and two sticks of butter
  6. One tsp salt
  7. ⅓ cup of oil
  8. 1/2 cup of water
  9. 7 ¼ cups of regular flour
  10. One yolk from an egg
  11. Sprinkle some sesame seeds on top.
  12. Fine salt, suitable for drizzling

Guidelines

Get the Yeast Going
Combine the yeast, sugar, and warm milk in a bowl. To give the yeast time to rise, let it rest for a minimum of ten minutes. In the meanwhile, put the butter in the fridge.

Get the dough ready.
Mix one teaspoon of salt and five hundred grams of flour in a big mixing basin. Blend well. Stir in the heated water, ⅓ cup of oil, and the active yeast mixture. Mix the batter until it becomes smooth.

Work up the Dough.
When the dough does not adhere to your hands, gradually add the remaining flour and mix. When the dough is ready, apply the remaining oil on it. For one hour, let the dough rise in a warm location covered with a towel.

Spread the Dough
Once the dough has risen, take it out of the bowl and roll it out on a surface dusted with flour. Roll the dough gently after grating in the frozen butter. Raise it up. The dough should be divided into five equal halves.

Form the Peels
Divide each portion into eight triangles after rolling it into a round. You can use any filling you choose, including processed or hard cheese, ham, sausage, or homemade sausage, to fill each triangle. Place each triangle on a baking sheet covered with baking paper after rolling it into a roll. For an additional thirty minutes, cover the rolls with a cloth and allow them to rise.

Cook the Peels
Set the oven temperature to 200°C (392°F). Brush the rising rolls with a mixture of one tablespoon milk and egg yolk. Add coarse salt and sesame seeds to taste. The rolls should be baked for 25 to 30 minutes, or until golden brown. After baking, take out take them out of the oven and allow to cool.

Assist
Warm peels can be served on their own or with your preferred spread. Savor the flaky, buttery flavor of these freshly prepared rolls!

Information on Nutrition
These savory and filling buttered leavened peels are a pleasure. Based on 16 serves, the following is an approximation of the nutritional breakdown per serving:

200 kcal of calories
Fat: 10g, Protein: 5g, Saturated Fat: 6g
24g of carbohydrates
1g of fiber
1g of sugars
200 milligrams of sodium
Vitamin A: 6 percent DV
Calcium: 4% DV
10% iron DV

In summary These delicious Homemade Buttered Leavened Peels are a great side dish or appetizer. They are simple to prepare and can be customized with your own fillings, so the whole family will love them. Savor them warm out of the oven and spread the happiness to those you care about.

No-Bake Chocolate Nutella Roll

No-Bake Chocolate Nutella Roll

Components:

  1. 350g of cookies
  2. 150 grams of melted butter
  3. 150g of gently warmed Nutella
  4. 3–4 tablespoons heated milk or cream
  5. Cold cream, 250 ml (33–34%)
  6. One hundred grams of powdered sugar
  7. One hundred grams of coconut flakes
  8. One or two bananas
  9. 50g chilled cream plus 1/2 teaspoon quick gelatin
  10. Eighty grams of white chocolate
  11. 50g chilled cream plus 1/2 tsp quick gelatin
  12. One hundred grams of dark chocolate

Guidelines:

  • Combine crushed cookies with melted butter.
  • Shape into a roll and chill for half an hour.
  • Beat together powdered sugar and chilled cream until stiff.
  • Sprinkle the coconut and banana on top of the biscuit foundation.
  • Cover and chill for thirty to forty minutes.
  • Blend 50g of cream with gelatin; set aside for five minutes.
  • Melt white chocolate and add gelatin; let cool for five minutes.
  • Heat dark chocolate and gelatin in a mixture of 60g cream and gelatin.
  • Roll in chocolate, then chill for ten minutes. Take off the clingfilm and serve cold!
  • Try this unusual dessert right now.

Baked Cauliflower Tastes Better Than Meat Crispy Roasted Cauliflower

Baked Cauliflower Tastes Better Than Meat Crispy Roasted Cauliflower

Especially when roasted to perfection, cauliflower has surpassed its reputation as an unremarkable, underappreciated vegetable and become a gourmet sensation. This recipe for Crispy Roasted Cauliflower is proof of the taste and adaptability of this underappreciated vegetable. This meal offers a crispy, savory experience that rivals any meat dish since it is infused with Parmesan and Italian spices. Its crispy texture and rich, savory flavor will win you over whether you’re a committed vegetarian or just trying to get more veggies in your diet.

  • Past Events
    A member of the Brassica family, cauliflower has been grown for generations. Originating in the Mediterranean area, it has long been a mainstay in several customary culinary traditions. Its versatility has led to its increasing global appeal over time.
  • nutritional advantages. Cauliflower is a staple in contemporary kitchens because roasting it brings out its inherent sweetness and adds a lovely crispness. This dish honors the traditional roasted cauliflower while enhancing it with modern tastes and methods.

Components

  1. One cauliflower head
  2. three lemon slices
  3. A few handfuls of dill 1/4 cup breadcrumbs from Panko
  4. one finely chopped garlic clove
  5. 1/3 cup of flour for all purposes
  6. three eggs
  7. Five tablespoons of olive oil
  8. One teaspoon of Italian herbs
  9. Several handfuls of finely chopped parsley
  10. Grated Parmesan cheese,
  11. one cup Add salt to taste.
  12. ground black pepper according to taste

Sauce:

  • one-third cup sour cream
  • half a cup of yogurt
  • finely chopped parsley
  • Black pepper and salt, ground
  • Juice from lemons

Guidelines

Get the cauliflower ready.

  • Cut the cauliflower into florets first. Get a pot ready. Bring a pot of salted water to a boil, then add the cauliflower florets, lemon slices, and a generous pinch of dill. After five minutes of boiling, strain and reserve. Before roasting, this procedure helps to soften and provide delicate aromas to the cauliflower.
  • Get the Coating Mixture Ready.
    Panko breadcrumbs, minced garlic, olive oil, Italian herbs, salt, crushed black pepper, chopped parsley, and grated Parmesan cheese should all be combined in a big mixing basin. Blend until well blended. This is the combination of breadcrumbs that will give the cauliflower its deliciously crispy covering.
  • Apply the Cauliflower Coat
    Arrange the bowl of breadcrumb mixture, the bowl of whisked eggs, and a plate of all-purpose flour to create a dredging station. First, coat each cauliflower floret with flour, then submerge it in the whisked eggs, and then cover it with the mixture of breadcrumbs. To get optimal crispiness, make sure to cover each piece equally.
  • Cook the cauliflower.
    Arrange the coated cauliflower florets onto a baking pan lined with parchment paper. Set the oven to 350°F (175°C) and bake the cauliflower for 20 minutes, or until it becomes crispy and golden brown. It will be difficult to wait for the completed dish once your kitchen is filled with the scent of the herbs and Parmesan.
  • Get the sauce ready.
    Make the sauce while the cauliflower bakes. Mix the yogurt, sour cream, chopped parsley, freshly squeezed lemon juice, salt, and ground black pepper in a small bowl. Blend well. The crunchy cauliflower is well complemented by this creamy, zesty sauce, which gives each bite a cool contrast.

Present and Savor

After baking, take the cauliflower out of the oven and allow it to cool somewhat. Serve the prepared sauce beside the crispy roasted cauliflower. If desired, garnish with more parsley. Savor this mouthwatering vegetarian dinner that will wow carnivores and vegans alike.

Nutrition Facts for Each Serving:

  • 220 calories
  • 10g of protein
  • 25g of carbohydrates
  • 3 grams of dietary fiber
  • 3g of sugars
  • 10g of fat
  • Three grams of saturated fat
  • 75 mg of cholesterol
  • 320 mg of sodium
  • Vitamin A: 8% Daily Value
  • 70% DV for vitamin C
  • 20% DV for calcium
  • 10% DV for iron

In summary
This recipe for Crispy Roasted Cauliflower is a delicious take on classic meat meals. It’s a unique meal that will leave you wanting more because of the herbs, Parmesan, and crunchy breadcrumb covering. Ideal for a supper on a weeknight or This recipe is guaranteed to become a family favorite when served as a side dish on a special occasion.

Incredible Krakow Cheesecake  Tasty and Easy to Prepare

Incredible Krakow Cheesecake  Tasty and Easy to Prepare

Are you prepared to take your taste senses on a gastronomic journey of discovery? You only need to look at the amazing Krakow Cheesecake! This dish is going to quickly become a favorite in your recipe collection since it is so flavorful and has the ideal ratio of sweetness to creaminess.

Ingredients

You’ll need the following to make your own masterpiece of Krakow Cheesecake:

Regarding the Dough:

  1. 300 grams of wheat flour,
  2. 60 grams of sugar
  3.  and 1.5 teaspoons of baking powder
  4. One pinch of salt
  5. 150 g of butter
  6. and 1 egg
  7. 50 grams of sour cream

Regarding the Filling:

  1. 120 g of raisins
  2. 500 g of cottage cheese,
  3. 3 eggs
  4. 120 grams of sugar
  5. 60 milliliters of milk
  6. 60 grams of corn starch
  7. One pinch of salt
  8. 10 g of vanilla sugar

Method by Step

combining the dough

Making the ideal crust for It’s easy to make your Krakow Cheesecake. Take these easy actions:

To prepare the dough, sift the flour and mix in the baking powder, sugar, and salt. Add the chilled butter in grated form to the batter and whisk well. Work the dough until it’s smooth after adding the egg and sour cream. Split the dough into two halves, cover one with clingfilm, and place it in the fridge for half an hour.
Fill the Baking Container: Slide the bigger piece of dough into the bottom of a baking container that has been lined with silicone paper. There’s no need to stress over creating the sides! Use a fork to pierce the dough to help it bake, and then chill it while you make the filling.

Getting the Filling Ready

  • Let the Raisins Soak: Soak the raisins in warm water first. In the interim, combine till smooth, combining the cottage cheese, milk, sugar, corn starch, salt, vanilla sugar, and egg yolks.
  • Add the Raisins: Drain the raisins and incorporate them into the filling ingredients until they are well distributed after the mixture is smooth.

Putting the Cheesecake Together

  • Get the egg whites ready: Form firm peaks with the egg whites by beating them.
  • Mix the Filling together: The egg whites should be gently folded into the filling mixture.
  • Incorporate the Upper Crust: Roll out the leftover dough and thinly slice it. Spread the strips across the cheesecake in a diagonal pattern.

Making the Cheesecake

  • Warm up the oven: Set the oven temperature to 170 degrees Celsius.
  • Bake until done: After assembling the cheesecake, bake it for about 50 minutes, or until the filling is set and the crust is golden brown. is ready.

Serving Ideas
After the Krakow Cheesecake cools, cut it into large slices and serve it with a dusting of powdered sugar or a dollop of whipped cream. Savor it with your morning coffee as a rich treat or as a lovely dessert!

Why Pick Cheesecake from Krakow?

  • Rich Flavor: Krakow Cheesecake has a rich and decadent flavor because to its creamy filling and buttery crust.
  • Simple Preparation: Krakow Cheesecake is a very simple dessert to prepare, even for inexperienced bakers, despite its sophisticated look.
  • Versatility: Krakow Cheesecake is a tasty delicacy that will satisfy any palette, whether it is eaten as an afternoon snack or as a sweet course to a dinner.

Advice for Making the Best Cheesecake:

  • Use High-Quality Ingredients To improve the flavor of your cheesecake, use premium ingredients such fragrant spices and fresh dairy.
  • Chill the Dough: To achieve a flaky and soft crust, refrigerate the dough before constructing the cheesecake.
  • Try Different Fillings: Experiment and add different fruits, nuts, or flavorings to your filling to make your Krakow Cheesecake your own.