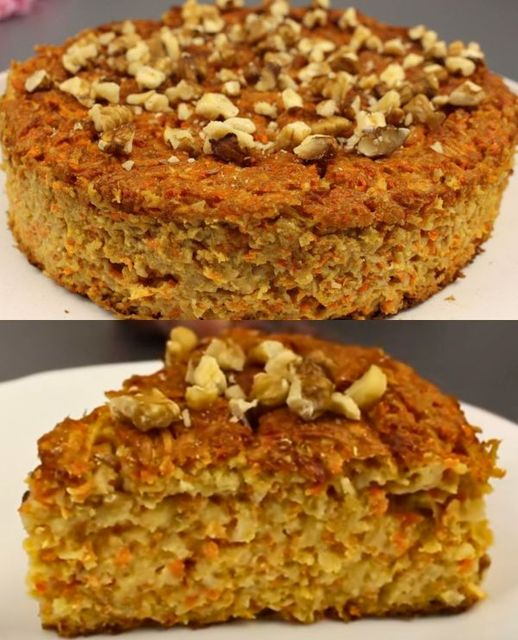
How to Make a Flourless Oatmeal and Carrot Pie – A Healthy Delight
Are you trying to find a tasty and healthful dessert that doesn’t include butter, flour, or white sugar? There’s nowhere else to look! This post will walk you through the process of making a delicious, tasty, and healthy flourless oatmeal and carrot pie. For people who wish to satisfy their sweet taste without sacrificing a healthy diet, this dish is ideal.
Components
- One cup, or around 130 grams, of oats: Oats make a dense, high-fiber basis for our pie.
- One cup (250 ml) natural yogurt: Natural yogurt gives the pie a creamy, tangy taste.
- Two units of eggs: Eggs support the structure of the pie and serve as a binding agent.
- Two tsp honey or syrup (about
Remove the foil and bake for an additional 15 minutes or until the top is golden brown.
Serve hot and watch your neighbors ask for the recipe!
- Get ready for the compliments!
50 g): For an enticing flavor, organically sweeten your pie with honey or syrup. - Two units of carrots (around 300 g): Carrots are a great source of vitamins and antioxidants in addition to adding a lovely orange tint.
- Two units of apples (around 320 g): Apples give extra nutrients and a touch of sweetness to the mixture.
- Walnuts (amount to taste for decoration): These will give your pie a nice crunch in addition to serving as decoration.
Process - After gathering all the necessary supplies,
let’s begin the detailed process:
Get the yogurt and oat mixture ready.
- Place the oats and natural yogurt in a bowl and let sit for approximately five minutes. This will provide a creamy foundation and help soften the oats. Include
- Remove the foil and bake for an additional 15 minutes or until the top is golden brown.
- Serve hot and watch your neighbors ask for the recipe!
-
Get ready for the compliments!
the Sweetener and Eggs
Then, combine the yogurt and oat mixture with the eggs and your preferred sweetener (honey or syrup). Make sure you stir everything well to include all of the ingredients. - Crate the carrots.
Grate the carrots finely and stir them into the mixture. Carrots give the pie a splash of color and a natural sweetness. - Slice and chop the apples.
Add the grated and peeled apples to the mixture. Apples give our pie moisture and a delicious taste. - Transfer the Blend into a Mold.
Line a pie mold with parchment paper or grease it. Evenly distribute the prepared mixture into the mold as you pour it in. - Use walnuts as decorations.
To enhance the taste and texture even more, scatter some walnuts over the Your bite will have a satisfying crunch as a result. - Cook to Glory
Set the oven temperature to 180°C (350°F), and bake the pie for 40 to 45 minutes. When a toothpick poked into the pie comes out clean, it’s done. - Give It Time to Cool
Let the pie cool completely before cutting. This will guarantee that it sets correctly and makes slicing easier.
In summary
Best wishes! You just made a delicious, decadent, and healthful flourless oatmeal and carrot pie. For anybody who enjoys a guilt-free dessert or who has dietary constraints, this dish is ideal.