Everyday Delight Cupcakes the Timplicity and Scrumptiousness

Everyday Delight Cupcakes the Timplicity and Scrumptiousness

Prepare to enjoy these cupcakes’ deliciousness and simplicity. You’ll want to prepare them every day!

Ingredients:

  1. two eggs
  2. 100 grams (4 tablespoons) of sugar
  3. One teaspoon of vanilla sugar
  4. A dash of salt
  5. Eighty grams of butter
  6. 130 milligrams of cottage cheese
  7. 150 grams flour, or 5. tablespoons or 0.90 cups
  8. One teaspoon of baking powder
  9. Eighty grams of raisins

Guidelines:

  • Beat eggs, sugar, and vanilla sugar in a bowl until frothy.
  • Add the cottage cheese, melted butter, and a dash of salt. Blend well.
  • Add the baking powder and flour gradually. Mix until well combined.
  • Add the raisins and fold.
  • Transfer the mixture into a 23 x 11 cm dish.
  • Bake for 35–40 minutes at 180°C (356°F), or until a toothpick inserted into the center comes out clean.

The Softest 5-Minute Cake in the World

The Softest 5-Minute Cake in the World

Uncover the mystique of this remarkably tasty and expedient cake!

Ingredients:

  1. three eggs, medium
  2. A dash of salt
  3. 150g of sugar and 8g of vanillin or vanilla sugar
  4. Lemon zest
  5. 120 milliliters of sunflower seed oil
  6. 150 milliliters of milk
  7. One hundred and fifty grams of flour
  8. Sweet yeast (16 grams)

Accents:

  1. Jam made with apricots
  2. grated coconut

Instructions:

  • Beat eggs till creamy in a bowl with sugar, vanilla sugar, and a touch of salt.
  • Stir in milk, lemon zest, and sunflower seed oil. Blend well.
  • Add the flour and sweet yeast gradually. Blend until well combined.
  • Transfer the mixture into a 27 x 28 centimeter mold.
  • Five minutes on high in the microwave (adjust the wattage if necessary; it may vary). Using a toothpick, make sure it comes out clean.
  • Allow the cake to cool.
  • Drizzle with apricot preserve and Add shredded coconut on top.
  • In only five minutes, savor the softest, tastiest cake you’ve ever had!

New York’s Famed Bakery Secret: Perfect Fudgy Brownies

New York’s Famed Bakery Secret: Perfect Fudgy Brownies

Find out how to make these incredibly fudgy brownies at home with only a few stirs!

Components:

  1. 90g of butter
  2. Two Eggs
  3. 110 grams of sugar
  4. 125g of 70% chocolate
  5. and 2g of instant coffee
  6. 64g of cake flour,
  7. 25g of brown sugar,
  8. 2g of vanilla extract,
  9. and 2g of salt
    Six grams of chocolate powder

Guidelines:

  • Combine 70% chocolate and melted butter.
  • Beat the eggs, sugar, brown sugar, vanilla extract, instant coffee, and salt together in a another bowl.
  • Mix the egg mixture with the melted chocolate mixture.
  • Add the chocolate powder and cake flour and sift. Mix until barely incorporated.
  • Fill a baking pan that has been oiled with batter.
    Bake for 20 to 25 minutes at 175°C (347°F), or until a toothpick inserted into the center comes out slightly moistened.
  • Before slicing into deliciously fudgy brownie squares, let it cool.
  • Savor the Experience the renowned New York bakery right in your own kitchen!

Homemade Delight Easy Recipe for Soft and Scrumptious Cinnamon Rolls

Homemade Delight Easy Recipe for Soft and Scrumptious Cinnamon Rolls

Have you ever yearned for the cuddly, reassuring hug of a hot cinnamon roll? You can make a batch of these delicious sweets in your own kitchen with only a few simple ingredients and a dash of love. Come along as we reveal the techniques for making the ideal cinnamon rolls that will tickle your taste buds and make you feel warm within.

Getting All of the Ingredients Ready

  1. 230 milliliters of heated milk
  2. One and a half tablespoons sugar
  3. Two tablespoons (8g) of dry yeast
  4. One egg
  5. 8g of vanilla sugar, 1 tsp
  6. One tsp salt
  7. 360g or two cups and 3/4 of wheat flour
  8. Two tablespoons of room-temperature butter
  9. Cinnamon and sugar to sprinkle

instructions

  • combining the dough
  • Heat the milk and mix it with the Salt, sugar, egg, dry yeast, and vanilla sugar. Stir until every item is well combined.
  • Stirring constantly, gradually whisk in the wheat flour as the mixture comes together to make a smooth dough. It’s time to roll up your sleeves and knead the dough by hand until it reaches the ideal consistency, after it gets too heavy to stir.
  • Allowing the Dough to Relax
    Once the dough has been kneaded, form it into a ball and transfer it to a basin. Let the dough rest in the basin for approximately half an hour by covering it with plastic wrap. This gives the yeast the chance to do its magic and produce a texture that is light and fluffy.
  • After letting the dough rest, carefully press it to get rid of any air bubbles. Separate the dough into 12 equal halves.
  • parts, forming each into a ball. To keep the dough balls from drying out, place them on a surface dusted with flour and cover with plastic wrap.
  • Getting Ready for Baking
    To make sure your oven is nice and toasty for baking, preheat it to 180ºC. Roll each ball of dough into a disc form, then use a knife to cut the center of each disc three times in a parallel fashion. Lay out the prepared dough on a baking sheet, allowing room for each roll to expand during baking.
  • Baking to a Perfect Finish
    Place the baking sheet in the oven that has been warmed, and bake the rolls for about 15 to 20 minutes, or until they are a beautiful golden brown. Watch them closely to avoid over-browning and make sure they comen out very soft and tender.
  • Putting the Finishing Touch
    When the rolls are perfectly cooked, take them out of the oven and dust them with a cinnamon-sugar mixture. This last step gives your cinnamon rolls an additional layer of warmth and sweetness, taking them to a totally wonderful new level.

Providing and Gratifying
The best part is about to happen: you get to serve and savor your freshly made cinnamon buns! These tender and aromatic sweets will make you smile and feel warm inside, whether you eat them for breakfast, lunch, or dessert. Pour yourself a cup of tea or coffee, gather your loved ones around, and enjoy every delicious mouthful.

Discover the Easy Homemade Puff Pastry Secret

Discover the Easy Homemade Puff Pastry Secret

You won’t believe how easy and tasty this quick approach is for creating your own puff pastry—you don’t even need eggs!

Components:

  1. 100 grams of butter without salt
  2. One and a half teaspoons of salt
  3. 500 grams of flour for bread
  4. Two hundred grams of water
  5. 250 grams of special butter or margarine (available online) to make puff pastry

Guidelines:

  • Combine the bread flour, salt, and unsalted butter.
    Once you have a smooth dough, gradually add water to the ingredients and continue to knead.
  • Roll out the dough to a rectangle with a thickness of around 1/4 inch.
  • Evenly coat two thirds of the dough with margarine or special puff pastry butter.
  • The uncooked third of the dough should be folded over the greased portion, and the remaining third should be folded over the top in a manner akin to letter folding.
  • Again, use the folded dough to roll it out into a rectangle.
  • After folding the dough once again, let it cool in the fridge for approximately half an hour.
  • The dough should be rolled and folded twice more, with a 30-minute chill in between.
  • You may now use your puff pastry in your preferred pastry recipes!
  • Savor your freshly baked puff pastry and ask yourself why you didn’t attempt this technique earlier!

 Delight in this 3-Ingredient Soft Date Cake – No Flour, No Gluten, No Sugar

 Delight in this 3-Ingredient Soft Date Cake – No Flour, No Gluten, No Sugar

Savor this delectable and moist date cake, created with only three simple ingredients! While the coconut cream offers a thick texture and the almond butter adds smoothness, the dates’ inherent sweetness is still evident. For anybody searching for a flavorful dessert that is free of gluten, sugar, and wheat, this cake is ideal.


Ingredients:

  1. 200g almonds
  2. and 250g dates
  3. – Four eggs

Guidelines:

Set oven temperature to 350°F, or 180°C. Line and grease a cake pan.
2. Remove date pits and let soak in boiling water for fifteen minutes before draining.
3. Process the dates and almonds into a smooth paste.
4. Include the eggs and mix until thoroughly mixed.
5. Fill the prepared pan with batter.
6. Bake for twenty to thirty minutes, or until a toothpick inserted into the center comes out clean.
7. Wait to slice till it cools.

Guidelines for Storing:

  • The cake may be kept in the fridge for up to five days if it is kept in an airtight container.
  • Before serving, defrost in the fridge for one night after freezing for up to two months.
  • Savor your tasty and nutritious date cake!

Place a container with salt in the bathroom, and watch household issues vanish completely.

Place a container with salt in the bathroom, and watch household issues vanish completely.

Parts:

  1. A little quantity of baking soda
  2. One hundred grams of coarse sea salt

Together with baking soda, which is renowned for its purifying qualities, you have a potent combination that not only makes the air seem cleaner but also enhances wellbeing.
How to Make Your Own Peace is Given Here. Bringing in

Combination: You’ll require:

  1. One hundred grams of sea salt, coarsely ground
  2. A little quantity of baking soda
  3. A pretty dish or a little, open container

Guidelines:

  • Combine the ingredients: Mix the sea salt and a little pinch of baking soda in a bowl. It just takes about a spoonful of baking soda to thoroughly combine with the salt.
  • Select a Location: Find an appropriate location for the container in your bathroom and fill it with the mixture. The container should match your dcor. The warmth and humidity in the bathroom aid in releasing the healthy qualities of the baking soda and salt.
  • Allow It to Operate: Place the container where you’ve decided. All you have to do is let the concoction settle and work its magic. It is said that the mixture will attract contaminants and bring the space’s energies into harmony.
  • Refresh as necessary: Every several weeks, or to preserve the mixture’s efficacy, it’s a good idea to change it if it seems wet or clumped. Additionally, it guarantees that your area will always be a tranquil and rejuvenating haven.

This easy fix is a fun way to infuse your house with a feeling of peace and tidyness. It’s simple, affordable, and makes use of common natural components that most people already have. If you give it a try, you could notice a little but enjoyable improvement in the atmosphere of your house. Take pleasure in the tranquility you’ve contributed to by adding a small amount of baking soda and salt!


Secret that Dentists don’t want you to know: Remove Tartar and Teeth Whitening in just 2 minutes

Secret that Dentists don’t want you to know: Remove Tartar and Teeth Whitening in just 2 minutes

Components::

2 tablespoons of bay leaf powder
1 teaspoon of salt
2 teaspoons of lemon juice
1 teaspoon of honey
2 teaspoons of toothpaste

Get the Combination Ready.

  • To begin, finely ground the dried bay leaves and cloves. For this, a mortar and pestle or a spice grinder would work well. In a small dish, combine the bay leaves and powdered cloves.
  • Create a Paste To make a paste, add a few drops of water to the powder combination. You want the paste to be thick enough to adhere to your toothbrush, so take care not to add too much water.
  • Make sure to brush your teeth. Brush your teeth as usual after dipping your toothbrush into the paste. Be sure to brush all regions of the affected area completely and softly. your dental health. Concentrate on the regions that have discolored and built-up tartar.
  • Rinse well. Rinse your mouth out with water after brushing for around two minutes. Your teeth should feel and appear cleaner and brighter. You should notice a change.

Advantages of Using Natural substances:

  • This approach makes use of natural substances instead of harsh chemicals like those present in certain commercial items.
  • Cloves have antibacterial properties that aid in the destruction of microorganisms that lead to foul breath and other oral health problems.
  • Mild Abrasive: Bay leaves have a gentle abrasive effect on teeth, assisting in the removal of surface stains and tartar.
  • Fast and Simple: You may quickly implement this 2-minute strategy into your everyday routine.

Additional Advice

  • on Consistent Brushing for Oral Health: Clean your Using fluoride toothpaste, brush your teeth at least twice a day to avoid tartar accumulation.
  • Floss Every Day: Flossing helps clear the gum line and spaces between your teeth of food particles and plaque.
  • Keep Yourself Hydrated: Drinking lots of water helps keep your mouth clean by removing germs and food particles.

Cloves and bay leaves are an easy-to-make, all-natural approach to improve your teeth-whitening and tartar-removal regimen. With a healthier smile and whiter teeth in only two minutes, this simple technique may be a wonderful addition to your regular dental care routine. Try it out and witness the incredible outcomes for yourself!

How to grow endless amounts of ginger at home.

How to grow endless amounts of ginger at home.

When you’re prepared to go on this thrilling journey, here’s a short guide to help you cultivate an infinite supply of ginger in the convenience of your own home.

Make sure you have the following before you start:

  • Organic Ginger Root: Growth inhibitors can be used to cure non-organic kinds. A shallow pot that is broad
    Rich in organic matter potatoes

Before planting your ginger, you must perform the following:

  • Choose the appropriate root: Choose an organic ginger root that is fresh and plump, ideally with little bumps that will grow or eyes that can be seen.
  • Soak the Roots: Take an overnight warm bath with your ginger root. In this stage, dormant buds are activated and any remaining inhibitors are helped to dissolve.
    When your ginger root is prepared to sprout, plant it. Place it in
  • your preferred pot. How to do it is as follows:
  • Load the container with organic soil that is high in nutrients, leaving a few inches on top.
  • With its eyes facing up, plant the ginger root horizontally in the earth.
  • Make sure the eyes of the ginger root are not buried too deeply by gently covering it with a thumb or two of dirt.
  • Make sure the soil around your ginger plant is damp but not soggy when you water it.

For your ginger plant to grow and thrive, proper maintenance is required. Here are some pointers:

  • Temperature: Maintain a constant temperature range of 65-85°F (18-29°C) for Ginger, since she like a hot and muggy atmosphere.
  • sunshine: Give your ginger plant six to eight hours of filtered or indirect sunshine each day.
  • Watering: Water the soil on a regular basis to keep it hydrated. anytime it appears like the top thumb of your plant is dry. Refrain from overwatering ginger roots since they might decay in wet weather.
  • Fertilization: To encourage healthy development, fertilize your ginger plant every two to three months with a balanced organic fertilizer.
  • Be patient. Since ginger grows slowly, you’ll need to be patient and give it the time and attention it needs to flourish.
    Ginger typically takes eight to ten months to fully develop.

The following is how to gather your own ginger:

  • distributing the dirt around the base gently.
  • Carefully remove the ginger plant from the ground using a garden fork or your hands, taking care not to harm the roots.
  • Choose mature rhizomes, or subterranean stems, chopping off what you don’t need, then replanting the rest to encourage more development.
  • Right now Now that you have your own ginger, the options are virtually limitless. You may savor the taste, scent, and health advantages of your handmade ginger whether you use it for cooking, making tea, or creating homemade treatments. Use your imagination, try up some new dishes, and feed your loved ones and friends enough!
    Why then wait? Begin your journey of cultivating ginger today and enjoy the delight of always having a supply of this amazing spice at your fingertips. Happy expansion!

Vegetable Pancakes: A Healthy Twist to Your Meal

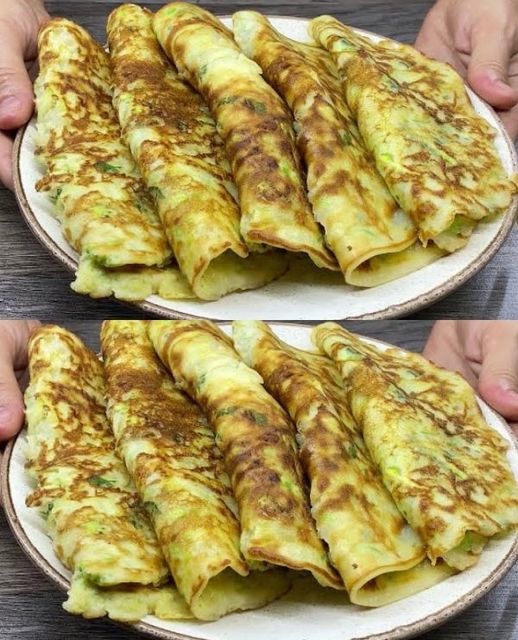
Vegetable Pancakes: A Healthy Twist to Your Meal!

Imagine smelling the delicious scent of freshly made veggie pancakes as you wake up. These savory treats are the ideal option for a filling breakfast or brunch because they are not only delicious but also healthy. This post will explain how to make vegetable pancakes with basic ingredients like potatoes, onions, and zucchini. Prepare yourself for a gastronomic journey that will satiate your hunger and please your senses!

Components

These delicious veggie pancakes require the following ingredients to make:

  1. One zucchini
  2. two medium-sized potatoes
  3. One huge onion
  4. vegetable-based cooking oil
  5. Add salt (to taste).
  6. three eggs
  7. 200 milliliters, or 3/4 cup milk
  8. 130 g (1 cup plus 2 tablespoons) flour
  9. One tsp baking powder
  10. (Optional) coriander
  11. Herbs (according to taste)

Setting Up the Season and Dough Grates:

  • To begin with, Grate potatoes and zucchini into a basin. Add some salt to them and stir thoroughly.
  • Fry the Onion: In a skillet with hot oil, cook the finely chopped onion until it turns golden brown. To make the batter, whisk the eggs in a another bowl and stir in the milk, flour, baking powder, and salt. Blend until well combined.
  • Mix the ingredients together: Grated potatoes and zucchini should be added to the batter. Stir in the chopped herbs and fried onions.
  • Shape and Fry: Preheat a pan’s oil. Form the pancake batter into patties using a ladle. Fry, brushing with a little oil, till golden brown on all sides. Also see Stovetop Milk Bread to savor the fluffy, soft treat.
  • Cooking the Pancakes in Fry
    The secret to perfectly fried pancakes is obtaining the golden crust that is so alluring. Prior to adding the batter, ensure that the oil is sufficiently heated. Make sure the pancakes have enough room to fry evenly by cooking them in batches. Pancakes should not be overcrowded since this may cause them to get mushy. After cooking, move the pancakes to a dish covered with paper towels so that any extra oil may be drained off.
  • Providing loving service
    The greatest part is about to begin: lovingly serve your delectable veggie pancakes! To add even more flavor, arrange them on a dish and top with fresh herbs. These pancakes are great with yogurt, sour cream, or your preferred dipping sauce. These veggie pancakes are a hit whether they are eaten for brunch, breakfast, or just as a satisfying snack.

Why Do Vegetable Pancakes Exist?
Pancakes with vegetables are not  just tasty but also quite adaptable. They let you sneak more veggie servings into your diet without sacrificing flavor. They are also a fantastic way to use up things you have remaining in your refrigerator. Vegetable pancakes are an excellent alternative for anybody searching for a nutritious breakfast, whether it a vegetarian or vegan one.

Advice on Making the Best Pancakes

  • Grate the Vegetables: For a smoother texture, be sure you grate the potatoes and zucchini finely.
  • Modify Seasoning: Before frying, taste the batter and make any necessary adjustments to the seasoning. Control the Oil Temperature: To guarantee that pancakes are cooked uniformly, keep the oil temperature constant.
  • Try Different Flavors: You may alter the pancake’s flavor by adding your preferred herbs and spices.
  • Cheesy Pancakes: For an even more decadent treat, add grated cheese into the batter. For a spicy twist, add some chopped chili peppers or paprika to the pancake mixture.
  • Whole Wheat Pancakes: For a healthy option, replace a portion of the flour with whole wheat flour.
  • Sweet Pancakes: Grated carrots or sweet potatoes can be added to the batter to provide a hint of sweetness.

Advantages for Health
Vegetable pancakes are not only tasty, but they are also quite healthy. They are brimming with fiber, vitamins, and minerals, among other vital components. Increasing the amount of veggies in your diet will help your general health and wellbeing. In addition, compared to regular pancakes, vegetable pancakes have fewer calories and fat since they are baked.