Easy Apple Cake Recipe Delicious Dessert for Any Occasion

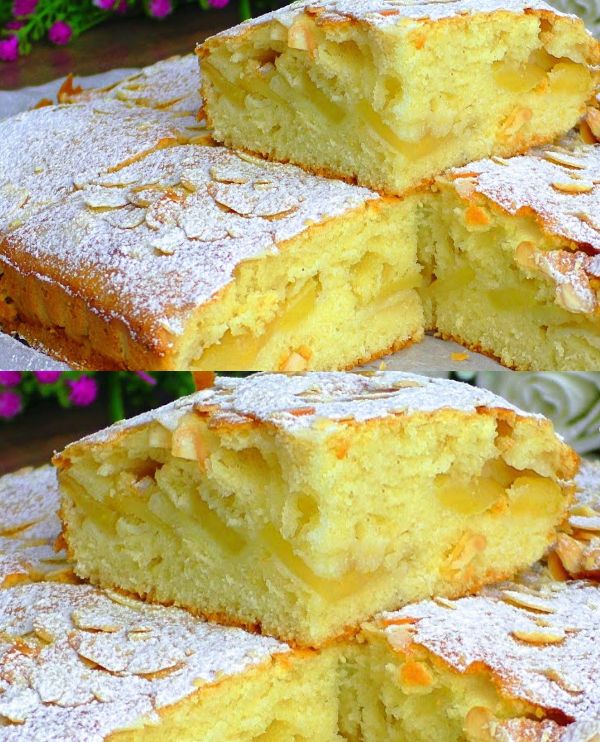
Easy Apple Cake Recipe – Delicious Dessert for Any Occasion

Are you prepared to go on a gastronomic journey that fuses the ease of baking with the sweetness of apples? You’re going to enjoy yourself if you’re nodding along! We’re going to try a delicious meal today that will hopefully entice your palate and quench your need for sweets. Prepare to create some culinary magic in your home with this simple and affordable apple cake recipe.

Overview
Imagine the scent of freshly cooked apples filling your home and luring you in for a taste. That’s the beauty of our apple cake recipe—it’s inexpensive, simple, and really tasty! This dish is sure to wow even the most experienced baker or kitchen beginner. Now put on your baking gloves and let’s get started!

Components

  1. One hundred milliliters of milk
  2. Soft wheat flour, 80 grams
  3. grams of butter, melted
  4. 25 grams of stevia sweetener (or 50 grams of regular sugar as an option)
  5. two eggs
  6. Two little apples, or four huge apples
  7. One tsp baking powder
  8. ½ lemon zest, grated ½ lemon juice

Getting Ready

Let’s get started on making this delicious dessert step-by-step:

Blending the Cake

  • First things first: break the eggs into a basin, stir well, and season with salt. Set your oven’s temperature to a warm 180°C while you’re at it. When the eggs are foamy, gradually whisk in the milk, the sugar or sweetener, and the lemon zest. Blend everything until a smooth batter is achieved.
  • Including the Apples
    Let’s now give those fruits some affection! To keep them from browning, peel, thinly slice, and sprinkle with lemon juice. Make sure the apple pieces are uniformly distributed by gently folding them into the batter. For the ideal rise, don’t forget to add the baking powder!
  • Making the Cake
    Using a spatula, level the top of the batter after pouring it into a rectangle mold that has been lined with parchment paper. For an added indulgent touch, drizzle the remaining melted butter over the surface. Place it in the oven and bake for 55 minutes, or until it becomes irresistibly golden brown.
  • Last Words
    It’s time to add the final touches to your kitchen after the delicious aroma of freshly baked apples fills the space. Dust off your cake, then slice it up and present it with a grin after dusting it with powdered sugar for a hint of sweetness.
  • Serving Ideas
    This apple cake is ideal served with a scoop of vanilla ice cream or a dab of whipped cream. Drizzle each slice with some warm caramel sauce for an extra-special treat. This cake is going to make you happy whether you’re eating a slice by yourself or with pals over coffee!

Flourless Oatmeal Bread Recipe For A Healthy Breakfast No Butter, No Kneading

Flourless Oatmeal Bread Recipe For A Healthy Breakfast No Butter, No Kneading

Are you sick of consuming the same old morning foods that make you feel lethargic? It’s time to add some nutrition and taste to your diet with this recipe for flourless oatmeal bread! This bread is really simple to make and full of healthy components. It’s the ideal choice for a quick and healthful breakfast because it doesn’t use butter and doesn’t need to be kneaded.

Ingredients You’ll need the following to prepare this flourless oatmeal bread:

  1. One cup of 90 g oat flakes
  2. A small amount of salt
  3. One tsp baking soda
  4. two tsp mixed seeds
  5. 200 ml (about 3/4 cup) of yogurt or kefir
  6. one medium-sized egg
  7. One tsp of vinegar made from apple cider
  8. As decorations, seeds

Getting Ready

  • Combining the Substances
  • Set the oven’s temperature to 180°C/360°F.
  • Combine in a mixing bowl the mixed seeds, baking soda, salt, and oat flakes.
  • Whisk the egg, apple cider vinegar, and kefir or yogurt in a another dish.
  • After adding the wet components to the dry ingredients, thoroughly mix them together.
    Making Baking
  • A 20 x 10 cm / 8 x 4 inch baking form should be greased.
    Smooth the top of the batter after pouring it into the prepared baking form.
  • Add some decorative seeds on top.
  • A toothpick put into the center of the bread should come out clean after baking it for 30 to 35 minutes, or until it is golden brown.

Refrigeration
After baking, take the bread out of the oven and let it cool for a few minutes in the pan.
Before slicing, move the bread to a wire rack to cool fully.

Serving Cut the

Serve flourless oatmeal toast with your preferred toppings, such jam, nut butter, or avocado. Savor it with a cup of tea or coffee for a filling and healthy morning!

Advantages for Health
In addition to being tasty, this flourless oatmeal bread is loaded with health advantages. Fiber from oats is excellent for supporting digestive health and helping you feel full and content. The seeds also provide some protein and good fats, which makes this bread a complete breakfast choice.

Changes
You are welcome to alter this recipe to your own tastes. To alter the flavor profile, add items like spices, nuts, or dried fruits. Try utilizing several kinds of seeds or experimenting with different seed mixtures. of yogurt to provide some extra diversity.

In summary
To sum up, this recipe for flourless oatmeal bread is revolutionary for anyone trying to get a good start to the day. It’s the ideal choice for a quick and healthful breakfast because it just requires a few basic ingredients and is simple to make. Try it and discover for yourself how tasty and fulfilling it can be!

Unbelievably Delicious Chicken Drumsticks Quick, Affordable, and Irresistible

Unbelievably Delicious Chicken Drumsticks Quick, Affordable, and Irresistible!

INGRIDENTS

  1. Two tablespoons tomato paste,
  2. three tablespoons olive oil,
  3. and seven chicken drumsticks
  4. Curry, thyme, black pepper, and salt
  5. 200 milliliters of boiling water,
  6. three potatoes,
  7. four carrots,
  8. one red onion,
  9. and one paprika
  10. Five garlic cloves,
  11. one onion,
  12. one zucchini,
  13. one eggplant,
  14. and one hundred milliliters of tomato sauce


Guidelines:

  • Set oven temperature to 190°C/375°F.
  • Combine tomato paste, olive oil, curry powder, black pepper, and thyme in a bowl.
  • Use the mixture to coat the chicken drumsticks.
  • Put the drumsticks in a dish that has been baked.
  • Fill the dish with boiling water.
  • Chop the red onion, garlic, paprika, potatoes, carrots, zucchini, and eggplant into bite-sized pieces.
  • Surround the drumsticks in the dish with the vegetables.
  • Pour tomato sauce all over the place.
  • Add salt for seasoning. curry, thyme, and pepper.
  • Bake the dish for 45 minutes with the foil covering it.
  • Take off the foil and bake for a further fifteen minutes, or until the vegetables are soft and the chicken is crispy.


Whisk Banana with Cookies You’ll be Amazed Delicious Dessert in 5 Minutes Without Baking

Whisk Banana with Cookies You’ll be Amazed Delicious Dessert in 5 Minutes Without Baking

Who doesn’t enjoy a simple, quick dessert fix? Particularly when it involves the delectable pairing of cookies and bananas. We’ll explore a straightforward yet delicious dessert dish in this post that will entice your palate and leave you wanting more. Prepare to make a delicious dessert in under five minutes!

Ingredients:

  1. two bananas
  2. 120 grams of cookies
  3. 35 grams of butter
  4. 75 grams of whipped cream
  5. 200 grams of concentrate milk
  6. 35 grams of sugar
  7. refined sugar
  8. Flakes of chocolate

Guidelines

Let’s examine the procedures for making this delicious dessert:

  • Smashing the Biscuits
    Scoop up a few of your preferred cookies and put them into a plastic bag. Crush them into tiny crumbs with a rolling pin. This step gives our dessert a delicious crunch.
  • Setting Up the Base
    Using a potato masher, put the mashed bananas and crumbled cookies in a mixing basin. After thoroughly mixing, pour the batter into a circular cake pan to create the foundation.
  • Preparing the Creamy Filling
    Melt the butter and sugar together in a saucepan. After melting, thoroughly combine with the milk concentrate. Simmer it for around five minutes, stirring all the time. This will be our dessert’s filling, this creamy mixture.
  • Putting the Dessert Together
    Over the prepared cookie and banana foundation in the cake pan, pour the creamy mixture. For an additional taste boost, arrange slices of banana on top.
  • Using chocolate flakes for decoration
    Beat the cream with a teaspoon of powdered sugar in a separate bowl.
  • until firm peaks start to form. Drizzle the completed dish with this deliciously creamy mixture. For a delicious garnish, generously sprinkle chocolate flakes on top.
  • Serving Ideas
    After assembling, place the dessert in the refrigerator for a short while to let it solidify. To enjoy the greatest flavor, serve cold. You may also experiment with different toppings, such as more fruits or a caramel sauce drizzle.

In summary
You’ve made a delicious dessert that will satisfy even the pickiest eaters in only five minutes. It’s impossible to resist the mix of cookies, bananas, and creamy delight. Why then wait? Make this delicious dessert now and experience ultimate happiness!

Incredibly Delicious Apple Pie: A Homemade Delight!

Incredibly Delicious Apple Pie: A Homemade Delight

With flour, some magic, and some crisp apples in your hands, you enter your kitchen. These basic components may be turned into a delicious apple pie that will definitely be the star of any event with only a few easy steps. Together, let’s go on this culinary adventure and learn the techniques for making the most amazing apple pie!

Components

  1. three thinly sliced apples
  2. 300 grams of flour
  3. 180 milliliters of milk
  4. 70 grams of butter
  5. three eggs
  6. 130 grams of sugar, or erythritol
  7. ten grams of baking powder
  8. One tsp vanilla sugar
  9. One dash of salt
  10. Sufficient icing sugar
  11. Sufficient almonds, flakes (optional)

Getting ready:

  • In Detail Perfect for Whipping Up the Batter Commence: Split those eggs into a basin. Add a splash of vanilla sugar, sweetener (or sugar), and a touch of salt.
  • Whisking Wonders: Using an electric whisk, beat the mixture until it becomes frothy and white, resembling a cloud.
  • How to Make the Optimal Crust with Flour Power: Sieve the flour and baking powder and then slowly stir them into the egg mixture.
  • To make Buttery Bliss, melt butter in a pot, then whisk in milk. Mix this into the batter to create a velvety, rich consistency. Stacking with New Apples
  • Prepare and Peel: Cut your apples into thin, delicious slices after peeling.
  • Layering Love: Fill a mold halfway full of batter, arrange apples on top, and then pour remaining batter on top. Remember to include the optional flakes of almond for an greater crunch!
  • Preheat and Bake: Bake the pie for 40 minutes, or until it’s aromatic and golden brown. Preheat your oven to 180°C.
  • Final Details
    Dust the pie with powdered sugar to provide a delicate and elegant touch.
    Providing and Gratifying
  • Slice & Serve: Cut into thick slices, serve hot, and observe the joyous expressions on your visitors’ faces.

Embrace the Art of Hand-Rolled Crispy Pastries A Timeless Recipe

Embrace the Art of Hand-Rolled Crispy Pastries A Timeless Recipe

Ever wanted a golden, crispy pastry that would melt in your lips with every bite? Come explore the wonders of hand-rolled crispy pastries. A culinary journey that blends ease of preparation with mouthwatering flavor.

Components

Before you begin, gather some basic yet necessary items for pastry making:

  1. two glasses of water
  2. two eggs
  3. One yolk of an egg for spreading
  4. One tsp salt
  5. Five and a half teaspoons of flour
  6. 125 grams of margarine or dairy butter
  7. 200 grams of cheese from cows

combining the dough

  • Mix the eggs and water in a bowl, then gradually stir in the sifted flour and salt. Mix until a dough that is cohesive forms. By hand, knead the dough until it is smooth and comes away from your hands and the bowl.
  • Split the dough in half. divide evenly in half, then roll each half into a thin crust. Evenly cover the surface with softened butter or margarine, then fold the dough in half like an envelope. Continue folding, buttering in between each fold, until you have a small, rectangular shape. Put the dough in the fridge for one hour.
    Getting the Filling Ready
  • Cut the dough into squares after rolling it out into a large rectangle. Put the crumbled cheese in the middle of each square.
  • Putting together
    Press down hard to seal the edges of the dough pieces as you enclose the cheese. Place the pastries in an arrangement on a parchment paper-lined baking tray.
  • Making Baking
    For a golden finish, beat the egg yolk and brush it over each pastry. Bake for one hour at 200 degrees Celsius in a preheated oven. Bake for 20 to 25 minutes, or until golden brown.
  • Check out this amazing recipe for chicken that will wow your guests!
  • Getting in touch Warm up the crispy pastries and let their enticing scent fill the air around you. Savor each crunchy, cheesy mouthful while pairing with your preferred beverage.

In conclusion,

hand-rolled crispy pastries are a celebration of custom, skill, and the happiness that comes from indulging in little things rather than merely being a recipe. Accept the challenge of pastry-making and savor the joy of producing something genuinely unique. 

New Dessert in 5 Minutes Try These Delicious No-Bake Treats

New Dessert in 5 Minutes Try These Delicious No-Bake Treats

The delight of biting into a rich dish without having to wait for it to bake comes to mind. That’s what makes these simple, no-bake sweets so delicious! You may quickly and easily make a magnificent mixture that will sate your sweet tooth in a matter of easy steps.

Components

  1. 350 grams of biscuits
  2. 85 grams of peanuts, ground
  3. 85 grams of sugar
  4. A 180-milliliter sweet cream
  5. One 10-gram bag of vanilla sugar (optional)
  6. 45 grams of powdered cocoa
  7. One hundred and ten grams of butter


Regarding the glaze:

  • 90 grammes of milk chocolate
  • 30 grams of dark chocolate
  • 30 grams of vegetable oil
  • 70 grams of ground peanuts

Method:

  • Blending the Components
    Break apart the biscuits: Using your hands or a pestle and mortar, break the biscuits into small bits first.with a blender.
  • Mix in the ground peanuts by grinding them and adding them to the broken biscuits.
  • Get the chocolate mixture ready by:

In a saucepan, combine sugar and cocoa powder; whisk until well combined. Add the sweet cream gradually, stirring constantly, until the mixture is smooth.

  • Forming the Sweets
    Add butter and sugar for vanilla extract. To the chocolate mixture, add the butter and vanilla sugar, and whisk until smooth and melted.
  • Mix in biscuit mixture: After adding the chocolate mixture to the dish with the crushed biscuits and peanuts, thoroughly mix everything together. Putting something in the freezer
  • Form the sweets: Press the mixture into a mold, roll it into balls, or pour it into silicone molds of your choosing. Make sure the mixture is compacted to prevent voids.
  • Put in the freezer to chill: Location the desserts in the freezer to set for approximately one hour.

Creating the Glaze

Get the glaze ready: Combine vegetable oil, milk chocolate, and dark chocolate to melt them. Blend in the ground peanuts until smooth.

Last Words

Cover the sweets: After removing the cold desserts from the molds, drizzle the glaze over them.

Serving Ideas

Take pleasure in your creations: Present these delicious candies on a tray and savor their rich, chocolaty flavor. For the perfect dessert, serve them with a scoop of vanilla ice cream or a glass of cold milk.
In summary
You can quickly prepare a batch of these delicious no-bake sweets in a matter of minutes.

Mexican Tater Tot Casserole

Mexican Tater Tot Casserole

I looked in every store in my neighborhood, but nothing was there. All they had was the chopped hashbrowns. A fresh thought came to me when I saw the Tater Tots. Put an end to the notion of hashbrown casserole and introduce Tater Tot casserole. It was a big success!

Components

A pound of lean ground beef

  1. one sliced onion
  2. One sliced red pepper
  3. One sliced orange pepper
  4. sliced yellow pepper
  5. One bundle Taco Adding flavor
  6. 1 jar (394 ml) of queso
  7. one-third of a kilogram bag of frozen Tater Tots
  8. One cup of shredded cheddar cheese

Guidelines

  • A big skillet should be heated to medium heat. Add the ground meat, onions, and peppers. Simmer for 7 to 8 minutes, or until the meat is no longer pink and the onions and peppers are tender. Add taco. adding flavor.
  • Set oven temperature to 400 degrees Fahrenheit.
  • Apply cooking spray to a large casserole dish to grease it. Evenly distribute the meat mixture across the bottom.
  • Spread the queso over the meat mixture after pouring it on top. Put Tater Tots on top. Bake for forty minutes.
  • Take out of the oven and top with cheddar cheese. Cook for a further five minutes, or until the cheese has melted. Warm up the food.

Just Put Cheese in the Zucchini The Easiest and Tastiest Zucchini Recipe Ever

Just Put Cheese in the Zucchini The Easiest and Tastiest Zucchini Recipe Ever

Though they’re sometimes disregarded in the vegetable section, zucchini have amazing culinary potential. This dish uses savory cheese, delicious chicken, and fragrant herbs to take the humble zucchini and turn it into something amazing. This dish will wow your taste senses and leave you wanting more, regardless of your level of culinary experience.

Ingredients:

  1. 1 zucchini
  2. One onion
  3. One carrot
  4. two garlic cloves
  5. Just one tomato
  6. Two hundred grams of cheese
  7. A 300-gram chicken breast
  8. two eggs
  9. two tsp of breadcrumbs
  10. Add salt to taste.
  11. To taste, grind black pepper
  12. Taste-tested thyme
  13. To taste, fresh parsley
  14. 50 milliliters of oil

Technique of Preparation

The Vegetable Filling’s preparation

  • Prepare the Veggies: Clean and cut the tomato, garlic, and onion.
  • Grate and peel the carrot.
    Sauté Aromatics: In a skillet with hot oil, sauté the onion and garlic until aromatic.
    Add Vegetables: To the pan, add diced tomato and shredded carrot. Add pepper, thyme, and salt for seasoning.
    Cook until the meat is tender. Simmer until the flavors combine and the veggies are soft.
  • Getting the Chicken Ready

  • Prepare the chicken breast: Clean the chicken breast and pat dry. Cut into thin steaks.
  • Put some seasoning to the chicken. Oil, salt, and pepper should be added to the chicken steaks.
  • Tenderize: Gently pound the chicken after covering it with cling film. Putting the Zucchini Rolls Together
    Prepare the zucchini. Strip the zucchini after washing and chopping. Add a little salt to help drive out extra moisture.
  • Roll and Coat: Roll each zucchini strip after dipping it in beaten eggs. breadcrumbs.
  • Arrange the Ingredients: Top each zucchini strip with a chicken steak, then a dollop of the vegetable filling, and finally, grated cheese.
  • Roll Up: Gently roll up each zucchini strip, putting it seam-side down on a baking dish that has been oiled.
    Baking to a Perfect Finish
  • Top with Cheese: For an even more cheesy finish, sprinkle some more cheese on top of the zucchini rolls.
    Bake: Bake the baking dish for 30 minutes, or until golden brown, in an oven that has been warmed to 190 degrees Celsius.
    Presenting and Accessorizing
  • Garnish: To add a pop of freshness to the warm zucchini buns, scatter some freshly chopped parsley on top.
    Serve: Take a bite out of the warm, gooey cheese and enjoy!

Discover the Wondrous World of Okra: 23 Facts You Should Know

Discover the Wondrous World of Okra: 23 Facts You Should Know

Okra can be the perfect addition to your diet if you’re searching for a new, healthful vegetable if you’re between the ages of 45 and 65. Okra, also referred to as “gumbo” or “lady’s finger,” is acclaimed for its adaptability and widespread appeal. Let’s explore 23 amazing facts about okra that will wow you!

Nutritional Benefits Packed with Vital Vitamins: Okra is high in B vitamins, as well as vitamins A, C, and K. These nutrients are essential for maintaining the health and vitality of your body.

  • Enhances Digestive Health: Okra’s high fiber content facilitates digestion and maintains intestinal health. It guarantees that everything is operating as it should and keeps things flowing easily through your system. Perfect
  • for Healthy Eating: Congratulations if you’re keeping an eye on your caloric consumption! As a low-calorie meal, okra is ideal for a diet that is well-balanced. Its deliciousness may be enjoyed without concern about your weight.
  • Defend Against Oxidative Stress: Okra has potent antioxidants including catechins and quercetin. These aid in preventing oxidative stress and shielding your cells from harm.
  • Builds Strong Bones: Okra is high in calcium and delicious at the same time. This vitamin is necessary to keep bones strong and healthy.

Advantages for Health

  • Blood Sugar Stabilization: Okra is a healthy food for people who are worried about diabetes or insulin resistance because of its high fiber content, which helps control blood sugar levels.
  • Heart Health Support: Okra’s fiber and antioxidant content support heart health. By incorporating
  • When you include okra in your meals, you’re showing your cardiovascular system some much-needed affection.
  • Eases Inflammation in the Body: Okra’s anti-inflammatory qualities can help you feel less pain and inflammation in your body. It’s an all-natural method to keep you feeling fantastic and make your joints feel better.
  • Boost Immune System: Okra’s high vitamin C concentration helps fortify your immune system and stave off sickness. Keep yourself bright and healthy with this wonderful veggie.
  • Remain Hydrated: Nearly 90% of okra is water, making it an exceptionally hydrating food. Add some okra to your meals to help your body stay hydrated and rejuvenated.
  • Culinary Delights: An Adaptable Favorite: When it comes to cooking, okra is incredibly adaptable. It can be boiled, grilled, fried, or even pickled. that. Try out several techniques and identify your best one!
  • inherent Thickening Agent: Okra is frequently used in soups and stews, such as the well-known gumbo, because of its inherent thickening qualities. To give your favorite recipes a taste boost, add it in.
  • A Mainstay of World Cuisine: Okra is a star in many different kinds of cooking, including American Southern cooking as well as Indian, Middle Eastern, and African cuisines. It’s well-liked everywhere.
  • A Perfect Match: Okra tastes well with flavors like garlic, onions, and tomatoes. Use these items to make a tasty okra-based supper that will leave you feeling delightfully satisfied.
  • Growing OKra Is Best Done in Warm Weather: Okra is a food that grows well in your garden since it excels in warm areas. Okra grows best in a bright spot, so if you be effortless!
  • Quick to Harvest: Okra may be harvested 50–60 days after sowing, in contrast to certain crops that take a long time to mature. See the results of your efforts rather rapidly.
  • Okra likes damp, rich soil that drains nicely. Make sure your okra plants have the proper soil, and observe their growth.
  • Regular irrigation: Okra needs regular irrigation, particularly in dry seasons. Your plants will repay you with an abundant yield if you keep them well-hydrated.

Interesting Facts

  • Historical Coffee Substitute: Okra seeds were utilized in place of coffee during the Civil War. This is a very adaptable vegetable with a fascinating history.
  • A Member of a Family: The okra plant is a member of the mallow family, which also includes interesting species like cotton and hibiscus. It’s with really good company!
  • Slimy Wonder: Mucilage is the slimy material that is present in okra. Unbelievably, there are several culinary and medical applications for this sliminess. Accept the distinctiveness of okra!
  • Okra flowers are self-pollinating and may draw beneficial pollinators like bees, making them a pollinator’s paradise. You’re providing these important critters with a tasty treat by cultivating okra.
  • Symbolic Significance: Okra is associated with good health and wealth in many civilizations. Savor this vegetable for its flavor and cultural importance as well.

Okra is more than simply a vegetable, to sum up. It’s a veritable gold mine of gastronomic delights, historical and cultural landmarks, and health advantages. Okra adds a distinctive and nutrient-dense flavor to any dish, whether it’s being cooked into a delicious gumbo or mixed into a light salad. Now armed with these newfound facts, embrace the world of okra and let it bring joy and goodness to your plate. Happy cooking and gardening!