Keto Zucchini Casserole

Keto Zucchini Casserole

For a vegetarian entrée or side dish, this simple baked keto zucchini casserole with sour cream and cheese is ideal.

This nutritious zucchini gratin is also devoid of gluten and eggs. The ideal casserole dish for keto that will make the most of your summer squash.

INGREDIENTS

  1. Two pounds of zucchini Four huge zucchinis
  2. One tsp salt
  3. Two ounces of peeled and sliced onions,
  4. plus one tablespoon of melted unsalted butter
  5. or olive oil to coat the dish
  6. Three cloves of garlic
  7. Half a cup of heavy cream
  8. Half a cup of sour cream
  9. one cup of split shredded Parmesan
  10. One cup of split grated mozzarella (or aged cheddar or emmental)
  11. One tsp salt

PROCEDURE

  • Aim for 425°F (220°C) in the oven. Butter should be used to grease a 1.5-liter square glass or ceramic baking dish. Put aside.
  • Cut the zucchini into 1/4-inch (0.6 cm) slices, then transfer them to a large bowl and add 1 teaspoon of salt on top.
  • over the slices, tossing them with your hands to coat each one with salt. Allocate twenty minutes. Don’t omit this step as it will extract the water from the zucchini and prevent a watery casserole!
  • After draining the zucchini slices, place them on absorbent paper and pat dry with additional absorbent paper to get rid of any remaining water.
  • Melt butter in a large saucepan over medium heat, then cook onions until they become tender and fragrant. Add the garlic, pour in the sour cream and heavy cream, and continue heating until bubbles start to form on the edges.
  • Add half of the parmesan and half of the mozzarella that have been grated, and stir until the cheese has melted completely and a cheesy sauce appears.
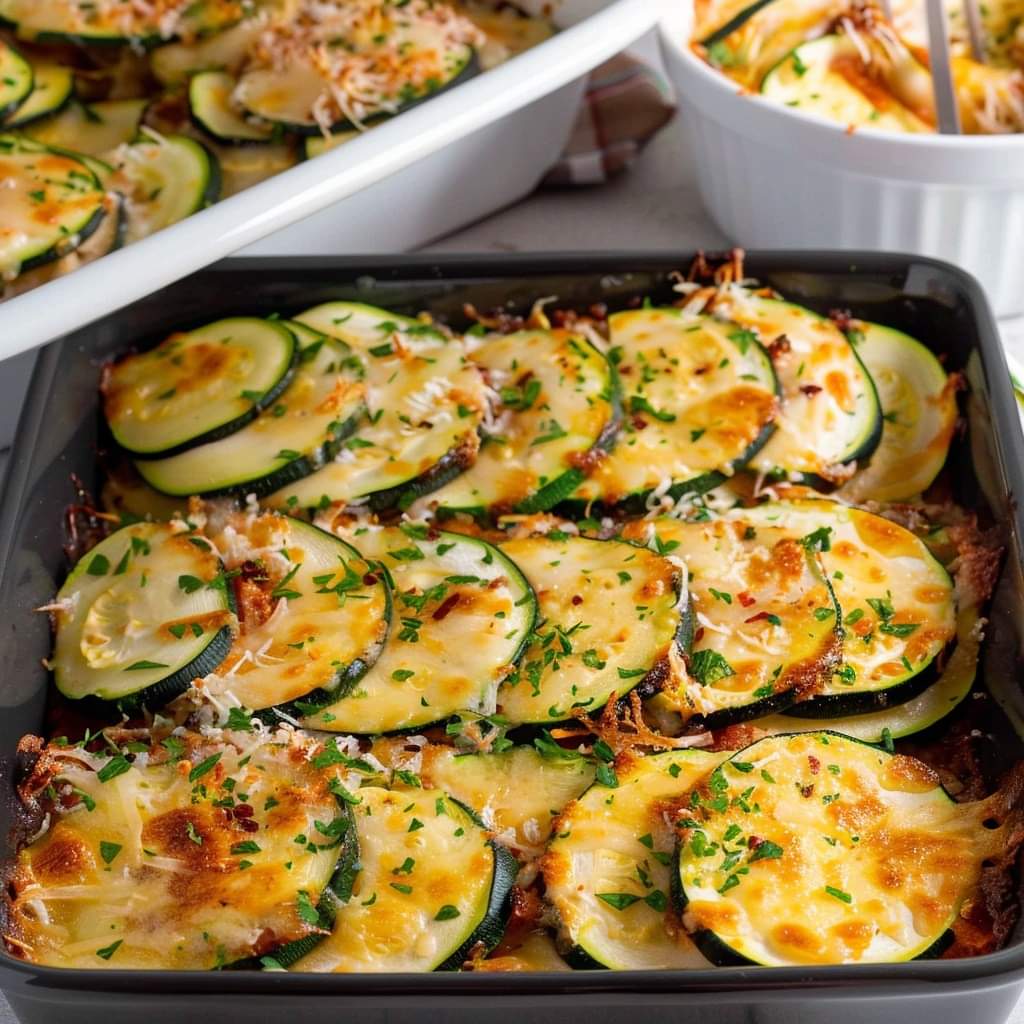
  • Arrange the slices of zucchini in a row within the square baking dish. To see how to make this, view the picture in my article or the video.
  • Spread the cheese sauce equally over all of the zucchini slices after pouring it on top. Over the zucchini slices, distribute the remaining mozzarella and parmesan cheeses.
  • Bake for 15 to 20 minutes, or until the zucchini are soft, the sauce is bubbling in the pan, and the cheese is browned on top. Avoid overbaking to avoid mushy zucchini.

Easy Loaded Creamy Shrimp Baked Potato Recipe

Easy Loaded Creamy Shrimp Baked Potato Recipe

When it comes to baking potatoes, I always make sure to serve my family the best and tastiest version I can find—and by best, I mean something like this recipe from Whip It Up With Jay on YouTube! This dish is so delicious that you won’t be able to eat it all in a matter of minutes once you put it on the table. If you would like to try this dish, please read the directions below and watch the tutorial video while you work.

INGREDIENTS

  1. Two big russet potatoes
  2. 1.5 pounds of big shrimp
  3. One teaspoon of your preferred seasoning or “slap your mama once” seasoning
  4. One teaspoon One teaspoon full seasoning
  5. One-half teaspoon of parsley
  6. 1/2 teaspoon ground black pepper
  7. One teaspoon of paprika

Rich Sauce

  1. One tablespoon of garlic paste
  2. One cup of heavy cream
  3. ¼ cup parmesan cheese and one cup Colby Jack cheese
  4. One teaspoon full seasoning
  5. 1/2 teaspoon ground black pepper
  6. 1 tsp of seasoned cilantro
  7. One teaspoon of paprika
  8. ½ little onion
  9. bell peppers
  10. Unsalted butter
  11. Parsley

INSTRUCTIONS

Step 1

  • Adjust the oven temperature to 400°F and get a baking pan ready. Make indentations all over the potatoes with a fork, then cover them with a generous amount of oil, rubbing it in until fully covered, and then toss in some salt. Place the potatoes on a baking sheet, cover them nicely with foil, and bake in a preheated oven for approximately one hour, or until fork tender (the larger the the potato, the longer cooking is required). After the shrimp have been deveined and their skin removed, put them in a big bowl and pour some oil over them.

Step Two

  • After giving them a thorough massage or tossing them to coat, season them thoroughly using your preferred brand of seasoning and the entire amount of seasoning. Put a pan on the stove over medium-high heat, add a little oil, and let it get hot before adding the shrimp with seasoning. Make sure they are well charred on all sides by tossing them every so often and letting them cook for 4 to 5 minutes.

Step Three

  • After the shrimp are cooked, remove from the pan and place the butter in it. Melt the butter and add the diced onions and bell peppers after that. Toss them well and cook for 4 minutes or until they become tender. Add the creole seasoning and all of the seasonings, stir well, and pour in the heavy cream. Reduce the heat to medium. After giving them a thorough swirl, add the Colby Jack and Parmesan cheeses and stir until they melt. After removing the sauce from the pan and turning off the heat, leave it aside.

Step Four

  • As demonstrated in the video, cut off the potatoes’ tops and scrape off the insides before putting them in a big dish. Add the cheese and a small amount of the cream sauce to the bowl of mashed potatoes and stir to incorporate. Season with salt and pepper. Evenly load the potatoes with the mixture, top with a little more cheese, and then gently arrange the shrimp on top. Re-place them in the baking dish, pour additional sauce over them, and bake for a further ten minutes. Present and savor!

Air Fryer General Tso’s Chicken

Air Fryer General Tso’s Chicken

I think my Air Fryer General Tso’s Chicken tastes better and is also healthier than takeout! A mouthwatering sauce with savory, sweet, and sour notes is combined with succulent pieces of crispy chicken. In less than 30 minutes, prepare this dish in the air fryer for a tasty dinner! It can also be made gluten-free.

INGREDIENTS

  1. One and a half pounds of boneless, skinless chicken thighs (roughly eight thighs), cut into bite-sized pieces
  2. 2 teaspoons reduced sodium soy sauce (or tamari if gluten free)
  3. 3 tablespoons cornstarch sauce
  4. 2 teaspoons vegetable oil or other neutral-flavored oil
  5. 1 teaspoon each of ginger and garlic
  6. 1/4 teaspoon of red pepper flakes
  7. 3 tablespoons of reduced sodium soy sauce (or tamari if gluten free)
  8. 1 tablespoon each of Hoisin sauce (you can use gluten-free Hoisin sauce)
  9. 1 tablespoon rice vinegar
  10. One teaspoon toasted sesame oil
  11. oilone tablespoon cornstarch plus 
  12. one tablespoon water; 
  13. ¾ cup reduced sodium chicken stock;
  14.  two teaspoons brown sugar;
  15.  two sliced scallions;Sunflower seeds as garnish

GUIDELINES

  •  Warm up the air fryer to 400°F. Let the chicken marinade for few minutes by mixing it with two teaspoons of soy sauce.
  • After that, throw the chicken pieces in large plastic bag with zip top to fully cover them in cornstarch.
  • After lightly sprinkling or brushing the air fryer rack with oil, place the chicken pieces in single layer.
  • Avoid packing the pan too full; you might need to cook the chicken in batches.
  • Cook for 8–10 minutes, or until chicken is thoroughly cooked. In the middle, give the basket shake.
  • Take out the chicken and put it in and transfer to a platter. Cook the chicken that is left.
  • In a medium saucepan, heat the vegetable oil over medium heat to prepare the sauce. Stir in the garlic, ginger, and red pepper flakes. Simmer for 30 seconds to release the aroma. Simmer for two to three minutes after adding the soy sauce, Hoisin sauce, chicken stock, vinegar, brown sugar, and sesame oil. Add the cornstarch mixture to the pot after mixing it with 1 tablespoon of water. Simmer until thickened, about one or two more minutes. Take off the heat.
  • After taking the chicken out of the air fryer, combine it with the sauce. Add sesame seeds and scallions as garnish. Accompany with brown rice.

Notes

  • Use gluten-free Hoisin sauce and tamari in place of soy sauce to keep this recipe gluten-free. You can cook the chicken on the stovetop in pan if you don’t have an air fryer.
  • Using small amount of olive oil, sauté the chicken over medium-high heat until it is cooked through and golden brown.
  • The chicken can alternatively be baked in the oven on sheet pan. Apply thin layer of olive oil to the chicken and bake it at 400°F for approximately 15 minutes, rotating it midway, until the internal temperature reaches 165°F. Remaining food can be kept in the refrigerator for three to four days if it is sealed tightly.
  • The meal can be frozen for maximum of three months.

Oven Crispy Parmesan Potatoes

Oven Crispy Parmesan Potatoes

Oven Crispy Parmesan Potatoes These tiny ones are far too addicting! Even when I double the recipe, we devour the entire tray!

These golden beauties pair perfectly with a slow-cooked, perfectly cooked tenderloin of beef or a succulent roast chicken. However, don’t let customs limit you. They look just as good served with a crisp green salad or as the centrepiece of a warm meal with eggs.

Recipe By: Rgahb

Ingredients For Oven Crispy Parmesan Potatoes:

  1. 4 large russet potatoes, peeled and chopped into rounds about 1/4 inch in diameter
  2. One-third cup extra virgin olive oil
  3. One tablespoon fresh thyme leaves or one teaspoon dried thyme
  4. One teaspoon garlic powder
  5. Half a cup shredded Parmesan cheese
  6. Salt and freshly ground black pepper, to taste
  7. Optional garnish of fresh parsley sprigs

Instructions For Oven Crispy Parmesan Potatoes:

  1. Set the oven temperature to 400 degrees Fahrenheit. To guarantee that we have that perfect crispiness, you want it to be really hot.
  2. Coat the potato rounds thoroughly by tossing them in olive oil. Give them some room as you arrange them in a single layer on a baking sheet covered with parchment paper. You don’t want any steaming at this point, do you?
  3. In a separate bowl, mix together the Parmesan cheese, thyme, garlic powder, salt, and pepper. Stir them thoroughly.
  4. Evenly sprinkle each potato circle with this mixture. You’re looking for a nice even coating, so every bite has that mouthwatering flavor.
  5. Transfer the baking sheet to the oven and bake for twenty to twenty-five minutes, or until crisp and brown. Watch them closely and flip them halfway through to make sure they are evenly crispy and browned.
  6. Take the potatoes out of the oven and allow them to cool slightly after they are golden like the fields in late September. Then, for a flash of colour, you may move them to a serving tray and sprinkle some of that fresh parsley on top.
Variations & Advice:
  •  For a unique touch, mix your own combination of herbs, such as oregano or rosemary, with the thyme. Wish to make a crust that is cheesy
  • During the last few minutes of baking, turn those potato rounds over, top with a little extra Parmesan, and broil for a short while. But watch out
  • There’s a thin line between crispy from, well, overdone.
  • Remaining potatoes? They are a delicious addition to hash in the morning or served with a sandwich at lunch.

My love, this recipe’s beauty isn’t just in the flavor—it’s also in the memories it evokes and brings back. It’s about the love that’s passed down, one crispy potato at a time, from one generation to the next, much like the well-worn pages of our family cookbooks. Enjoy now and give me credit later.


Air Fryer Pasta Chips

Air Fryer Pasta Chips

Air Fryer Pasta Chips

Try my Air Fryer Pasta Chips for another delectable appetiser or snack. I’ll tell you up front: this snack is quite addictive! This crunchy pasta with a strong garlic-parmesan flavour permeated every mouthful, and I could not stop eating it! It would be an excellent snack to grab and go and chew on during the day because it is so easy to create. Yes, the pasta chips taste great dipped in garlic or marinara sauce, but I also really like them without any sauce!

Rigatoni pasta noodles that have been prepared, air-fried, flavoured with garlic, and topped with parmesan cheese make up the appetiser known as “Air Fryer Pasta Chips.”

Preparation Time: 15 minutes

Cooking time: 10 minutes

Total Time: Twenty-five minutes

Recipe By: Amanda Rettke

Ingredients for Air Fryer Pasta Chips:

  1. 8 ounces cooked, drained, al dente rigatoni noodles
  2. 3 tablespoons divided olive oil
  3. 1 teaspoon minced garlic
  4. 1 teaspoon kosher salt
  5. ½ teaspoon ground black pepper
  6. ½ cup grated parmesan cheese

Instructions for Air Fryer Pasta Chips:

  • Warm up the air fryer to 400°F.
  • Place cooked noodles in a big bowl. Apply a single spoonful of olive oil on top. Toss in the coat.
  • Arrange the spaghetti noodles in a single layer on your air fryer rack or basket.
  • Air fried till golden brown, 8 to 10 minutes.
  • Pasta chips should be moved to a bowl.
  • Put the garlic, salt, pepper, and remaining oil in a separate bowl. Blend thoroughly.
  • Coat the spaghetti chips by pouring the oil mixture over them and tossing.
  • Add some parmesan cheese on top and serve with
  • your preferred dipping sauce, such as garlic or marinara.
Nutrition Facts:

140 kcal of calories
Course: Starter
Six servings

Can I Use My Oven to Make Pasta Chips?

Indeed! You can still enjoy this snack if you don’t have an air fryer or if you just like to use the oven. Preheat the oven to 425°F before making the pasta chips. After cooking the pasta according to the directions on the air fryer, bake it for 20 to 25 minutes and then toss it with the oil mixture and parmesan Parmesan. Even though the pasta won’t get as crispy, it will still taste great!

Which Air Fryer Is the Best?

After testing three different kinds at home, I suggest the Ninja Air Fryer. Although it is easier to use and produces more consistent results, you can move up a size if necessary. I’ve been really

Orange English Cake

Orange English Cake

Orange English Cake  One of the many recipes that populate our kitchens is this one, which is a real confectionery gem. Its endearing simplicity and the zesty orange flavour combine to produce a singular experience that goes beyond culinary restrictions. We welcome you to discover the mysteries of this timeless item and introduce a little of English culture into your house by using our guide.

Recipe By: m.alicar

Ingredients For Orange English Cake:

  • Three cups of wheat flour
  • One cup of sugar
  • One cup of butter
  • Four eggs
  • One cup of orange juice
  • The zest of two oranges
  • 1 tablespoon baking powder
  • Half a teaspoon of salt

Instructions For Make Orange English Cake

  • Dough: Beat the butter and sugar together in a bowl until a creamy consistency is achieved.
  • Egg Addition: Beat thoroughly after each addition of egg, then add the eggs one at a time.
  • Adding Secos: Sieve the baking powder, salt, and wheat flour into the batter. Gently stir.
  • Introducing Citrus Flavour: Incorporate the orange juice and zest into the dough, blending until a uniform texture is achieved.
  • Baking: Place the dough in a pan that has been buttered, and bake it for 45 to 50 minutes at 180°C, or until a toothpick inserted in the centre comes out clean.

Relevance:

  • Orange English Cake is a culinary adventure that embodies the grace and heritage of English cooking, not just a recipe. Its subtle, astringent flavour elevates any cake to a new level, making it a must-have ingredient for homemade cakes.

Advice:

  • For an additional taste and appearance boost, consider adding an orange icing topping.
  • For a taste of Britain, serve thin slices with tea.

In summary:

Together, we delve into the skill of crafting an English Orange Cake—a recipe that cuts across boundaries and provides a taste of English heritage. Please let us know about your experiences attempting this recipe in the comments below. We value your feedback and ideas as we work to further expand our culinary universe. I hope every piece of this cake serves as a gateway to a flavorful adventure that you won’t soon forget!

Dynamic Trio Olive Oil Lemon and Honey

Dynamic Trio Olive Oil Lemon and Honey

Recipe for Dynamic Trio Olive Oil Lemon and Honey. Revealing the Health Advantages of Honey, Lemon, and Olive Oil Elixir: A Powerful Combination for Wellness.

Find out how a simple mixture of honey, lemon, and olive oil may change your life. Explore the depths of its medicinal qualities and discover the ideal way to prepare it to maximise its effects.

The Healing Advantages Honey, Lemon, and Olive Oil Elixir:

Liver Health:

This elixir helps maintain the liver, which is essential for digestion and blood purification. By eradicating the virus and improving liver function, it helps fight hepatitis C.

Prevention of Kidney Stones:

The potassium citrate in lemons dissolves kidney stones, and the olive oil helps them pass, providing relief from this common condition.

Weight management:

OIC acid in olive oil reduces hunger, encouraging fullness and helping you shed pounds.

Cardiovascular Support:

Packed with antioxidants, this mix lowers bad cholesterol, strengthens blood vessels, and promotes heart health—all of which lower the chance of strokes.

Joint Pain Relief:

This elixir provides relief from joint pain and is a natural cure for rheumatism.

The Appropriate Method of Preparation:

  • To make this infusion, whisk together warm water, lemon juice, and organic honey. To keep it from being exposed to light and maintain its nutritional integrity, store it in an opaque bottle. For best effects, take a teaspoon every day on an empty stomach.
  • In conclusion, accept the age-old knowledge contained in the elixir of olive oil, lemon, and honey. This powerful mix is designed to nourish your body, mind, and soul, elevating your overall well-being. Discover the key to vigour and set off on a path to long life and comprehensive health.

grated ginger onion garlic lemon juice and honey

grated ginger onion garlic lemon juice and honey

This recipe grated ginger onion garlic lemon juice and honey. Mix honey, lemon juice, grated ginger, onion, and garlic. How to Get Ready for It.

The flu is a frequent viral sickness that causes a variety of health symptoms. It is usually treated with over-the-counter medications and syrups that are easily found in pharmacies. We’d like to provide a straightforward natural solution to manage symptoms like mucus and chest congestion, even if pharmacies stock a broad variety of products to do so. Please read on if this piques your interest.

The following are natural solutions for clearing the chest of mucus and phlegm:

Ingredients For Mix honey, lemon juice, grated ginger, onion, and garlic:

  • One tablespoon of peppercorns.
  • a single tablespoon of honey.
  • Two tablespoons of ginger, grated.
  • Three mugs of water.

You May Also Like:

Watermelon Ginger Juice

Ginger Lemon Honey Paste

Lemon and Ginger for Lung Vitality

How Ginger and Red Onion Keep Me Healthy

The Wonders of Ginger Water

How to Prepare and Use It:

  • First, fill a small saucepan with water, then set over medium heat. When it comes to a boil, incorporate the black pepper and ginger.
  • After three minutes of boiling, let the mixture to cool until it reaches a temperature that is comfortable.
  • To taste, add honey to sweeten the mixture.
  • Drink this beverage as needed.

Suggested Use:

To help with congestion and cough relief, try to have three to four glasses of this solution each day. On the other hand, one cup on an empty stomach might be enough to relieve moderate symptoms connected to mucus production.

In addition, we have a powerful natural cure for colds and flu:

Ingredients for natural cure for colds and flu

  • fresh garlic, either crushed or chopped.
  • onion that has been cut recently.
  • fresh ginger root, grated.
  • freshly grated horseradish.
  • Fresh cayenne pepper (seeded), diced or thinly sliced.

How to Prepare and Use It:

  • Put all of these ingredients in a blender and process until the mixture is smooth and lump-free.
  • Pour this mixture into a glass jar that is airtight and keep it there for two weeks. Shake the jar gently once a day (one jar each day) during this time.
  • Strain the mixture, saving only the liquid, after the two-week interval.


Chicken and Dumplings Soup

Chicken and Dumplings Soup

With tiny dumplings cooked with soft chicken and veggies in a delicious broth, Chicken and Dumpling Soup is a contemporary spin on the classic! Compared to classic chicken and dumplings, this soup is lighter while maintaining the same comfort level.

INGREDIENTS

Regarding the Chicken Soup:

  • One and a half pounds of cubed, 1/2-inch chicken breast
  • One large onion, peeled and chopped; three minced garlic cloves
  • Four neatly sliced carrots and four thinly cut celery stalks
  • Four teaspoons of Land O Lakes® Olive Oil & Sea Salt Butter One half-stick
  • one tsp finely ground mustard
  • 1/8 teaspoon of colored ground turmeric
  • 64 ounces of low-sodium chicken stock with one bay leaf
  • 1/4 cup of finely chopped parsley
  • Taste of pepper

For dumpling

  1. one and a half cups flour
  2. Grated Parmesan cheese, three tablespoons
  3. One tablespoon of freshly chopped, finely thyme leaves
  4. 1/2 tsp freshly chopped, coarsely minced rosemary
  5. Half a teaspoon of salt
  6. 1/4 tsp ground pepper
  7. one and a half cups whole milk

GUIDELINES

  • Melt the Land O Lakes® Butter with Olive Oil and Sea Salt in a large sauce saucepan over medium heat. Add the carrots, celery, onion, and garlic. Simmer for 8 to 10 minutes. Stir from time to time.
  • Stir in the chicken stock, mustard, turmeric, and bay leaf. Heat till boiling. For the next fifteen minutes, simmer, covered, with reduced heat.
  • In the meantime, combine the dumpling ingredients in a medium-sized bowl. Using a fork, stir until a moist, doughy consistency is achieved.
  • Reheat to a boil once the soup base has reduced in temperature for fifteen minutes.
  • Add the parsley and chicken and stir. Next, drop tiny 1/2-teaspoon-sized dough lumps into the soup using a spoon. Simmer for five minutes, or until the dumplings and chicken are well cooked.

Chicken Lasagna Roll Ups

Chicken Lasagna Roll Ups

Cooking Chicken Lasagna Roll Ups is a comforting evening dish. Lasagna noodles are folded up with tender chicken, broccoli, and cheese, then baked in a handmade cream sauce.

This recipe, which serves as a full supper, is a family favourite!

Rather than arranging the components in a pan, a lasagna roll up is produced by wrapping all of the classic lasagna ingredients in pasta.

Preparation Time: 25 minutes
Cooking Time: One hour Five minutes
Cooling period of fifteen minutes
Time Spent: One hour, forty-five minutes
Six servings

Recipe By: Holly Nilsson

Ingredients For chicken lasagna roll-ups:

  • 12 cooked and cooled lasagna noodles
  • 4 cups cooked chicken
  • 3 cups cooked and cooled broccoli
  • 2 ½ cups shredded mozzarella cheese mixture
  • 2 cups cottage cheese or ricotta
  • 1 cup shredded mozzarella cheese
  • ¼ cup shredded parmesan cheese
  • 2 eggs
  • 2 tablespoons chopped parsley

Sauce for Recipe:

  • ¼ cup butter
  • One diced onion
  • Two minced garlic cloves
  • One-and-a-half cups flour,
  • Two cups chicken broth, one and a half cups milk,
  • Four ounces cream cheese
  • One cup shredded mozzarella
  • One and a half cups Parmesan
  • One teaspoon dried basil
  • One and a half teaspoons chopped oregano

Instructions For chicken lasagna roll-ups:

  • Turn the oven on to 350°F.
  • Mix the ingredients for the cheese mixture and reserve.

Sauce:

  • Heat the butter in a medium saucepan and sauté the onion and garlic for about 3 minutes, or until soft. Cook for one to two minutes after adding flour.
  • Gradually add the milk and broth, whisking after each addition. It will start out thick but thin out. After adding all of the liquid, whisk in the melted cream cheese. Simmer for one minute.
  • Take off the heat and mix in the dried basil, oregano, mozzarella, and Parmesan cheeses.

Putting together:

  • Fill a 9×13 pan with one cup of the sauce mixture.
    Arrange the noodles.
  • Spoon chicken, broccoli, and cheese mixture over noodles. Top each with 2 tablespoons mozzarella cheese.
  • Roll noodles and place seam down in the pan. Top with the remaining sauce.
  • Cover with foil and bake for 30 minutes. Remove foil, sprinkle with remaining cheese, and bake for another 15 minutes.
  • Remove from the oven and let cool 15 minutes before serving.

Notes If you’d like, you can use ricotta instead of cottage cheese.
You can add broccoli or any other steamed vegetable, such as carrots or asparagus, in place of it.

Although we like the taste of the homemade sauce, you can use one or two jars of Alfredo sauce to speed up preparation.

Information on Nutrition:
serving size: two roll-ups; 931 calories; 60g of carbohydrates; 72g of protein; 44g of fat; 24g of saturated fat; 1g of trans fat; 235 mg of cholesterol; 1456 mg of sodium; 892 mg of potassium; 4g of fibre; 10g of sugar; 1798 IU of vitamin A; 50 mg of vitamin C; 747 mg of calcium; 3 mg of iron
The estimated nutritional information is subject to change depending on the brands of components and cooking techniques employed.