The Hidden Treasure of the Mimosa Plant

The Hidden Treasure of the Mimosa Plant

Un-be-known to many, The Hidden Treasure of the Mimosa Plant—famous for its subtle charm and exquisite tactile sensitivity—is more than just a striking sight.

This little plant holds a secret as satisfying as finding a treasure trove in your own backyard. The magic of the mimosa plant goes much beyond its captivating habit of folding its leaves when touched; inside a single leaf is a wealth of health advantages.

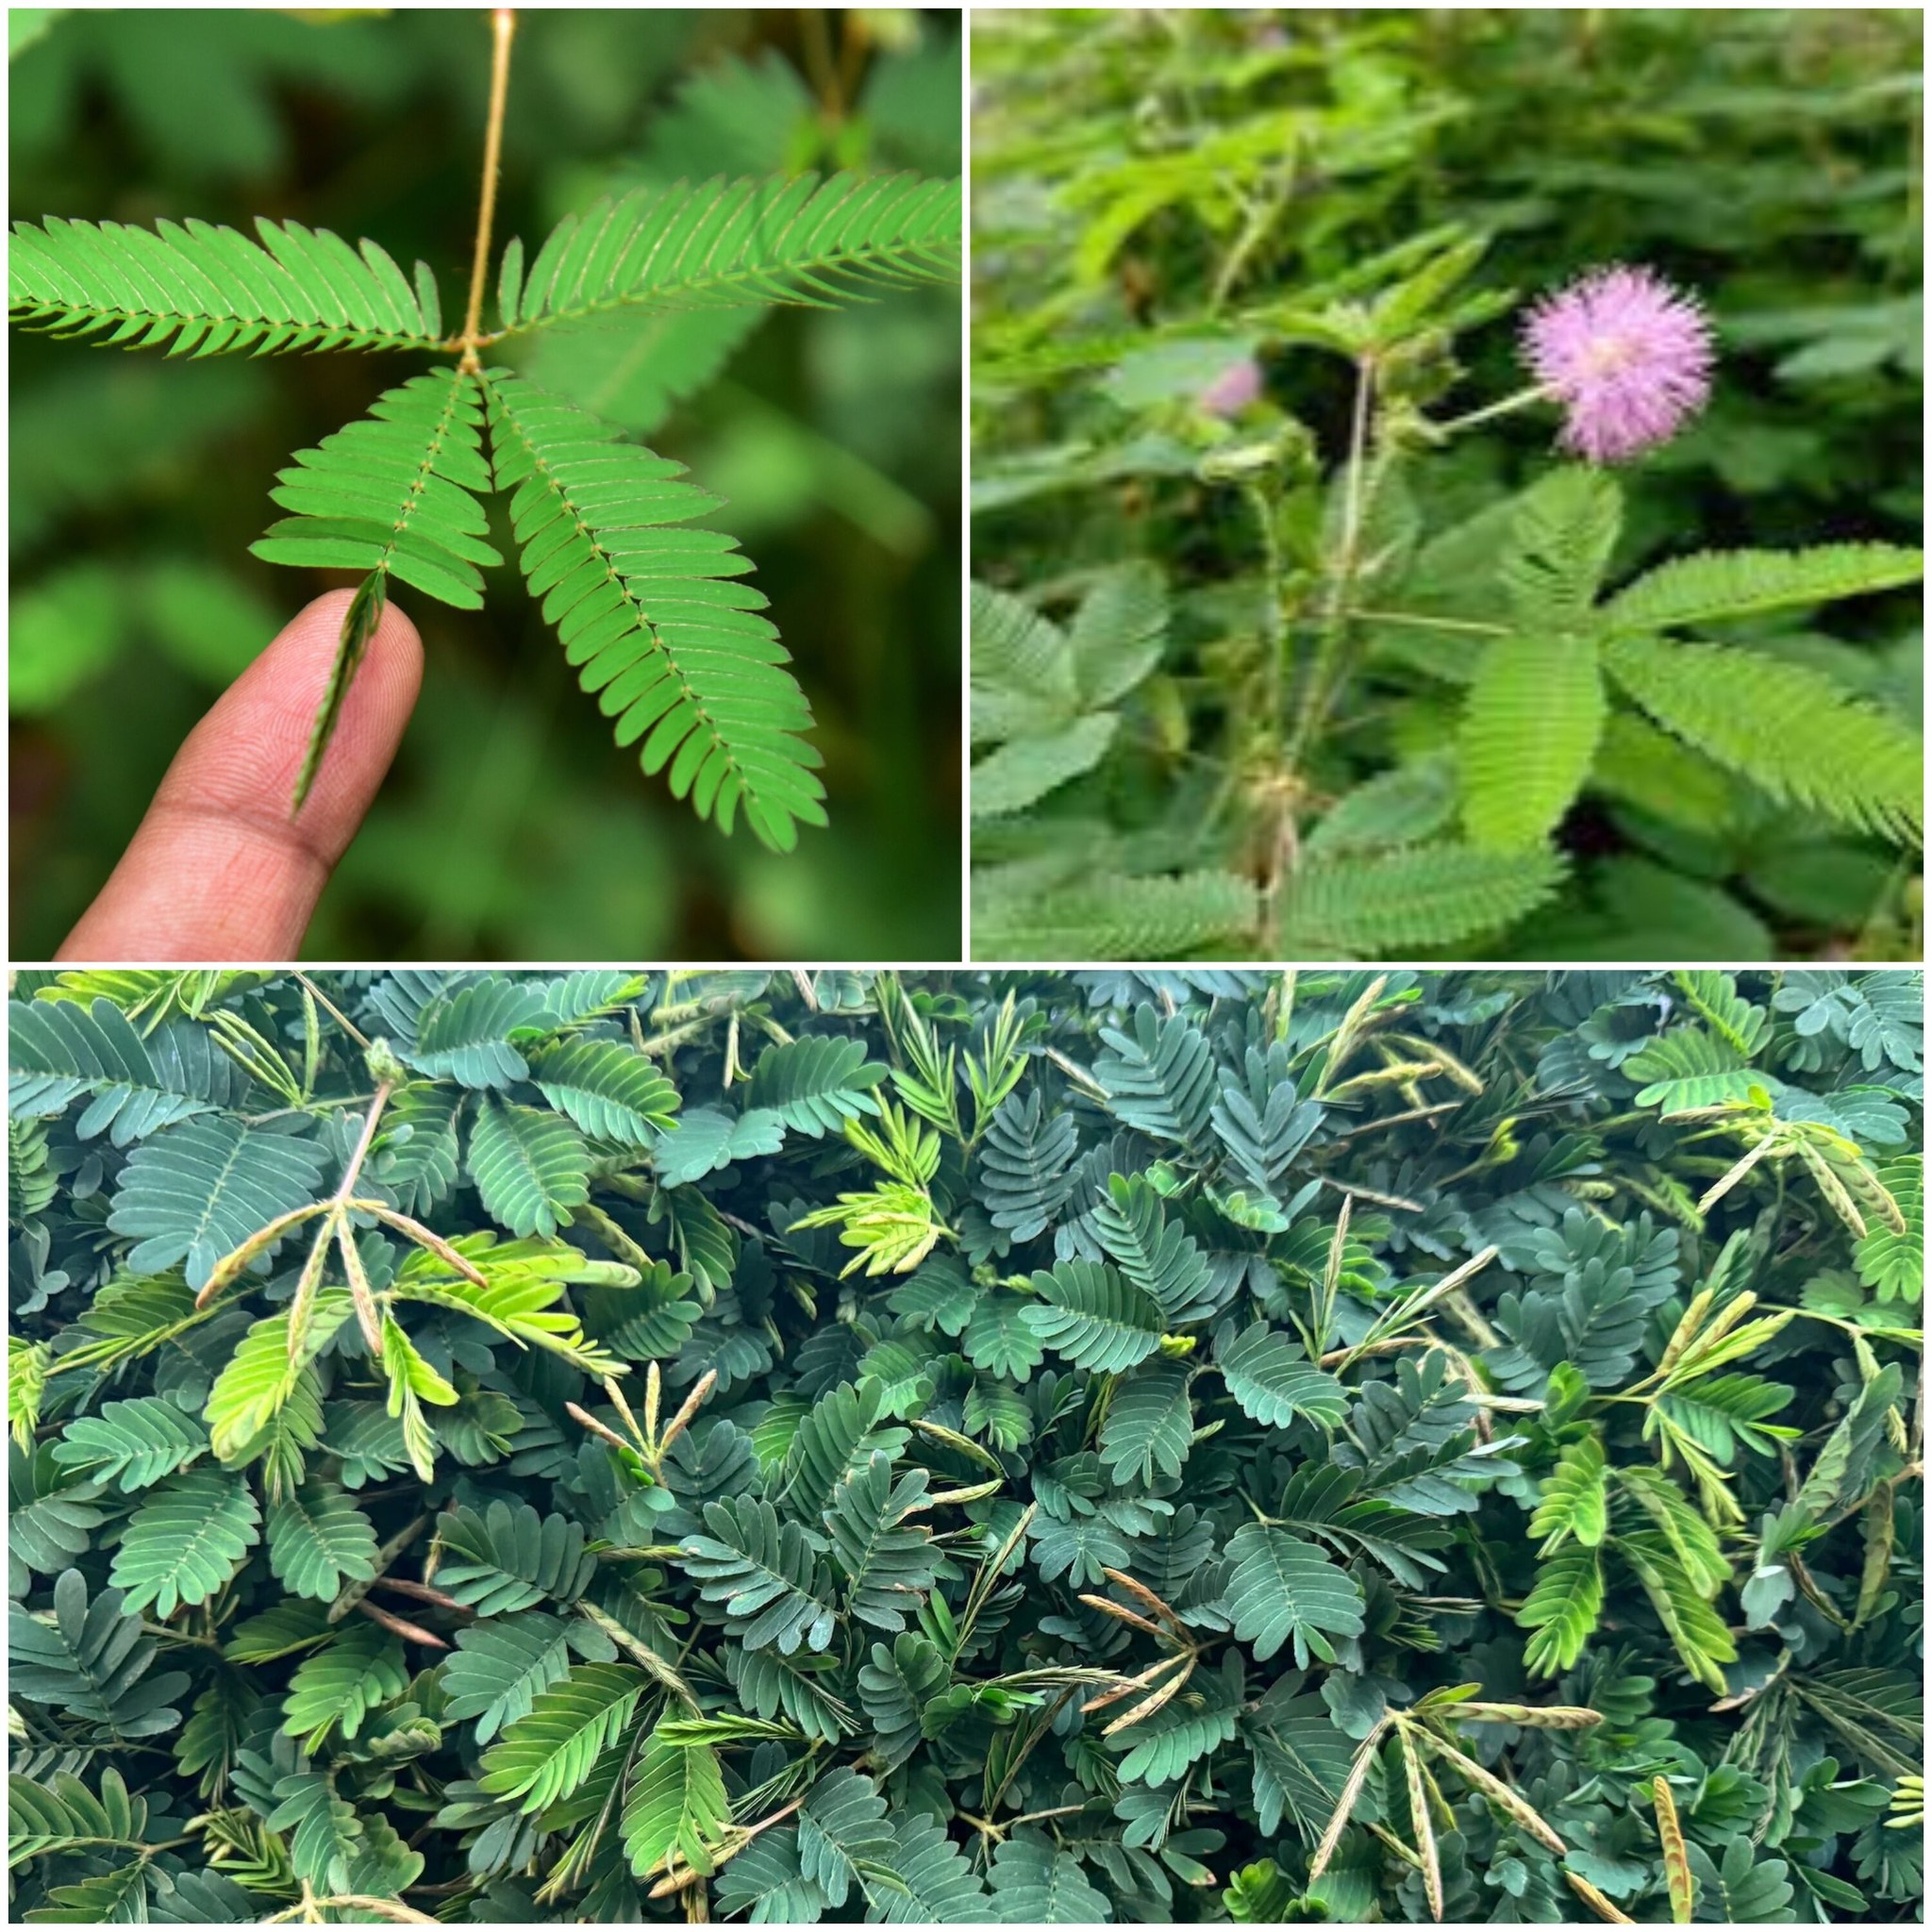
Known by many as the “touch-me-not,” the mimosa is a delightful natural phenomena that has captured the attention of both botanists and enthusiasts.

Its leaves fold inward and droop in response to touch or motion, a cunning defence mechanism to fend off predators, only to unfold a short while later in a show of tenacity. But the real worth of this plant is much more than its fascinating movements; for those who know its secrets, there are chances aplenty.

The Mimosa plant is most known for its medicinal properties. Mimosa leaves have been used for their anti-inflammatory and reparative qualities in traditional medicine by cultures all over the world.

These leaves are used as an all-natural remedy for:

cuts, bruises, and other ailments.

Plant extracts have been used to treat skin conditions, reduce pain, and serve as a sedative to reduce tension and anxiety.

Furthermore, the plant’s potential extends beyond its ability to treat illnesses. Studies are investigating the Mimosa’s potential for air and soil purification, which makes it an important ally in environmental preservation campaigns. It is an obvious choice for reforestation efforts and the reclamation of lands affected by pollution or misuse because to its quick growth and durability.

To sum up, the mimosa plant is a gem that goes unnoticed in the world of plants. Its delicate look and touch-sensitive nature indicate a plant with a lot of promise and worth, not simply for show. The Mimosa is undoubtedly a plant worth more than gold, whether for its therapeutic qualities, advantages for the environment, or the simple delight of witnessing its leaves dance at the least touch. Thus, keep in mind that you are witnessing a veritable treasure trove of natural resources the next time you come across this modest yet remarkable plant.


Nothing beats my nana’s Ambrosia Salad Nana make it the best

Nothing beats my nana's Ambrosia Salad Nana make it the best

A traditional Nothing beats my nana’s Ambrosia Salad Nana make it the best, American dessert, ambrosia salad has been served on tables for many generations, usually during holiday parties or joyous family get-togethers. The word “ambrosia” means “food of the gods” in Greek mythology, suggesting that this dish is a delectable confection appropriate for heavenly creatures. Ambrosia salad is thought to have Southern beginnings and gained popularity in the United States in the late 19th century, despite its precise origins being rather obscure. This creamy, fruity mixture usually contains small marshmallows, coconut, and a variety of canned or fresh fruits, all of which are held together by a sweet binder like yoghurt, sour cream, or whipped topping.

The prep time: Ten minutes.
Overall Time: Ten minutes
8 servings

Recipe By: Georgia Lynn

This salad is excellent either as a light dessert or as a sweet side dish to go with a variety of main courses, especially at barbecues or potlucks. It is a cool contrast to hearty meals like creamy casseroles or grilled meats. Some people like to eat it as part of a brunch feast, where it goes well with pastries and egg dishes. A modern and health-conscious variation of Ambrosia Salad is sometimes served with a mixed greens salad. To make this adaptable meal look more beautiful during banquets or gatherings, it can also be served in individual serving glasses.

Ingredients For Ambrosia Salad:

  • 1 cup of drained canned pineapple chunks
  • One cup of drained canned mandarin oranges
  • One cup of halved and stemmed maraschino cherries
  • One cup of shredded coconut with sugar
  • One cup of little marshmallows
  • 1/2 cup (optional) chopped pecans or walnuts
  • One cup of whipped topping (such as Cool Whip) or sour cream

Instructions For Ambrosia Salad:

  1.  Put the maraschino cherries, mandarin oranges, and pineapple chunks into a sizable mixing bowl. Toss to combine the fruits gently.
  2. Fill the bowl with the small marshmallows and the crushed coconut. Now is the time to fold in the nuts, if you have chosen to use them.
  3. Depending on your desire, spoon in the whipped topping or sour cream. Fold in the mixture until all the ingredients are fully combined and the creamy element coats the fruit evenly.
  4. Before serving, cover the bowl with plastic wrap and chill the salad for at least one hour. The flavours combine during this chilling period, and the marshmallows soften a little.
  5. Gently toss the Ambrosia Salad before serving.

AMBROSIA SALAD: WHAT IS IT?

  • The ambrosia salad recipe from today is a little retro.
  • I have happy memories of my grandmother baking ambrosia for almost every church event.
  • Ambrosia comes in a variety of forms, and it seems that every grandmother has her own special recipe. This recipe has been made with cottage cheese, sour cream or vanilla custard; some variations even exclude the almonds.

Nourishment : 289 kcal, 41g of carbohydrates, 4g of protein, 14g of fat, 8g of saturated fat, 2g of polyunsaturated fat, 4g of monounsaturated fat, 5 mg of cholesterol, 46 mg of sodium, 250 mg of potassium, 4g of fibre, 32g of sugar, 599 IU of vitamin A, 16 mg of vitamin C, 90 mg of calcium, and 1 mg of iron.
US Customary is the measuring method that My Baking Addiction uses by default. Unit conversions are offered as a courtesy, but there might be some differences.


Sweet Onion Casserole

Sweet Onion Casserole

The mix of rice, Swiss cheese, and sweet onions in this recipe is delicious. It’s a great accompaniment to any meal, such as roasted fowl or grilled meats. Every time you serve it, you’ll receive compliments on it—it’s a family favorite.

Ingredients

  1. One-third cup of raw basmati rice
  2. Five cups of water
  3. Half a cup of butter
  4. Three pounds of finely chopped sweet onions
  5. One cup of half-and-half
  6. One and a half tablespoons of salt
  7. Two cups of Swiss cheese, shredded and divided

Guidelines

  • Turn the oven on to 350 degrees Fahrenheit (175 degrees Celsius). Grease a two-quart casserole dish.
  • In a big saucepan, bring the water to a boil and add the rice. For about five minutes, stir, lower the heat to low, and simmer the rice until it is halfway done. After draining, set rice aside
  • In a large skillet over medium heat, melt butter; sauté and stir onions for about 8 minutes, or until they are transparent but not browned. In the skillet with the rice, combine the sautéed onions and butter; add the half-and-half, salt, and 1 3/4 cups of Swiss cheese. Spoon mixture into the baking dish that has been prepared, and top with the remaining 1/4 cup of Swiss cheese.
  • Bake, uncovered, for approximately one hour in a preheated oven, or until rice is soft and top is gently browned.

Nutrition Information

(per serving)

323 Calories

32g Carbs,

11g Protein,

and 17g Fat

Keto Cheesecake Bites

Keto Cheesecake Bites

These easy Keto Cheesecake Bites are the low-carb, sugar-free, and gluten-free versions of one of the most popular desserts worldwide. Their base of almond and coconut flour combined with their creamy vanilla flavour will quickly make them one of your favourite keto cream cheese desserts.

SET UP TIME: 20 minutes
Cooking time: 30 minutes
COURSE: American

Servings: Dessert 12

Recipe By: Keto Diet

What Is The Carb Content Of Cheesecake?
The amount of carbohydrates (per serving) that each of my goods has is broken down here:
Carbohydrates per serving:
All six grams are made up of carbs.
4 g of total carbohydrates

Ingredients For Keto Cheesecake Bites:

  1. One and a quarter cups of almond flour
  2. Three teaspoons of granular sweetener
  3. Five tablespoons of melted butter
  4. Eight ounces of cream and room-temperature cheese
  5. A single large egg, room temperature
  6. 1/4 cup of sugar, granulated 1/4 cup sour cream at room temperature
  7. One tsp vanilla extract

Instructions For Keto Cheesecake Bites:

  • Preheat the oven to 350°F. Line a 12-cup muffin tin with liners.
  • To prepare the crust, combine the granulated sugar, butter, and almond flour. Fill each muffin cup to the brim with ingredients, pressing firmly with your fingertips.
  • Filling: Using a hand mixer, fully beat together the cream cheese, egg, sour cream, powdered sweetener, and vanilla extract. Evenly divide the mixture among the muffin tins. Approximately 2 tablespoons make 1 cup.
  • Preheat the oven and bake for TWENTY minutes. Take out of the oven and let cool completely. To firm up, refrigerate in the refrigerator for at least three hours. Serve.

Observations Nutritional value per serving: 12 One small cheesecake, 196 calories, 4 grams of carbs, 4 grams of protein, 15 grams of fat, and 1 grams of fibre is served.

Is cheesecake suitable for keto?

Cheesecake is one of the easiest desserts to convert to a ketogenic diet because it contains very few carbohydrates in any of its ingredients (well, except from the sugar and biscuit foundation).
How can you keep the cheesecake tasting original even after removing the sugar and replacing the biscuit base?

Which sweeteners work well with cheesecake that is keto?

I have substituted stevia for sugar in this recipe because it is far better for your stomach than sugar and doesn’t require the same physical properties (melting, solidifying, etc.).

If you dislike the taste of stevia, you can substitute erythritol; however, this will result in a considerable shift in the overall amount of carbohydrates. You can also use 1.3 times the amount of monk fruit as stevia to achieve a similar sweetness.


White velvet buttermilk cake recipe

White velvet buttermilk cake recipe

The charming little sister of red velvet cake is white velvet. One of the most popular cake flavors ever is definitely red velvet cake, which has been around for a very long time. However, not everyone desires to consume red food coloring, or perhaps they are unable to do so due to certain dietary restrictions. Either way, having options is usually a good thing.

Equipment

  • Mixer Stand
  • Whisk Ingredients for Attachment Paddle Attachment

Ingredients for White Velvet Cake

  1. 14 ounces of cake flour
  2. 13 oz of sugar, granulated
  3. One tsp salt
  4. One-third tsp baking powder
  5. One-half teaspoon of baking soda
  6. 5 ounces of room temperature egg whites
  7. Four ounces of vegetable oil
  8. Ten ounces of room temperature or slightly warm buttermilk
  9. Six ounces of softened, unsalted butter
  10. two tsp vanilla

Frosting Ermine Components

  1. Sugar, granulated, 14 oz.
  2. 3 ounces of flour
  3. sixteen ounces of whole milk
  4. 16 ounces of room temperature unsalted butter
  5. 1/2 teaspoon salt and 2 teaspoons vanilla essence

Guidelines

NOTE: To ensure proper mixing and incorporation, it is EXTREMELY IMPORTANT that all of the above-mentioned room temperature ingredients be measured by weight and kept at that temperature.

  • Preheat the oven to 335°F (168°C) to 350°F (177°C). To avoid my cakes turning too dark on the exterior before the middle is fully baked, I usually use the lower setting.
  • Use cake goop or your favorite pan spray to coat two 8″ x 2″ (or three 6″) cake pans (with some leftover batter). Pour batter into your pans until they are about ¾ filled.
  • In a bowl fitted with a paddle attachment on a stand mixer, mix together flour, sugar, baking soda, baking powder, and salt. Stir for ten seconds to blend.
  • Mix the oil and ½ cup of the milk together and set aside.
  • Whisk together the egg whites, vanilla, and remaining milk until the eggs are broken up and set aside.
  • When the mixture resembles coarse sand, add the softened butter to the dry ingredients and blend on low for about 30 seconds. Once the dry ingredients are moistened, add your milk/oil combination and continue mixing for two minutes. Next, increase the speed to medium (I used my KitchenAid’s setting 4). Your cake may collapse if you don’t let it combine at this stage.
  • After scraping your bowl, turn the speed down to low. In three batches, add your egg white mixture, mixing the batter for 15 seconds in between.
  • Pour into the prepared pans after scraping down the sides one more to ensure everything has been integrated. For 35 to 40 minutes, bake the cake, or until a toothpick inserted into the center comes out clean and the cake has not yet started to shrink from the pan’s sides.
  • Release the steam from the cake by firmly tapping the pan on the countertop immediately. This inhibits the cake’s shrinkage.
  • Before turning the cakes out of the pan, allow them to cool for ten minutes within. That’s normal—the cake will shrink a little. Place on a cooling rack and allow to cool completely. To retain moisture in the cake, you can either cover the cakes in plastic wrap and freeze them, or personally cool them before handling.
  • Before icing, thaw on the countertop while still wrapped

Instructions for Ermine Frosting

In medium saucepan, whisk together  sugar and flour over medium heat. Toast the flour for around minutes. Increase the heat to medium-high and whisk in the milk gradually. Continue whisking until mixture becomes pudding-like and thick.

Wrap in plastic wrap and allow to cool. Using stand mixer bowl, add the butter and beat on high until the butter is light and fluffy.

As you beat, gradually add one spoonful of your cooled flour mixture at time. smooth buttercream is ensured by incorporating gradually.

Once everything is creamy, add the salt and vanilla, and then frost the cooled cake.

No bake dessert a delicious and quick recipe

No bake dessert a delicious and quick recipe

No bake dessert a delicious and quick recipe. All You Need Is Yoghurt and Fruit Prepare This Appetising Dessert. This fruity five-minute dessert is incredibly delicious and doesn’t require baking or gelatin! Anyone can make this quick and simple meal at home, even if they are not a skilled chef! When they taste this, we’re positive that your entire family and circle of friends will be astounded! You’ll be shocked by how good it tastes and how simple it is to prepare!

Ingredients For No bake dessert: a delicious and quick recipe:

  • Kiwifruit
  • Clementine
  • Apple, banana, grapefruit, and persimmons
  • Can use any fruits of your taste
  • Eight grams of agar-agar
  • 350 ml of milk
  • 50 ml of water
  • Condensed milk 200 grams
  • 200 grams of sour cream or yogurt

Instructions For No bake dessert: a delicious and quick recipe:

  1. Slice and peel every fruit.
  2. Fill a tray that isn’t filled with fruit slices.
  3. Combine water and agar-agar in a sauce pan. Stir and cook until thickened.
  4. Blend in milk and condensed milk. Simmer for two minutes.
  5. Finally, toss in the fruit slices and add the yogurt to the mixture.
  6. Fill the tray up with everything.
  7. Allow to chill fully in the refrigerator.

This delicious and simple-to-make Fruit Yoghurt Jelly Cake is a show-stopper. It is light and refreshing. You can use whichever fruits you have on hand, but I used Kiwifruit, Cllementine,mango, grapes, strawberries, and oranges in my fruit mix.

Refreshing Flake Ice Cream

no flakes Ice cream

Refreshing Flake Ice Cream

Savor the smooth, rich, and delicious flavor of handcrafted ice cream topped with luscious chocolate chips. This delicious delicacy will satisfy any sweet craving because it combines velvety smooth ice cream with tempting chocolatey bits.

Ingredients:

  1. Two cups of heavy cream
  2. one cup of whole milk
  3. 3/4 cup of sugar, granulated
  4. One tsp vanilla essence
  5. Half a cup of chocolate shavings or flakes, either dark or semi-sweet

Guidelines:

  • Combine the heavy cream, whole milk, vanilla extract, and granulated sugar in a mixing dish and whisk until the sugar is fully dissolved.
  • Transfer the blend into an ice cream machine and process in accordance with the manufacturer’s guidelines until it attains a consistency suitable for soft serve.
  • Melt the chocolate in a heatproof bowl to make the chocolate flakes while the ice cream ischurning.
  • bowl placed either in the microwave for brief bursts of time or over a pot of simmering water (double boiler method), stirring until smooth.
  • In the final few minutes of churning, slowly pour the melted chocolate into the churned ice cream, allowing the chocolate to form flakes as it combines with the ice cream, once the ice cream has reached the appropriate consistency.
  • Swirl the chocolate flakes throughout the chocolate flake ice cream as you transfer it to a freezer-safe container.
  • Once the ice cream is solid, cover the container with a lid or plastic wrap and place it in the freezer for at least 4 hours.

Hints & Variations

  • : Use dark chocolate with a higher cocoa content for a more rich chocolate flavor.
  • Change the melted chocolate’s thickness to create a customized texture for the chocolate flakes. Let the melted chocolate cool somewhat before mixing it into the ice cream for thicker flakes.
  • Try out several chocolate varieties, such milk or white chocolate, to create interesting flavor combinations.

Read more

Cheesy Baked Chicken Breast and Peppers,

Cheesy Baked Chicken Breast and Peppers,

Delight in the tastes of “Cheesy Baked Chicken Breast and Peppers,” a delicious recipe that consists of baked chicken breasts, pepper jack cheese, mozzarella, pickled pepper rings, olive oil, and seasonings. Perfect for an easy, cheesy, and tasty dinner

Ingredients for cheesy baked chicken breast and pepper

  1. Four chicken breasts, medium-sized Instead, use two large chicken breasts that have been cut in half lengthwise;
  2. two teaspoons of olive oil;
  3. one teaspoon each of paprika and Italian seasoning;
  4. one teaspoon of garlic powder;
  5. one teaspoon each of salt and black pepper;
  6. one cup of pickled pepper rings;
  7. one cup each of shredded mozzarella and pepper jack cheese;
  8. Parsley, finely chopped, to garnish

Guidelines for cheesy baked chicken breast and peppers

Setting Up the Cooking Area: Turn the oven’s temperature up to 400 degrees Fahrenheit, or 200 degrees Celsius. Next, carefully coat a 9 x 13-inch baking dish with cooking spray or oil.

To season the chicken, put the breasts in the baking dish that has been prepared. Make sure they are evenly coated by drizzling them with olive oil. Next, sprinkle a mixture of salt, paprika, black pepper, garlic powder, and Italian seasoning over the chicken breasts’ two sides.

Adding Cheese and Peppers: Top the spiced chicken breasts with the pickled pepper rings. Over the chicken, liberally scatter a mixture of pepper jack and mozzarella cheeses.

Baking Procedure: Preheat the oven and place the baking dish inside. Bake for twenty to twenty-five minutes. When the internal temperature of the chicken hits 165 degrees Fahrenheit (74 degrees Celsius) and the cheese on top is bubbling and golden in color, the chicken is deemed done.

Last Minute Details & Serving: Take the baked item out of the oven. Add some freshly chopped parsley to the chicken as a garnish. This recipe goes well with cauliflower rice on the side and is best served right away.


Keto Turkish-Style Bread

Keto turkish bread

The Keto Turkish-Style Bread is devoid of gluten and has extremely little carbohydrates. This recipe is suitable for keto dieters. It’s a grain-free, healthful bread. This recipe has an excellent flavour that people adore, and it has a great nutritional value. Keto Turkish-style bread is healthy and quite simple to prepare. It tastes really spicy, which is a nice thing. People like to bring this dinner to parties and other events. For a ketogenic diet, this meatloaf is ideal. The flavours in this recipe are excellent because of the additions.

What is Turkish-style keto bread?
The Turkish-style bread, which consists of eggs, almond flour, salt, olive oil, and chilli flakes, is incredibly tasty and appealing. This recipe’s seasonings are ideal. This recipe is incredibly high in nutrition. It has an excellent texture and a lot of flavours.

Ingredients For Keto Turkish-Style Bread:

  • Two tablespoons of olive oil.
  • One package of dry yeast
  • One tablespoon of salt.
  • 300 grams of almond flour
  • One Egg
  • Parsley and pinch of chilli flakes

Instructions For Keto Turkish-Style Bread:

  • Preheat your oven to 300°F.
  • Use a bowl and fill it with the almond flour and salt.
  • Transfer the yeast to a second bowl, cover with boiling water, and let sit for about 10 minutes.
  • Transfer the eggs and almond flour to a new container.
  • Once thoroughly combined, form the dough.
  • Pinch the dough just enough to make it soft. Place them on the baking sheet and sprinkle with the parsley and pinch of chilli flakes.
  • The bread should be microwaved for nearly thirty minutes.
  • It’s prepared for serving now.

Notes: For nearly three days, cover the dish tightly and store it in a cool area. Warm up your oven for the recipe.

Is the bread made in the Turkish style healthy for us?
Indeed, it is good for our health. It tastes excellent and has few calories, but it is not sweet or high in carbohydrates.

Facts about Nutrition:

3 grams of dietary fibre 200 kcal of calories. One grams of sugar 17 g of total fat 2 g of net carbohydrates Two milligrams of saturated fat 7 g of protein Five grams of total carbs

no bake cookies cake

no bake cookies cake

o-Bake Cookie Cake transforms the traditional no-bake cookie into a cake!

The previous month was my son’s birthday. He replied he wanted a no-bake cookie cake for dessert when I asked him what he wanted for his birthday.I asked him several questions because I wasn’t sure exactly what he meant.

He expressed his desire for me to create a cake using my no-bake cookie recipe.Using my no-bake cookie bar recipe, I was able to turn no-bake cookies into a bar, but I wasn’t sure how it would turn out as a cake. Although I had never seen it included in a cake recipe, I was game to try.

I used my Peanut Butter Free No-Bake Cookie Recipe in place of the traditional one because my daughter is allergic to peanuts.

Ingredients for no bake cookies cake

  1. two cups of sugar
  2. One cup of butter
  3. Half a cup of milk
  4. Four tsp cocoa
  5. One tsp vanilla essence
  6. Three cups of quick oats (use gluten-free quick oats for a gluten-free variation)
  7. one-third cup chocolate chips

DIRECTIONS

  • Heat the first 4 ingredients until they boil.
  • Simmer for one minute.
  • After adding the oats, chocolate chips, and vanilla, mix everything together until the chocolate chips are melted.
  • Transfer to a circular cake pan. Use a 9- or 10-inch pan; they work well. (If serving this on a plate or cake platter, line the pan with parchment paper to facilitate removal from pan.)
  • Chill until solid.
  • Slice, then present.
  • These can be stored in the fridge for a few days.