7 Ways To Use Up Your Vegetable Scraps
Before using veggies in a lot of meals, a lot of individuals have a tendency to cut off bits of them. Food waste can come from anything, including the ends of squash, the skins off carrots, and the leaves on vegetables. Furthermore, up to 40% of the food produced and sold in the US is never eaten, according to Zero Waste Memoirs. That’s why it’s so worthwhile to make something delicious out of every scrap of leftover veggies.
1.Boil them into a broth
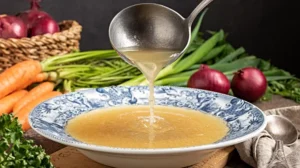
Keeping broth on hand is a great idea for a variety of recipes. There are several applications for broth, ranging from stews and soups to risotto and casseroles. For this reason, repurposing leftover vegetable scraps to make broth is a great way to utilise up ingredients that might otherwise go to waste. Even better, as Tasty points out, creating your own vegetable broth from leftover scraps is quite simple and allows you to adjust the broth’s salt content, among other ingredients.
According to Serious Eats, you can simply place the scraps (frozen or not) in a pot and cover them with water. You can also add other ingredients like aromatics, such as garlic or a bay leaf, to add more flavor. Cook the broth for 10 minutes only. Strain the broth through a sieve and store it in the fridge or freezer depending on how soon you plan to use it. As the publication explains, a vegetable broth made from scraps will not thicken on its own, and it is best compared to store-bought stock.
2. Cook with them
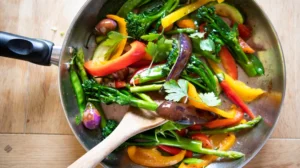
If you prefer to put your leftover veggie scraps to hard work in the kitchen by using them in your cooking, then consider a sauté. Healthline suggests sautéing the stalks of greens such as kale to make a healthy side dish. This could also be done with other kinds of stalks such as those of Swiss chard, fresh broccoli, or even cauliflower.
After sautéing, the stalks might be eaten on their own, but once cooked, they could also be utilised in other recipes, such quiche. Other vegetable leftovers, like carrots or even the ends of courgette sliced finely, can be added when using them in a meal where the vegetables won’t be as noticeable.
Simply place any leftover veggies in a hot skillet or nonstick pan and add some fat, such butter or olive oil, to sauté them. After tossing the vegetables to ensure they cook on all sides, take them off the stove and use them however you see fit.
3.Turn them into veggie chips
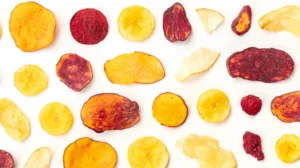
Cooking vegetable chips is another easy way to use up vegetable scraps or leftovers you might have. From the stemless ends of carrots and potato peels to the leafy greens from broccoli and so much more, you can easily bake, broil, or fry the scraps into crisp veggie chips, according to Zero Waste Memoirs. Not only will this solution reduce your food waste, it will also provide a healthy snack that satisfies your need for crunch.
You can always use a stovetop deep-walled pot to produce your own homemade veggie chips. Air fryers ought to function as well. However, if you want to turn your vegetable scraps into a tasty snack, just cut them into thin chips, mix them with a little oil and spice, and arrange them in a single layer on a baking tray (source: The Big Man’s World). After preparing, simply bake the chips in an oven set to 400 degrees Fahrenheit for 10 minutes on each side.
4.Add them to a salad or wrap
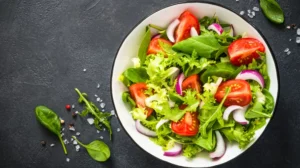
For vegetables that have leafy green tops, such as carrots, radishes, and celery, among others, you don’t have to discard the leaves. Instead, they can be used right alongside other greens such as spinach, arugula, and endive. While you can use the leaves in cooked dishes that call for steamed or sautéed greens, the easiest method is to toss them into salads or other dishes with raw veggies, according to Healthline.
The easiest thing about utilising vegetable greens in salads, wraps, or sandwiches is how little work they take to prepare. All you have to do is set them in whatever you are getting ready. Obviously, you can also include the leftovers into various spreads and beverages, such as pesto, smoothies, hummus, or green juice. It’s all about coming up with an inventive way to store extra greens, exactly like you would store bought greens.
5.Grow them into new vegetables
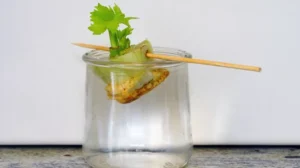
GardenTech claims that you can truly grow new plants with the leftovers of a food. Certain food, like avocados, can even use their huge seeds to sprout roots and renew the produce. However, this is a project that will require time and work. However, this is a fantastic substitute to try to salvage what’s left if you don’t want to or just can’t use your vegetable scraps for whatever reason. And it’s tremendously rewarding if it succeeds.
To grow new vegetables from leftovers, you’ll need to first trim the end of the vegetable. This allows the vegetable to take up fresh water and start to regenerate roots as well as new growth. Once the vegetable has been trimmed, simply place it in fresh water and set it somewhere with a good source of natural light. With time, the vegetable should grow, but be sure to refresh its water regularly when it starts to get cloudy.
6.Use them as a natural dye

Lastly, according to Zero Waste Memoirs, making natural colour with various vegetable leftovers is an inventive and enjoyable way to put them to use. Although you could use the all-natural dye for fabric, it works well for colouring other foods for a fun or festive supper. Using vibrant homemade dye, you may change everything from fresh pasta to hard-boiled eggs (for Easter).
Depending on their colour, beets and peppers can be used to generate red or orange dye, according to Alpha Foodie. Turmeric or even yellow bell peppers can be used to make yellow. Use red cabbage for purple colouring and spinach for green. Once you decide on the colour you want, it’s just a matter of processing the vegetables with the wheat and egg required to generate a colourful pasta dough. You can use a food processor or blender, but to get the nicest colours, wash the machine thoroughly in between colours if you’re making more than one.
7.Compost them
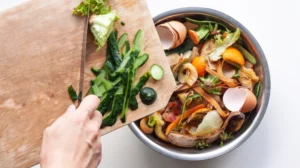
Composting kitchen scraps is nothing new for environmentally conscious kitchens, but it might be for some home cooks. Composting vegetables is simply the act of allowing organic materials, such as vegetable leftovers, to decay, as Taste of Home explains. While this might not sound like a particularly exciting or fun use for the scraps, it actually produces an incredibly useful material for those who garden or even have a pot of herbs. With time and after the combined organic items have broken down, those previously discarded vegetable scraps, fruit peels, paper, leaves, nutshells, and more will turn into soil that has tons of nutrients for new plants to feed on and grow.
The Kitchn says there are a few different approaches to begin going. Composting in your freezer or on your kitchen counter is the simplest method. Scraps only need to be arranged in a container. If it’s going in your freezer, though, you might want to use an airtight container. To actually put your compost to use for your plants, add leftover scraps to the blender and whirl them into a watery paste and go ahead and add them to the soil of your plants with something like stale bread.
Tips by: Tasting Table