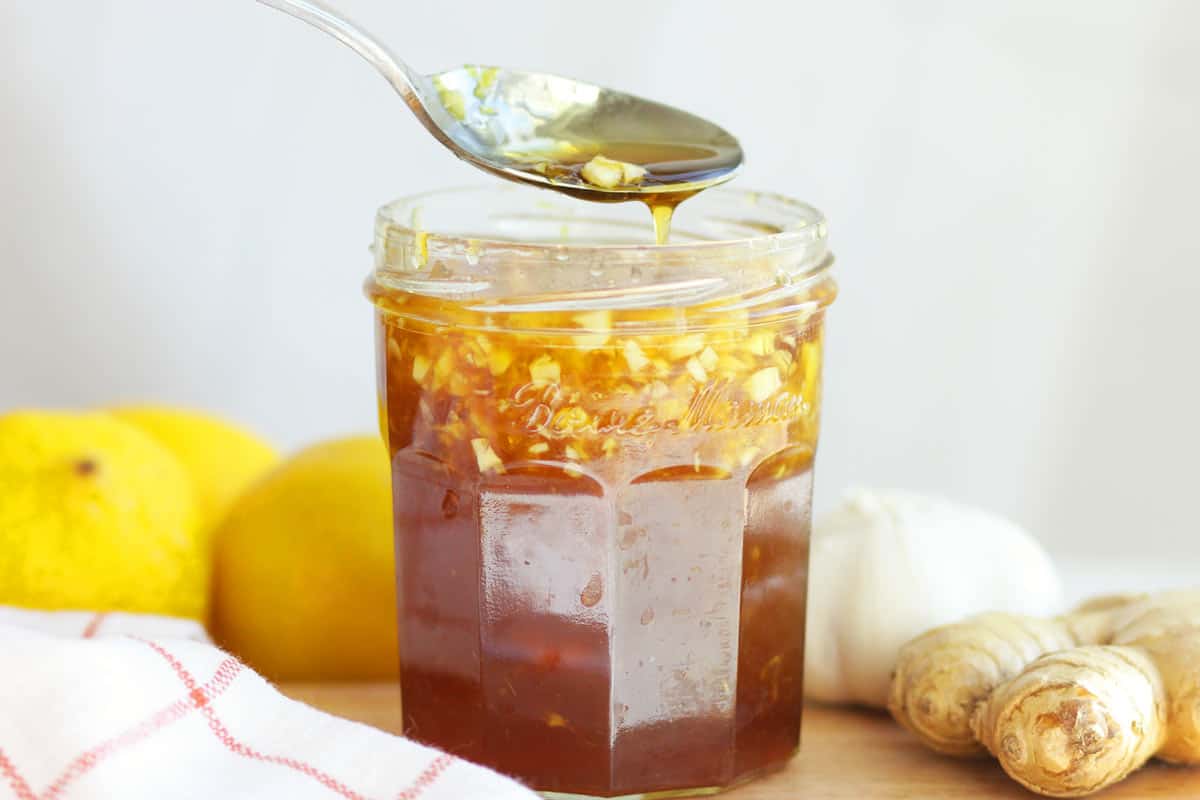
Easy yummy recipe

Easy yummy recipe

I love making everything from scratch, but today was not the day  I have no idea what to call it, but it fed 3 adults a toddler, and preteen with some leftovers!

editing to add in more exact instructions!

Ingredients;

  1. 2 frozen chicken breast (the ones I have were fairly large)
  2. 1 32oz container of 50% less sodium chicken broth
  3. 1 packet of chicken gravy
  4. 1 family size can of cream of chicken soup
  5. 1/2 stick of butter
  6. 1 24 oz pack of reams frozen noodles
  7. 1 10 oz bag of frozen mixed veggies
  8. Roughly 1/2 tsp of pepper
  9. 1/2 tsp of onion powder
  10. And a sprinkle of dried parsley.

Instructions

  • Add chicken, soup, broth, gravy and spices. Mix. Cooked on high for roughly 5hrs. I shredded the chicken in the crockpot with a fork, then added frozen noodles and veggies for another hour, or until noodles are done to your liking. Served hot with biscuits.

Air Fryer Peanut Curry Tofu with Gingery Cauliflower Rice

Air Fryer Peanut Curry Tofu with Gingery Cauliflower Rice

A quick vegan low-carb dinner is this Air Fryer Peanut Curry Tofu with Gingery Cauliflower Rice.

Ingredients for the Tofu:

  1.  14-ounce package extra-firm tofu, drained;
  2. 2 tablespoons reduced sodium soy sauce or gluten-free tamari, plus 1 teaspoon;
  3. 1 grated clove of garlic;
  4. 1 teaspoon curry powder;
  5. 2 tablespoons smooth peanut butter;
  6. 1 teaspoon sriracha sauce;
  7. 1 teaspoon grated fresh ginger;
  8. Olive oil spray;
  9. 2 tablespoons chopped peanuts

For the “Rice,” you’ll need:

  1. 1 tablespoon extra-virgin olive oil
  2. 1 minced garlic clove
  3. 1 teaspoon grated fresh ginger
  4. 2 scallions, sorted by color
  5. One 12-oz container of frozen or fresh riced cauliflower
  6. and one-third teaspoon of kosher salt

Guidelines

  • After draining, place the tofu on a platter covered with paper towels or tea towels. To remove extra water from the tofu, cover with another towel and set a heavy pan on top.
  • Prepare the marinade: Meanwhile, mix the grated garlic clove and two tablespoons soy sauce in a small bowl. Mix by whisking.
  • Cube up the tofu: After moving the tofu to a chopping board, turn it over, and cut it in half lengthwise. After turning it over one again to get it level on the chopping board, cut it into 32 equal cubes. Place the cubes in a single, uniform layer in a medium-sized shallow container or dish.
  • Tofu should be seasoned: Apply curry powder, making sure to cover all surfaces. Transfer sauce from bowl to the tofu, turning pieces to ensure uniform coating. For a minimum of ten minutes, marinate.
  • To make the peanut sauce, move the tofu marinade to a shallow dish and combine the peanut butter, sriracha, 1 teaspoon ginger, and 1 teaspoon soy sauce in a small bowl. Mix well, gradually adding a small amount of warm water to thin to a pourable consistency (I used approximately ½ tablespoon). Put aside.
  • To air fry, mist the basket with oil. After placing the tofu in the air fryer in a single layer, cook it at 370°F for 12 to 14 minutes, shaking the basket halfway through, until the outside is crisp and golden and the inside is tender.
  • Prepare the cauliflower rice by heating a medium skillet to medium heat in the interim .Swirl in the olive oil to coat the pan. Add the scallion whites, minced garlic, and 1 teaspoon of ginger. Add the cauliflower rice and continue to sauté for 30 seconds. Add a pinch of salt and cook, stirring frequently, for four to five minutes.
  • Add Peanut Sauce and Toss: If preferred, move the marinated tofu from the air fryer basket to the same shallow dish, add the sauce, and toss to coat.
  • To serve, divide the cauliflower rice into two small bowls and place half of the tofu in each. Add peanuts and scallion greens on the top of each.


SOFT & FLUFFY HOMEMADE BREAD

SOFT & FLUFFY HOMEMADE BREAD

It looks easy enough to make bread with basic flour, water, yeast, and a little salt, doesn’t it? However, even small adjustments to ingredient amounts, baking methods, or measurements have a big effects on the quality of your bread.

With a few easy recipe adjustments, you can easily create the ideal level of fluff and soft texture in your bread. Let’s begin by discussing common bread-making errors that lead to dry or chewy bread and providing advice on how to correct them:

Ingredients:

  1. 5 cups of flour
  2. 1 tablespoon of dry yeast
  3. 2 tablespoons of sugar
  4. 1 teaspoon of salt
  5. 1/4 cup oil
  6. 2 cups of milk
  7. 1 tablespoon of butter
  8. 100 grams of ghee
  9. 1 egg yolk
  10. Sesame

Preparation:

  1. Mix all ingredients for batter and knead.
  2. Divide the dough into 4 parts.
  3. Stretch out the cake.
  4. Brush with melted butter and form a roll.
  5. Let sit for 30 minutes.
  6. . Roll up each roll and brush with butter. Form a roll. Place on a baking tray with parchment paper and make cuts.
  7.  Let sit for 1 hour.
  8. Grease each roll with yolk and sprinkle with sesame seeds.
  9. Bake for 20 minutes at 180°C/350°F.


puff puff Recipe

PUFF PUFF RECIPE
Ingredients:
  1. Flour_ 2cups
  2. Yeast_ half table spoon
  3. Sugar_ 4 tablespoons
  4. Salt. _pinch
  5. Milk _any milk of choice
  6. Milk flavour 1 satchet
  7. Flavours of your choice(1 tsp)
  8. Nutmeg (half tablespoon)
  9. Luke warm Water_1 cup depends on the type of flour
  10. Pepper- to ur taste. You can use grated fresh pepper or dry grounded pepper
  11. I prefer the grated fresh pepper and its optional
  12. Onions- to ur taste ( optional)
  13. Groundnut oil enough for deep frying
METHODS:
Step1. In a large bowl pour in the lukewarm water
Step2. Add in the sugar, yeast,salt, flavor into the water turn very well
Step3. Gradually sieve in the flour into the water mixture, use your finger to mix very well, until the mixture becomes stretchy, cover with a clean towel
Step4. Allow to proof(rise) for 30 minutes
Step5. Pour the grated pepper and onions, into the mixture and mix well.
Step6. Into a deep frying pan pour in the oil and place over the heat, allow it to be very hot, then using your finger tips starts make the ball and put into the oil,allow to brown on both sides ,once its has brown use your perforated spoon to bring them out, allow to strain.
Enjoy
Useful tips to get the perfect round puff puff 👌
1: Make sure the yeast is still active
2: Use big bowl that will contain the mixture,because after rising it will double in size.
3. Use lukewarm water not hot water o.
4. There are different types of flour and water might be lesser or more depends on the type of flour one is using so it’s advisable you add it bit by bit to avoid adding more than it is required
5.Get the right consistency
6.Make sure your hand is wet before scooping the batter.
7.Make sure your oil temperature is right (if you drop batter in the oil and it comes up immediately, then the oil is at the right temperature.
Please try it out and let’s see the outcome

French Onion Soup Burgers

French Onion soup burger

🍔🧅 French Onion Soup Burgers 🍔🧅

I have finally found a burger that I just want to eat all the time. And I’m not normally a big burger person! These French Onion Soup Burgers are everything a burger shoul

They’re juicy and super flavorful and can I just say Caramelized Onions and melty Provolone or Gruyere and an Onion Bun just to drive those flavors home? Do I even need to say anything else?

Prep Time: 20 minutes

Cooking Time: 30 minutes

Total Time: 50 minutes

Ingredients:

  1. 1 1/2 pounds ground beef
  2. 1 packet or about 4 to 6 tablespoons Lipton Onion Soup Mix
  3. 2 1/2 tablespoons butter
  4. 2 large onions, thinly sliced
  5. a pinch of thyme
  6. water as needed, about a 3/4 cup
  7. 1 tablespoon brandy or Sherry (optional, but recommended)
  8. 4 to 8 ounces Swiss or Provolone cheese
  9. 4 buns and a little butter or oil to brush them with

Directions:

  • Mix ground beef with onion soup mix; set aside to rest as the onions are caramelized.
  • Add the butter to a skillet, when hot, add the onions and thyme and about 1/4 cup of water. Add lid and allow to simmer for three or four minutes until onions are tender are the water is nearly evaporated.
  • (Check during cooking time to make sure all the water hasn’t evaporated early.) Remove lid and continue to cook, stirring often and adding a splash of water now and then if the onions are beginning to darken unevenly and stick to the pan. When onions are soft and beautifully browned, add dash of the brandy or Sherry and remove from heat.
  • Place a dent in the top of each burger so they’ll cook up flat and not rounded. Cook on the stovetop in a medium-hot pan or on the grill over medium-high heat, turning once, for about three minutes on the first side. Turn and add a spoonful of caramelized onions and a slice or two of cheese to the top of each burger, lower the heat to medium and continue to cook until burger is desired doneness, two to four minutes longer. Cover if needed, for a minute or two to get the cheese to melt.
  • In the meantime, brush the cut side of the buns with butter or oil and toast in a hot pan or on the grill.

Notes on temperature:

We like ours at 143 degrees F. which is just slightly pink in the middle.

  • rare: 125 degrees (dark purple-red, just warm, tender)
  • medium rare: 135 degrees (bright purple-red, warm, tender, very juicy)
  • medium: 145 degrees (rich pink, yielding, slightly tender, juicy)
  • medium well: 155 degrees (tan with slight pink, firm, some juice)
  • well: 160 (tan to brown, no pink, chewy, little if any juice)

If you need more or less than four burgers, for each burger:

For each burger:

  • 6 ounces ground beef
  • 1 to 1 1/2 tablespoons onion soup mix
  • 2 teaspoons butter
  • 1/2 large onion, thinly sliced
  • a small pinch of thyme
  • water as needed
  • 1/2 teaspoon brandy or Sherry (optional, but recommended)
  • 1 to 2 ounces Gruyere (Swiss) or Provolone cheese (one or two slices)
  • 1 bun and a little butter or oil to brush it with

Air Fryer Method;

  1. Line the air fryer basket with foil or parchment and spray with olive oil spray.
  2. Place the patties evenly in the basket.
  3. Air Fry for 5 minutes at 375 Degrees.
  4. Carefully open and turn and cook an additional 5 minutes at 375 degrees.
  5. Open up the air fryer and see if they are to your desired doneness or at least 165 degrees.
  6. If they need additional time, add an additional 2 minutes to the cook time.

EASY CHOCOLATE CREAM CHEESE POUND CAKE

EASY CHOCOLATE CREAM CHEESE POUND CAKE

This simple pound cake with chocolate cream cheese gets together very quickly, yet it tastes fantastic. It’s an easy cake that everyone will enjoy to make.

Ingredients for the Dreamy Cream Cheese Chocolate Pound Cake:

  1. Two ounces of chopped dark chocolate,
  2. or 3/4 cup (105 g) all-purpose gluten-free flour; Better Batter was used by me.If xanthan gum is already present in your blend, omit the 1/2 teaspoon.
  3. 1/4 cup (36 g) cornstarch (you can also use potato starch or arrowroot)
  4. One tsp of kosher salt
  5. sixty grams, or 3/4 cup Dutch-processed cocoa powder (plus 1/8 teaspoon baking soda if using natural cocoa powder)
  6. sixteen tablespoons (224 grams) of room-temperature unsalted butter
  7. One cup (200 grams) of powdered sugar, plus additional for sprinkling
  8. 9 ounces (252 g) of room-temperature eggs (approximately 5 large eggs)
  9. Two tsp finely ground vanilla extract
  10. Two fluid ounces, or 1/4 cup made coffee (or milk, but let’s focus on the coffee!), at room temperature

 Regarding the Chocolate Glaze:

  1. diced four ounces of dark chocolate 
  2. and one-fourth cup (2 fluid ounces) of heavy cream
  3. One teaspoon of pure vanilla

SETTLEMENT:

  • Set the broiler temperature to 325°F. Grease or line normal 9-by-5-inch part skillet with parchment paper and store it. Put the chopped chocolate in small, microwave-safe bowl and melt it in 30-second bursts at 60% power until it’s smooth and liquefied (or use double evaporator).
  • Set the bowl aside to cool for bit. Filter the flour, thickener, cornstarch, and cocoa powder into medium-sized bowl. Add the salt and mix until thoroughly combined. Close up the basin. In the oar connection-equipped bowl of stand blender (or an Using a hand blender in a large bowl, beat the sugar and margarine until the mixture falls from the mixer in a lace when the oar is lifted, about 3 minutes.
  • Beat in the vanilla and eggs one at a time until everything is well combined. After each choice, beat to combine the chocolate with the fermented espresso.

Finally, add the flour and cocoa powder mixture slowly while the blender is running on low. briefly till they recently joined. The player should pour thickly and be smooth.

After emptying the hitter into the prepared dish, use a damp spatula to smooth the surface. Put in the center of the preheated broiler and cook until a toothpick inserted in the center comes out clean.

compared to a few clammy pieces joined (around 60 minutes). Remove from the broiler and let cool in the prospect for a few minutes before transferring to a wire rack to cool completely.

Prepare the covering. Put the broken chocolate into a small, heatproof bowl. Put the cream and vanilla into a small saucepan and heat over medium-low heat until the mixture thickens. Drizzle the heated cream over the chopped chocolate and allow to sit for about a minute, or until the chocolate begins to melt.

Process the chocolate until it’s smooth and dissolved. Using a large blade or tiny counterbalanced spatula, spread the icing evenly over the cooled pound cake. Let the coating settle at room temperature for the duration. Slice generously and proceed to serve.

Inspired by and styled by Donna Hay. modified from my recipe for gluten-free chocolate cinnamon pound cake in the Starbucks style.

Have fun

HOMEMADE CREPES

HOMEMADE CREPES 😋
Pancakes versus crepes: I’ll take the crepes side every time. Why? I can eat a lot more of them before feeling unduly full because of their thin and delicate texture and infinite versatility (you may serve them with savoury or sweet fillings). 😅 Sure, a heaping plate of fluffy pancakes has its place, but in my opinion, crepes are the best. especially when they’re as simple as this homemade pancake recipe. Do you need more persuasion? Continue reading.
Ingredients:
  1. 3 eggs
  2. ½ liter of milk
  3. ½ teaspoon salt
  4. 250 grams of flour
  5. 50 – 55 grams of butter

Preparation:

  1. We take a large bowl and add the flour, along with the salt. We stir with a hand whisk, and make a small well in the centre of the flour as if we were making homemade pasta.
  2. Next, we melt the butter for a few seconds in the microwave and set aside.
  3. Pour the eggs and melted butter into the hole made previously in the flour. We mix with the same hand whisks until we see that we have correctly integrated the ingredients. We can previously crack the eggs into another container to prevent any pieces of shell from leaking out.
  4. Now, we pour the milk little by little without stopping stirring. We must achieve a homogeneous mixture with practically no lumps.
  5. Next, we pass the mixture obtained through a fine strainer using a spatula. This way we won’t let any stubborn lumps that haven’t dissolved slip through. We cover the dough and let it rest for at least an hour.
  6. After the time has passed, we get a medium or large frying pan, depending on the size we want the homemade crepes. We recommend that it be a non-stick pan. We place the pan over a low heat and grease it with a little butter. We can help ourselves, in this case, with kitchen paper to remove excess.
  7. We take a serving ladle and use it to pour the dough into the pan. This way we won’t be guilty of adding too much.
  8. Spread the mixture by gently rotating and lifting the pan.
  9. Once we start to see that bubbles are forming, we lift one edge of the crepe with a spatula. If it is golden brown, we turn it over and let it cook on the other side. This process can last more or less 1 minute from when we spread the dough on one side, and 45 seconds on the other.
  10. We continue with the same process until we have finished with all the dough.

Million Dollar Pound Cake

Million Dollar Pound Cake

Million Dollar Pound Cake This cake is rich, buttery, and dense—worth a million dollars! It’s simple to prepare and goes well with breakfast, dessert, or even as a snack!
I adore serving it with fresh berries, whipped cream, and a cup of tea or coffee.


WHAT MAKES THIS CAKE A MILLION DOLLAR POUND?

According to some, the cake’s moniker came from the perception that it tastes extremely expensive. The word “pound” refers to the fact that one pound of each of the four main ingredients—flour, butter, sugar, and eggs—is used to make the cake.

Since the 1700s, the term “pound cake” has been in usage, and its origins are thought to be in Europe.


Ingredients Million Dollar Pound Cake

  1.  4 cups all-purpose flour sifted
  2. 1 pound salted butter softened (4 sticks)
  3. 1 tablespoon pure vanilla extract
  4. 1 teaspoon almond extract
  5. 3 cups granulated sugar
  6. 6 large eggs
  7. ¾ cup whole milk OR buttermilk


Instructions For Million Dollar Pound Cake

  • Preheat the oven to 300°F. Butter and flour an angel food/tube pan with a removable bottom. Set aside.
  • In the bowl of a stand mixer using the whisk attachment whisk together the butter, vanilla and almond extracts. Whip for 5 minutes on medium-high.
  • Switch to the paddle attachment. Add the sugar gradually beating on medium until light yellow in color. (Around 5 minutes)
  • Add the eggs one at a time beating well after each addition. Scrape the sides of the bowl as needed.
  • Lower the speed of the mixer and add the flour alternately with the milk, beginning and ending with flour. Stop and scrape the sides of the bowl occasionally
  •  After all has been added, beat for 1-2 minutes until the flour has fully incorporated.
  • Spread evenly into the pan and bounce on the counter, if needed to settle.
  • Place into the oven and bake for 1 hr 30-45 minutes OR until a toothpick inserted into the cake comes back clean.
  • Cool for 15 minutes, then remove the outer ring.
  • Cool completely on a cooling rack


ESSENTIAL ADVICE:

  • It’s crucial to remember that some parts of the cake could cook more quickly than others. I recommend slicing the cake into three to four separate parts using a knife to make sure it cooks through. The cake is cooked through if a knife inserted into it comes out clean.
  • Take care not to overbake it, though.
  • Verify that the eggs are room temperature and that the butter has softened.
  • Use real vanilla essence and high-quality butter for the finest results. Steer clear of fake vanilla extract.


Easy Croissants Recipe

Easy Croissants Recipe

This simplified croissant recipe will have you baking croissants like a pro. Flaky, buttery, and deliciously authentic, yet so easy to make!

Prep Time: 20 minutes + chilling time

Cooking Time: 15-18 minutes

Total Time: 1 hour 40 minutes

Ingredients:

  1. 2 1/4 cups all-purpose flour
  2. 1/4 cup granulated sugar
  3.  1 1/4 teaspoons active dry yeast
  4.  1 teaspoon salt
  5.  1 cup unsalted butter, cold
  6.  2/3 cup milk, cold
  7.  1 egg for egg wash

Directions:

  1. In a bowl, combine the flour, sugar, yeast, and salt. Mix well.
  2.  Cut the cold butter into small cubes and add it to the flour mixture. Use a pastry cutter or your fingers to work the butter into the flour until you have a coarse, crumbly mixture.
  3.  Gradually add the cold milk and mix until a dough forms.
  4.  Turn the dough out onto a floured surface and knead it briefly, just until it comes together
  5. . Roll the dough into a rectangle, then fold it into thirds like a letter.
  6.  Repeat the rolling and folding process two more times.
  7. Wrap the dough in plastic wrap and refrigerate for at least 1 hour or overnight
  8. . Preheat your oven to 425°F (220°C).
  9.  Roll out the dough into a large rectangle. Cut it into triangles.
  10. Roll each triangle tightly, starting from the wide end, to form croissants.
  11. Place the croissants on a baking sheet lined with parchment paper.
  12. Beat the egg and brush it over the croissants for a golden finish.
  13. Bake for 15-18 minutes or until the croissants are golden brown and flaky.
  14.  Enjoy your freshly baked, buttery croissants!
    (including chilling time)

Air Fryer Method:

  1. Preheat the Air Fryer to 350°F/175℃ for 3 minutes while you brush the rolls with egg wash
  2. Now put the rolls into the Air Fryer. Put the rolls in a single layer and prevent them from touching
  3. Cook for 7 minutes or until golden brown and completely cooked

Q/A

How should croissants be stored?
Store these handmade croissants in a container that can seal tightly. They keep well for up to a week and are still wonderful the next day.

Their shelf life will be extended to around 10 to 14 days in the refrigerator.

Are croissants freezer-friendly?

After baking, croissants can absolutely be frozen. Similar to numerous other pastry or bread recipes, these freeze admirably and can be thawed at room temperature in less than an hour.

On the other hand, I would advise against freezing croissant dough or unbaked croissants. While many bread doughs may be stored for up to two weeks, there’s always the possibility that the yeast won’t make it.

Notes:

*Instant yeast may be substituted.  Rise time may need to be reduced by 10 to 15 minutes.  You’ll know your dough is done rising when it has doubled in volume.

Air Fryer Chicken Bites

Air Fryer Chicken Bites

Boneless, skinless chicken breast chunks are used to make these simple, high-protein Air Fryer Chicken Bites—perfect for a last-minute meal! I make a big amount and use half of it to prepare the week’s meals.

Additionally, cooked chicken bits can be frozen:

  • After letting the chicken cool, place the chunks on a sheet pan and flash-freeze.
  • Once frozen, move to a bag or container that is safe to be kept in the freezer for up to three months.
  • To eat, either thaw them overnight in the fridge or reheat them straight from frozen in the air fryer for around five minutes at 350°F, shaking the basket halfway through.

Ideas for Accompanying Chicken Bites

  • These easy chicken pieces go well with variety of sides. Main Course: Serve this chicken over rice, beans, or sweet potatoes accompanied by Brussels sprouts, green beans, or green salad. Tacos: Place tortillas around the chicken and cover with cheese and salsa. Bowls: Combine chicken, vegetables, and fried egg in grain bowl and top with more Italian dressing. Salads: To provide more protein, add the meat to any salad.

Ingredients:

  • 3 pounds of cubed chicken breast (organic preferred), sized at 1 inch.
  •  1/4 cup Italian dressing
  • 1 tablespoon store-bought or homemade Adobo seasoning
  • 1 tablespoon dry Italian herbs
  • 1 teaspoon kosher salt
  • 1 tablespoon optional Sazon seasoning

Instructions

  • Combine the chicken, kosher salt, dried Italian herbs, adobo seasoning, and optional sazon in a big bowl.
  • Apply a little layer of oil to the basket. Shaking the basket, air fried the chicken for 12 minutes at 400F in an even layer, in batches as needed, until it’s golden and cooked through.