Chicken Lasagna Roll Ups

Chicken Lasagna Roll Ups

Cooking Chicken Lasagna Roll Ups is a comforting evening dish. Lasagna noodles are folded up with tender chicken, broccoli, and cheese, then baked in a handmade cream sauce.

This recipe, which serves as a full supper, is a family favourite!

Rather than arranging the components in a pan, a lasagna roll up is produced by wrapping all of the classic lasagna ingredients in pasta.

Preparation Time: 25 minutes
Cooking Time: One hour Five minutes
Cooling period of fifteen minutes
Time Spent: One hour, forty-five minutes
Six servings

Recipe By: Holly Nilsson

Ingredients For chicken lasagna roll-ups:

  • 12 cooked and cooled lasagna noodles
  • 4 cups cooked chicken
  • 3 cups cooked and cooled broccoli
  • 2 ½ cups shredded mozzarella cheese mixture
  • 2 cups cottage cheese or ricotta
  • 1 cup shredded mozzarella cheese
  • ¼ cup shredded parmesan cheese
  • 2 eggs
  • 2 tablespoons chopped parsley

Sauce for Recipe:

  • ¼ cup butter
  • One diced onion
  • Two minced garlic cloves
  • One-and-a-half cups flour,
  • Two cups chicken broth, one and a half cups milk,
  • Four ounces cream cheese
  • One cup shredded mozzarella
  • One and a half cups Parmesan
  • One teaspoon dried basil
  • One and a half teaspoons chopped oregano

Instructions For chicken lasagna roll-ups:

  • Turn the oven on to 350°F.
  • Mix the ingredients for the cheese mixture and reserve.

Sauce:

  • Heat the butter in a medium saucepan and sauté the onion and garlic for about 3 minutes, or until soft. Cook for one to two minutes after adding flour.
  • Gradually add the milk and broth, whisking after each addition. It will start out thick but thin out. After adding all of the liquid, whisk in the melted cream cheese. Simmer for one minute.
  • Take off the heat and mix in the dried basil, oregano, mozzarella, and Parmesan cheeses.

Putting together:

  • Fill a 9×13 pan with one cup of the sauce mixture.
    Arrange the noodles.
  • Spoon chicken, broccoli, and cheese mixture over noodles. Top each with 2 tablespoons mozzarella cheese.
  • Roll noodles and place seam down in the pan. Top with the remaining sauce.
  • Cover with foil and bake for 30 minutes. Remove foil, sprinkle with remaining cheese, and bake for another 15 minutes.
  • Remove from the oven and let cool 15 minutes before serving.

Notes If you’d like, you can use ricotta instead of cottage cheese.
You can add broccoli or any other steamed vegetable, such as carrots or asparagus, in place of it.

Although we like the taste of the homemade sauce, you can use one or two jars of Alfredo sauce to speed up preparation.

Information on Nutrition:
serving size: two roll-ups; 931 calories; 60g of carbohydrates; 72g of protein; 44g of fat; 24g of saturated fat; 1g of trans fat; 235 mg of cholesterol; 1456 mg of sodium; 892 mg of potassium; 4g of fibre; 10g of sugar; 1798 IU of vitamin A; 50 mg of vitamin C; 747 mg of calcium; 3 mg of iron
The estimated nutritional information is subject to change depending on the brands of components and cooking techniques employed.

Hasselback Potatoes Recipe

Hasselback Potatoes Recipe

Thinly sliced potatoes are roasted until they are the perfect golden brown, and then cheese, sour cream, and green onions are added on top. These potatoes are known as hasselback potatoes. A simple but stunning side dish that goes great with steak and chicken!

Ingredients

  1. Six russet potatoes, o
  2. ne-quarter cup olive oil,
  3. one-fourth cup melted butter,
  4. salt, and pepper to taste, ei
  5. ght thin-cut cheddar cheese slices, cut into one-inch squares,
  6.  one-third cup sour cream,
  7. two teaspoons green onions,
  8. and cooking spray

DIRECTIONS

  • Start the oven at 450 degrees Fahrenheit. After lining a sheet pan with foil, spray cooking spray on the foil.
  • On a chopping board, sandwich a potato between two chopsticks. Cut the potato into thin, ⅛–¼ inch-thick slices. The chopsticks will stop you from having to from slicing through completely.
  • Proceed with the remaining potatoes in the same manner. Arrange the potatoes onto the baking sheet.
  • Mix the butter, olive oil, salt, and pepper in a small bowl.
  • Make sure to get some of the olive oil mixture between the potato slices as you brush the entire surface.
  • Bake potatoes for 50–60 minutes, or until they are soft and golden.
  • After taking the potatoes out of the oven, give them five minutes to cool.
  • Place a slice of cheddar cheese between each potato cut.
  • Put the potatoes back in the oven and continue to bake for another three to five minutes, or until the cheese has melted.
  • Place a dollop of sour cream on top of each potato, and then scatter the green onions  on top. Serve right away.

NUTRITIONAL INFORMATION

402 kcal of calories,

39 g of carbohydrates,

7 g of protein

18 g of fat,

10 g of saturated fat,

37 mg of cholesterol,

186 mg of sodium,

935 mg of potassium,

3 g of fiber,

2 g of sugar,

336 IU of vitamin A,

13 mg of vitamin C,

44 mg of calcium, and 2 mg of iron.

CREAMY WHITE CHICKEN ENCHILADAS

CREAMY WHITE CHICKEN ENCHILADAS

Creamy White Chicken Enchiladas are prepared with cheese, shredded chicken, green chiles, flour tortillas, and a delectable creamy white sauce!

Set Up Time: fifteen minutes

Cooking Time: 25 minutes

Time Spent: forty minutes Five servings

A TASTY RECIPE FOR CHICKEN ENCHILADA

Chiladas are among my favourite Mexican dishes, aside from chimichangas. This is one of those dishes that even finicky eaters enjoy! It has a delicious creamy sauce that truly brings everything together, and it’s not spicy at all. This is an easy evening dinner that comes together quite quickly!

Ingredients:

  1. One cup of shredded Monterey Jack cheese (or mozzarella) \two cups of cooked, shredded chicken (you can also use a store-bought rotisserie chicken) with Adobo
  2. seasoning and salt
  3. pepper to taste
  4. Ten taco-sized flour tortillas
  5. three tablespoons of butter
  6. three tablespoons of all-purpose flour
  7. two cups of chicken broth,
  8. one cup of sour cream
  9. four ounces of diced green chilies (do not drain)
  10. one cup of shredded Cheese from Monterey Jack

Instructions  for White Chicken Enchiladas:

  1. Set the oven’s temperature to 350F.
  2. Apply nonstick cooking spray to a 9 x 13-inch baking dish.
  3. One cup of shredded cheese should be added. Add some Adobo seasoning, salt, and pepper for flavour.
  4. Put a little of the chicken mixture into each wheat tortilla.
  5. After rolling each one, put it on the baking dish. Just cram them all inside.
  6. Melt butter in a saucepan of moderate size. Stir in flour; simmer and thicken for 1 minute, being careful not to burn.
  7. Whisk in chicken broth until it’s smooth.
  8. Add chilies and sour cream and stir. Make sure the mixture doesn’t boil.
  9. Remove the sauce from the stove and serve the enchiladas with it. Add the remaining cheese shreds on top.
  10. Bake for twenty to thirty minutes. You can broil these for one or two minutes on high, if you’d like, until the cheese is bubbling and gently browned. Warm up and enjoy with your preferred sides.

SUGGESTIONS FOR CHICKEN COOKING AND SHREDDING:

  • There are two methods you can use to prepare chicken. A few chicken breasts can be roasted in the oven. Toss them with a little olive oil, season with salt and pepper, and bake for 35 to 45 minutes.
  • Alternatively, boil your chicken until it’s done. Alternatively, you may use rotisserie chicken from the grocery. It just comes down to how much time you have available and what kind of chicken you want. The chicken that is roasted or rotisserie will have the most flavour.
  • After the chicken is cooked, shred it with two forks. Alternatively, place your chicken in the mixing bowl and use the paddle attachment on your stand mixer. After you turn on the mixer, the chicken will be properly shredded in just one minute.
  • I’ve prepared this set for five dishes, figuring that each individual will eat two enchiladas.

Course: Principal Course

Slow Roasted Lamb Shoulder

Slow Roasted Lamb Shoulder

This is a simple, traditional roast lamb dish that yields meat so delicate that it can be torn apart with two forks instead of a carving knife.

Of course Principal Dish

 British Cuisine: Lamb Shoulder Preparation Time: 10 minutes

 4 hours for cooking

 Ten minutes of rest

 Total Duration Ten minutes and four hours

 Servings Six portions

Ingredients:

  1. 18–24 sprigs entire rosemary leaves
  2. One or two bulbs of garlic, split into cloves and skinned
  3. Three tablespoons of olive oil
  4. 1.5 to 2 kg of lamb shoulder, salted and ground just before using

Guidelines

  • Set an oven rack in the center position and preheat to the highest settings
  • Take a large roasting tin and put half the rosemary and half the garlic bulbs in it. Drizzle with 1 tbsp of the olive oil then, using your hands mix everything together so the herbs and garlic are coated in oil.
  • Using a sharp knife, cut a criss-cross pattern on the top, fatty side, of the lamb shoulder without cutting down into the meat.
  • Put the lamb on top of the rosemary and garlic already in the tin.
  • Season the lamb with salt and pepper then drizzle another tablespoon of olive oil over it. Using your fingers, rub the seasoning and oil into the lamb.
  • Strew the remaining rosemary and garlic over the lamb and drizzle with the final tablespoon of olive oil.
  • Tightly cover the roasting tin with foil and reduce the oven temperature to 160C Fan / 350F / Gas 4.
  • Half the garlic bulbs and half the rosemary should be placed in a big roasting tin. Drizzle with 1 tablespoon of the olive oil, then, using your hands, combine all the ingredients until the garlic and herbs are well covered.
  • Cut a crisscross pattern on the top, fatty side of the lamb shoulder using a sharp knife, being careful not to cut through the meat.
  • Place the lamb in the tin on top of the garlic and rosemary.
  • After adding salt and pepper to the lamb, cover it with an additional tablespoon of olive oil. Massage the oil and seasoning into the lamb with your fingertips.
  • Drizzle the last tablespoon of olive oil over the lamb and scatter the remaining rosemary and garlic on top.
  • Set the oven to 160C Fan / 350F / Gas 4, then cover the roasting tin tightly with foil.
  • Place the lamb in the oven and let it cook slowly for four hours. Check to see whether your shoulder is cooked after three hours if it is within the recommended weight range shown in the ingredient list.
  • When the lamb pulls easily from the joint and comes away cleanly without any meat stuck to it, it is ready.
  • Raising the oven temperature and returning the lamb, uncovered, until cooked to your preference will allow you to brown the outside of the meat a bit more (5-10 minutes).
  • After the meat is done, move it to a warm plate, cover it, and let it rest for at least ten minutes.
  • Shred the meat with two forks to serve.

Optional accompaniments

  1. Remove some of the fat released from the lamb while it’s cooking and use it to make crispy roast potatoes.

Prepare a gravy:

  •  Throw away the rosemary and place the garlic cloves aside while the lamb is resting.
  • Remove the majority of the fat and reserve for later usage, like roast potatoes.
  • mix in 1 tablespoon flour to the liquids and simmer for 1 to 2 minutes.
  • To create a smooth sauce, progressively add more lamb or chicken stock while stirring continuously. After 5 to 10 minutes, check the seasoning.
  • Squeeze the soft garlic clove contents into the sauce.liked and/or add redcurrant jelly, mint cut fine, or both.

Lemon muffins

Ingredients For Lemon Muffins:

The recipe for tender and aromatic glazed cakes is called lemon muffins. In our version, we glazed the muffins with a mixture of powdered sugar and lemon juice, then topped them with a slice of citrus fruit and fresh mint leaves for a visually striking and impactful outcome. This allows the sweet citrus taste of the dough to contrast with the sour notes of the topping, giving you a pleasing range of flavours. If desired, you can offer the desserts as part of a party buffet or Sunday brunch, or serve them as a stand-alone dessert served with a glass of limoncello after the meal.

Ingredients For Lemon Muffins:

  1. Two chunks of organic lemons
  2. 150 g of powdered sugar
  3. 130 g of flour (Type 405)
  4. 70 millilitres of milk
  5. 50g cornflour
  6. 40 ml of sunflower oil
  7. Eight grams of baking powder
  8. Two slices of eggs

Regarding the lemon glaze:

  1. 80g of powdered sugar
  2. Three tablespoons of lemon juice

To sum up:

  1. One organic lemon
  2. Mint leaves that are fresh
  3. The zesty and invigorating take on the traditional American muffin is the lemon muffin.
  4. These delectable lemon sweets are produced from organic citrus peel and juice.

Instructions For Lemon Muffins:

  • Step 1: Gather the powdered sugar into a bowl and add the shredded lemon peel for seasoning.
  • Step 2: Stir in baking powder, cornflour, and sifted flour.
  • Step 3. Combine the granules.
  • Step 4: Include milk.
  • Step 5: Add the seed oil in step five.
  • Step 6: Add the lemon juice, squeezed, to the other ingredients.
  • Step 7: Complete the egg process.
  • Step 8: Using a hand mixer, thoroughly combine everything.
  • Step 9: The finished product ought to be a creamy, lump-free blend.
  • Step 10: Spoon the prepared mixture into a muffin tin that has been lined with paper cases, filling it about two thirds of the way. Bake in a static oven at 180°C for about 20 minutes. The cakes should be taken out of the oven, taken out of the tin, and allowed to cool when the allotted time has passed.
  • Step 11: Make the icing in the meanwhile. Pour the lemon juice into a bowl with the sifted powdered sugar. Next, thoroughly stir with a spoon until the desired consistency of liquid sauce is achieved.
  • Step 12: Spread the muffin tops with the lemon icing.
  • Step 13: Add a half-lemon slice, a fresh mint leaf, and allow it to set.
  • Step 14: Transfer the lemon muffins to a platter, present them at the table, and cut them into pieces.

Suggestion For Lemon Muffins:

  • We suggest using delicious and low-acid lemons, like Sfusato Amalfitano, for this dish because they are fragrant and juicy. Or any other variety you happen to have at home works just fine, provided it hasn’t been chemically treated to make it safe to eat whole, skin and all, without posing any health hazards.
  • If desired, you can enhance the cakes with candied fruit, rehydrated raisins, or white chocolate chips. Alternatively, you can experiment with a more delicate and smooth version by incorporating well-drained cow’s milk ricotta from the whey into the other components.
  • If you’d rather, you can use oranges or tangerines in place of the lemons, or swap out the seed oil for 50 grams of soft butter.
  • For a maximum of four to five days, the lemon muffins can be kept at room temperature under a baking tray.


Nutella Filled Baked Donuts

Nutella Filled Baked Donuts

For all donut enthusiasts, these handmade baked donuts with their crispy cinnamon-sugar crust and oozy Nutella inside are an incredible treat. With this recipe for donuts, you may now enjoy two of your favorite things together: DONUTS and NUTELLA!

Ingredients

Donut batter:

  1. One cup of flour for all purposes
  2. One tsp baking powder
  3. A pinch of salt
  4. One-third cup unsalted butter, melted (one-third for pan greasing and three-quarters for dough).
  5. .25 teaspoons of sugar
  6. One-half teaspoon of cinnamon
  7. One egg
  8. One-half teaspoon of vanilla
  9. Seven tablespoons of milk
  10. ¾ cup (8 oz or 220 grams) of

Nutella is used as the filling and topping.

  1. Two tablespoons of ¼ sugar or light brown sugar mixed with unsalted butter
  2. One teaspoon of cinnamon, adjusted to taste.

Guidelines

  • Use plastic wrap to line the donut pan. Spoon Nutella into a piping bag (or cut the corner off a zip-lock bag). To form the ring, pipe Nutella into the middle of each cavity. Then, freeze until firm. When you’re ready to construct the donuts, take the Nutella rings out of the pan, put them on a plate, and put them back in the freezer.
  • Set oven temperature to 350°F. Melt butter in the donut pan and set it aside.
  • Mix the flour, baking powder, and salt in a small bowl.
  • Mix the remaining 3 ½ tablespoons of melted butter and 2 ½ tablespoons of sugar in a separate bowl. Whisk in the egg, milk, vanilla, and cinnamon until well combined. Add flour mixture and whisk.
  • Spoon the mixture into a piping bag (or snip the corner off a zip-lock bag). Pour half of the batter into the donut pan. Place the Nutella rings on top after taking them out of the freezer. Pour the remaining batter over Nutella.
  • Preheat the air fryer (or oven) to 350 degrees F, Bake for 13 to 15 minutes, or until firm to the touch and golden brown.
  • After 5 minutes in the pan, flip the donuts over onto a cooling rack.
  • Combine sugar and cinnamon in a bowl.
  • Melt two tablespoons of butter.
  • After dipping each donut in the cinnamon sugar mixture, brush with melted butter.


zucchini herb and pancetta frittata

zucchini herb and pancetta frittata recipe

This recipe for freezer-friendly zucchini slices is incredibly simple and works well for a light lunch or dinner.

Ingredients for zucchini herb and pancetta frittata 

  1. 20g butter plus additional for lubrication
  2. One chopped onion,
  3. 150g of pancetta,
  4. three large zucchini, shredded Perfect Italiano,
  5. 150g Ideal Cheese Melt
  6. 150 grams of flour with self-rising
  7. Six eggs, whisked just until fluffy
  8. one-third cup of vegetable oil
  9. 1/3 cup finely chopped herbs, such as tarragon, thyme, and parsley

Procedure for zucchini herb and pancetta frittata 

  • Set oven temperature to 180°C. Lubricate a Lamington nonstick pan.
  • In a medium-sized frypan set over medium heat, melt the butter. After it has melted, add the pancetta and onion, and stir gently for five minutes, or until the pancetta starts to brown and the onion softens. Take off the heat source and allow it to cool slightly.
  • After grating the zucchini and pressing out any extra juice, combine it with the Perfect Italiano Perfect Melt cheese in a big bowl. Stir in the cooled pancetta and onion combination, flour, eggs, oil, and herbs. Add salt and pepper to taste, then mix everything together.
  • After pouring the batter into the prepared pan, bake it for 30 minutes, or until it becomes brown and puffy. Take out of the oven, then serve hot or room temperature

Advice & Suggestions:

  1. To freeze, let cool fully before securely wrapping in plastic wrap. Freeze for up to three months after placing in an airtight container.
  2. Refrigerate overnight to defrost, then reheat in the oven or microwave.

Apple Fritter Bread

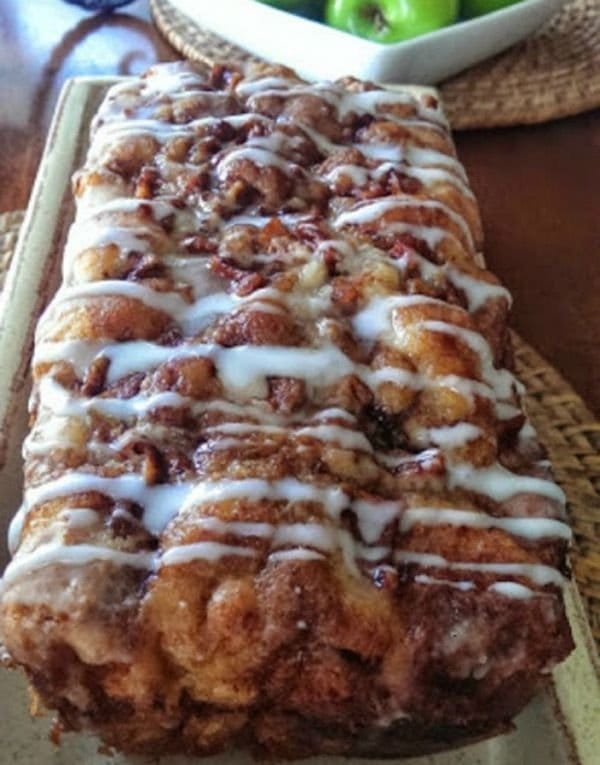
Awesome Country Apple Fritter Bread

Loaf of fluffy, buttery white cake with layers of cinnamon and brown sugar swirled throughout and on top, packed full of apple pieces. Basically Unstoppable!

Ingredients

Cinnamon/brown sugar mixture

  1. ⅓ cup sugar, light brown
  2. one tsp finely ground cinnamon

Recipe for Apple Bread Loaf

  1. ½ cup softened butter
  2. Half a cup of sugar, grated
  3. two room-temperature eggs
  4. A quarter-tsp vanilla extract
  5. a quarter cup all-purpose flour
  6. 1/4 tsp baking powder
  7. ½ cup room temperature milk or almond milk

Apple Mixture, Chopped

  1. Two large Granny Smith apples, peeled and roughly chopped (not finely chopped).
  2. Two teaspoons of sugar, granulated
  3. One tsp of cinnamon

Traditional Cream Glaze

  1. ½ cup of sugar powder
  2. 1-3 tablespoons of cream or milk, depending on desired glaze thickness. Use extra milk to create a thinner glaze that can be poured over the entire loaf for a more apple fritter-style baked good, similar to the apple fritter donut.

DIRECTIONS

  • Set the oven’s temperature to 350. Apply non-stick cooking spray to a 9 x 5-inch loaf pan. Alternatively, line the pan with parchment paper or foil for easy removal for slicing.

Cinnamon/brown sugar mixture

  • In a dish, combine 1/3 cup brown sugar and 1 teaspoon cinnamon. Put aside.

Recipe for Apple Bread Loaf

  • In another bowl, combine and whisk together and 1/2 cups flour and and 3/4 teaspoons baking powder; leave aside.
  • Using an electric mixer, whip 1/2 cup softened butter and 2/3 cup granulated sugar in separate medium-
  • sized bowl until smooth and creamy.
  • Incorporate two eggs, one at time, until well combined with the butter/sugar mixture; incorporate one and half teaspoons of vanilla essence.
  • Blend in the flour combination after adding it to the creamed butter mixture.
  • Blend in 1/2 cup milk and process until smooth batter is achieved.

Apple Mixture, Chopped

  • In bowl, toss diced apples with teaspoon cinnamon and tablespoons granulated sugar. Prepare to layer.

Layer Repetition:

  • Spoon the leftover apple bread batter into the loaf pan that has been preheated, allowing it to spread, and then cover with the leftover chopped apple mixture.
  • The remaining brown sugar/cinnamon mixture should then be sprinkled on top.
  • Make several swirls in the mixture with a knife.
  • Preheat the oven and bake for about 60 minutes, or until a
  • toothpick inserted in the center of the loaf comes out clean.

Traditional Cream Glaze

  • In order to create glaze, thoroughly combine 1/2 cup powdered sugar with 1 to 3 tablespoons of milk or cream. (If combination needs a boost, microwave for 10 seconds to make it pourable.)
  • After letting the loaf sit in the pan for about fifteen minutes, take it out and let it cool fully on a cooling rack. Pour glaze over.
  • Make two batches if you want additional glaze.

Easy Apple Pie with Frozen Puff Pastry

Easy Apple Pie with Frozen Puff Pastry

This is the recipe for apple pie that my mother used to prepare when I was a kid, however you may have seen one similar to it a long time ago. These days, I enjoy making it for my own family.

It’s basically infallible because frozen puff pastry is used. If I had any advice, it would be to make sure the apple filling isn’t too thin and to avoid adding too much since this could cause it to spill. It will burn and the pastry won’t puff if it spills out.

Naragon’s recipe

Ingredients

  1. One sizable Apple
  2. 1/4 cup sugar and 4 shakes Powdered cinnamon
  3. 50 ml of water and 100 ml
  4. One splash of lemon juice
  5. Puff pastry, frozen, one bag
  6. One egg yolk plus one tsp water

Instructions for Cooking

First Step

Roughly chop the apple into small pieces. Soak in water with salt. Their varied cuts will give the filling a pleasing texture.

Step 2

Transfer the apples to a pot with a little oil and cook over medium heat, taking care not to burn them.

Step 3

Lower the heat and stir in the cinnamon, sugar, and 100 ml of water after the apples start to become fairly transparent. Simmer until they are golden brown, about 10 minutes.

Step 4

Once it resembles this picture, taste and add more sugar or cinnamon to adjust the flavor.

Step 5

To keep it from burning, add 50 cc of water and simmer for an additional five minutes. Cook the additional water until it evaporates. After removing from the heat, squeeze in the lemon.

Step 6 Addendum:

I used to place the puff pastry sheets straight onto the oven tray, but after hearing from some readers that they adhered to the pan when baked, I changed my approach!

Step 7:

Let the puff pastry sheets sit for fifteen minutes at room temperature. Line a baking pan with parchment paper and place two sheets of puff pastry on it. Once it has cooled down a bit, cover with the apple filling.

Step 8

Avoid packing on too much, and avoid overflowing the edges. Add two to three shakes of cinnamon once it’s uniformly distributed.

Step 9

Using a knife, make deep lengthwise cuts in the two remaining sheets. Arrange them atop the Step 7 apple filling-topped sheets. Now is the time to preheat the oven

Step 10:

To close, run the back of a fork down the edges. Hard puff pastry can cause the edges to come apart easily,

Step 11

Use an egg yolk beaten with one teaspoon of water to make an egg wash to glaze.

Step 12

Bake for ten minutes at 200°C on the upper rack of the oven. Bake for a further ten minutes at 170°C when the top begins to brown.

Step 13

Since every oven is different, carefully monitor your oven and modify the baking time accordingly.

Step 14

When the top is golden brown and it has puffed up, it is done. Once off the pan, let it cool.

Step 15

Completed! These taste great both hot and cold.

Step 16

I used puff pastry with pre-existing air holes this time. If you’re using a puff pastry without holes, use a fork to make holes in each of the four sheets

Sausage And Creamy Hashbrown Casserole

Sausage And Creamy Hashbrown Casserole

My goodness! This dish is very delicious! I promise you will fall in love with it if you give it a try! You can certainly add extra ingredients if you’d like. Friends, have a wonderful day and remember to share this recipe with your family and friends. Have fun!

Prep Time: 15 mins

Cook Time: 40 mins

Total Time: 55 mins 

 Yield: 10 Servings

Ingredients:

  1. two glasses of milk
  2. Beaten eight eggs
  3. Two pounds of mild or spicy sausage
  4. 16 ounces of softened cream cheese at room temperature.
  5. 32 ounces of frozen hash browns, shred.
  6. Half a teaspoon of salt
  7. Half a teaspoon of pepper
  8. One-half teaspoon of garlic powder
  9. One-half teaspoon of onion powder
  10. Two cups of cheddar cheese, shredded

Instructions:

  1. Set oven temperature to 350°F.
  2. After the sausage is fully cooked, drain the fat, stir in the cream cheese and set aside.
  3. When the hash browns are lightly browned, add them to the skillet and cook.
  4. Arrange the hash browns evenly on the bottom of a 9 x 13 baking pan that has only been lightly greased.
  5. Add the sausage and cream cheese mixture over top.
    Top with a sprinkling of cheddar cheese
  6. Blend the milk, eggs, and seasonings, then drizzle the mixture over the dish.
  7. Bake for forty to fifty minutes, uncovered. or until 160°F is reached inside.