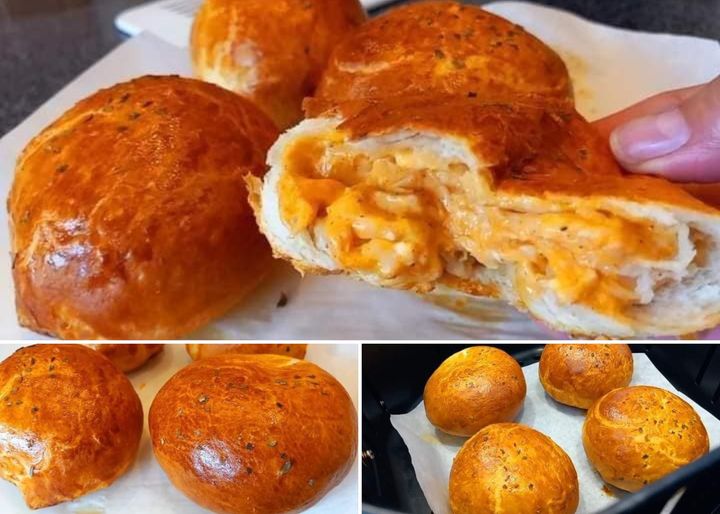
Air Fryer Buffalo Chicken Bombs Recipe
Entire taste fandom is invited! Take one look at these amazing Air Fryer Buffalo Chicken Bombs if you’re ready to step up your cooking game. This recipe will make your taste buds happy dance; it’s not just a crowd-pleaser. It’s a delicious explosion. Here are the delectable details that are ideal for posting in your preferred Facebook group.
Taste Bud Bliss Ingredients
1. DELICIOUS CHICKEN
Slice the chicken breasts thinly cutlets, making sure they are skinless and boneless. This offers our highly flavorful creation the ideal canvas.
2. CREAMY DELICACY
If you want the mixture to have a smooth, luscious texture, add some cream cheese. Use whichever flavor you prefer, conventional or infused with a dash of herbs.
3. HOT AND SOUR KICK
A Buffalo Chicken Bomb is never fully formed. sans buffalo sauce, the star of the show! For an even more individualized touch, make your own handmade version or choose your favorite brand.
4. CLOSE IT UP
Bacon pieces offer a smoky, savory layer that accentuates the spicy buffalo flavor of these delicious ingredients.
Step-by-step Explosion of Flavors
Step 1: PREPARE THE CHICKEN
After arranging the chicken cutlets, generously cover each one with a layer of cream cheese. This is what gives our Buffalo Chicken Bombs their creamy center.
Step 2: Magic Buffalo
Pour a generous amount of buffalo sauce onto the chicken that has been smothered in cream cheese. Here’s where the robust flavor really shines, so don’t be shy.
Step 4 of the Air Fryer Brilliance:
Air Fry to Perfection Put your chicken bombs wrapped in bacon into the To ensure the best frying, place them in a single layer within the air fryer basket. Preheat the air fryer to 375°F, then let the bacon cook for about 15 to 20 minutes, or until it’s perfectly crispy.
Step 5: Snack and Have Fun
When your Buffalo Chicken Bombs are golden and incredibly crispy, take them out of the air fryer. After allowing them to cool slightly, cut them into little pieces. Watch these delicious bombs vanish in a matter of seconds.
DISPLAY LOVE AROUND YOUR FACEBOOK GROUP
- It’s time to spread the love now that you’ve perfected the art of Air Fryer Buffalo Chicken Bombs. Share your delicious creation in your preferred Facebook group, and you’ll get a ton of comments.
- These bombs can be used for virtual potlucks or celebrations of culinary achievements. are certain to make you the group’s hero.
- A fantastic culinary adventure awaits you, where every delicious taste blends aspects of creaminess, spice, and smoke.
- Embrace the enthusiasm and let the Buffalo Chicken Bombs steal the spotlight at your next gastronomic get-together—your Facebook group is in for a treat!