Rejuvenate Your Liver and Veins in 3 Days

Rejuvenate Your Liver and Veins in 3 Days

Rejuvenate Your Liver and Veins in 3 Days! The Ultimate Liver Detox Overview Overall health depends on having a strong liver and clear veins, but our contemporary lives can occasionally strain these important organs. Thankfully, nature offers us potent substances that can support optimum health by revitalising and cleaning the liver and veins.

A straightforward mixture of lime, garlic, and parsley can be used to start a three-day liver detox that will leave you feeling renewed and invigorated. Let’s explore the advantages of these components and discover how to take use of their cleansing potential.

1. Parsley:

Rich in minerals, vitamins, and chlorophyll, parsley supports liver function and helps with cleansing.

Its diuretic qualities aid in the removal of toxins from the body and lessen vein and liver irritation.

2. Garlic
Sulfur-containing chemicals found in garlic stimulate liver enzymes and encourage the synthesis of glutathione, a potent antioxidant that supports detoxification.

In addition, it lowers cholesterol and enhances blood flow, promoting vein health.

3. Lime:

Vitamin C, which is abundant in limes, strengthens the immune system and improves liver function.

Because of its acidic nature, it promotes the formation of bile, which helps the liver break down toxins and lipids.

The Recipe

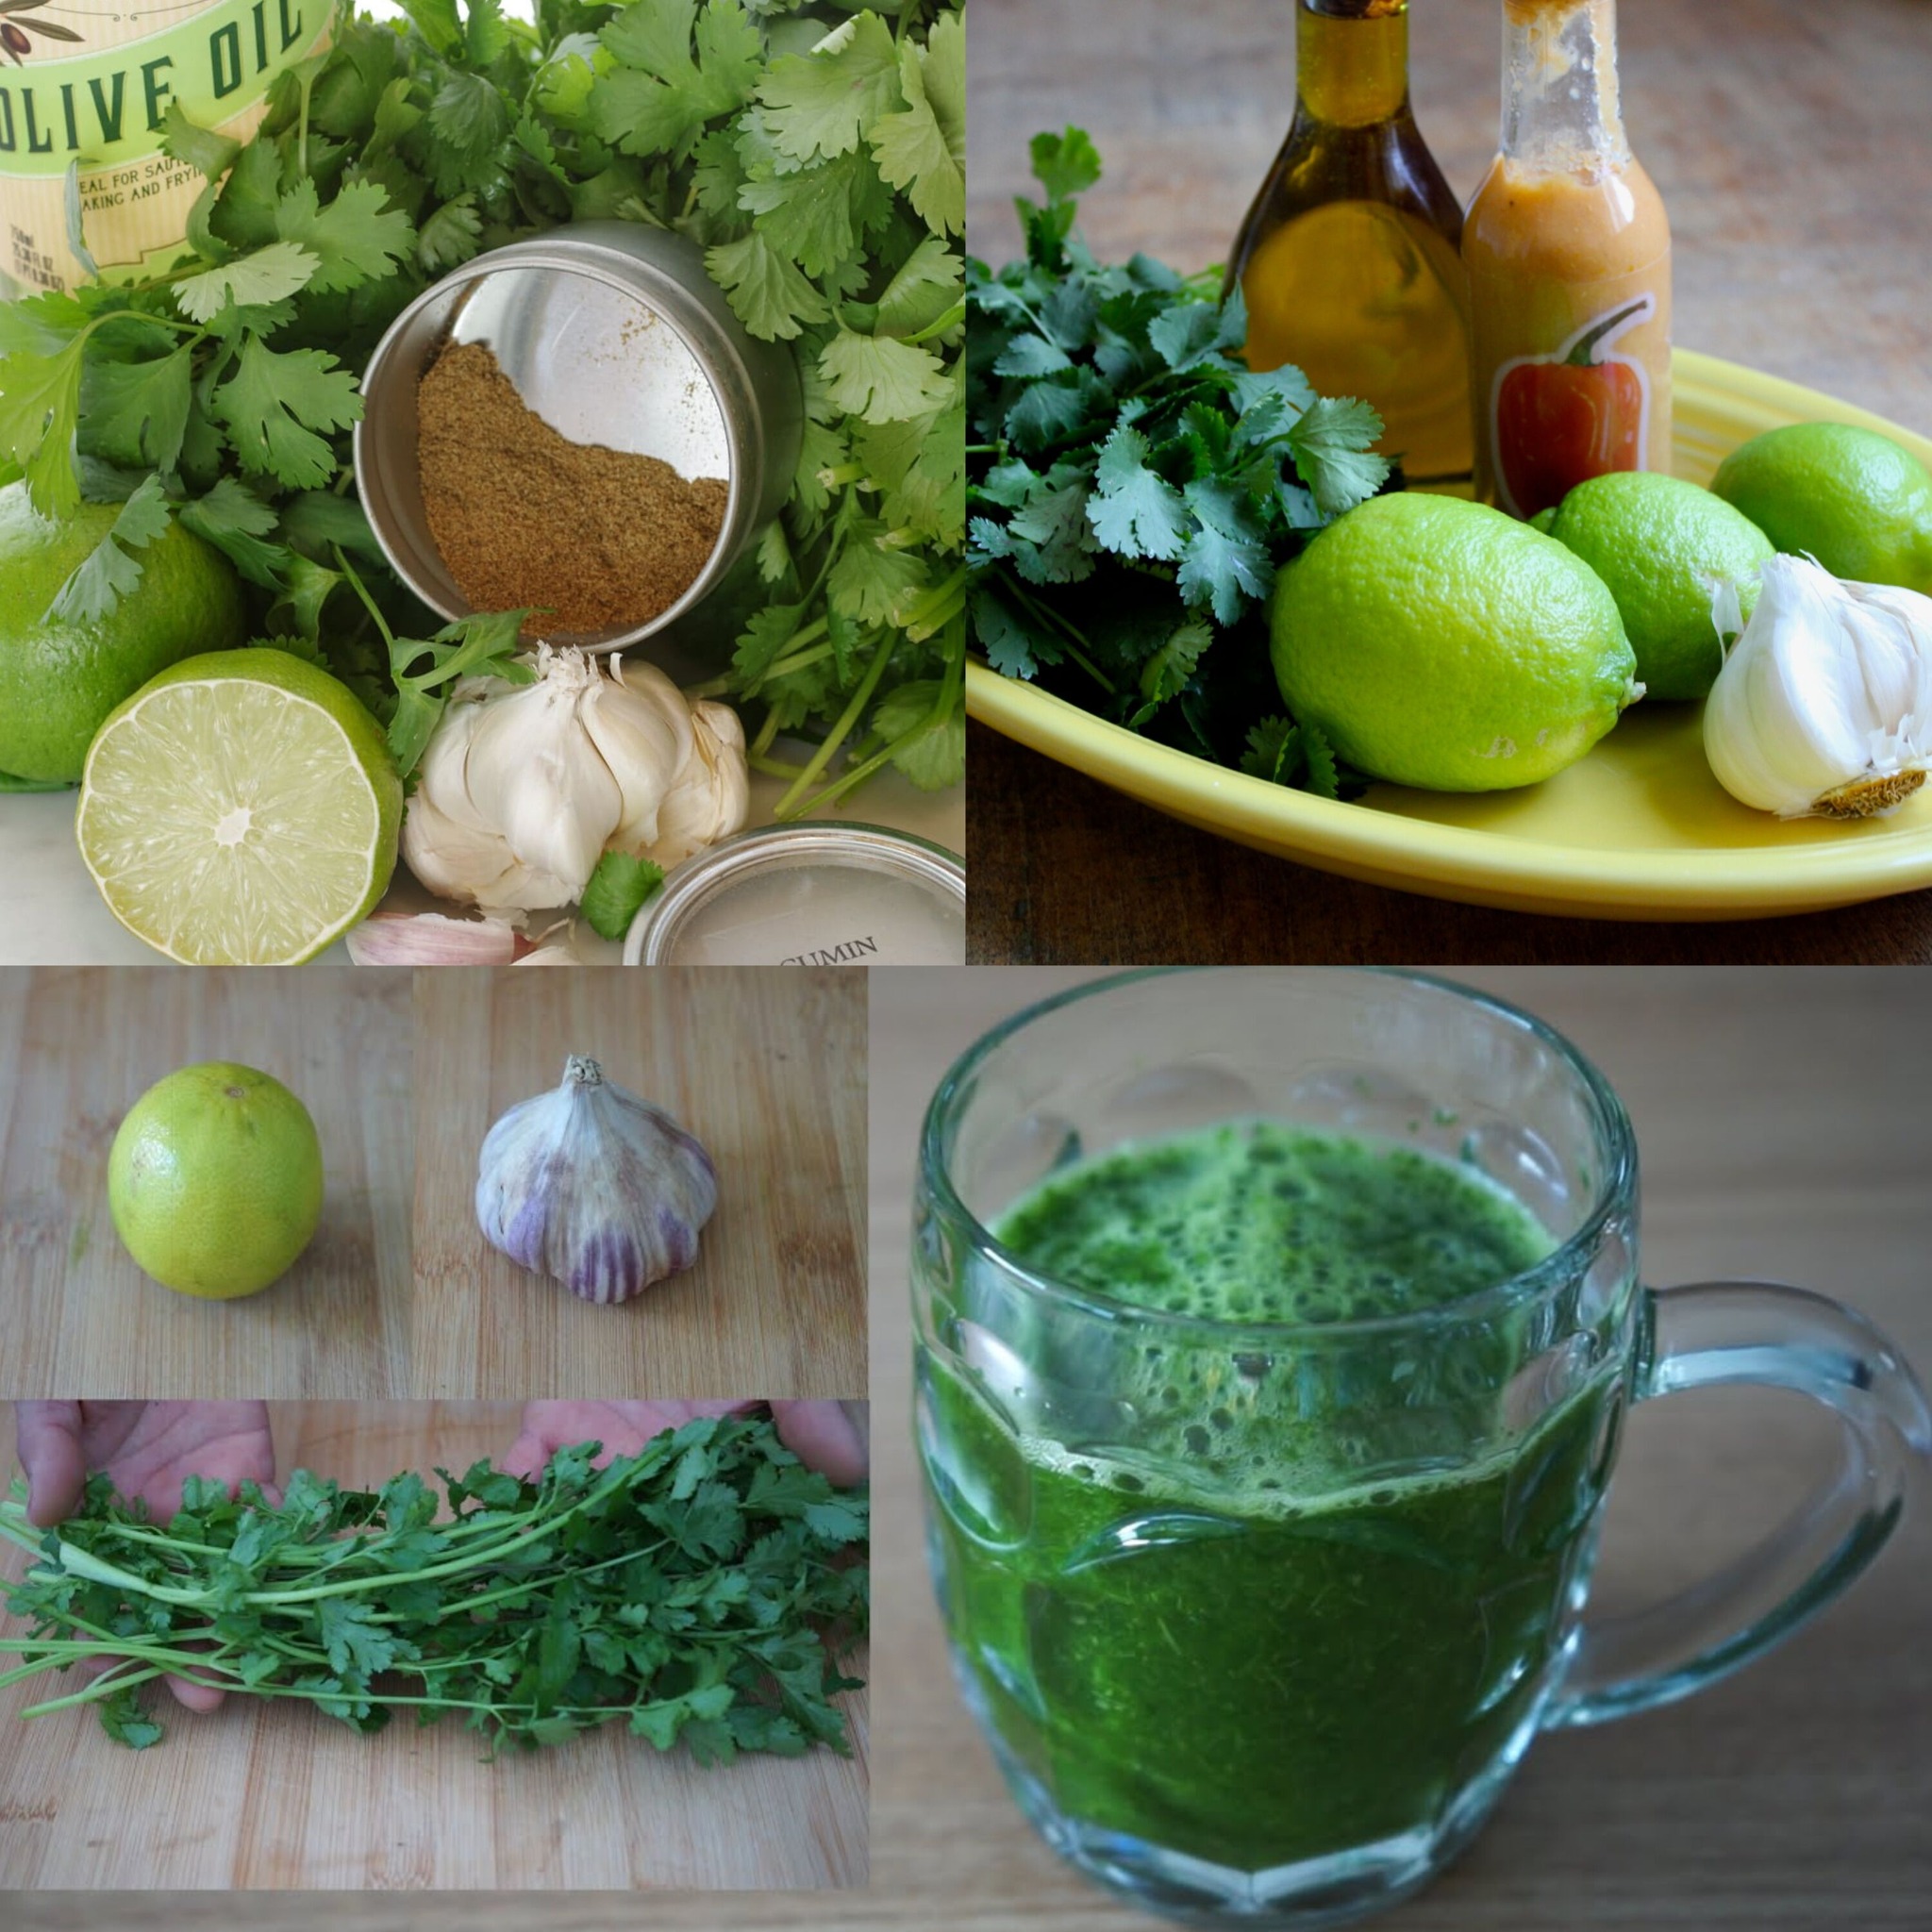
1. Parsley, Garlic, and Lime Detox Drink:

Put one or two peeled garlic cloves, a handful of fresh parsley, and the juice of one lime in a blender.

Blend in one cup of water until smooth.

Drink this detoxifying elixir first thing in the morning on an empty stomach for three consecutive days.

2. Incorporating into Meals:

  • Add garlic and parsley to your meals all day long. For an added detox boost, add them to homemade sauces, salads, or soups.
  • For extra taste and health benefits, squeeze fresh lime juice over your food or add zest.

3. Rest and Hydration:

  • To aid in the removal of toxins, stay hydrated during the detox phase by consuming lots of water.
  • To help the detox process even further, get enough sleep and do some light exercise, like yoga or walking.


Unlock the Hidden Benefits of Lemon Peels

Unlock the Hidden Benefits of Lemon Peels Overview Lemons are a widely used fruit in the kitchen and other areas of the house, in addition to their delicious flavor. Though many of us are used to extracting the juice and throwing away the peel, not many are aware of the wealth of health and functional advantages that lemon peels themselves offer. Here’s why you ought to reconsider before discarding those lemon peels.

Powerhouse of Nutrition Lemon peels are far more dense in vitamins, minerals, and fiber than the juice itself, making them extremely healthy. They are rich in calcium, potassium, and magnesium, which are necessary for heart health and strong bones, as well as vitamin C, which is essential for immune system and skin health.

Advantages for Health Boosting Heart Health:

  • Lemon peels’ fiber and plant-based chemicals can raise cholesterol levels and perhaps lower the risk of heart disease.
  • Improving Oral Health: The antibacterial qualities of lemon peels can aid in the destruction of oral infections, resulting in less cavities and a breath that is fresher.
  • Enhancing Digestive Health: Lemon peels’ dietary fiber keeps the gut healthy by avoiding constipation and encouraging regular bowel movements.

Useful Applications in the House

  • Natural Cleaning Agent: You can prepare a natural, potent cleanser with lemon peels that will leave your surfaces shining and your house smelling wonderful. All you have to do is let the peels soak in vinegar for a few weeks, drain them, and use the liquid to clean.
  • Peels should be dried before being ground into a scrub for brighter skin.powder, then combine it with sugar and coconut oil to create a natural face scrub that can aid in skin softening and brightness.
  • Insect Repellant: Many insects find the natural oils in lemon peels repulsive. Fresh peels will help deter ants, roaches, and other pests; place them near doors or windowsills.

In summary

  • Lemon peels are too precious to discard. These peels can be a significant part of your daily routine due to their rich nutritional profile and numerous applications in the home and for health purposes. Save the peel from the next lemon you use; both your body and your house will appreciate it!

How Can Baking Soda Help You Have a House That Always Smells Good?

How Can Baking Soda Help You Have a House That Always Smells Good?

We all want to live in a home with a pleasant scent all the time. However, foul smells from smoking, cooking, painting, or even our children’s shoes can occasionally linger in our houses. Furthermore, it might be difficult to maintain a fresh scent in our homes because of the restricted airflow brought on by rain and cold weather.

Baking soda can help in this situation! A quick and easy way to get rid of unpleasant smells and maintain a fresh scent throughout your house is to use baking soda. The best thing is that using it is simple!

Making a Handmade Room Fragrance

Use baking soda to make your own room aroma by following these easy steps:

What You’ll require:

  1. One-teaspoon baking soda
  2. Three cups of warm water
  3. Three tsp fabric softener

Guidelines:

  • Pour the fabric softener, lukewarm water, and baking soda into an empty spray bottle.
  • To ensure that all the components are mixed, firmly close the bottle and shake well.
  • Your handmade room aroma is now prepared for usage! How to Apply: Just mist the mixture throughout your house, paying particular attention to odor-prone areas.
  • Give the room’s aroma time to fill the air and do its magic.
  • The aroma of baking soda will fill your house with welcome, clean scent as it absorbs the smells.
  • You may enjoy house that smells great all the time and wave goodbye to unpleasant scents with this handcrafted room perfume.

Reasons to Drink Okra Water

Reasons to Drink Okra Water

Are you trying to find a natural, healthful beverage to add to your daily regimen? Do give okra water a try! It is simple to prepare and offers a plethora of health advantages. This article discusses the possible benefits of okra water consumption and the reasons it’s becoming more and more well-liked among health enthusiasts.

Okra Water: What Is It?

Soak okra pods in water for up to a day to make okra water. Through this procedure, the chemicals and nutrients in the pods are extracted, resulting in a nourishing beverage. Even though the taste and texture of okra can turn off some people, okra water is a terrific way to still reap the advantages of this vegetable.

The Vitamin Content of Okra Water

While it’s unclear what exactly nutrients okra water contains, okra is a vegetable that’s rich in vital minerals and vitamins. Nutrients that are abundant in raw okra pods include:

  1. Two grams of protein
  2. Seven grams of carbohydrates
  3. 3 grams of fiber
  4. 33% of the Daily Value (DV) is manganese.
  5. C: 24 percent of the DV
  6. 16% of the DV is thiamin.
  7. 14% of the DV is folate.
  8. 13% of the DV is magnesium.
  9. B6: 12% of the Daily Value
  10. Copper: 12 percent of the DV

These nutrients are essential for immune system performance, blood sugar control, and metabolism. Antioxidants found in okra also help to prevent free radical damage and support general health.

Okra Water’s Health Benefits:

1. Blood Pressure and Heart Health

  • Potassium, a mineral that aids in preserving fluid balance and controlling sodium levels, is abundant in okra. Potassium can assist by calming blood vessels and arteries. lessen the burden on the cardiovascular system and blood pressure.

2. Increasing Immune Function

  • Okra water’s high antioxidant and vitamin C concentration can strengthen the immune system. Antioxidants protect the body’s cells from free radical damage and encourage the generation of white blood cells. These cells support the immune system and fight infections.

3. Digestive Health

  • Okra can help you consume more fiber overall in your diet. Okra’s mucilaginous fiber facilitates food digestion and guards against gastrointestinal problems like gas, bloating, cramps, and constipation. It also encourages regular bowel movements and lowers cholesterol levels.

4. Improving Eyesight

  • Beta carotene, lutein, xanthene, and vitamin A are all abundant in okra. These substances shield the retina’s cells. from harm resulting from free radicals. Okra can lower the risk of cataracts and macular degeneration when consumed regularly.

5. Skin Conditions

  • Okra has a strong antioxidant content that promotes better skin. Okra can help you seem younger and smoother by reducing wrinkles, scars, and acne by scavenging free radicals.

All things considered, drinking okra water on a regular basis can have several health advantages. So why not give it a shot and see for yourself what benefits there are? Okra water will help you stay hydrated and healthy.

Air Fryer Arby’s Beef and Cheddar Sandwiches

Air Fryer Arby’s Beef and Cheddar Sandwiches

Arby’s Beef and Cheddar Sandwiches: An Air Fryer Parody — Prepare to have your appetites satisfied with a tasty take on a classic fast-food dish!

Introducing our delicious recipe for Air Fryer Copycat Arby’s Beef and Cheddar Sandwiches, which delivers the famous flavors of Arby’s straight to your kitchen.

Easy to make and much more pleasant to eat, these sandwiches are a nostalgic delight with soft buns, ooey-gooey cheddar cheese sauce, and tender roast beef. Come along with us as we set out on a culinary adventure that will provide that signature Arby’s flavor to your table along with the extra benefit of being cooked to perfection in your air fryer. It’s time to savor a handmade treat that perfectly embodies everyone’s preferred fast-food sandwich.

Components

  1. Ketchup ¼ and Red Ranch Sauce
  2. one tsp water
  3. One-half teaspoon of onion powder
  4. One-half teaspoon of powdered garlic
  5. One tsp Worcheshire sauce
  6. Half a teaspoon of salt
  7. One-quarter tsp apple cider vinegar

Cheese Sauce from Arby’s

  1. two tsp milk
  2. One cup of Cheez Whiz
  3. ¼ cup of cheddar cheese, shredded

Sandwich with Roast Beef

  1. One pound of roast beef slices
  2. Four standard onion buns
  3. Four cheddar cheese slices
  4. Twice as much unsalted butter

Guidelines

  • For the Red Ranch Sauce to be made: After combining all the ingredients, let them sit in the fridge for 20 to 30 minutes.
  • To Prepare the Cheese Sauce for Arby’s: Combine the Cheez Whiz, milk, and shredded cheese in a small saucepan. Heat on low heat until the sauce melts, stirring frequently to prevent scorching.
  • To put the sandwich together: After adding around 3 pieces of roast beef, 2 slices of cheddar cheese, and the cheese sauce, add about 1 tablespoon of red sauce.
  • Place into the 320 degree Fahrenheit air fryer and cook for 2 to 4 minutes, or until the cheese is melted.

air fryer italian meatball and biscuit bake

air fryer italian meatball and biscuit bake

Italian Meatball and Biscuit Bake Air Fryer -You’ll be hankering after seconds of this delectable Italian Meatball and Biscuit Bake recipe. The biscuits have a buttery crunch on top, and the meatballs are flavorful, fluffy, and light. This is a great quick weekday supper that only takes a few minutes to cook in your air fryer!


Your family will clamor for more after trying this Air Fryer Italian Meatball and Biscuit Bake dish since everyone loves Italian meatballs. Using your air fryer to cook this tasty dish is simple and quick. To give it a unique touch, you may even be inventive and add other spices or veggies!

You can prepare this delicious dinner in a matter of minutes! And the air fryer does an amazing job of frying it to perfection!

At the end, you’ll have a dinner that everybody will enjoy!

Components

  1. 16 ounces of homemade or frozen meatballs
  2. One packet of biscuits made with buttermilk
  3. Marinara sauce, fourteen ounces
  4. Half a cup of mozzarella cheese


Guidelines

  • Defrost the meatballs first. Alternatively, use room-temperature meatballs if using handmade.
  • Next, roughly chop your biscuit dough into 1-inch pieces.
  • Combine the meatballs, sauce, and chopped biscuit dough in a big bowl. Blend thoroughly so that each biscuit
  • Then sauce is poured over the meatballs.
  • Fill an air fryer pan with the meatball, biscuit, or pasta sauce (generally safe to use in an air fryer if oven safe).
  • Put the pan inside the air fryer and cook it for five minutes at 340 degrees Fahrenheit. If the dough is still uncooked after 5 minutes, give it a couple more minutes. Once you’re certain that the biscuits are done, top them with shredded mozzarella cheese, cover, and let sit for a minute or so. Alternatively, you can just stand close to the air fryer and take it out once the cheese has melted.
  • Arrange, present, and savor!

Boost Your Bone and Joint Health with Garlic Oil

Boost Your Bone and Joint Health with Garlic Oil

Boost Your Bone and Joint Health with Garlic Oil: A Simple 2-Ingredient Recipe

Overview Sustaining an active and pleasant lifestyle requires strong bones and joints. What if you could use just two basic components to support the health of your bones and joints? A powerful, simple-to-make cure that works wonders is garlic oil. Now let’s explore how you can take use of garlic oil’s advantages.

Garlic’s Health Benefits for Bones and Joints Garlic has several health advantages, particularly for the health of your bones and joints. It is not only used to flavour your favourite foods. Antioxidants and anti-inflammatory substances found in garlic help relieve pain and lessen joint inflammation. It also contains minerals like calcium, sulphur, and zinc that are vital for healthy bones.

How to Prepare Garlic Oil at Home

All you need to make your own garlic oil is garlic and your favourite carrier oil, such as coconut or olive oil. It’s that simple. This is how you do it:

Components:

  1. 3–4 fresh garlic cloves
  2. One cup of coconut oil or olive oil

Getting ready:

  1. Cut the garlic cloves coarsely after peeling them.
  2. Add the oil to a small saucepan along with the chopped garlic.
  3. The mixture should be heated for ten to fifteen minutes on low heat. Be careful not to let the garlic brown, as this can produce a bitter taste.
  4. Remove from heat and let the oil cool.
    Strain the oil to remove the garlic pieces, and store the infused oil in a clean, airtight container in a cool, dark place.


Garlic Oil Use for Healthy Bones and Joints You can use garlic oil in a few different ways to benefit from it:

  • As a Salad Dressing: To make your typical dressing even better, try adding a few drops of garlic oil to your salads. This combines the health benefits of garlic into your diet while also enhancing flavour.
  • For Cooking: Use garlic oil to cook or finish dishes, adding a healthy and flavorful twist to your meals.
  • Topical Application: Gently massage the oil into the affected areas to help reduce joint pain and stiffness. The massaging action helps to increase blood flow, further aiding in reducing discomfort.

summary

In summary Garlic oil is a simple, all-natural method to enhance joint and bone health with just two ingredients. You can benefit from more mobility and less discomfort by implementing this easy cure into your everyday practice. Garlic oil can be applied topically or utilised in cooking, making it a useful addition to any wellness arsenal. Try it out and experience the difference!

Unlocking a Tropical Secret: Lose Weight with Papaya Seeds

Unlocking a Tropical Secret: Lose Weight with Papaya Seeds

First of all, Are you trying to lose weight and want to boost it naturally? Papaya seeds, which are frequently disregarded and thrown out, can be the key component you’re looking for. Packed with of nutrients and enzymes, these small seeds are gaining popularity as a healthy weight-management option. Let’s examine how including papaya seeds in your diet might aid in safe and efficient weight loss.

  • Advantages of Papaya Seeds: Packed with health advantages, papaya seeds are delicious as well. Papain, an enzyme found in them, facilitates digestion and accelerates the breakdown of proteins, which may quicken metabolism. As a more effective metabolism burns more calories, this can be especially helpful for weight loss. Papaya seeds are also rich in antioxidants and have anti-inflammatory qualities.in fiber, which may prolong the sense of fullness.

How to Lose Weight Using Papaya Seeds:

  • Start Small: The robust flavor of papaya seeds is frequently compared to a cross between mustard and black peppercorns. If you’ve never eaten them before, start out by eating only a few seeds each day and work your way up to a larger amount depending on your tolerance.
  • Include in Meals: You may grind up the seeds and add them to your salad, puree them into a smoothie, or combine them with honey and lemon juice to make a dressing. Their spicy flavor adds a welcome pop to meals that would otherwise be boring.
  • Daily Consumption: To reap the benefits of papaya seeds, consistency is essential. Aim to include a tiny amount of seeds in your diet each day. A tsp of smashed seeds each day is a suitable place to start.
  • Hydration: Drink more water while including papaya seeds into your diet. This promotes general digestive health and aids in your body’s processing of the high fiber content, both of which are essential for weight loss.
  • Precautions: Papaya seeds can be strong, but they are generally safe for most individuals. It’s crucial to begin with a tiny amount and observe how your body responds. It’s advisable to speak with a healthcare professional before incorporating papaya seeds into your diet if you take prescription medicine or have a medical condition. This is especially true if you’re thinking about using them to lose weight.


In conclusion, using papaya seeds to support your weight loss objectives is a novel and all-natural approach. Given their many health advantages and adaptability, when combined with a balanced diet, they can be a great addition. Keep in mind that no food can make you instantly lose weight, but you can reach your weight loss goals by combining papaya seeds with a nutritious diet and frequent exercise. So why not see what these little powerhouses can accomplish for you by giving them a try?

air fryer meatballs

air fryer meatballs

Meatballs cooked in an air fryer: An air fryer is a great healthy substitute for a frying pan. This appliance cooks food rapidly and thoroughly so that it is crispy on the exterior and moist on the inside using hot air and convection technology. One of my favorite dishes is the air-fried meatballs; they always turn out deliciously tender!

Expert Advice For Preparing The Perfect Meatballs:

  • Since cheese adds so much flavor to the meatballs, I started doing so. You can use whichever cheese you choose, but Parmesan is one of my favorite types to use. Cheese that has been shredded is another family favorite. Serve this with marinara sauce, and it’s fantastic.
  • Do not continue to stir the meatballs after they have been combined; otherwise, they will wind up air-fried and dry. Stop working them and roll them into balls after they are blended. The final result will be superior.
  • To ensure that the meatballs do not stick, spray the air fryer basket.
  • Even if you need to make two or three better batches, avoid packing your air fryer basket too full.There won’t be enough room for the meatballs to air fry properly if the basket is packed too full, causing them to cling together.
  • uniform in size. I typically use a cookie scoop since it guarantees that they will all cook at the same time if they are all the same size. They’ll cook considerably better in the end and finish all at once. No speculating

Components

  1. Lean ground beef, 2 pounds
  2. 1/4 cup bread crumbs from Italy
  3. One big egg
  4. two tsp milk
  5. One-third cup finely grated Parmesan cheese
  6. one tsp finely chopped garlic
  7. One tablespoon of freshly chopped parsley
  8. Half a teaspoon of dried oregano
  9. A smidgeon of kosher salt
  10. ¼ teaspoon of black pepper, ground

Guidelines

  • Coat the basket of your air fryer with cooking spray and place it aside.
  • In a large mixing bowl, combine all the ingredients. until they are barely blended.
  • From the ingredients, form 14–16 meatballs.
  • Meatballs should be added to the air fryer basket in a single layer while working in batches.
  • Allow the meatballs to cook at 380°F for 11 to 14 minutes, or until the internal temperature reaches 160°F.
  • Serve straight away or save for meatball subs or soups.
  • Arrange, present, and savor!

air fryer zucchini boats

air fryer zucchini boats

Are you looking for a tasty and nutritious way to eat zucchini? There’s just one place to look: air fryer zucchini boats! You may alter this simple recipe to include your preferred toppings and make it ideal for working chefs. Why then wait? Try this delicious dish right now!

Different Zucchini Boast Recipes for the Air Fryer

Searching for a fresh filler to put inside your zucchini boats? Take a look at this collection of tasty and simple fillings that are ideal for air-frying! From meats and cheeses to vegetables and fruits, there is something for everyone here. Now start preparing some healthy food or a delectable appetizer.

  • Add your preferred veggies to the vegetarian zucchini boats, such as diced tomatoes, peppers, onions, and perhaps even some cooked tofu. Serve with parmesan cheese, marinara sauce, sour cream, or tomato sauce.
  • Mexican Zucchini Boats: Top with your preferred toppings, cheddar cheese, cooked taco meat, or ground beef seasoned with taco spice!
  • Add some cooked eggs, sausage, cheese, and yellow bell pepper to the breakfast zucchini boats.
  • Who doesn’t love Air Fryer Zucchini Pizza Boats?  Add your preferred pizza toppings, some pizza sauce, and shredded mozzarella cheese.

Components

  1. Three cooked and chopped chicken breasts
  2. Frank’s Red Hot Buffalo Sauce, 1/2 cup
  3. Two tablespoons of melted butter
  4. three medium-sized zucchini
  5. Two teaspoons of shredded blue cheese
  6. two celery stalks, chopped
  7. Two tsp of ranch dressing

Guidelines

  • Straw the zucchini and pat dry. Each zucchini should be cut in half lengthwise. Carefully hollow out each zucchini half with a spoon.
  • Melted butter, hot sauce, and shredded chicken should all be combined in a medium-sized bowl. Stir until well blended and buffalo is covered on the chicken. sauce. Fill each zucchini boat with buffalo chicken.
  • Put the zucchini boats inside the basket of the air fryer. Preheat the oven to 350 degrees Fahrenheit and cook for eight to ten minutes. After cooking, remove from the oven and top the boats with chopped celery, crumbled blue cheese, and ranch dressing drizzled over