Discover the Power of Natures Recipe

Discover the Power of Natures Recipe

Discover the Power of Natures Recipe


Do you want to look and feel decades younger while also looking after your digestive system and joints? There’s nowhere else to look! We possess a basic, all-natural mixture that is quite effective. This recipe, which is made with healthy components like pumpkin seeds, raisins, flaxseed, and honey, is evidence of the wonderful advantages of the abundance of nature. Let’s explore this daily dosage of goodness from nature that will keep you feeling young and energetic.

Ingredients: Nature’s Superstars

This combination is a nutritional powerhouse since each ingredient adds a unique set of health benefits:

  • Pumpkin seeds: Packed with antioxidants, omega-3 fatty acids, and magnesium, these little jewels are a superfood. They support your joints, lower inflammation, and are excellent for your heart.
  • Raisins: These dehydrated fruits are high in iron and fiber and make natural sweeteners. QQaThey provide you with a mild energy boost and support a healthy digestive system.
  • The superfood flaxseed is well-known for having a high concentration of omega-3 fatty acids. Because of its high fiber content, it is great for your joints and promotes a healthy digestive system.
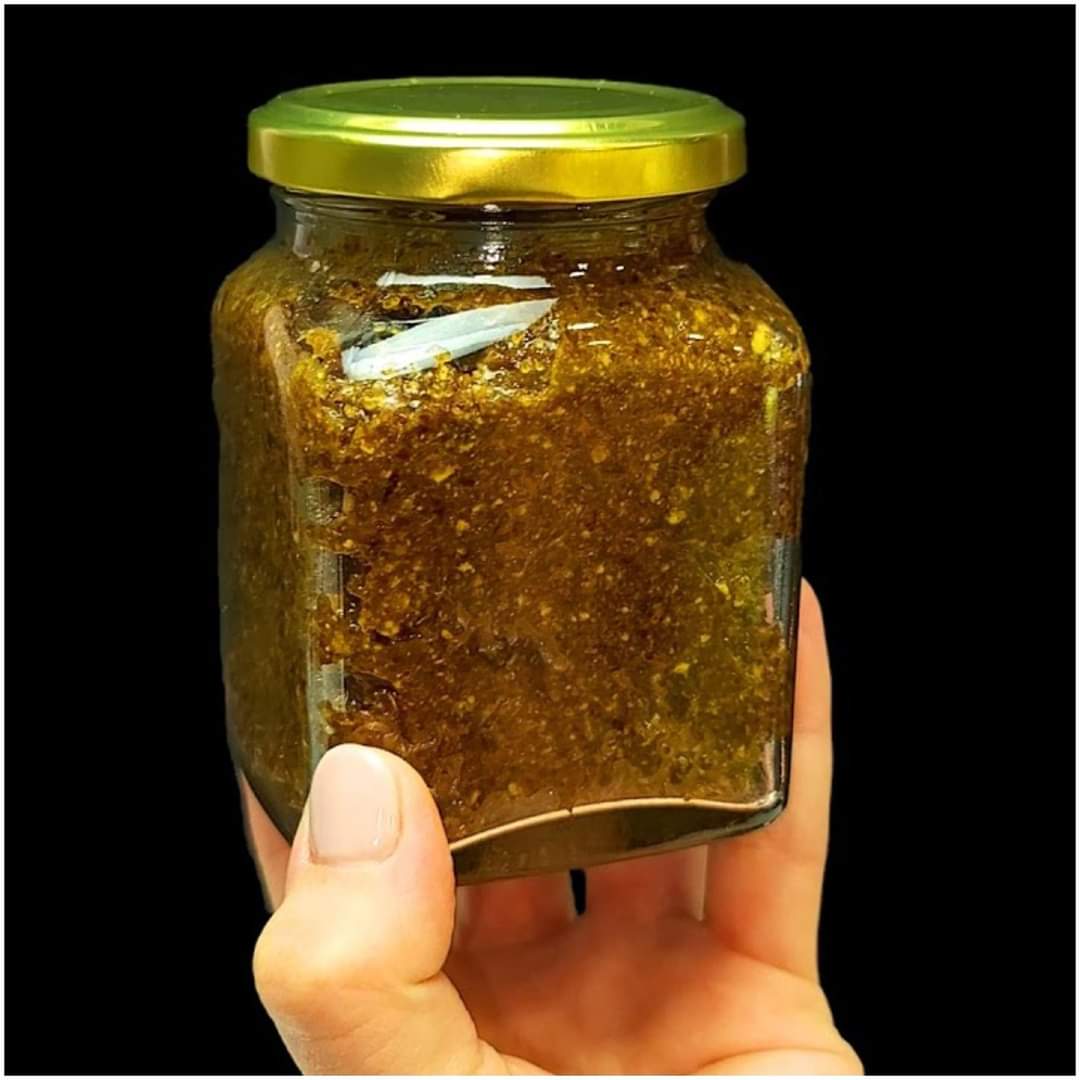
  • Natural Honey: Honey is well-known for its anti-inflammatory and natural digestion aiding qualities in addition to its delightful flavor.Making this nutritious blend is as simple as it gets. Just mix the following ingredients together in a bowl:

The Daily Mix: How to Prepare and Enjoy

  1. Five teaspoons of pumpkin seeds
  2. Four teaspoons of raisins
  3. Three tsp of flaxseed
  4. Four to five tablespoons of pure honey

Combine these ingredients and stir until thoroughly covered with the honey, forming a sticky and delectable mixture. The beauty of this recipe lies in its flexibility—so feel free to adjust the quantities to your taste preferences and health needs.

Integrating Into Your Daily Routine

Take one spoonful of this mixture daily for best effects. It will provide you with sheer joy and nutritional benefits whether you choose to have it as a sweet ending to your supper or as a way to start your morning.This natural cure is a way of life that embraces the happiness of feeling well from the inside out, not merely a combination of ingredients. You are embracing a holistic approach to health that can keep you feeling young, energetic, and active at any age by making the decision to include such potent, natural components in your daily routine.

Embrace the Joy of Feeling Youthful

This natural cure is a way of life that embraces the happiness of feeling well from the inside out, not merely a combination of ingredients. You are embracing a holistic approach to health that can keep you feeling young, energetic, and active at any age by making the decision to include such potent, natural components in your daily routine.


Air Fryer Croissant French Toast

Air Fryer Croissant French Toast

This breakfast was incredibly simple. I adore this dish, and it tastes even better with fresh fruit. You can use your preferred berries in place of the fresh strawberries I used today.

This tasted amazing and was a really simple French toast casserole. I adore how the buttery croissants contrast with the sweet flavor of roasted strawberries. It tasted great when I drizzled some maple syrup on top! My children were enthralled by it.

Different Recipes

  • French toast with chocolate chip croissants: stuff the croissants with chocolate chips before dipping them into the egg mixture. Every bite is a nice surprise thanks to the melted chocolate.
  • Almond Croissant French Toast: Before dipping, lightly coat the croissants with almond paste or marzipan. Once air-fried, garnish with chopped almonds for a nutty taste.
  • Berry Stuffed French Toast: Before dipping the croissants in the egg mixture, stuff them with a mixture of cream cheese and your preferred berry jam. This gives a delicious flavor blast.

Components

  1. Four big croissants
  2. Three big eggs
  3. half a cup of milk
  4. One tsp vanilla essence
  5. half a teaspoon of cinnamon powder
  6. Two teaspoons of sugar, granulated

Guidelines

  • Segment the croissants lengthwise in half.
  • Beat the eggs, milk, vanilla essence, ground cinnamon, and a little amount of granulated sugar together thoroughly in a shallow basin.
  • Gently submerge the croissant halves in the custard mixture. Take care not to soak them for too long as this will cause them to become mushy.
  • Set your air fryer to 350°F, or 175°C, on high.
  • To keep the air fryer basket from sticking, lightly coat it with butter.
  • The dipped croissants should be arranged in a single layer inside the air fryer basket. Your air fryer’s size will determine whether you need to do this in batches or not.
  • Cook for approximately After cooking each croissant for 4–5 minutes, carefully flip it over and cook for a further 3–4 minutes, or until the outside is crispy and golden brown.
  • Present the heated croissant French toast. For extra taste, you may top them with some fresh berries, whipped cream, powdered sugar, or maple syrup drizzle.

air fryer lemon crab cakes

air fryer lemon crab cakes

Amazing Lemon Crab Cakes Made in the Air Fryer! Have a wonderful dinner with your family today and serve them a plate of handmade crab cakes!The Greatest Crab Cake Recipes:

  • Don’t Overmix: Using your hands, thoroughly combine all the ingredients until they are well combined. If you overmix, your crab cakes will turn quite dense.
  • Extra Lemon Flavor? Taste and adjust the lemon zest to your preference. Add additional zest if you’d like more lemon.
  • What Goes With What When Serving? Accompany with a delicious dipping sauce!
  • Halfway through the cooking process, you might need to flip them over, depending on your air fryer.
  • Dousing Your Cooking Basket with Spray? To ensure the crab cakes don’t stick to the basket, line it with parchment paper or spray it with cooking spray.

How to Keep Things

  • Crab cakes, if you have any leftover, are fantastic for lunch the following day. The crab cakes should be refrigerated after being wrapped in saran wrap.
  • They’ll linger for roughly two or four days.

How To Warm Up A Cake of Crabs

  • Crab cakes that are left over can be quickly reheated in an air fryer. Put them inside the air fryer and cook for five to seven minutes at 350 degrees Fahrenheit.
  • Before air-frying, mist them with cooking spray to get more crunch!

Components

  1. eight ounces of raw lump crab
  2. One sliced green onion
  3. Mayonnaise, two tablespoons
  4. Two tablespoons of bread crumbs
  5. one tsp lemon zest
  6. One tablespoon of lemon juice

Guidelines

  • In a small mixing bowl, combine the crab, green onion, mayonnaise, bread crumbs, lemon zest, and lemon juice.
  • Mix thoroughly.
  • Form into 4 patties and refrigerate for approximately 30 minutes to solidify.
  • Mist the basket or tray of your air fryer with olive oil.
  • After that, arrange your patties on top and use the air fryer option, which is set to 370 degrees F for 10 to 12 minutes.
  • Arrange, present, and savor!

The Lifesaving Secret

The Lifesaving Secret

The Lifesaving Secret of Keeping Ginger in Your Car

Imagine finding something as inconspicuous as ginger—a basic, natural substance that might just save your life. That’s correct, having a single piece of ginger in your car can really help in an emergency. This is a little-known fact that not enough people are aware of. Let’s examine why your car should always have this modest root.

Ginger: More Than Just a Spice

Ginger has been utilised for millennia in many cultures for its therapeutic characteristics. It is well-known for its strong flavour and health advantages. It’s a multipurpose ally for your health, acting as a natural cure for nausea, digestive issues, and even cold symptoms.

The Car Connection: Why Ginger?

You may be wondering how an automobile might benefit from ginger. That’s because of its strong anti-nausea properties. Motion sickness can occur at any time, whether you’re driving a long distance or have to manoeuvre through narrow streets. Ginger can be a simple and efficient cure during these times. Chewing on a tiny piece might help reduce motion sickness symptoms, which will ease discomfort and make your trip much more enjoyable.

Beyond Motion Sickness

Ginger can help with more than just motion sickness, though. Moreover, it has anti-inflammatory qualities that make it useful for relieving unforeseen headaches and other discomforts that may occur when travelling. Furthermore, its organic stimulant properties might offer a mild energy boost, keeping you focused without the need for coffee.

How to Keep Ginger in Your Car

It’s easy to store ginger in your automobile. Even in different temperatures, it can be preserved for several days in a tiny, sealed container or a resealable bag. Just be careful to swap it out frequently so that it doesn’t lose its effectiveness.

Conclusion!

Although it may seem strange at first, there are unquestionable advantages to having ginger in your automobile. This easy habit could significantly improve your travel comfort and safety, from reducing motion sickness to offering all-natural relief from minor aches. The next time you travel, think about packing this herbal cure. It’s a little action that could make a significant difference in how well you travel.

The Magic of Lemon and Salt

The Magic of Lemon and Salt

The Magic of Lemon and Salt

Clean and Deodorize with Lemon-and-Salt Scrub

Lemons are now used for more than just cooking! Did you know that lemons can be used for more than just giving your favourite foods a zesty taste? You can use them to clean and freshen your home. It’s accurate! You may take use of lemons’ natural cleaning properties and have a pleasant, fresh home with just a few easy actions.

Make a potent lemon-and-salt scrub by combining the natural cleansing qualities of lemons and table salt. Using this miracle scrub, you can get rid of stains and smells from kitchen surfaces, counters, and cutting boards. It’s also simple to create! Simply dust a lemon quarter’s exposed flesh with a tiny bit of salt and go to work cleaning!

Don’t panic if any of your brass or copper objects have tarnished! Salt and lemons are your friends. After dipping a lemon quarter’s salted side into additional salt, spread it over the tarnished area. The abrasive effect of the salt and the acidity of the lemon will work together to remove tarnish and restore shine. It resembles a little makeover for your metal possessions!

Is there an offensive smell coming from your garbage disposal that just won’t go away? Relax! Just pour a quarter of a lemon filled with salt down the garbage disposal and let it do its thing. The salt works as a natural abrasive to clean the disposal, and the grinding action of the disposal will assist disperse the revitalising lemon aroma. To maintain your refrigerator, simply arrange a quarter of a salted lemon on a tiny plate. The salt will assist regulate humidity, and the lemon will absorb any unwanted smells. Kitchen smells, good bye!

Salt and lemons have natural cleaning properties that will make you say goodbye to harsh chemicals! Try these suggestions to have a clean and fresh house. Your home will smell amazing and be a sight to behold, and your friends and family will be astounded to learn that you only use natural substances to maintain the health and beauty of your home.

No Sugar Jam

No Sugar Jam

No Sugar Jam Quick & Easy  for a Delightful Breakfast


There is no need to forgo your health in order to enjoy a homemade, delicious treat first thing in the morning. We have a nice surprise for you if you’re trying to cut back on sugar without compromising flavour: a simple, quick recipe for sugar-free jam that goes great over toast, porridge or yoghurt in the morning. This recipe makes a jam that tastes so good you won’t think it’s sugar-free by enhancing the natural sweetness of fruit with a few nutritious components.


The Magic of Fruit-Based Sweetness

Berries, apples, peaches, and other fruits are full of natural sugars that caramelise wonderfully when cooked, making them the ideal foundation for a sugar-free jam. We’ll concentrate on using berries in our recipe because of their strong flavour and antioxidant qualities, but you can experiment with other fruit options.

Ingredients:

  1. Two cups of berries, either frozen or fresh (blueberries, raspberries, or strawberries)
  2. a pair of teaspoons chia seeds
  3. One tablespoon of newly squeezed lemon juice
  4. For added sweetness, feel free to add a drizzle of honey or pure maple syrup.

Guidelines:

  1. Prepare the Fruit: Rinse and cut the fresh berries if using them. Frozen berries can be used directly.
  2. Cook the Berries: Place the berries in a saucepan over medium heat. As the berries warm up, they will start to break down and release their natural juices. Use a fork or potato masher to help them along.
  3. Add Lemon Juice: Stir in the fresh lemon juice. The acidity will enhance the natural flavours of the fruit and add a lovely brightness to the jam.
  4. Add the chia seeds and stir thoroughly to thicken with the fruit once it has softened and taken on a saucy texture. Not only are chia seeds nutritious, but they also function as a natural thickener. Once the mixture has the consistency of jam, lower the heat and simmer it for a few minutes.
  5. Remove from the heat source and let the jam cool before serving. As it cools, it will get thicker yet. Keep refrigerated in an airtight container.


You may still enjoy life’s sweeter treats without consuming additional sugar, as demonstrated by this jam made without added sugar. This jam will bring happiness and health to your breakfast table whether it is spread on whole-grain bread, mixed into your muesli in the morning or dolloped over Greek yoghurt. Savour the simplicity, taste, and freshness of handcrafted jam each day of the week!

Air Fryer Mini Apple Cakes

Air Fryer Mini Apple Cakes

When it comes to holiday desserts, nothing is better than a mini cake, and these Air Fryer Mini Apple Cakes are no different! They make the ideal little bite for your family!

Ingredients:

  1. ½ cup light brown sugar;
  2. 2 small sliced granny smith apples;
  3. 4 tablespoons melted butter;
  4. ¾ cup softened butter;
  5. 2 large eggs;
  6. 1 teaspoon pure vanilla extract;
  7. 1 ¼ cups all-purpose flour;
  8. 1 teaspoon baking powder;
  9. 1 teaspoon ground cinnamon;
  10. 1 teaspoon ground nutmeg;
  11. Ⅻ teaspoon kosher salt;
  12. ¼ cup whole milk;

Icing/Glaze:

  • 1 cup powdered sugar;
  • 2 to 3 tablespoons milk

Guidelines

  • Grease your muffin pans with cooking spray that doesn’t stick. Melted butter and brown sugar should be well mixed and smoothed out in a small bowl.
  • Fill the muffin tray with one spoonful of the butter/brown sugar mixture. To the remaining mixture, add your diced apples and put aside.
  • Next, combine the butter and brown sugar in a separate bowl or stand mixer, and beat until frothy and light. While mixing, scrape down the sides of the bowls and fold in the eggs and vanilla extract. In a small bowl, stir together the flour, baking powder, nutmeg, ground cinnamon, and salt. Pour in the mixture, slowly fold in the butter mixture, and stir until all of the dough is incorporated.
  • To ensure the apples stay in place, evenly distribute the cake batter among the muffin tray, being careful to pour it over them. When the toothpick inserted into the center of the muffin tray comes out clean, bake for 10 to 12 minutes at 320 degrees Fahrenheit using the air fryer setting.
  • Before taking the cakes out of the muffin tins, take them out of the air fryer and let them to cool for a few minutes.
  • Just before serving, drizzle with the frosting.
  • Arrange, present, and savor!

air fryer kimchi pancakes

air fryer kimchi pancakes

Do you enjoy kimchi? Try these Air Fryer Kimchi Pancakes. Pancakes, perhaps? You’re going to enjoy these air fryer kimchi pancakes if you said “yes” to either of those questions! They taste great and are really simple to make. They’re also a fantastic way to finish off any remaining kimchi. Try them out right now!

One of the newest appliances for the kitchen is the air fryer, which is an absolute necessity if you want crispy meals. The meal is cooked using hot air in an air fryer, which requires less oil than traditional deep-frying. This makes it a more healthful choice while preparing meals. Pancakes are among my favorite foods to prepare in the air fryer. Not just any pancakes, but pancakes with kimchi! You’re in for a treat if you haven’t tasted them before. They have a tinge of spice from the kimchi and are crunchy and delicious. You’ll become addicted as soon as you sample them, I promise!

Kimchi: What Is It?

A classic Korean dish prepared from fermented vegetables is called kimchi. It can be eaten as an accompaniment to other dishes or on its own and is often sour and spicy. Although cabbage is the most popular vegetable used to produce kimchi, other vegetables including carrots, radishes, and cucumbers can also be used. A tasty and nutritious approach to give your dishes flavor is using kimchi.

Components

  1. One big egg
  2. Two tablespoons soy sauce
  3. and one tablespoon kimchi brine from a jar
  4. 1/3 cup of flour for all purposes
  5. Half a cup of kimchi
  6. four big, diced onions

Guidelines

  • Combine all of the ingredients in a big bowl. After that, shape them into pancakes. If extra flour is required to form a binding, then do so.
  • After putting them in the air fryer basket, cook for 8 to 10 minutes, or until they are cooked through, at 350 degrees Fahrenheit.
  • Arrange, present, and savor!

air fryer bourbon bbq chicken tenders

air fryer bourbon bbq chicken tenders

With the use of an Air Fryer, you can quickly and easily make these delicious, simple, and easy to make Bourbon BBQ Chicken Tenders in just a few minutes!

There is nothing better than a delicious chicken recipe that yields a dish that is juicy, tender, and savory! This is so tasty and simple that it will quickly become one of your favorite dinners!

Because there is no breading and you are using chicken tender, this chicken dish is ideal. Your child will quickly come to love this dish. The flavor of perfectly grilled BBQ chicken breast flesh!

There are many of low-carb and ketogenic BBQ sauce options available if you’re following a ketogenic or low-carb diet.

Components

  1. One-pound chicken tenders
  2. half a cup barbecue sauce made with bourbon.
  3. One tsp salt
  4. One tsp black pepper
  5. two tsp Seasoning for Poultry

Guidelines

  • To begin, season your chicken with poultry seasoning, salt, and pepper.
  • Use nonstick cooking spray or olive oil spray to coat the air fryer basket.
  • Put the chicken in a big bowl and stir in the barbecue sauce.
  • Next, place your chicken in the basket or on the air fryer tray and set the timer for 7 minutes at 350 degrees Fahrenheit.
  • Turn the chicken over and cook for a further seven minutes.
  • Examine the

Pro Tip:

  • You may use any Air Fryer basket or oven model with this recipe. I have prepared this many times over the years, using various Air Fryer Basket and oven versions as well as the Ninja Foodi and Instant Pot Crisp Lid. The recipe remains unchanged.
  • Use a meat thermometer to ensure the chicken reaches the proper internal temperature of 165 degrees Fahrenheit for optimal results.
  • Any of your favorite barbecue sauces will work, even homemade ones. The recipe remains the same if you’re looking for a low-carb, gluten-free, or diabetic-friendly barbecue sauce.

air fryer copycat wingers sticky chicken fingers

air fryer copycat wingers sticky chicken fingers

We took a road trip to Idaho last summer. We made a stop at Wingers, an incredible eatery. The Air Fryer Copycat Wingers Sticky Chicken Fingers were a huge hit with my kids.

Tenders

The following expert advice will help you cook frozen chicken tenders in an air fryer:

  • Turn on the air fryer: Before frying the chicken tenders, turn on your air fryer for a few minutes. This will make it more likely that they will cook through and turn crispy.
  • Don’t overcrowd the air fryer: Avoid packing too many chicken tenders into the air fryer basket at once. This will make it more difficult for the hot air to circulate, which will cause uneven cooking and a less crispy texture.
  • Shake the basket: To guarantee that the chicken tenders cook through and get a uniform coating of breading, shake the basket a few times while they are cooking.
  • Apply cooking spray: To help the chicken tenders brown and crisp up, mist them with cooking spray before cooking.
  • Utilize a meat thermometer: Check the chicken tenders’ internal temperature with a meat thermometer. To make sure the chicken tenders are thoroughly cooked and safe to consume, they should be cooked to an internal temperature of 165°F (74°C).
  • Modify cooking time: Depending on the size and thickness of the chicken tenders, modify the cooking time. It will take longer to cook thicker chicken tenders than thinner ones.
  • Serve right away: Serving chicken tenders right out of the air fryer will provide the optimum texture and flavor because they are best enjoyed hot and crispy.

Components

  1. 26 ounces of frozen or breaded chicken tenders
  2. one-third cup spicy sauce
  3. half a cup of water
  4. Yes, three cups of brown sugar.

Guidelines

  • Fill the air fryer basket with the frozen chicken tenders.
  • Preheat the air fryer to 400 degrees Fahrenheit and cook for 7 minutes.
  • After flipping the chicken with tongs, air fry it for an additional three to four minutes.
  • Pour the sauce over it.
  • Arrange, present, and savor!
  • Sticky Finger Sauce from Winger
  • In a small saucepan, combine the hot sauce, water, and brown sugar; boil until thoroughly combined, stirring all the while.